The Battle on Had Abbadon took place in 137 ABY, and was the result of a trap set up by a mixed band of both Jedi and Imperial Knights to assassinate Darth Krayt, Dark Lord of the Sith and reigning Galactic Emperor. The battle commenced after Krayt's Imperial garrison was attacked on Had Abbadon by the group of Knights, and one of Krayt's servants, Darth Reave, was allowed to escape in order to inform Krayt that Jedi Cade Skywalker was among the perpetrators. Krayt was also summoned by Karness Muur—whose spirit inhabited Jedi Master Celeste Morne, Skywalker's other associate. Muur offered to heal Krayt of the Yuuzhan Vong implants that were killing him in exchange for a partnership in galactic rule, only if the Dark Lord came alone to Deep Core world. Krayt did not follow Muur's instructions, and instead arrived on Had Abbadon with Darths Maladi, Stryfe, and Talon, with his lieutenant Darth Wyyrlok remaining behind on their ship. In spite of Krayt's defiance, Muur still chose to demonstrate his healing power. It was at this moment that Jedi sprung their trap with the Imperials, engaging Darth Krayt and his Sith Lords in battle.
Morne commanded her rakghoul mutants to attack as she dueled with Krayt. Imperial Master Azlyn Rae seized an opportunity to cut the Dark Lord down, and mortally wounded him. Morne then subjected Krayt to a lethal torrent of Force lightning, inadvertently engulfing Rae as well. The battle appeared to be over when Krayt seemingly fell to his death, and Celeste Morne was slain by Skywalker, after she asked him to free her of Muur's spirit. The Jedi and Imperials then collected their wounded, and fled Had Abbadon. Meanwhile, Darth Wyyrlok landed a shuttle planetside to collect his defeated Sith brethren, where he also found Darth Krayt to be alive. When the Dark Lord requested that Wyyrlok tend to his injuries, the Chagrian instead defeated and presumably killed him. However, after suffering severe injuries at the hands of Wyyrlok, Krayt was resurrected and soon revealed his existence to the mutinous Sith.
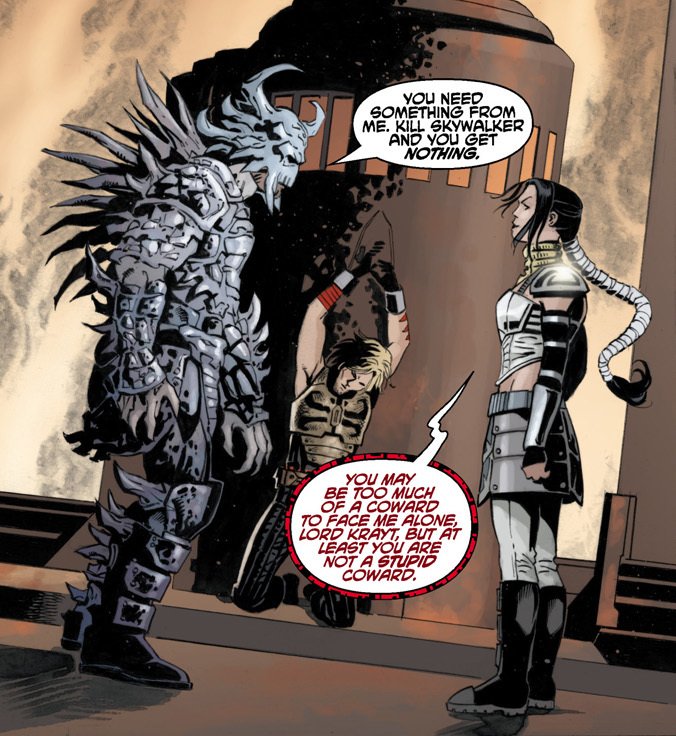
By 137 ABY, Darth Krayt felt as though his days were numbered, and that he would not live to see his dream of a stable galaxy under Sith rule come to pass. He was still unable to purge his body of the Yuuzhan Vong biots that threatened to consume him, despite relentless searching for ways to do so. Krayt had received word from one of his minions that Cade Skywalker, a Jedi with remarkable healing powers, had engaged and defeated Krayt's garrison on the Deep Core planet of Had Abbadon. Krayt had also received a summons from an ancient Sith Lord named Karness Muur, whose spirit inhabited a female Jedi Master named Celeste Morne. Muur appeared to have Skywalker held captive on Had Abbadon, and offered Krayt both Skywalker as a prisoner and a chance to be healed by Muur's own power—should Krayt allow Muur's spirit to inhabit his body instead. Muur told Krayt to come alone to Had Abbadon, and if he did not, Muur would kill not only Skywalker, but Krayt as well.
Darth Krayt confronts Celeste Morne in the Deep Core.
However, Skywalker and Morne were actually attempting to lure Darth Krayt to the Deep Core, where they would ambush him and attempt to kill him. Along with the Twi'lek Jedi Shado Vao, they partnered with Imperial Knights Antares Draco, Ganner Krieg, and Azlyn Rae to lie in wait for the Dark Lord of the Sith. All parties hid their presences in the Force, and awaited the arrival of the enemy.
Krayt touched down on Had Abbadon with Darths Maladi, Stryfe, and Talon, against the explicit orders of Muur. His primary advisor, Wyyrlok, was ordered to remain in orbit and gather more information on Muur and the claims of his power. Muur appeared before Krayt in the body of Morne, and Skywalker appeared to be bound in their custody. Muur condemned Krayt for his defiance, and reminded him of their deal; but when Krayt questioned the spirit's healing abilities, Muur briefly demonstrated them. At that moment, Skywalker called his lightsaber to his hand while loosing his bonds, and attacked Darth Talon, who had sensed his intent in the last moment. Imperials Draco, Krieg, and Rae, along with Jedi Shado Vao sprung their trap, and arrived to do battle with the Sith.
Through Muur's talents with Sith magic, Morne commanded her army of Sithspawn-rakghouls to attack Krayt, while the other Lords dueled with the Jedi. Darth Stryfe dispatched the rakghouls surrounding Krayt with Force lightning, while Darth Maladi fought with Shado Vao. She openly regarded her opponents with respect for developing a plan with Sith undertones as she assaulted the Twi'lek with her own lightning barrage. Despite the ferocity of her attacks, Darth Maladi remained evenly matched with Vao.
After defeating Darth Talon in a brief encounter, Skywalker attacked Stryfe. He Force-pushed the Sith Lord into a pile of thermal detonators set by Skywalker's friend Jariah Syn. The resulting explosion engulfed Stryfe, and threw him off the platform. Skywalker then went to battle with Morne's rakghouls, who were running rampant and terrorizing Jedi, Sith, and Imperial Knight alike without discrimination.
Jedi, Sith, and Imperial Knights do battle on Had Abbadon.
In the midst of fighting off the Sithspawn, the Imperial Knights had fallen back to consider their role in the current battle. Draco felt it was their duty to retrieve Morne's Sith talisman, which gave her the power to transform non Force-sensitive beings into rakghouls. However, Rae believed that destroying Krayt was paramount, and that the three of them should work to that end in unison. Draco responded by Force-pushing Rae to the ground in disagreement, before Krieg interfered. Draco then attempted to move in on Morne, but was immediately found out by her, and repelled with the Force. Muur's spirit then took control of Morne and exposed Draco's treacherous motives, while vowing to kill the Jedi, turn Skywalker's companions into rakghouls, and take Darth Krayt's body as its own.
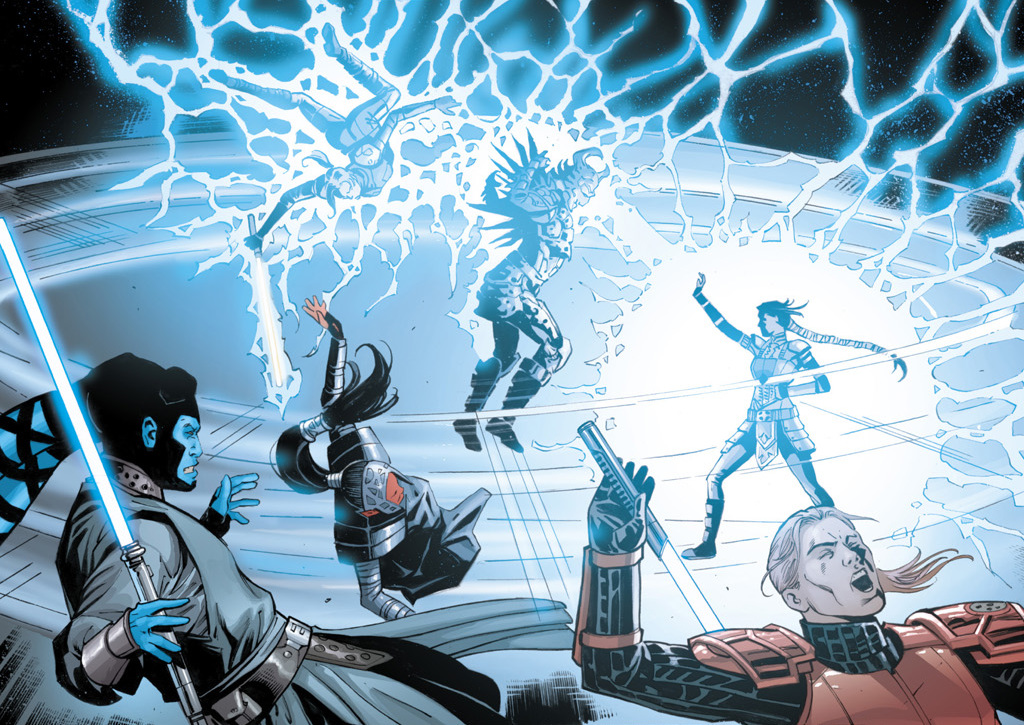
At the last moment, Krayt repelled all the rakghouls with an immense blast of Force lightning, temporarily interrupting the battle. He then fell upon Morne, coaxing her to embrace the dark side power of Muur that Krayt felt within her. Abandoning their lightsabers, Krayt and Morne exchanged volleys of Force lightning. Maladi fell in beside the Dark Lord, and added her power to his in an attempt to overpower Morne.
Seeing that Krayt was occupied, Azlyn Rae called for Skywalker to cover her while she attempted to finish Krayt. Skywalker fended off the advancing rakghouls as Rae launched herself at Krayt from behind, and succeeded in stabbing him through the chest with her lightsaber. Krayt's concentration suddenly broken, Muur seized the chance to unleash a massive torrent of lightning—one that fully consumed both Rae and Krayt, and scattered the remaining combatants around the platform. Muur then hurled Krayt's defeated body over a nearby cliff to his apparent death. Rae received severe burns over most of her body with nearly all her hair singed away.
In the wake of the battle, the Sith were gone, and the rakghouls had been wiped out. Morne was able to momentarily wrench control of herself from Muur before confronting Skywalker. Knowing that Muur would soon take permanent control, Morne acknowledged her fate and begged Skywalker to kill her. He obliged her by running her through with his blade. Upon her death, Morne's body turned to dust.
The aftermath of Darth Wyyrlok's treachery.
The amulet of Muur's in Morne's possession that both housed his spirit and power, now free from Morne's body, immediately latched onto Skywalker's arm. Muur believed that he would make this Jedi his new thrall; instead, Cade displayed his strength of will by resisting Muur's temptation. He poured the Force into the weak points of the talisman and caused it to shatter, which in turn caused Muur's spirit to fade.
Cade then turned his attention to Azlyn's condition and moved to take her aboard the Mynock to get help. He was stopped by Ganner who claimed that as an Imperial Knight, Rae belonged with them. However, Vao used a Force push to knock Ganner and Draco away and he, Cade, and the rest of Cade's crew left to seek help from Bantha Rawk.
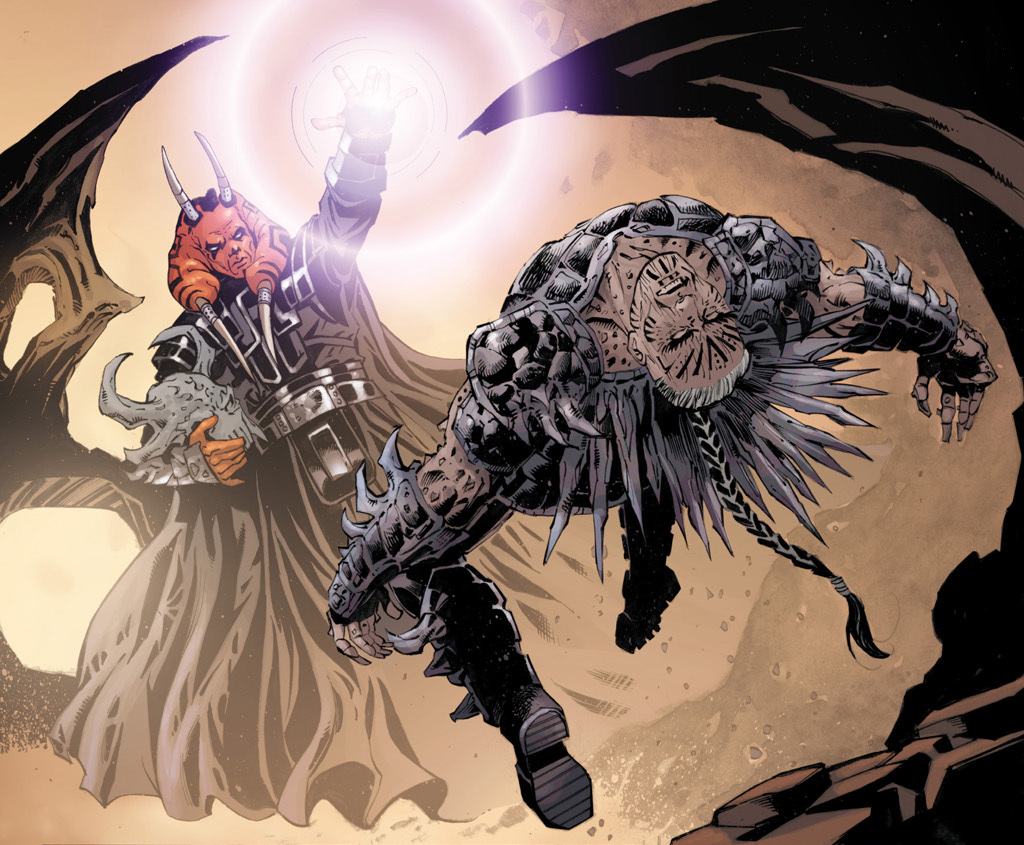
Darth Wyyrlok, having sensed his master in need, had journeyed to the planet surface. There at the bottom of a canyon, he came across Krayt's broken and burned body. Wyyrlok was shocked to discover that Krayt was still alive, having used the Force to cushion his fall. Krayt ordered Wyyrlok to take him to a bacta tank as his encounter with Muur had taught him the knowledge he needed to finally heal himself of the coral growths on his body. However, Krayt would, it seemed, never get a chance to use this knowledge. Claiming that sometimes for a cause to continue, the leader of that cause must die, Wyyrlok killed Krayt with Force lightning before taking his body to be buried on Korriban. However, Krayt was able to resurrect himself through the use of implants, and on Korriban, he once more revealed himself to the mutinous Sith. The next year, Krayt led an attack on the Temple of the Sith on Coruscant and killed Wyyrlok in retaliation for his betrayal.