Concave Dish Composite Beam Superlaser
The Concave Dish Composite Beam Superlaser served as the primary weapon system for the Death Stars; it was a type of superlaser.
Description

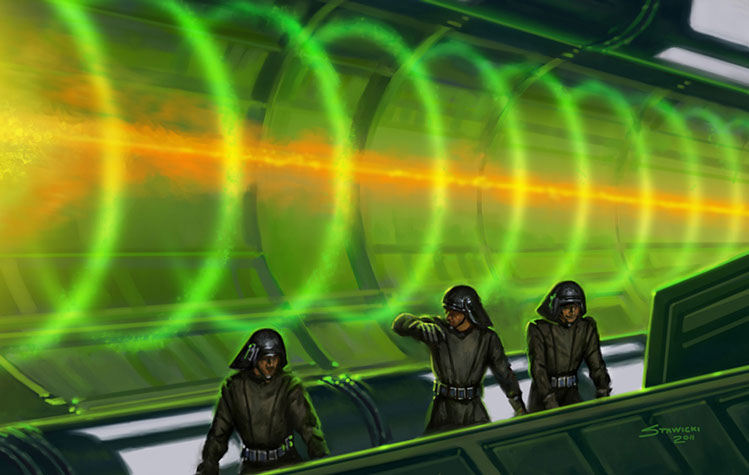
The superlaser on the first Death Star featured eight tributary beams positioned in a circular pattern surrounding the concave dish. Conversely, the superlaser on the second Death Star incorporated seven tributary beams arranged around the concave dish in a heptagonal configuration, encompassed by a circle, with an additional eighth beam situated in the center. These individual beams were then unified into the main superlaser through the application of an invisible, cone-shaped forcefield. Each of the tributary beams was itself constructed from eight smaller beams, all converging within one of the eight Superlaser Convergence Chambers, resulting in a total of 64 beam tubes. At the very core of the concave dish superlaser were focusing lenses that served to amplify the superlaser's intensity.
Initially, the Death Star's superlaser could only target planets, and its recharge time spanned several hours. However, by the time the Death Star II was constructed, the superlaser had been upgraded to target even large capital ships, with a significantly reduced recharge time measured in minutes. The laser's power source was derived from specialized power crystals that the 501st Legion procured from Mygeeto under the direction of Darth Sidious. Furthermore, the activation of the Death Star's superlaser incurred substantial costs for the Imperial military, both financially and in terms of potentially losing strategic resources on habitable or resource-rich planets. Consequently, various restrictions were implemented to govern its use: A comprehensive and up-to-date Imperial Intelligence report on the intended target was mandatory before superlaser activation; targeting any worlds, even those listed, without explicit authorization from Imperial High Command and the Galactic Emperor was strictly prohibited; and only personnel holding oversector administrative rank and possessing current firing codes issued by the Office of the Emperor were authorized to activate the superlaser.
History
The first fully operational superlaser was installed as the primary armament on the first Death Star battle station. However, its development encountered technical challenges, leading to the proposal and potential development of the Composite Beam Superlaser as a contingency plan in case the Concave Dish's technical issues proved insurmountable. This alternative weapon required manual positioning via a mechanical arm and fired proton beams at the targeted planet to disrupt its core, rendering it uninhabitable. Ultimately, the Concave Model was selected as the final superlaser design, surpassing the regular Composite Beam Superlaser model, with a weapons researcher overseeing development in place of Bevel Lemelisk. At one point during development, plans were considered to integrate the Superlaser along the battlestation's equator. In 2 BBY, Galen Marek traversed one of the firing tubes within the superlaser dish during the Battle on Death Star I, causing structural damage. During this period, the Imperials were also conducting test firings at one-minute intervals, forcing Marek to evade the superlaser blasts and resulting in the deaths of several Imperials caught in the crossfire during their search for him.
The full-scale superlaser, installed on the first Death Star, was utilized on six separate occasions. Its initial use occurred during a Rebel raid on the Death Star, where Rebel agent X2 employed the still-incomplete superlaser to destroy one of the escorting Star Destroyers. Subsequently, it was fired at four percent power to obliterate the Fortressa, a Lucrehulk-class battleship under Rebel control. Three additional shots were secretly test-fired shortly thereafter, resulting in the destruction of the prison planet Despayre. Finally, a full-power shot was unleashed to destroy Alderaan, demonstrating the Galactic Empire's might. This immense power established the Death Star as one of the most formidable weapons in the history of the galaxy. However, before it could be fired a seventh time at the Rebel Alliance base on Yavin 4, it was destroyed during the Battle of Yavin.
An enhanced iteration of the superlaser was constructed in conjunction with the Death Star II, and was responsible for the destruction of the Liberty and the bulk cruiser Urjani. However, the Rebel Fleet's actions forced ships within Death Squadron into a broadside battle, limiting its operational effectiveness. There were also plans to use it to annihilate Endor, in the event that the Rebels managed to disable the shield generator, but the Death Star II, along with the concave dish composite beam superlaser, was ultimately destroyed before this could occur.
Behind the scenes
In the Star Wars Blu-ray special edition collection, the Concave Dish Composite Beam Superlaser areas of both the first and second Death Stars are referred to as the "Laser eye." Initial plans also positioned it within the middle of the Equatorial trench, as depicted in the schematics.