Rescue of Princess Leia
The daring Extraction of Princess Leia served as a crucial catalyst in 0 BBY, directly precipitating the Battle of Yavin. This event unfolded when Luke Skywalker, accompanied by Obi-Wan Kenobi, Han Solo, Chewbacca, C-3PO, and R2-D2, successfully liberated Princess Leia Organa from the clutches of the Galactic Empire's initial Death Star. They achieved this aboard the freighter, the renowned Millennium Falcon. Furthermore, this rescue included the second, and last, lightsaber duel between former Jedi Master Obi-Wan Kenobi and his previous apprentice, Darth Vader. During this confrontation, Kenobi selflessly sacrificed his life, merging with the Force.
Initial Stages
A Fateful Meeting
The Alliance to Restore the Republic initiated Operation Skyhook, a covert endeavor aimed at acquiring the plans for the Empire's ultimate weapon, the Death Star. The goal was to expose the battle station's vulnerabilities and pave the way for its eventual destruction.
Princess Leia Organa secured the stolen schematics, compelling her to seek refuge on the desert world of Tatooine aboard her diplomatic vessel, the Tantive IV. She was relentlessly pursued by the Imperial I-class Star Destroyer, known as the Devastator. When stormtroopers boarded her ship, led by Darth Vader, the Imperial forces' Supreme Commander, Organa concealed the plans within the memory banks of the astromech droid R2-D2. Accompanied by the protocol droid C-3PO, the two droids escaped in an escape pod and crash-landed on Tatooine.
Jawa scavengers recovered the droids, who were subsequently purchased by Owen Lars, Luke Skywalker's uncle. While servicing Artoo, Skywalker discovered a holographic message from the Princess, stating: "Help me, Obi-Wan Kenobi. You're my only hope." This message prompted Skywalker to seek out the former Jedi Master Obi-Wan Kenobi, who was living under the alias "Ben Kenobi." Kenobi rescued Skywalker from Tusken Raiders and brought him to his hut, where Skywalker repaired the droids and recovered the remainder of Organa's message. She pleaded with Kenobi to deliver the astromech droid to her father, Bail Prestor Organa, on Alderaan. Initially reluctant, Skywalker agreed to join Kenobi after discovering that his Uncle Owen and Aunt Beru had been killed by Stormtroopers searching for the droids.
Journey to Alderaan
Skywalker and Kenobi sought transport to Alderaan in order to deliver the Death Star plans to Organa. Their search led them to the spaceport town of Mos Eisley.
Upon their arrival in Mos Eisley, Skywalker, Kenobi, and the droids were confronted by Imperial stormtroopers. However, Kenobi employed a Jedi mind trick to persuade the troopers to allow them passage. Skywalker and Kenobi proceeded to a cantina in search of a pilot to transport them to Alderaan. Kenobi successfully negotiated a deal with Han Solo, a smuggler, and his Wookiee co-pilot, Chewbacca, to transport them to Alderaan for 17,000 credits, with 2,000 paid upfront and 15,000 upon arrival.
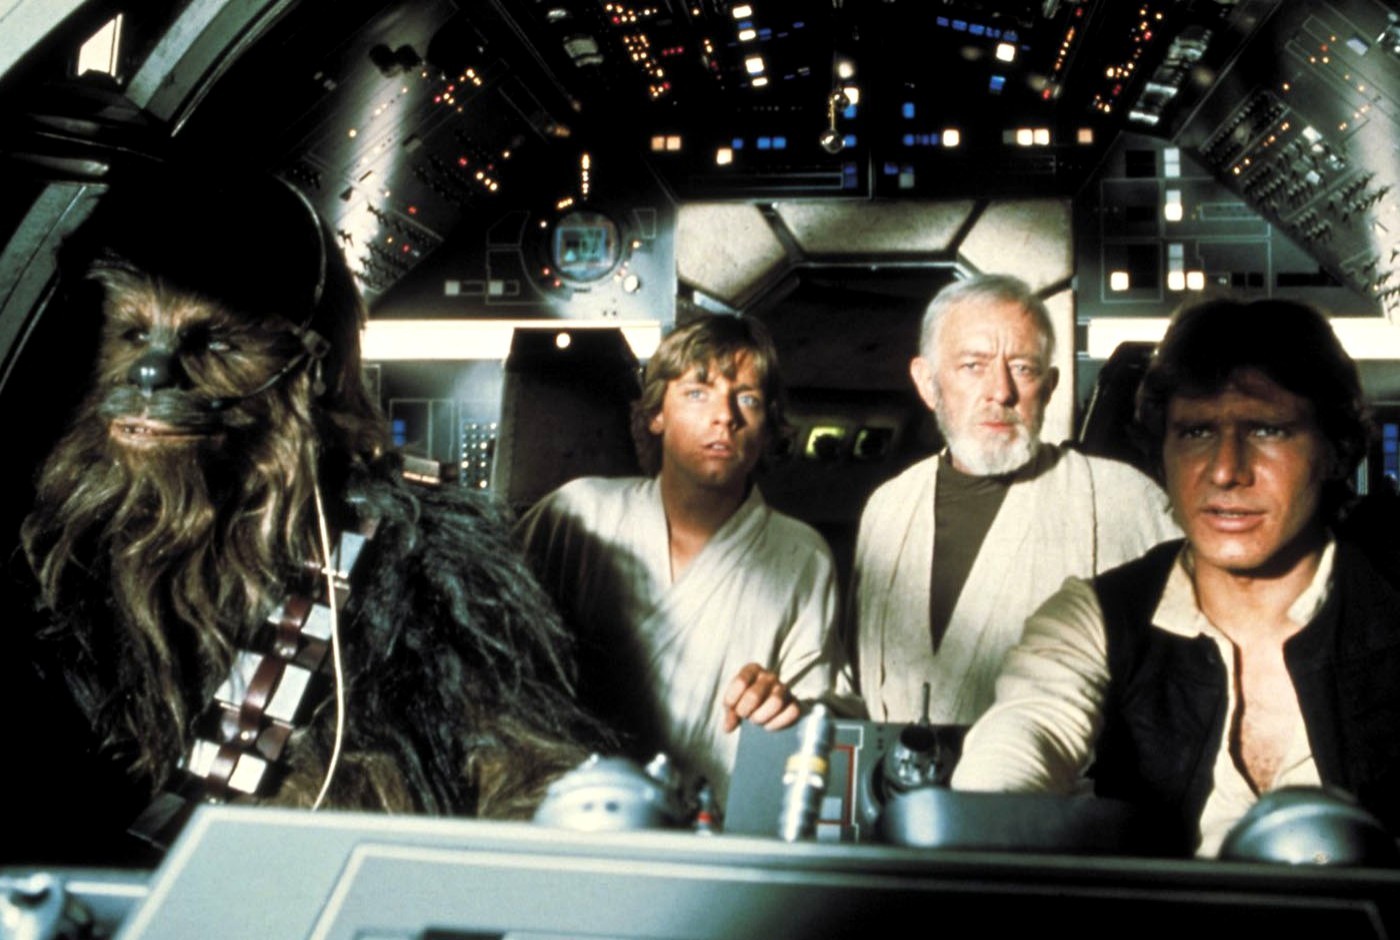
The group convened at Docking Bay 94, where they boarded the Millennium Falcon. They successfully evaded Zeta Squadron and escaped an Imperial blockade by initiating a jump to hyperspace.
The Rescue Operation
Arrival at the Death Star
Upon reaching Alderaan's coordinates, they discovered only an asteroid field. The planet had been destroyed by the Death Star's superlaser under the orders of Wilhuff Tarkin, the Grand Moff of Oversector Outer. While attempting to comprehend the situation, they observed a lone TIE/LN starfighter seemingly heading toward a small moon. As they pursued the fighter, Kenobi realized that it was not a moon, but an enormous space station. Moments later, a powerful tractor beam pulled them into a hangar bay.
Rescuing Princess Leia
Once aboard the Death Star, the group concealed themselves within the Millennium Falcon's smuggling compartments to avoid detection during the initial inspections. When Scanning crew BT-445 boarded, they were ambushed. Solo and Skywalker then requested assistance from the guarding stormtroopers TK-421 and TK-422. They subdued the two stormtroopers, enabling them to disguise themselves as stormtroopers.
Disguised as stormtroopers, Solo and Skywalker, accompanied by Chewbacca, proceeded to seize control of the hangar's control room. They eliminated several officers, including Pol Treidum and an Imperial Navy trooper. Once inside, Kenobi instructed R2 to log into the Imperial network to locate the tractor beam's power supply. Kenobi then departed to disable the tractor beam controls, leaving the others to wait in the control room.
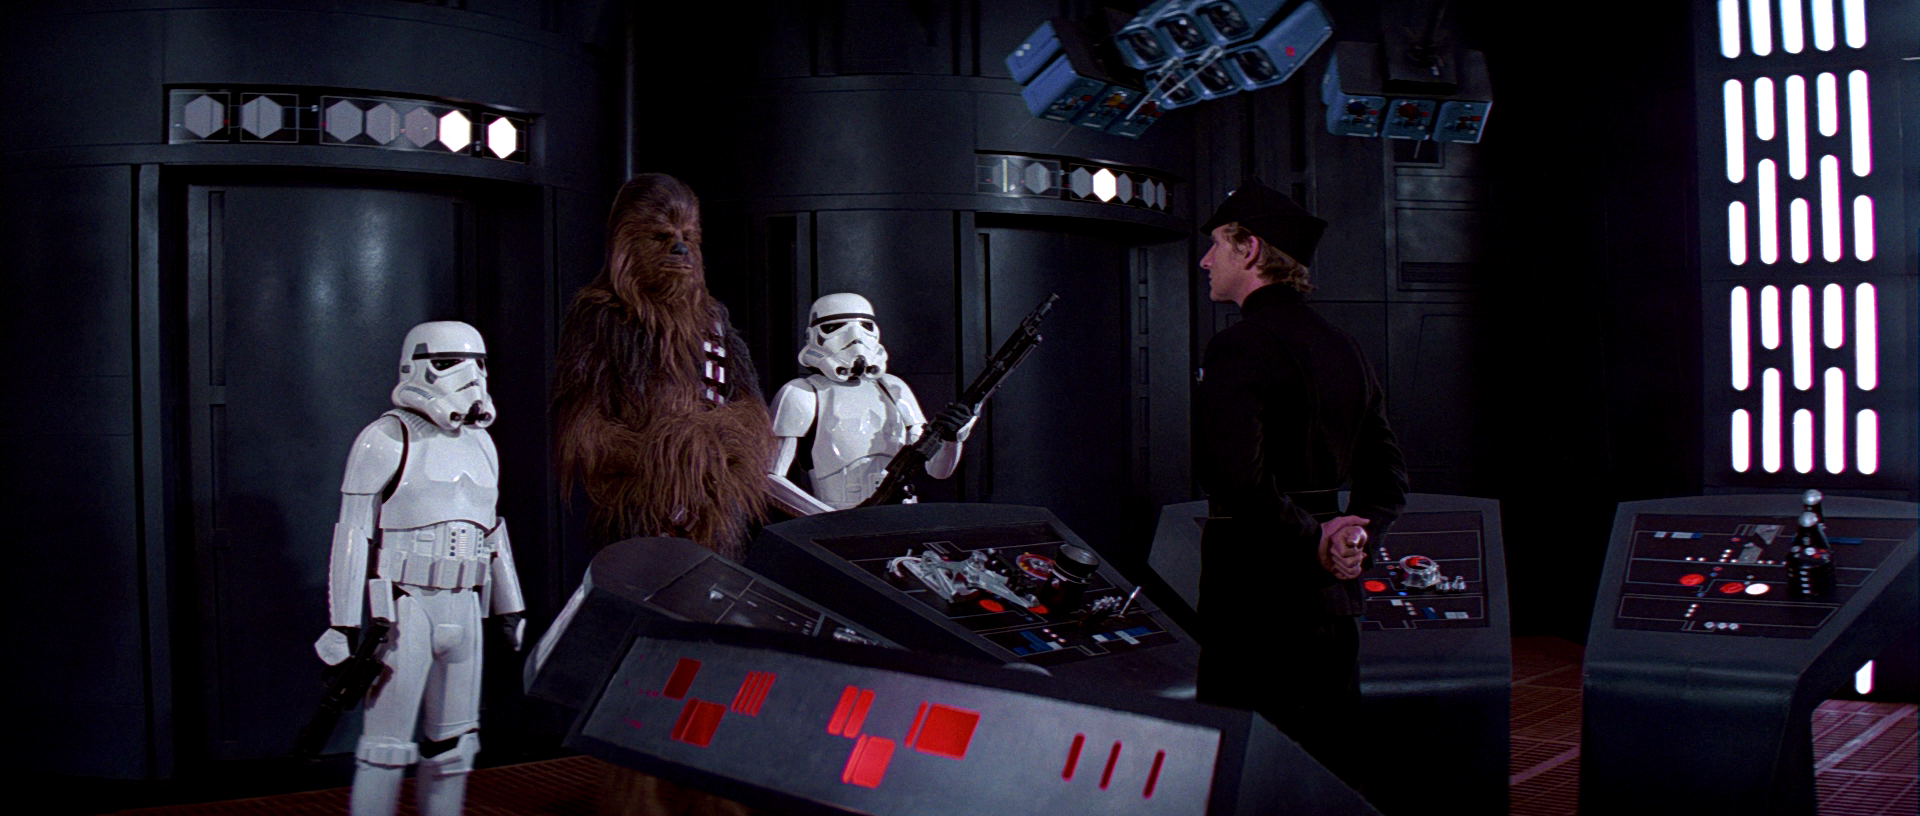
Shortly thereafter, R2 discovered that Princess Organa was being held prisoner aboard the station. With some persuasion, and the promise of a substantial reward, Skywalker convinced Solo to participate in a rescue attempt. Skywalker's plan involved "arresting" Chewbacca as a fake prisoner and attempting to "exchange" him for Organa. Despite Chewbacca's initial resistance, Solo cuffed him, acknowledging Skywalker's true intentions. However, Solo remained skeptical of the plan's success.
Leaving the droids in the control room with instructions to lock the door and hope for the best in case of Imperial suspicion, Skywalker and Solo proceeded to Detention Block AA-23. En route, they encountered a MSE-6-series repair droid on patrol, which Chewbacca promptly scared off with a roar. Upon reaching their destination, Skywalker attempted to bluff the guards by claiming a prisoner transfer from Cell Block 1138. When Shann Childsen, one of the officers, grew suspicious, the trio was forced to resort to blaster fire.
After eliminating the guards and disabling security cameras, Solo quickly located the Princess's cell. Skywalker went to retrieve her while Solo stalled on the intercom with a fabricated "reactor leak" story. When the operator demanded his identification number, Solo, realizing his cover was blown, destroyed the console and urged Skywalker to hurry. Skywalker soon found Organa and released her from her cell. He revealed his identity, explaining that he was there to rescue her and that he was allied with Kenobi.
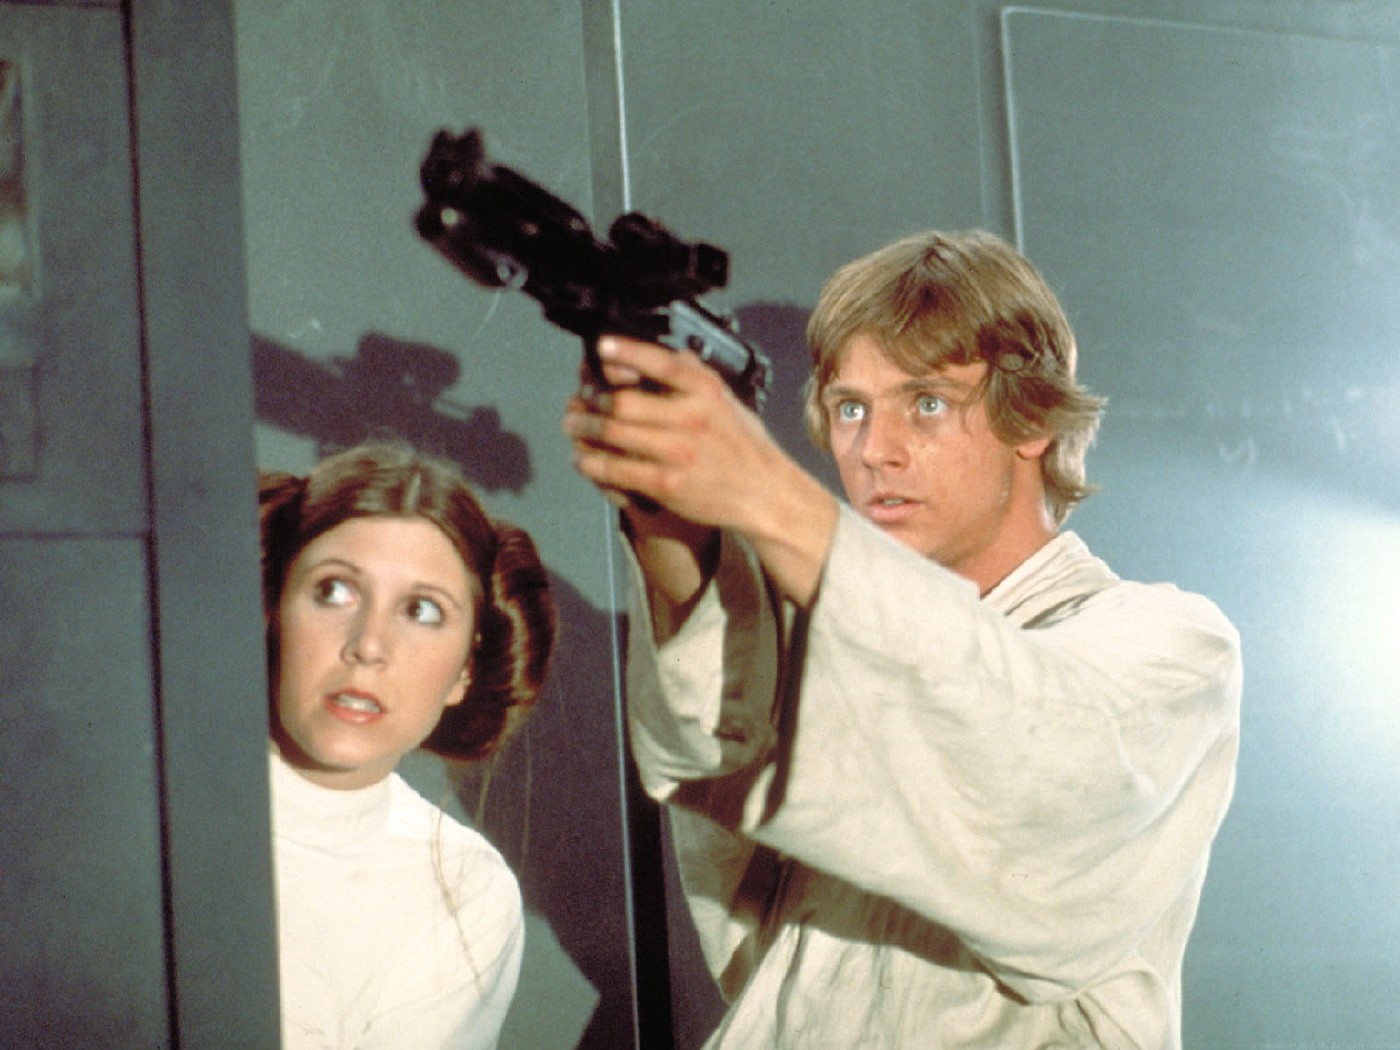
Simultaneously, a team of stormtroopers breached the door to the cell block, only to be gunned down by Solo and Chewie as they entered the narrow opening. The advantage was short-lived, and the duo was soon overwhelmed by the sheer number of stormtroopers, Death Star troopers, and IT-O Interrogator droids. Neither man had devised an escape plan, and C-3PO, who, along with R2, had posed as Imperial droids to return to the hangar bay, informed them via comlink that the only escape route was the main entrance. As troopers flooded the hallway and pinned them down with blaster fire, Princess Organa took control. She grabbed Skywalker's blaster and blasted through a ventilation shaft leading to garbage compactor 3263827.

Once inside, Skywalker attempted to blast open the door with his rifle, only to discover it was magnetically sealed. Solo, unaware of Skywalker's previous attempt, tried the same approach with the same result. Skywalker was then pulled into the water by a dianoga residing within the compactor. Solo managed to shoot the creature, saving Skywalker, but not before he lost the comlink. Sensing the impending compression cycle, the dianoga retreated underwater. No sooner had Skywalker been rescued than the compression cycle began, and the walls began to close in, a final attempt by the stormtroopers to prevent the prisoners' escape. Skywalker frantically searched for the missing comlink as the others attempted to climb out or halt the cycle. Finding the comlink, Skywalker called for 3PO's help. However, the droids were delayed in responding as they were hiding from Imperial patrols, only learning of the situation when the doors were close to crushing them. Just before they were crushed, R2 managed to halt the cycle.
After escaping the trash compactor, Skywalker and Solo discarded their stormtrooper armor, but not before taking the utility belts, and headed for the Millennium Falcon. They soon encountered a stormtrooper patrol searching for them. Solo and Chewie attacked aggressively, killing one of the squad members, despite Skywalker's protests, forcing the patrol to retreat to another hangar bay where reinforcements awaited. Overwhelmed, they were forced to retreat.
Meanwhile, Skywalker escorted Organa along an alternate route to the hangar bay. They encountered another patrol and took cover behind a blast door. Seeing no lock, Skywalker blasted the controls, inadvertently activating the bridge controls, stranding them on a ledge above a deep chasm. With the stormtrooper patrol about to breach the door and other troopers firing from nearby ledges, Organa provided covering fire while Skywalker prepared a grappling hook to swing across the chasm, receiving a good luck kiss from Organa beforehand. Skywalker also shot TK-119, causing him to fall down the shaft. The groups eventually rendezvoused in a corridor above the hangar and discussed how to reach the Falcon undetected by the stormtroopers stationed there.
Confrontation with the Dark Lord
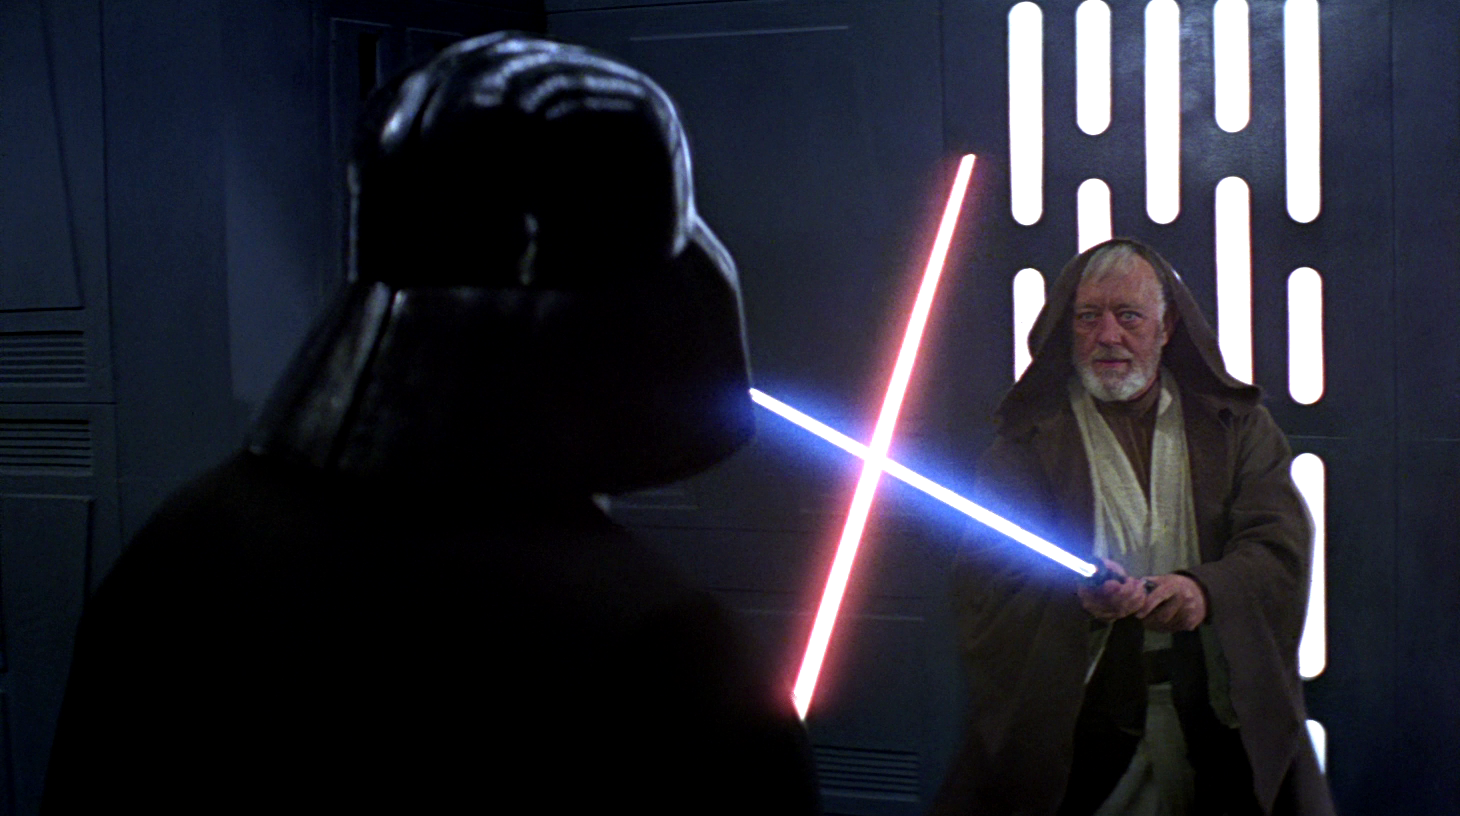
After disabling the tractor beam, Kenobi returned to the hangar where the Falcon was located, suspecting that his objective had been too easily accomplished. Just before reaching the hangar, he encountered his former apprentice, Darth Vader. Realizing that Vader had sensed his presence long before their encounter, Kenobi suspected that he had been allowed to deactivate the tractor beam as part of a trap. He drew his lightsaber and prepared to face his destiny.
Vader stood at the end of the hall leading to Docking Bay 327, lightsaber ignited and awaiting Kenobi. As Kenobi ignited his own weapon, the Supreme Commander advanced, raising his lightsaber to attack. As Kenobi mirrored his pose, Vader declared that he had been waiting for him and asserted his superior power.
Kenobi retorted, mocking Vader with his Darth title, before attacking the Dark Lord who was caught off-guard. Vader blocked the blow and riposted, Kenobi barely blocking the attack, then Vader attacked again, sending Obi-Wan retreating. Then Vader attacked more two times, but Kenobi blocked each blow even with his old age. The Jedi Master twirled and parried a third stab, then he blocked and countered the cyborg's next attack. Then Obi-Wan attacked, but Vader blocked and countered the attack, surprising Kenobi with his more advanced skills since their last confrontation. Kenobi charged with again, but Vader blocked the strike and pushed his former master in the wall and went to deliver the finishing strike. The Jedi Master, however, somehow dodged and used the opportunity to run around the Sith Lord.
Vader taunted Kenobi, stating that his former master's power was weakening, but the Jedi Master retorted that if he were struck down, he would become more powerful than Vader could imagine. Kenobi charged again, but Vader anticipated the strike, locked blades, and pushed Kenobi back. Vader angled his blade and told Kenobi that he shouldn't have returned. Kenobi realized that the Vader he was facing was far different from the one he had fought on Mustafar, and defeating him would be a different story. Seizing the offense, Vader attacked Obi-Wan, initiating an exchange of blows that were blocked and countered. However, the Jedi Master was soon tiring, so after a brief blade-lock, he started backing away, but the Sith Lord followed him with his controlled but ruthless offense.
Vader drove Obi-Wan back to an open doorway of the hangar, where the Supreme Commander tried to chivvy his old mentor in the way, but Kenobi countered an attack and forced Vader to pull back to the opposite wall. There, Kenobi would truly feel that he would never be able to defeat Vader, since the Dark Lord has become a far superior fighter than himself. At that same moment, he took a glimpse of the hangar, and saw some stormtroopers guarding the Millennium Falcon and Luke and the others (including Leia Organa) hiding nearby, waiting for a distraction to get in the ship.
Just then Vader all by sudden unleashed a flurry of attacks faster than the human eye against Kenobi, who somehow blocked and parried each one of them. The two rapidly circled and matched each other's blows for a while as the stormtroopers ran closer to the doorway. Kenobi realized that with that distraction, the others received a chance to run to the Millennium Falcon, he only needed to distract Vader and his troops just for a little more time. Seizing the offense, Kenobi unleashed several blows that put Vader on the defensive, but the Dark Lord soon regained the upper hand and locked blades with his former master. As the stormtroopers approached the duel even closer, Kenobi would really begin to feel his age, realizing that at any moment he would be struck down by Vader or shot by the Stormtroopers. He thus concluded that his defeat was inevitable.
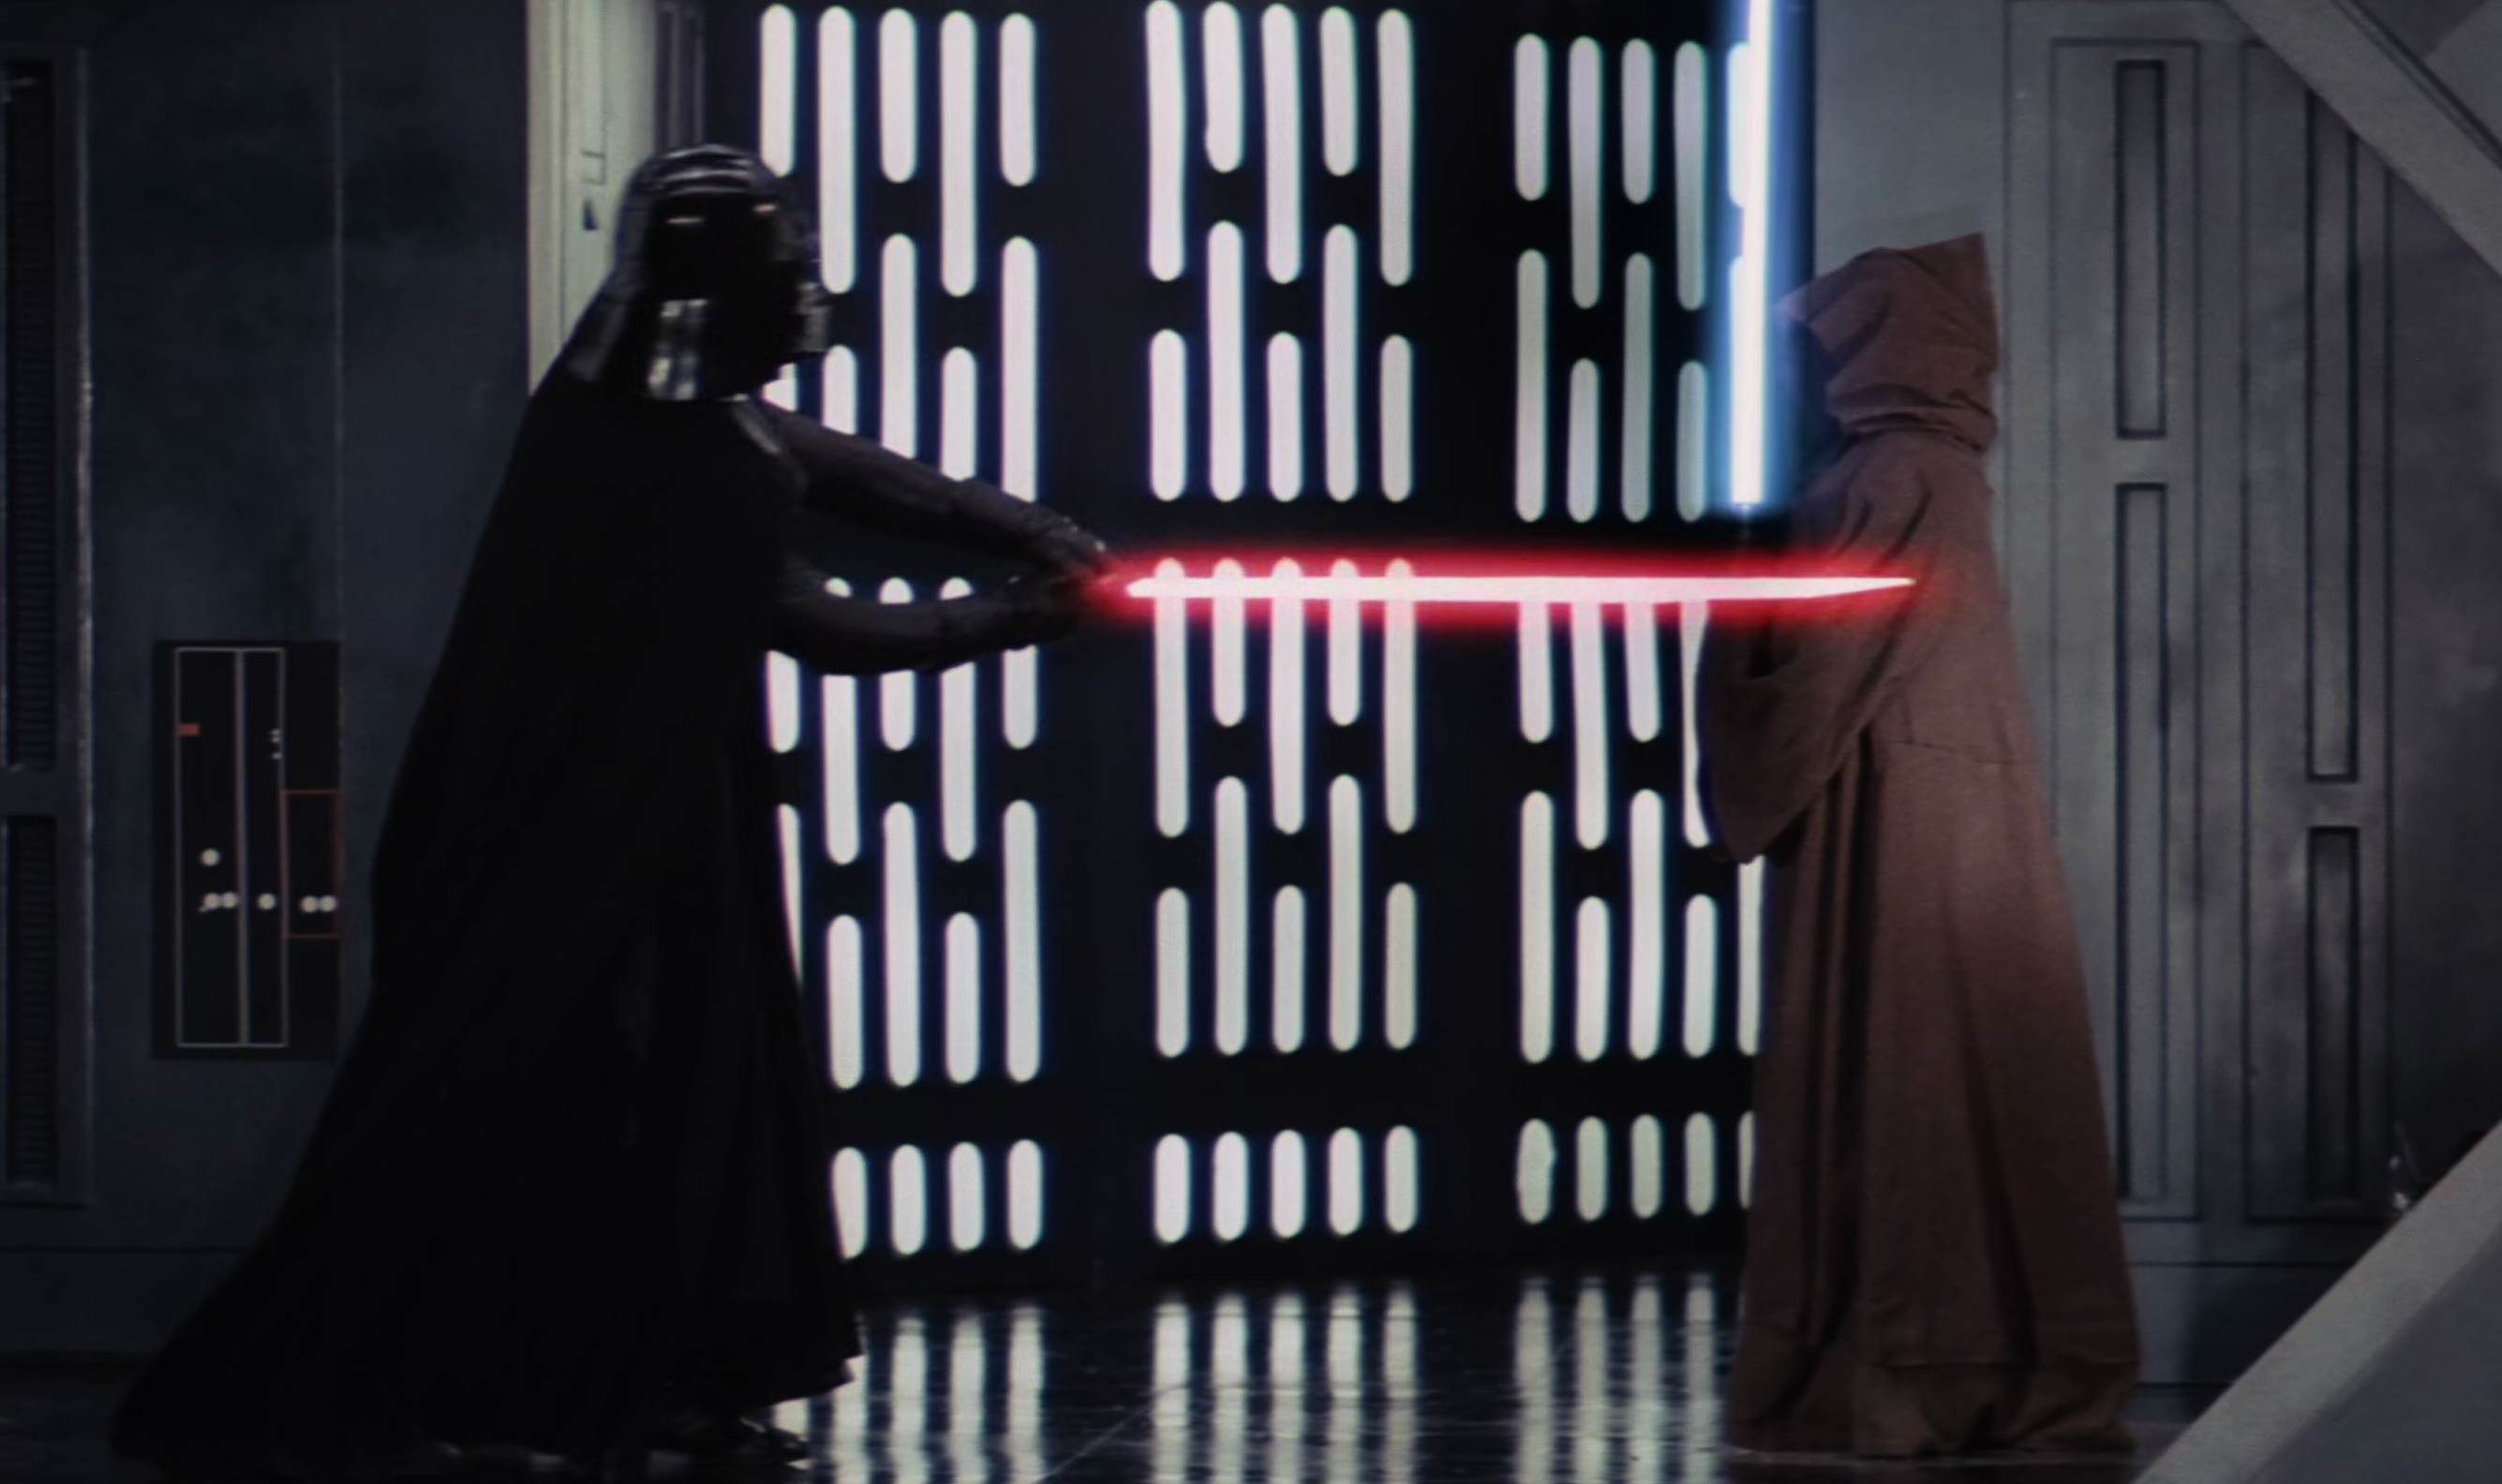
He took one last glimpse at the hangar and saw that Luke have stopped following his companions to their ship and was watching the duel, shocked with seeing his mentor so out of breath. Kenobi knew that the best way to give Luke and others a chance to escape was if he sacrificed himself. So he looked at Vader again and smiled, confusing the Dark Lord, then he lifted his blade in front of his face and closing his eyes, he took a long breath. Hesitating, Vader tried to find out the reason of Obi-Wan's suicidal tactic, but at the same time, he viciously sent his lightsaber through Obi-Wan's neck, only for Kenobi to use the Force to extinguish his physical body and become one with the force.
Luke Skywalker, shocked and distraught by the death of his mentor, cried out in grief. This attracted the attention of the stormtroopers who had been observing the duel, and they immediately turned and began shooting at Skywalker. As the firefight commenced, a shocked Vader inspected Kenobi's remains only to find the robes Kenobi had worn piled in a heap; his body had vanished.
Skywalker, despite his shock at seeing Kenobi slain, was able to take out most of the stormtroopers guarding the Falcon as Vader turned to the hangar. Seeing this, he was quick to lock out Vader by shooting the blast door's controls at Solo's urging. Though Skywalker, in his anger, was eager to finish off the remaining stormtroopers in the hanger, the disembodied voice of Obi-Wan Kenobi urged Skywalker to board the Falcon and escape. Kenobi's deactivation of the station's tractor beam systems allowed the Millennium Falcon to leave the Death Star unhindered. Before leaving the battleground, Vader retrieved his former Master's lightsaber as a keepsake, eventually storing it in his personal fortress on Vjun.
As they escaped, the Falcon encountered at least four TIE fighters on patrol. Despite Skywalker's grief, he and Solo were able to destroy the pursuing TIE fighters and finally escape to the Rebels' base on Yavin 4. While Solo congratulated himself on his role in the daring rescue, Princess Organa asserted that it was a ruse and that they were being allowed to escape, and suspected the reason they were allowed to escape was that they were being tracked, although Solo ultimately admitted that he did not care about aiding the Rebels and just wanted payment. However, the rescuers did not know that the Empire had secretly stored a homing droid aboard their ship under Lord Vader's advice to Governor Tarkin, which gave the Empire information on the destination of the Falcon. R2-D2 later destroyed it, but was too late to prevent the Empire from learning that the Alliance's main base was on Yavin 4.
Consequences
The Millennium Falcon successfully transported the Death Star plans to the Rebel Alliance on Yavin 4, which the Empire tracked. After pinpointing a critical flaw in the space station's design, the Rebels initiated an assault on the Death Star, culminating in its destruction by the Force-sensitive Luke Skywalker piloting an X-wing and employing a proton torpedo.
Vader experienced a fleeting connection with Skywalker through the Force shortly before the latter's escape and began to suspect that he was the pilot responsible for the Death Star's destruction. He spent months attempting to uncover his identity before finally learning that he was, in fact, his son, whom he had believed to be unborn due to his wife Padmé Amidala's death.
Footage pertaining to the rescue was transmitted to a facility located on Galvoni III, later discovered by Voren Na'al during a data theft mission and incorporated into a comprehensive report on the Death Stars.
Behind the Scenes
The Rescue on Death Star I was initially depicted in the original Star Wars film, A New Hope.
This scene showcased the first lightsaber duel in the movie series, though it was actually the second (and final) encounter between Obi-Wan and Darth Vader. Their initial duel occurred during the Duel on Mustafar in Star Wars: Episode III Revenge of the Sith.
To infiltrate the Princess's detention area, Luke and Solo adopted the guise of stormtroopers, feigning the capture of Chewbacca. They informed the cell block's commanding officer that they were transferring the Wookiee from detention block 1138. This number is an allusion to THX 1138, the initial cinematic work of George Lucas. Furthermore, the cell's designation was not originally part of the script; Mark Hamill, the actor portraying Luke, spontaneously created it during the scene's filming, much to the dismay of George Lucas. An impromptu addition also happened earlier when the pair entered the elevator, with Luke commenting on his limited visibility through the helmet (this stemmed from Mark Hamill's genuine inability to see through the Stormtrooper helmet's eyeholes, believing the cameras were not actively recording).
The initial dialogue delivered by Han Solo as he attempted to raise a false alarm after eliminating the stormtroopers within the detention center was improvised by Harrison Ford, attributed to either a lapse in memory or a failure to familiarize himself with the script.
Notably, this installment marks the only instance within the series where David Prowse personally executed the lightsaber combat sequences; subsequent films employed a stunt double due to his repeated breakage of the poles used as stand-ins for the lightsaber blades. This change in performers may account for Vader's pivoting movements in this particular film, a characteristic absent in the sequels.
Initially, Obi-Wan was slated to survive his confrontation with Darth Vader and escape aboard the Falcon. However, George Lucas encountered difficulties in establishing sufficient narrative tension. Editor Marcia, who was also Lucas's wife, proposed the idea of killing off Obi-Wan. Lucas ultimately concurred that Obi-Wan's absence from the remainder of the film would be beneficial. Actor Alec Guinness reportedly threatened to resign over this alteration, but Lucas persuaded him that the change would improve the story's overall impact.
This specific event was made playable in the video games Star Wars: Rogue Squadron II: Rogue Leader and Star Wars: Rogue Squadron III: Rebel Strike, both as unlockable bonus missions. The former game's focus was on the escape segment of the mission, while the latter centered on the rescue operation itself, incorporating scenes extracted directly from the film interspersed within the playable segments. In Rogue Squadron II: Rogue Leader, the player assumes control of one of the Falcon's quad cannons, tasked with destroying incoming TIE fighters. Given the game's inclusion of a significantly larger number of fighters than depicted in the film (necessary to achieve the game's highest award, the gold medal), it is considered non-canonical for the purposes of this article. In Rogue Squadron III: Rebel Strike, successfully completing this level within the main game unlocks Star Wars: The Arcade Game for play in Arcade mode. Furthermore, the bonus mission from the first game was integrated into the cooperative campaign of the second. New CGI cutscenes were created specifically for these games—animators tried to recreate the scene of Luke Skywalker and Han Solo in the control room—but because of problems in reworking the game engine, the final version just used clips from the movies.
The Rescue on Death Star I was also featured as a level within the 1987 Japanese Star Wars game, whose canonicity is uncertain. Within this game, Luke is tasked with evading prowler droids while attempting to locate Princess Leia's cell within the massive space station. Furthermore, in contrast to the original film, he and Vader engage in direct combat, rather than merely catching a brief glimpse of one another.