Skirmish on Cloud City
During the Imperial Era, specifically in 2 BBY, a battle took place on Bespin, in Cloud City. This conflict involved the Galactic Empire's military forces and Starkiller, who served as the secret apprentice to the Sith Lord Darth Vader. Before Starkiller arrived in Cloud City, his Sith master tasked him with forming a rebel army to draw out the Empire's adversaries. Once Darth Sidious, also known publicly as Emperor Palpatine, became sufficiently preoccupied with the rebellion, Vader assured Starkiller that they would jointly assassinate Sidious before seizing control of the Empire.
Soon after Starkiller embarked on his mission, he sought out an ally to furnish him with the necessary contacts and resources for building a rebel army. He selected General Rahm Kota, a Jedi on the run whom Starkiller had seriously wounded at a TIE Fighter Construction Facility orbiting Nar Shaddaa. Eventually, the apprentice located Kota in Cloud City, only to find the Jedi deep in alcoholism due to despair. Starkiller also discovered that Kota had lost his eyesight after his own lightsaber burned his eyes during their lightsaber duel above Nar Shaddaa.
As Starkiller tried to convince the drunken Jedi to rejoin the fight against the Empire, a squad of stormtroopers entered the cantina, seeking Rahm Kota. Consequently, Starkiller was compelled to battle Imperial soldiers throughout the city, protecting Kota, especially given the general's inebriated and despondent state. Despite Starkiller's victory over the Imperial garrison, which included a member of the Emperor's Shadow Guard, Kota still viewed resistance against the Empire and its "limitless" army as futile. Nevertheless, Starkiller managed to persuade Kota to provide the contacts needed to initiate a galaxy-wide rebellion.
Background
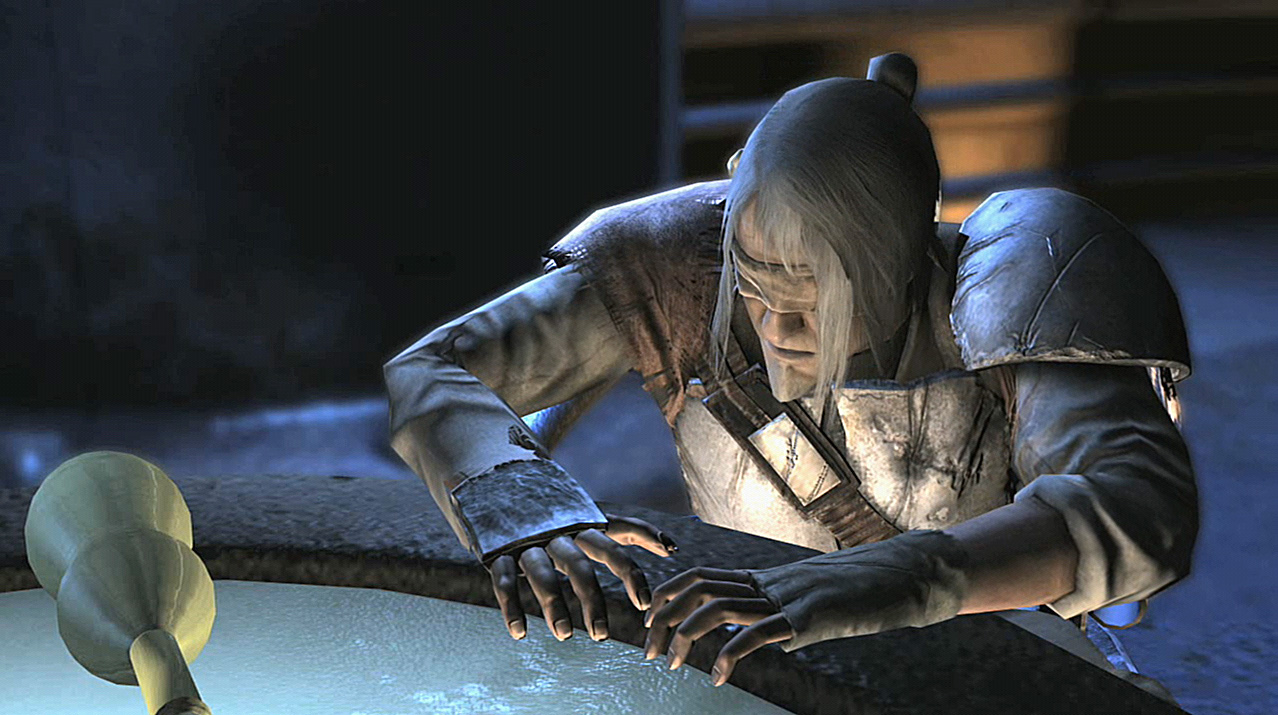
Starkiller's quest to find Rahm Kota spanned the galaxy, leading him from Nar Shaddaa, where the Jedi was last seen, to Ziost, an ancient Sith planet. From there, he traced Kota to Bespin. Following his defeat and blinding at Starkiller's hands, Kota abandoned his fight against the Galactic Empire and resorted to alcoholism to numb his bitter feelings. However, after Starkiller intercepted an Imperial transmission indicating Kota's location and the Empire's dispatch of a dangerous agent to capture him, he had to quickly travel to Bespin. He discovered the former Jedi General in the Vapor Room, a local cantina in Cloud City, where Kota was nearly unconscious and extremely drunk, making him uncooperative and insistent on being left alone.
The Confrontation
Starkiller, posing as a Jedi, attempted to reason with the disheveled general, but a group of stormtroopers located them with the help of Ugnaught informants. This marked the first time Starkiller actively fought Imperial troops as an enemy of the Empire. Previously, he had only killed Imperials to eliminate potential witnesses.
While Kota hid beneath a table, Starkiller ignited his new lightsaber and attacked, focusing on the heavily armed and armored Uggernaughts. He used telekinesis to disable one and overloaded the other's electrical systems, killing the pilot and scattering the stormtroopers. During the battle, Starkiller felt restricted by the need to avoid harming innocent bystanders, maintaining his Jedi facade. Despite the engagement with Imperial forces, he still planned to use his original landing site to extract Kota. He contacted Juno Eclipse, confirming he had Rahm Kota and requesting immediate extraction from the Vapor Room.
As Kota drunkenly followed the apprentice, Starkiller hoped the Jedi could manage on his own but was ultimately forced to protect him. After cutting through the Vapor Room storeroom, Starkiller attacked the nearby squad. As he dragged Kota along the corridors to the Vapor Room's supply dock, Starkiller anticipated heavy Imperial resistance but remained confident, planning to board the Rogue Shadow using Force Jump. However, an Imperial Shadow Guard arrived at the docks, thwarting his plan. As Starkiller deflected blaster fire to eliminate the Guard's stormtrooper escort, he warned Juno to avoid the loading dock. Consequently, the extraction point shifted to the shipping balloon dock, where the Rogue Shadow would await the apprentice's return.
While Starkiller fought the guardsman, Kota retreated to find another escape route. This allowed Starkiller to abandon his Jedi pretense and tap into the dark side of the Force. He blasted the guard back with a telekinetic surge, followed by a Force lightning attack. Starkiller won the energy struggle and forced the guardsman off the dock.
Hoping Kota had survived on his own, Starkiller moved toward the balloon dock, puzzled by the Shadow Guard's identity and allegiance. He concluded that the guard served Emperor Palpatine rather than Darth Vader, whom he initially mistook the guardsman for due to their similar appearances. After easily defeating the Imperial forces in his path, he faced another guardsman, more skilled than the first, but Starkiller defeated him as well. Arriving at the dock, he found it swarming with stormtroopers and Uggernaughts, led by two Shadow Guardsmen.
During the fight, Starkiller's connection to the Force deepened, and he fought instinctively. He threw stormtroopers off the dock or into each other and even brought down a heavy freight from a shipping balloon. When his opponents regrouped, Starkiller telekinetically crashed an entire shipping balloon onto them, clearing out most of the Imperial soldiers, including Imperial dropships attempting to disembark.
As they approached the Rogue Shadow, a Lambda-class T-4a Shuttle arrived at the landing pad, disgorging eight stormtroopers and another Shadow Guard. Marek and the Shadow Guard engaged in an intense duel using both Force abilities and lightsaber combat. Marek ultimately prevailed, forcing the Shadow Guard into a headlock, sweeping him around, throwing him into the air, blasting him with Force lightning, and then impaling him with his lightsaber as he fell. Kota then appeared as Marek stood triumphant.
After the Battle
Kota remained unimpressed by Starkiller's victory; his defeat on Nar Shaddaa had made him pessimistic about the galaxy. He argued that victory was impossible due to the Empire's "limitless army." However, Starkiller appealed to his sense of honor, and Kota agreed to help the apprentice's cause. He revealed a contact in the Imperial Senate who could use the assistance of a Force-sensitive warrior willing to fight the Empire. Shortly after the Rogue Shadow extracted them, Starkiller felt drawn to the Jedi Temple, prompting him to return to Coruscant for a third time.
Behind the Scenes Information
This mission is absent from the PS2, PSP, and Wii versions of the game. In those versions, the search for Kota takes place in a Nar Shaddaa cantina called The Undertow, involving only one Shadow Guard, numerous stormtroopers, and "bar scum." Notably, Marek only fights one shadow guard in the game, whereas he battles four in the novelization.
In the Xbox 360 and PS3 versions, Kota wields a blue lightsaber.