Battle of the TIE Fighter Construction Facility
During the Imperial Era, specifically in 3 BBY, General Rahm Kota, a Jedi who survived the Great Jedi Purge (an event orchestrated by Sith Lord Darth Vader with the goal of eliminating the Jedi Order), commanded his militia in a battle. This conflict aimed to seize control of a TIE fighter construction yard that was in orbit around Nar Shaddaa's moon. This action was part of a larger series of assaults on various Imperial targets, all under the direction of Senator Bail Prestor Organa from the planet Alderaan. Kota, a masterful strategist, devised a battle plan that enabled his militia to successfully conquer the station.
As it became evident that Kota and his forces held a considerable advantage over the defending Imperials, Darth Vader made the decision to deploy his secret Sith assassin and apprentice, "Starkiller", with the mission of neutralizing the threat. However, because Starkiller's very existence was a closely guarded secret known only to Vader and an Imperial pilot named Juno Eclipse, as he was instrumental in Vader's scheme to overthrow his own master, the Emperor Palpatine, Starkiller received orders to eliminate all witnesses within the construction facility, which included Imperial stormtroopers. After arriving in the main hangar bay aboard his vessel, the Rogue Shadow, Starkiller advanced through the facility, killing everyone he encountered, effectively bringing the battle to an end.
This culminated in a lightsaber duel between Kota and Starkiller, which unfolded within an observation tower. Using his skills with the Force, Kota managed to detach the chamber from its foundation, causing it to plummet towards Nar Shaddaa's moon. Starkiller overpowered the Jedi, forcefully throwing him to the ground and rendering him helpless. As a final desperate measure of defense, Kota granted Starkiller a glimpse of a possible future, one where he was free from Vader's control, before being blinded and ejected through a shattered window, although he somehow survived. Starkiller secured his own safety before the observation tower crashed onto the moon.
Prelude
Rahm Kota, a Jedi Master, was saved from certain death during the execution of Order 66 at the conclusion of the Clone Wars because he didn't trust the Clone troopers. He believed clone soldiers were not suitable for combat, and instead relied on a small group of his own special troops, personally selected and trained by him. Because there were no clones present to carry out Order 66, and Kota's men would never obey such an order, Kota was able to vanish into the Outer Rim Territories, with his men joining him. Years later, Rahm Kota reappeared as a rebel insurgent, with his original men having reorganized into a group known as Kota's Militia. Kota was the first to truly rebel against the Empire, setting the stage for many other groups to follow suit, which ultimately led to the formation of the Rebel Alliance.
With intelligence provided by Bail Organa, his contact within the Imperial Senate, Kota initiated a guerrilla war against the Empire. He attacked numerous outposts and facilities, constantly harassing the Imperial military. His ultimate objective was to attract the attention of Darth Vader, with the intention of assassinating the Sith Lord. This led him to gradually escalate his tactics, eventually leading to an attack on the TIE Fighter Construction Facility above Nar Shaddaa.
While Kota was engaged in his war, Vader was training his secret apprentice. Galen Marek, Vader's apprentice, had been taken on by the Sith Lord to serve as his tool, acting as Vader's assassin during his training. As Kota attacked the facility, Vader declared Marek's training complete. As a final test, he dispatched him to the facility to eliminate Kota and retrieve his lightsaber. Marek was also instructed to kill all combatants, both Imperials and insurgents, to ensure that no one could reveal his existence.
The battle
Kota's assault
While the militia's space forces engaged TIE Fighters around the facility, Kota's ground troops successfully landed inside the facility. The infantry in the hangar forced the Imperial stormtroopers back from the bulkhead door. At least one Lambda-class shuttle was destroyed, crashing into the hangar. With Kota leading the charge, the militia overran the facility, quickly capturing the command center. After executing the stormtroopers inside, Kota ordered his militia to secure the area.
He then instructed them to place explosive charges throughout the facility, specifically on levels two, nine, and twelve, and to direct any enemies towards him. As his men activated the command center's holoprojector, they received sensor data indicating an approaching ship: the Rogue Shadow, Marek's vessel. Mistaking Marek's ship for Vader's, Kota quietly celebrated having drawn the Sith Lord out of hiding.
He ordered the hangar twelve containment field to be lowered and instructed the men there to take their positions.
Starkiller's Intervention

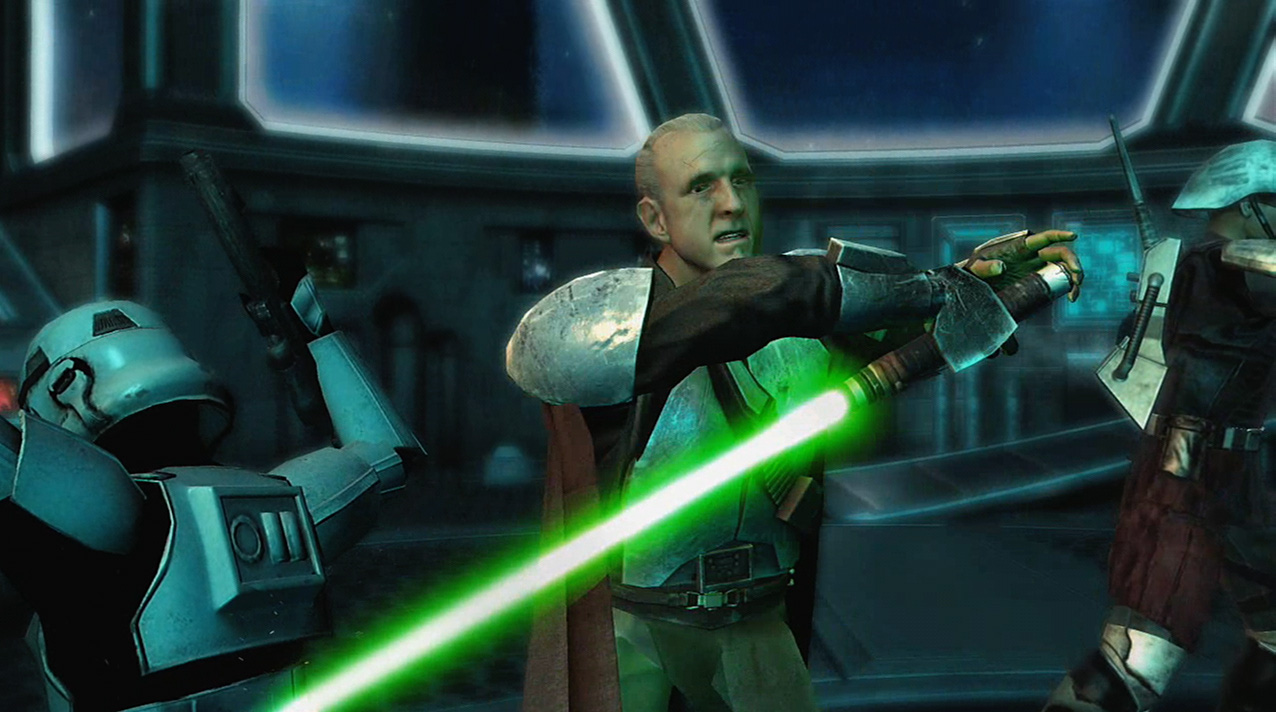
Marek entered the facility through a service corridor extension adjacent to the hangar. Militia members had fortified their positions with E-WEB blaster turrets and sealed the doors to prevent any Imperials from escaping the hangar when Marek appeared. He swiftly eliminated all the troopers within the hangar, both Imperials and insurgents. Using the Force to unlock the heavy bulkhead doors, he advanced, cutting down any soldiers unfortunate enough to cross his path. As he approached the central factories, his pilot, Captain Juno Eclipse, warned him about a squadron of TIE Fighters in his vicinity, flying through the cavernous space of the hangar.
Navigating the walkways and catwalks of the factory, Marek killed the soldiers in his way while attacking the TIE fighters with telekinesis and Force lightning. As the battle continued and Marek massacred the combatants, the facility's security level was raised, and an order was issued to eliminate any unauthorized personnel. At least two TIE Fighters were shot down by enemy fire and crashed into the walkways. Marek took a lift to the next floor, where militia and Imperial forces were engaged in a firefight on a bridge spanning the station. A damaged TIE crashed into a walkway, destroying a section of it; however, Marek easily jumped the gap and continued his mission. Eventually, all hangars fell to rebel forces, and the assembly lines began to collapse.
Marek encountered several Imperial Navy Commando squads throughout the factory, who were either retreating from pursuing Militia men or were pinned down; Marek killed all of the Commandos.
As Marek began breaching the assembly line, Kota's men trapped him within an energy shield. He deactivated it by using the Force to pull its generator out of the wall outside the barrier, and then moved on. From there, he confronted an AT-CT walker in the wing assembly area, which he crushed into a cube and smashed into the ground using the Force. After clearing the wing assembly area, he rode one of the lifting TIE wings to a higher level, from which he entered a cockpit assembly area where deadly laser arms manufactured the chassis of future Imperial war machines. After navigating through the wing and cockpit factories, he finally reached the watchtower where Kota was waiting for him.
The duel
Upon entering the command center, Starkiller confronted the surprised Kota, who had anticipated Vader's arrival. Despite this, Kota decided to confront this "boy" regardless.
Marek initiated the battle with a burst of Force lightning, which Kota managed to deflect. Realizing the futility of this attack, Marek ceased his barrage and charged at the general. Kota skillfully evaded Marek's attacks, slashing at his assailant's legs as he passed. Marek responded with a telekinetic blast, which Kota once again deflected. Having successfully assessed Kota's defenses, Marek adopted a more cautious approach, circling Kota warily and maintaining a light telekinetic attack, bombarding Kota with fragments of chairs he had sliced apart.
Kota used Marek's hesitation to launch an attack, advancing aggressively and attempting to overwhelm the darksider with a swift and determined assault. In response, Marek relied on his knowledge of Soresu to defend against Kota's wild attacks. Kota changed his tactics, employing a slower and more deliberate fighting style interspersed with rapid and sudden strikes. Marek continued to fend him off, and as Kota's guard began to falter, he countered. Focusing solely on Kota, he disregarded everything else, and their duel raged throughout the control center.
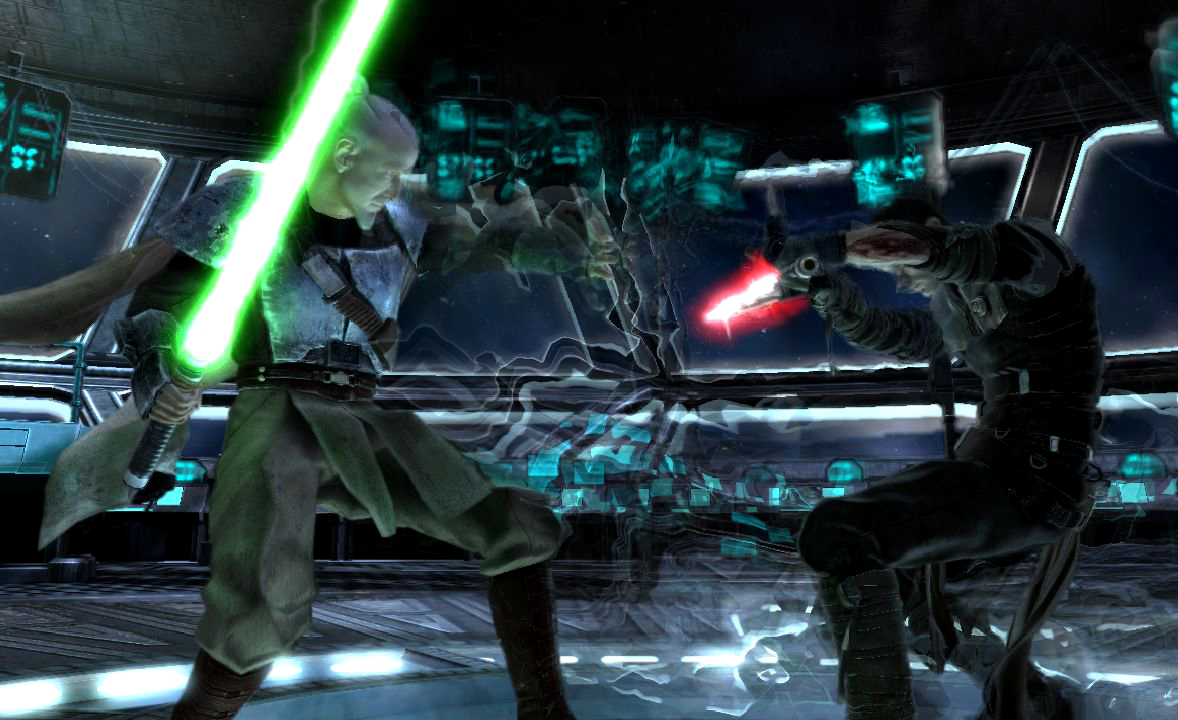
While Marek acknowledged Kota's strength and intelligence, noting that he possessed many moves the darksider had never encountered before, he was ultimately able to push him back. Despite Kota's attempts to regain the offensive or provoke a mistake from Marek, he quickly grew weary and sustained hits. In desperation, Kota momentarily disengaged from the duel. Admitting that he had underestimated Marek, he declared that he could not allow him to live. Using telekinesis, Kota seized the entire command center structure, tearing it from the facility and sending it plummeting into Nar Shaddaa's upper atmosphere, stating that he was willing to "bring the facility down onto [Marek and Kota's] heads" if necessary to stop him. As the control center flipped over during its descent, they resumed their duel.
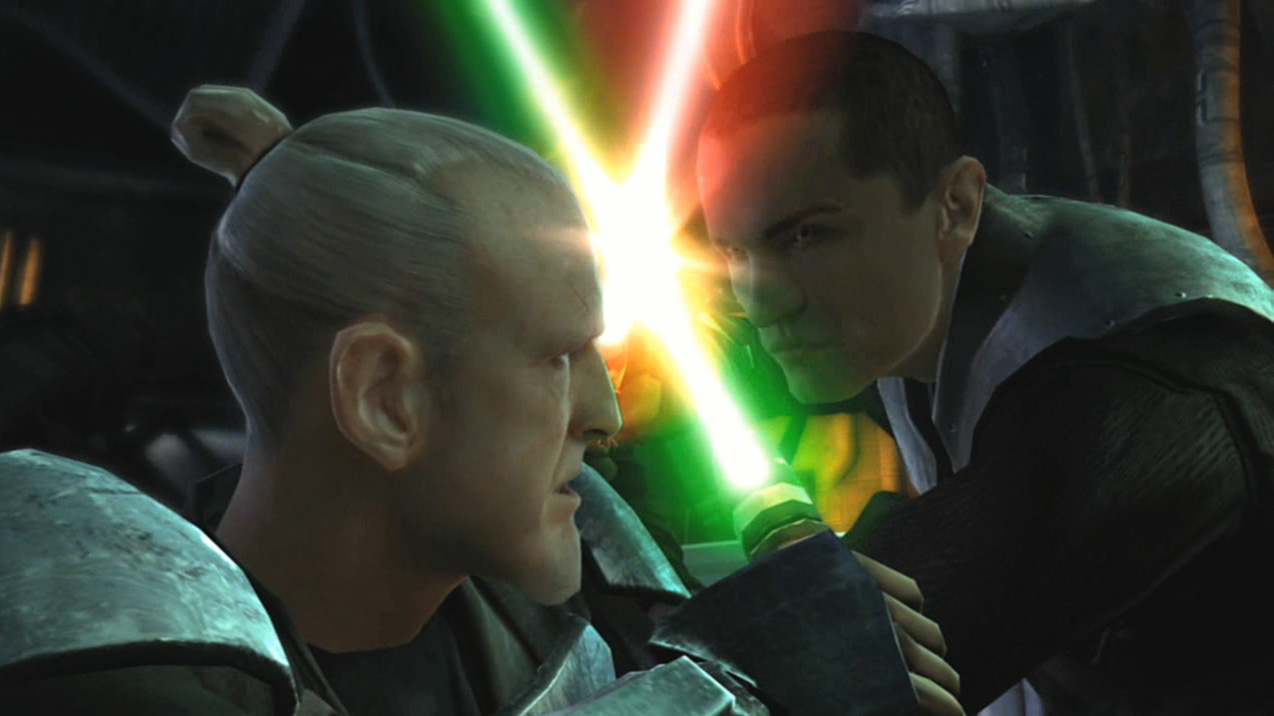
However, Kota was unable to maintain his defense. Marek seized Kota in a telekinetic chokehold and hurled a piece of debris at him, which slammed Kota against the wall behind him. Maintaining his grip, Marek slammed the helpless general against the floor, then flung him against the ceiling, leaping up after him and physically assaulting him before blasting him back down. Kota crashed to the floor with such force that he shattered the glass beneath him. As Kota attempted to stand, Marek leaped at him and attacked. Kota managed to block, initiating a bladelock. As he pushed against Marek's blade, Kota cryptically stated that he could see the young man's future, and that he would not always be Vader's servant. As Kota continued to contemplate the vision, he was startled to see himself as part of his opponent's destiny. Capitalizing on Kota's surprise at the revelation, Marek gained the upper hand. Overpowering Kota, he forced the blades into his eyes, blinding and stunning him. In agony, Kota unleashed a wave of Force energy that shattered the viewports of the command center, causing him to drop his lightsaber. Marek was briefly sucked out, but managed to hold on. Wind howled through the command center as debris was pulled out due to the sudden change in pressure, and Kota followed, falling spread-eagle into the Vertical City below. Vader's apprentice retrieved Kota's lightsaber, claiming it as a trophy of his victory.
Aftermath
With Kota presumed dead, Marek departed the control center, leaping onto the hull of the Rogue Shadow as it flew below. Upon returning to the Executor to report to his master, Marek received a debriefing from Vader, who declared that while he was powerful, he was unfocused and easily distracted. Vader then dispatched Marek to the Jedi Temple to refine his skills. Once there, Marek fought his way through the Imperial garrison stationed there and proceeded to the Jedi Trials Chamber. Inside the Chamber, he engaged a holographic Jedi training program modeled after the ancient Sith Lord; Darth Desolous. After defeating the program, Marek received orders from Vader via PROXY, instructing him to find and kill the deranged Jedi Kazdan Paratus on the planet Raxus Prime. Marek followed these orders and proceeded to undergo several other trials of finding and killing Jedi.
Kota's Fate
Kota survived his fall, although he was blinded and injured from the duel. He went into exile and became an alcoholic on Cloud City. Marek, remembering Kota's final words and attempting to assemble an army of individuals disloyal to Palpatine as Vader had suggested, decided to locate the Jedi and request his assistance. Marek eventually decided to defect from Vader due to the lies and betrayals he had experienced, and confront his former master, ultimately dying in battle against the Galactic Emperor Palpatine. He was killed during the duel with the Sith Lord, but he founded a rebellion, fulfilling Kota's vision.
Behind the scenes
The TIE Fighter Construction Facility level of The Force Unleashed was released as a downloadable demo on Xbox Live and PlayStation Network on August 21, 2008. The demo featured enhanced force powers and concluded with a special AT-ST boss fight.
In versions of the game for consoles other than the Xbox 360 and the PlayStation 3, a presumably non-canonical build of the game presents a different approach to the facility. In this version, the Rogue Shadow lands directly in the hangar bay, rather than the service corridor next to it. Starkiller fights his way through a series of corridors, hangars, and an assembly line. He shoots down a Rebel gunship attempting to land in one of the hangar bays, and interrogates a survivor of the crash to learn about Kota's whereabouts. A Rebel is depicted hijacking an AT-ST, and Starkiller destroys it by impaling the pilot and crushing the walker using his power. It's worth noting that a significant difference between the Xbox 360/Playstation 3 versions and the PSP, PS2, and Wii versions is that in the former, the Rogue Shadow arrives at the production facility after the insurgents have completely taken it over, while in the latter, it arrives during the space battle between the insurgents and the empire. Also, although Rahm Kota mentioned planting explosives, they were never detonated in the Wii, PS2, and PSP versions. Furthermore, in the Wii/PS2 versions, the facility remains in space after Starkiller's duel with Kota (although Kota still mentions trying to "bring the facility down on [their] heads" to defeat Starkiller late in the fight, and attempts to use the Force to cause the room they were in to quake), unlike the Xbox 360/PlayStation 3 versions where the facility falls into the atmosphere. Additionally, the TIE Fighter Construction Facility itself had different designs in the two versions.
According to unlockable artwork, the duel between Rahm Kota and Starkiller was originally intended to continue on top of the Rogue Shadow, but this idea was abandoned for unknown reasons.