Battle on the Frontier
The Battle on the Frontier was a campaign led by Grand Admiral Thrawn, occurring after the Battle of Hoth. To be more precise, it came after Admiral Harkov's successful resolution of the Sepan Civil War. In this campaign, Thrawn successfully created a new Imperial base in the Pakuuni system. This system, located in the Outer Rim, possessed trade routes that the Empire deemed crucial. Prior to Thrawn's campaign, significant pirate activity made trade in the region extremely perilous. Despite facing strong opposition from local Pirates, who were supported by the Rebellion, Thrawn managed to establish the installation and enforce Imperial control over the system.
The campaign
Loading base equipment
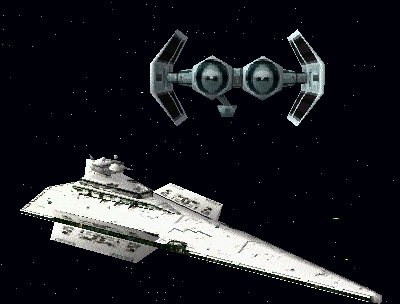
At that time a Vice Admiral, Thrawn initiated the pacification of the Pakuuni system by carefully examining the remains of a derelict manufacturing facility close to the planet Argoon. Imperial forces suspected that Rebel transmissions, indicating their intention to destroy the loading area, were the reason for the abandoned cargo area. Thrawn supervised this operation from his flagship, the Victory-class Star Destroyer named Stalwart, initially deploying a single TIE Bomber to investigate the five groups of discarded Cargo containers. TIE Bomber Alpha 1 discovered various useful station components within the containers, leading to the deployment of Heavy Lifter group Mule. As the Heavy Lifters began arriving to retrieve the valuable containers, Rebel Y-wings entered the area, heading towards the Stalwart. In response to the impending bombing runs, TIE Fighter flight group Gamma was launched, assisted by TIE Bomber Alpha 1 after it completed its inspections. Soon after, more Rebel starships joined the battle, including CR90 corvettes Dragon and Beecon, followed later by Viper. The Stalwart deployed additional TIE Bombers and Interceptors to counter the growing Rebel threat. The newly arrived Imperial forces successfully suppressed the enemy corvettes, only to be met by Rebel B-wings and X-wings emerging from hyperspace. As Imperial starfighters finished off the remaining Rebel raiders, all five Heavy Lifters from Mule completed their mission and returned to the Stalwart's hangar. A lone A-wing arrived in a final attempt to inflict casualties on the Empire, but Thrawn's mission had already been accomplished.
Destroy the Pirate outpost
Having gathered the remaining station parts from the abandoned depot, Admiral Thrawn tasked Commander Buckeye and the Nebulon-B2 frigate Ludwick with destroying a nearby Pirate installation. The Pakuuni Pirates had amassed a considerable fleet of supplies, Corvettes, Y-wings, and Z-95 Headhunters. Imperial Intelligence suspected that Rebel starships were assisting the local pirate groups; furthermore, members of the Secret Order suggested that searching the containers could reveal contraband, thus requiring their capture. The frigate Ludwick initiated the assault by launching three groups of TIE Bombers. The Bombers began attacking Corvettes Leach, Clavier, and Grapler as pirate Z-95s and Y-wings moved to intercept. TIE Fighter group Theta was deployed in response to TIE Bomber losses, being better suited for dogfighting with the enemy's shielded fighters. Maarek Stele, the flight leader of TIE Bomber group Alpha, flew by the pirate containers during the battle. Stele discovered Rebels hiding among the containers; the Assault Transport Tiger launched from the Ludwick to capture the Rebel fugitives. As predicted, Rebel starfighters arrived just as the last of the containers exploded. Having completed their primary mission, the Imperial Bombers returned to the hangar, leaving the Rebel fighters to contend with the interceptor craft and the Ludwick's turbolasers.
Hold position
Grand Admiral Thrawn's task force had successfully eliminated the pirate outpost, securing a foothold in the Pakuuni system. Following the initial attack, the Frigate Ludwick patrolled the system until Imperial convoys carrying parts and construction crews could arrive to build a new space installation. Imperial intelligence indicated a high likelihood of an enemy counterattack. The Ludwick deployed two flight groups of TIE Fighters and a group of Interceptors to patrol the system until the convoys arrived. Less than fifteen minutes before the convoy's arrival, the Alliance Nebulon-B frigate Huntress emerged from hyperspace, launching B-wings and Z-95 Headhunters, quickly joined by Y-wings from Gold group to bomb the Frigate Ludwick. Imperial fighters defeated the initial fighters from the Rebel Alliance, who were swiftly replaced by fresh X-wings. Imperial Fighters fought bravely against the Rebel attack, but their Rebel rocket and torpedo attacks succeeded in heavily damaging the Ludwick's hull. As the Ludwick's condition worsened, Assassin-class corvette group Horvus arrived, along with the Victory-class star Destroyer Stalwart and the rest of the convoy. Faced with the power of the Stalwart and its combined task force, Frigate Huntress retreated to the safety of hyperspace.
Guard Space Station NL-1
With the system secured for the arriving convoy, construction finally began. Platform NL-1 was nearing completion when another Rebel assault occurred. Imperial intelligence suggested that patrols be vigilant for more hit-and-run attacks from the hyperdrive capable Rebel fighters, as well as corvette-class starships. Defiant of the Imperial presence, Rebel forces launched their first assault on the platform itself with A-wings, Y-wings, and two Assassin-class corvettes from group Moori. With its shields functioning at only fifty percent, Platform NL-1 was highly vulnerable to the impending Rebel assault. Imperial Gunboats, TIE Bombers, and Interceptors from Frigate Ludwick quickly found themselves engaged in combat against Y-wings, A-wings, and the newly arrived X-wing starfighters. A portion of Assault Gunboat group Tau destroyed Corvettes Moori, leading to the arrival of Shuttle Shakker. Before the attack, Secret Order agents had requested that trusted pilots arrange for the capture of such escape craft, hoping to extract crucial information about Rebel plans in the system. Maarek Stele himself ensured the identification of the Shakker and its subsequent disabling. Transport Soryi launched from NL-1 to capture the Officers found aboard. As Imperial fighters whittled down the remaining Rebel forces, Transports from group Del arrived to attempt another futile torpedo run on the platform. With the capture of Shuttle Shakker and the arrival of the Victory Star Destroyer Stalwart from hyperspace, the destruction of the remaining Rebel forces was swift.
Thrawn inspects NL-1
Nearly completed, Admiral Thrawn was eager to inspect the work of his subordinates on NL-1. Due to the need for repairs and refurbishment, much of Frigate Ludwick's TIE Fighter and Interceptor stores could not be deployed as a fighter screen during Thrawn's inspection; therefore, the Ludwick would rely on heavily armed TIE Bombers to oversee the Vice Admiral's visit. Thrawn and his staff traveled from his command ship to NL-1 aboard Transports Sigma. No sooner had Thrawn begun his journey to NL-1 than another attack composed of Rebel A-wings and X-wings arrived. Imperial pilots moved to intercept as Thrawn's inspection team boarded the platform. Imperial fighters managed to eliminate this low-level assault just as Admiral Thrawn completed his inspection, returning to the Stalwart aboard Transport Omega. Moments after Imperial TIE Bombers moved to escort Thrawn back to the Stalwart, several groups of pirate shuttles arrived to add to the disruption. Thrawn safely arrived aboard his vessel as Imperial fighters suppressed the last of the pirate nuisance.
Wait for relief forces
The Victory Star Destroyer Stalwart remained on station for the final critical steps of the station's construction. System Patrol Craft Ranger arrived shortly after the previous enemy engagement. The Stalwart then departed the system to assist in the arrival of relief for the battle-weary pilots of Frigate Ludwick. In the absence of a Star Destroyer, patrol frequency increased, and pilots aboard the Ludwick anticipated further enemy activity. Hoping to gather additional information, members of the Secret Order tasked pilots to be alert for any craft carrying high-priority targets. Local Rebel forces spared no expense in yet another attempt to eliminate Imperial control of the Pakuuni sector. Assault Transports Thunder soon arrived, accompanied by B-wings, the rebels' more advanced assault craft. Escorting Gunboats, TIE Bombers, and Interceptors moved to intercept, followed by the arrival of a suspicious shuttle. An Imperial Gunboat inspected and disabled this shuttle, Electra, revealing it to be carrying Rebel Advisors. During this event, more Rebel forces arrived aboard Transports Rover, along with A-wing and X-wing fighters. Transport Shark, dispatched to capture Shuttle Electra, succeeded in its mission even amidst the heavy fighting. The Rebel onslaught heavily taxed the abilities of the Imperial pilots and inflicted heavy damage on station NL-1 and patrol craft Ranger. Despite this, Imperial starfighters gained the upper hand against the imposing rebels, just as the Victory Star Destroyer Stalwart arrived with Frigate Gaarni, CR90 Corvette Stallion, and supplies aboard Bulk Freighters Sivaa, to relieve Frigate Ludwick.
Aftermath
Following the final assault on Platform NL-1, Admiral Thrawn's forces oversaw the final repairs resulting from the previous conflict. Thrawn closely monitored the repair operations from his flagship, keeping his subordinates on a tight schedule. With the establishment of NL-1, Vice-Admiral Thrawn moved on to other assignments, while Maarek Stele received yet another transfer to a different vessel and task force.
Behind the scenes
The Battle on the Frontier is Battle 3 of Star Wars: TIE Fighter.
During this campaign, Maarek Stele was promoted to Commander.
"THX 1138" was the name given to a group of type B cargo containers in this campaign. This is one of many instances where LucasArts used this call sign for various Star Wars objects and characters.
For reasons unknown, Platform NL-1 changes from type C to type A in the final mission of the campaign.