B'ink Utrila
B'ink Utrila, a female lethan Twi'lek, distinguished herself within the Jedi Order as both an instructor and a Master. During the tumultuous period of the Clone Wars, she mentored Rennax Omani, a Human Padawan, accompanying her alongside a squad of clone troopers to the desolate moon of Draay 2. Their mission: to secure the ancient Sith artifact known as the Gauntlet of Kressh the Younger, preventing its acquisition by Count Dooku, the leader of the Confederacy of Independent Systems. Despite successfully locating the Gauntlet, Utrila, upon touching it, was overwhelmed by the dark side of the Force and resolved to leave it securely protected on the moon. Subsequently, their Republic forces were ambushed by Mandalorian Death Watch, led by Pre Vizsla. The ensuing conflict resulted in the destruction of the Jedi Temple housing the Gauntlet, a result that brought Utrila a sense of relief, ensuring the artifact's inaccessibility. However, the mission's aftermath led Omani to make the difficult decision to depart from the Jedi Order.
In 19 BBY, Coruscant, the capital of the Galactic Republic, faced an attack orchestrated by General Grievous, aiming to capture Supreme Chancellor Palpatine. Appointed by Master Yoda to provide assistance, Utrila joined forces with Roth-Del Masona, Roron Corobb, Stass Allie, Shaak Ti, and Foul Moudama to transport Palpatine to a fortified bunker. Despite their efforts, Grievous breached the bunker's defenses. Although Utrila and her Jedi comrades fought valiantly to impede Grievous, the droid general proved too powerful, swiftly defeating and killing Masona, Corobb, and Moudama. While Utrila managed to inflict some damage on Grievous, his mastery of four lightsabers simultaneously proved insurmountable, leading to her demise as he struck her through the heart.
Biography
The Gauntlet of Kressh the Younger
B'ink Utrila, a female Twi'lek, held a position of significance within the Jedi Order as a Jedi instructor. By the time the Clone Wars erupted, she had risen to the esteemed rank of Jedi Master. Choosing to wield a pair of lightsabers in combat, she oversaw the training of Rennax Omani, a Human female Padawan. As a Jedi Master, she also held the rank of Jedi General in the Grand Army of the Republic, commanding a squad of clone troopers. In 20 BBY, Utrila, Omani, and their troops were deployed to the moon of Draay 2, located in the Outer Rim Territories. According to a [holocron](/article/holocron-legends], the Jedi Temple on the moon housed a perilous Sith artifact known as the Gauntlet of Kressh the Younger, rumored to grant its wearer invulnerability to physical harm. The Jedi High Council aimed to prevent this artifact from falling into the hands of Count Dooku, the leader of the Confederacy of Independent Systems, tasking Utrila with either retrieving the Gauntlet for safe storage on Coruscant or ensuring its permanent containment.
Upon arriving on the moon, the Jedi were accompanied by clone troopers including Lieutenant "Law," "Cannon," "Glitch," and "Horns." Guided by the instructions within the holocron, the Republic force discovered the planet's Jedi Temple nestled within a valley. Slowly descending towards the temple entrance, Utrila and Omani used the Force to pry it open. Law then activated a lamp droid before leading his squad inside to secure the area, followed by Utrila and her Padawan into a vast hall. Despite the apparent absence of a secret entrance, Utrila urged patience, encouraging her Padawan to use the Force to discern their next course of action.
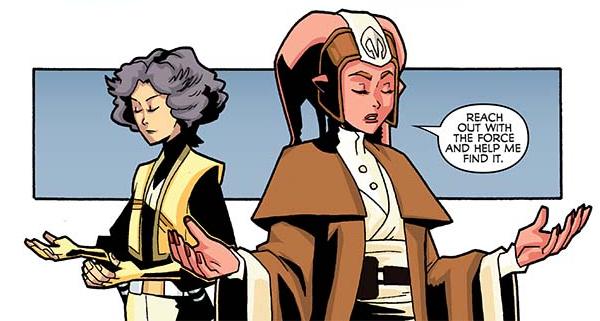
Glitch, one of the clones, believed he possessed Force-sensitive abilities and attempted to join the Jedi in their meditative state. However, he inadvertently activated a |Jedi guard droid disguised as a statue of Lucien Draay, a Jedi Master from millennia prior. The droid attacked, forcing Utrila and Omani to seek cover. Horns attempted to disable the machine with a thermal detonator, but it proved ineffective. Utrila instructed Law to cease fire while she and her apprentice attacked with their lightsabers, yet the droid remained unscathed. Glitch's attempts to use the Force were futile, leading Utrila to realize the droid was designed to defend against Sith, not Jedi. Ordering Law to resume fire to distract the droid, Utrila and Omani used the Force to manipulate a large mechanism at its core, deactivating the temple's defender.
Utrila then tasked Glitch with locating the panel he had activated, marking its position. Reasoning that the guardian droid guarded a secret passage, the Jedi Master examined the area, discovering a wall panel with numerous small holes. Familiar with such devices, Utrila explained that inserting a lightsaber blade into the correct hole would open the passage, while any other hole would trigger the temple's collapse. Without hesitation, the Twi'lek activated one of her lightsabers and successfully opened the chamber. Leading Law and the clones, the Jedi began exploring, with Utrila advising Omani to use the Force to detect future dangers. Frustrated by her Padawan's uncertainty, the Jedi Master explained that the Force flowed through all living beings, allowing them to sense echoes of the past. Utrila scolded her Padawan for forgetting basic teachings from her days as a Jedi Initiate.
The Jedi then encountered a carving depicting Lucien Draay battling Sith Acolyte Haazen, who wielded the Gauntlet of Kressh the Younger. Pausing to study the carving to locate the Gauntlet, Utrila instructed Glitch to rejoin Law and the other clones, who had ventured deeper into the chamber. The Jedi soon found the clones battling blaster-resistant sarls in a chamber containing the Gauntlet. Ordering Omani to assist the troops, Utrila decided to retrieve the Gauntlet herself, only to discover that the creatures were also lightsaber-resistant. Utrila, realizing the sarls had become invulnerable due to prolonged exposure to the Gauntlet, used the Force to push them away.
The Twi'lek Jedi Master leaped towards the Gauntlet of Kressh the Younger, but upon contact, she was overwhelmed by the dark side of the Force. Horrified, she ordered an immediate retreat, instructing them to clear the chamber as the sarls returned to guard the Gauntlet. When Law questioned how they would retrieve the artifact, Utrila, explaining her experience, decided it was too dangerous to remove. Satisfied that they had confirmed its location, she resolved to prevent it from falling into Count Dooku's hands. Disturbed by her encounter with the Gauntlet, Utrila decided to camp in the temple overnight, planning to contact the Jedi High Council for further instructions in the morning.
Death Watch interferes
Omani secured the temple by removing her master's lightsaber from the wall device and volunteered for first watch with Glitch, allowing Utrila to rest. Utrila slept in a tent within the temple, but her rest was brief. Glitch burst into the temple with Omani's lightsaber, urging everyone to wake up. An explosion sent the clone trooper flying, followed by Mandalorian Death Watch commandos led by Pre Vizsla, who had captured Omani. Vizsla, having followed the Jedi to retrieve the Gauntlet, demanded the Republic force drop their weapons or Omani would be harmed. Utrila and the clones complied. The Mandalorian then demanded Utrila lead him to the Gauntlet, but was distracted by the markings on trooper Horns' helmet, which indicated he was also part of Death Watch. Vizsla challenged Horns to join Death Watch, ordering him to kill Utrila. The clone refused, prompting the Mandalorian to raise a blaster to Horns' head.
At that moment, Glitch recovered, wielding Omani's lightsaber, and challenged the Mandalorians. Vizsla, amused, drew his own weapon, the darksaber, and dueled with Glitch. During the fight, Glitch stepped on the panel activating the temple's guardian droid. As the droid rampaged, Utrila freed Omani from her restraints. Glitch, still battling Vizsla, plunged Omani's lightsaber into the wrong hole in the wall device, causing the temple to collapse. As Utrila retrieved her Padawan's lightsaber with the Force, she urged Omani to evacuate the temple, leaving Glitch behind. The Mandalorians retreated using their jetpacks, firing on the Republic forces, but the Jedi defended themselves with their lightsabers. The clones and Jedi reached safety, and Horns shot down one of the Mandalorians, forcing Death Watch to retreat.
Utrila and her troops mourned Glitch before leaving Draay 2. Before returning to Coruscant, Omani announced her intention to leave the Jedi Order and return to her homeworld, feeling unable to continue as a Jedi after her experiences on Draay 2 and Glitch's sacrifice. Utrila accepted her decision, assuring her that her parents would be proud. Law informed the Jedi Master that she was expected on Coruscant. Before departing, Omani wondered about the fate of the Gauntlet of Kressh the Younger and whether anyone would be assigned to guard it. Utrila was confident that no such measures were needed, unaware that Glitch had survived the temple's destruction and taken the Gauntlet. The clone trooper, alone on Draay 2, attached the Gauntlet to a heavy rock and threw it into a river.
Another victim of Grievous

In 19 BBY, the Confederacy forces, led by General Grievous, attacked the Republic's capital of Coruscant. Supreme Chancellor Palpatine was Grievous's primary target. Jedi Masters Shaak Ti and Stass Allie had managed to extract Palpatine from his office in the 500 Republica with the assistance of Masters Mace Windu and Kit Fisto, but further assistance was required to move the Chancellor to his bunker deep within the planet. Master Yoda dispatched Utrila and her fellow Jedi Roth-Del Masona, Roron Corobb, and Foul Moudama in a Low Altitude Assault Transport to the Sah'c Canyon to rendezvous with Palpatine and the other masters. As Windu and Fisto left to pursue Grievous, who was heading towards the Senate District, the six remaining Jedi, the Chancellor, and his guards departed in the LAAT on a southerly heading, descending deeper into the canyon towards the bunker complex.
Upon reaching the complex, Ti instructed Utrila, Masona, Corobb, and Moudama to assist Palpatine's personal Red Guard unit in escorting the Supreme Chancellor to a waiting landspeeder, advising them that she and Allie would follow after confirming their arrival with the Jedi Temple. The four Jedi, the Chancellor, and his entourage entered a tunnel towards the bunker in the speeder, eventually reaching sanctuary within the heart of the complex. To Utrila and the other Jedi's surprise, the secure door to the bunker opened soon after, revealing Grievous and his IG-100 MagnaGuard bodyguard unit. The Jedi drew their lightsabers as the troops guarding the Chancellor opened fire on the new arrivals with little effect. Grievous activated two of his lightsabers and engaged Utrila and the other Jedi, while the MagnaGuards set about cutting through the troops and Red Guards in the room to retrieve Palpatine.
Masona was quickly decapitated by the droid general, who then killed Corobb. A brief lull in the fighting allowed Utrila and Moudama to assess the situation before renewing their attack on Grievous together. The droid general responded by using his in-built repulsorlifts to levitate off the ground and wield two more lightsabers with his feet. Grievous swiftly mutilated and felled Moudama, leaving Utrila to battle the general alone. She managed to strike the general's droid body several times during the duel, pressing her attack to try and remove one of Grievous's limbs. The droid general responded by stabbing Utrila in the heart, killing her instantly. Grievous successfully took Palpatine offworld and held him aboard his flagship, the Providence-class carrier/destroyer Invisible Hand, before the Supreme Chancellor was eventually rescued by the Jedi Obi-Wan Kenobi and Anakin Skywalker.
Personality and traits
As a Jedi Master, B'ink Utrila demonstrated a strong reliance on the Force, allowing it to inform her decisions and guide her path when exploring the Jedi Temple on Draay 2. She firmly believed that the Force permeated all living beings and that it was unnatural for a Jedi to use the Force for aggression, a trait she associated with the Sith. She consistently used real-world scenarios to instruct her Jedi Padawan, Rennax Omani, but was disappointed when the young Human forgot fundamental teachings from her early days at the Temple. Nevertheless, she appreciated and was proud of her apprentice's efforts, but respected Omani's decision to leave the Jedi Order after their encounter with the Death Watch and the Gauntlet of Kressh the Younger on Draay 2. Utrila herself struggled with the Gauntlet upon touching it, and was deeply disturbed by the Sith artifact's power, refusing to ever touch it again. The Jedi Master recognized the Gauntlet's power and believed that the Force would prevent it from falling into the wrong hands. While resolute when facing the infamous Jedi killer General Grievous, Utrila showed palpable fear when confronted with the prospect of the droid general wielding four lightsaber blades against her single weapon.
Appearance and attire
Utrila, a red-skinned lethan Twi'lek, wore the plain robes typical of a Jedi Master, along with a simple headpiece.
Powers and abilities
B'ink Utrila's mastery of the Force enabled her to become a Jedi instructor within the Jedi Order. She could use telekinesis to open large doors, manipulate devices like those in the Draay 2 temple's guardian droid, and summon weapons such as lightsabers to her hands from a distance. She wielded two lightsabers, although she could use just one in combat if necessary, and was wielding a single blade as of 19 BBY. Utrila was also skilled at deflecting blaster bolts with her lightsaber. Utrila also relied on the Force to sense danger and detect the movements of those who had walked the same paths as her in the past. She successfully activated mechanisms in the Draay 2 temple to complete her mission. Utrila could also detect the dark side inherent in objects like the Gauntlet of Kressh the Younger. She was also proficient in lightsaber combat, landing blows on General Grievous on Coruscant while defending Supreme Chancellor Palpatine. Utrila lasted longer in the duel than any other Jedi involved before being killed by Grievous's blades.
Behind the scenes
B'ink Utrila first appeared as an unnamed female Twi'lek Jedi in James Luceno's novel Labyrinth of Evil (2005), and was later given a name in the article "Unknown Soldier: The Story of General Grievous," written by Abel G. Peña for Star Wars Insider 86 (2006). Holocron continuity database official Leland Chee suggested to Peña that the character be consolidated with a depiction of a lethan Twi'lek Jedi instructor in the Power of the Jedi Sourcebook (2002), and provided the character's name. Utrila later appeared as a major character in Justin Aclin's digest comic The Clone Wars: Defenders of the Lost Temple (2013).
Labythinth of Evil's depiction of Palpatine's abduction by Grievous conflicts with that shown in "Chapter 24" and "25" of the television series Star Wars: Clone Wars. In Clone Wars, Palpatine is defended in the bunker by Roron Corobb, Foul Moudama, and Shaak Ti—Utrila, Masona, and Allie are not present.