Escape from Kamino (1 BBY)
In the galactic standard year of 1 BBY, a significant military engagement transpired on the aquatic planet of Kamino. Following the demise of Galen Marek, previously an understudy to the Galactic Empire's Sith Lord Darth Vader, which occurred on the original Death Star space station, Vader embarked on a mission to replicate his fallen apprentice. He gathered Marek's remains and extracted genetic material to produce a group of replicas, all intended to serve as replacements. The majority of these clones suffered from physical and mental instability, but gradual advancements were achieved, leading to the creation of a newer generation of increasingly balanced clones. Vader then began the process of instructing these clones, although many of them eventually succumbed to the same mental deterioration that had plagued their predecessors. Whenever a clone went mad, Vader would simply proceed to train the next one. One particular clone, designated Starkiller, was merely the latest in a long line of failures, despite being considered one of the most promising subjects.
During a simulated combat scenario involving several Sith Training Droids, Starkiller demonstrated an inability to defeat one of the automatons when it manifested the likeness of Juno Eclipse, Marek's former love interest. This failure to overcome the ingrained memories of Starkiller's genetic source marked him as a disappointment, prompting Vader to prepare for the clone's termination. However, Starkiller resisted and retaliated against Vader with a surge of Force-based electricity, capitalizing on the Sith Lord's momentary lapse in focus to break free from the training facility. Navigating through the Imperial military force—which included riot control troopers, rocket troopers, carbonite-encased war droids, and others—stationed within Timira City, the location of his cloning, Starkiller fought his way towards a designated landing zone. Along his path, he managed to gain assistance from certain stormtroopers through the use of mind control techniques. Upon reaching the landing zone, Starkiller made his escape from Vader by commandeering the Sith Lord's personal spacecraft, successfully fleeing the planet.
Background
In the year 2 BBY, Darth Vader's original student, Galen Marek, had been sent on a mission to establish the Rebel Alliance as part of an intricate plan to divert the attention of Emperor Palpatine of the Galactic Empire. This diversion was meant to allow Vader and Marek to surprise and eliminate the Emperor. Although Marek accomplished his objective, Vader betrayed him, revealing that Palpatine had conceived the entire plan to gather all of his adversaries in one location for their swift destruction, and that Marek's apprenticeship under Vader had been a pretense. The Sith Lord had no intention of betraying his superior, and Marek was left for deceased. Simultaneously, the Rebel leaders were captured and transported to the original Death Star space station for Palpatine's personal execution. However, Marek refused to accept this outcome and traveled to the Death Star, intending to save the Rebels. After defeating Vader in a fierce lightsaber battle, Marek was presented with the choice of killing the Sith Lord and taking his place as Palpatine's apprentice, but he declined and attacked Palpatine. Marek perished in the process, but not before the Rebel leaders managed to escape aboard his vessel.
Seeking to replicate Marek in 1 BBY, Vader traveled to the cloning facilities located on the aquatic planet of Kamino and oversaw the creation of a group of clones based on his deceased apprentice. The process was highly unpredictable, marked by numerous setbacks and failures due to the inherent challenges of cloning individuals with Force sensitivity. Many of the initial subjects were deformed, and even the later, more stable clones were still prone to mental instability and psychosis within a matter of months. As the subjects failed, Vader simply discarded them and moved on to training the next clone. Eventually, Vader began training another clone identified as "Starkiller," Galen Marek's designated code name.
The Breakout
Starkiller's Training Exercise
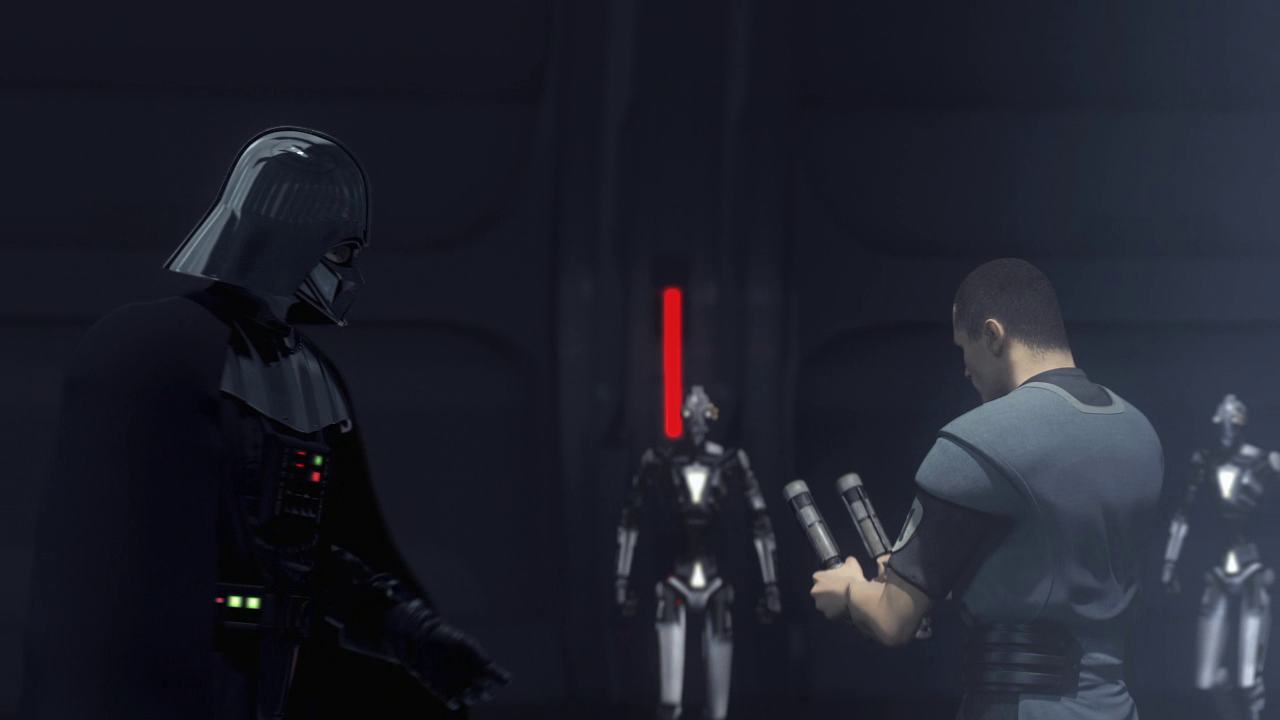
Upon Vader's arrival in Timira City on Kamino to evaluate the Starkiller clone, the subject had been confined to an isolation chamber for approximately thirteen days, relying on the Force to sustain his starved and dehydrated body. Vader was impressed by the clone's resilience, releasing him from the chamber and informing him that General Rahm Kota, Galen Marek's Jedi mentor, had been captured on the planet Cato Neimoidia. Vader stated that upon completion of the clone's training, he would be dispatched to eliminate the Jedi. Vader then inquired about Starkiller's recurring visions and memory fragments. While Starkiller elaborated on them, Vader dismissed them as echoes of a dead man's experiences, a mere byproduct of the cloning process that would eventually dissipate. However, Vader also emphasized that Starkiller would be rendered useless if these visions persisted. Vader activated a series of Sith Training Droids and provided Starkiller with a pair of lightsabers, initiating the training session.
Starkiller performed admirably in the training exercise, effortlessly dismantling the holodroids until only one remained. As he prepared to strike down the final droid, Starkiller hesitated upon realizing that it had assumed the form of Juno Eclipse, Galen Marek's former lover. Despite Vader's insistence, Starkiller was unable to suppress his innate affection for her, rendering him incapable of attacking the droid. Vader destroyed the droid himself, declaring that Starkiller would suffer the same fate as the other failed clones. Before Vader could act on his threat, Starkiller experienced a sudden vision of the original Starkiller's betrayal at Vader's hands. Starkiller opted to resist Vader's impending execution, turning against the Sith Lord and unleashing a torrent of Force lightning. Vader was momentarily staggered as his cybernetic enhancements malfunctioned under the assault, allowing Starkiller to exploit the opportunity to breach the wall of the training room and escape into the torrential rainstorms of Kamino.
Flight into Timira City
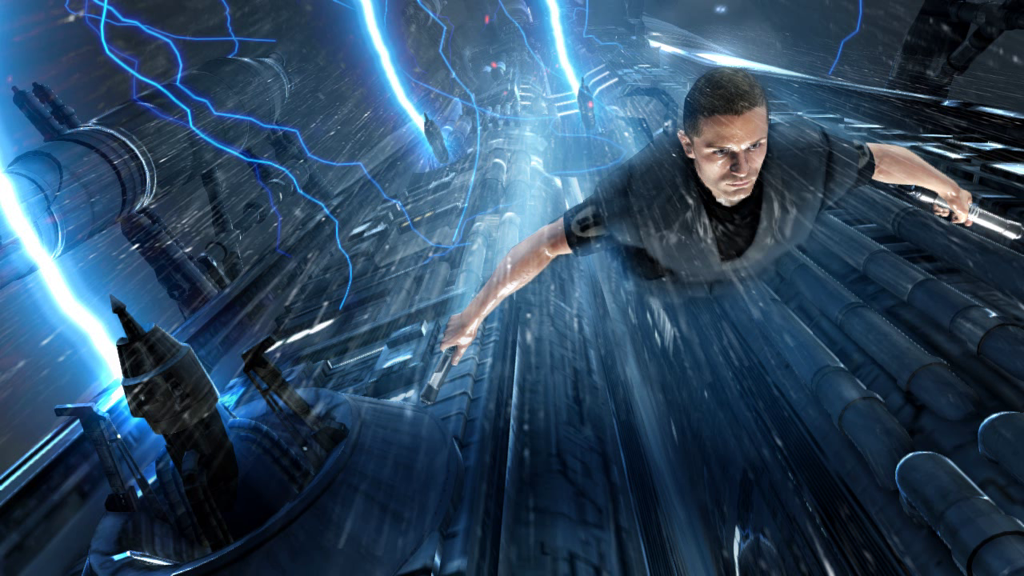
Starkiller's training facility was located at the summit of one of Timira City's spires, prompting Starkiller to plunge into the open atmosphere. As he descended the tower's side, he employed his formidable telekinetic abilities to clear a path, demolishing exterior structures and obliterating a squadron of TIE fighters that attempted to intercept him. After crashing through a large glass dome at the spire's base, Starkiller unleashed a powerful Force wave upon impact, eliminating the stormtroopers within the chamber. He fought his way onto the city's outer ramparts, swiftly dispatching any soldiers in his path. The riot control troopers who joined the conflict presented a minor challenge to Starkiller, as their electrostaffs could deflect his lightsaber strikes, but they were ultimately no match for his Force capabilities.
After battling along the ramparts, Starkiller managed to re-enter the city, making his way to one of the smaller cloning facilities. Continuing through the laboratories, he eventually reached an observation deck overlooking the Timira City parade grounds. Starkiller suddenly experienced a brief vision demonstrating the use of a Force mind trick, and he compelled the lone soldier patrolling the area to commit suicide by leaping through the gallery window to his death. The sudden commotion alerted the gunners operating the heavy laser emplacements above the parade ground, who opened fire on the gallery, forcing Starkiller to retreat to the grounds. Fighting through the parade grounds, he reached one of the main entrances, where he was confronted by a carbonite war droid. Starkiller used telekinesis to tear off the automaton's heavy shield before destroying the droid. Starkiller continued to use his lightsabers and the Force to engage his enemies—including stormtroopers, Imperial rocket troopers, riot control troopers, and others—he faced along the way. He also employed the mind trick power to get enemy forces to assist him by either fighting the other soldiers or by killing themselves. He caused severe structural damage along the way as well, such as at Barracks D4.
Starkiller stumbled upon one of the main landing platforms, where he repelled a wave of stormtroopers delivered by Imperial gunships. Navigating a series of catwalks above the landing platform, Starkiller eliminated all of the soldiers in his path before re-entering the facility. As he traveled down a windowed corridor along the edge of one of the domes, he was harassed by another gunship, which destroyed the corridor behind him as he fled. Exiting the dome, he saw Darth Vader's TIE Advanced x1 docked on the adjacent landing platform. Destroying the communications tower in front of him, Starkiller used it as a bridge to reach the platform.
Once on the platform, Starkiller drew heavily on the Force as he attacked the trio of All Terrain Scout Transports guarding Vader's vessel, falling into Force fury. He made short work of the walkers and cut loose against the stormtrooper reinforcements who arrived. The landing platform was quickly cleared, and Starkiller started toward Vader's starfighter. It was then that Vader himself arrived, telekinetically blasting open the double doors into the cloning facility as he marched out into the rain. Starkiller increased his pace and quickly boarded the fighter, taking off immediately. As Starkiller attempted to fly away, Vader grasped the ship with the Force, seeking to halt the clone's escape. After a brief contest between Vader's power and the ship's engines, Starkiller managed to flee in the fighter. Following Starkiller's escape, Vader hired the bounty hunter Boba Fett to find and capture Juno Eclipse and bring her back to Kamino. Vader planned on using Eclipse as bait to draw Starkiller back to Kamino, where Vader would be waiting.
Aftermath
In response to the breakout, security at the facility was increased, affecting the development of Subject 1157, another clone of Marek. Following the information provided by Vader, Starkiller traveled to Cato Neimoidia, intent on rescuing Rahm Kota in order to discern the whereabouts of Juno Eclipse. Starkiller successfully completed his mission, although Kota did not know the location of Eclipse. Starkiller then traveled to the planet Dagobah, where he found Jedi Master–in–exile Yoda. After having a vision about Eclipse and speaking with Yoda, Starkiller left for the Itani Nebula to find Eclipse. However, by the time he arrived there, Eclipse had been captured by Boba Fett and taken back to Kamino. Starkiller went back to Kamino to rescue her, and he there fought against Vader, defeating the Dark Lord and finally reuniting with Eclipse. Vader was taken hostage by the Rebel Alliance, and they took him away to be put on trial.
Behind the Scenes
The escape from Kamino was initially referenced on the original version of the promotional website for the 2010 LucasArts video game Star Wars: The Force Unleashed II. The original website presented the perspective of Subject 1157, another clone of Marek, from within his cloning tank. Viewers could access audio logs detailing 1157's development, one of which mentioned the battle. The escape is also mentioned in the current version of the website, which changed in format after the game was released. The battle was first depicted in Sean Williams' 2010 novelization of Star Wars: The Force Unleashed II. The escape from Kamino served as the introductory level in the video game.
The Flash-based game Escape from Kamino also recreated the level. The game was found on the official Facebook page for Star Wars: The Force Unleashed II.
While the Wii, Nintendo DS, and Xbox 360/PlayStation 3 versions of the game differ from each other, the storyline remains basically the same. This article follows the Xbox 360/PlayStation 3 version, since it remains closer to the novel, which is considered the higher level of canonicity. The story presented in the novel cuts down the battle considerably; Starkiller jumps out of the training facility directly to the landing platform that holds Vader's starfighter. He uses the Force to knock down the three AT-STs before boarding the fighter. Also, Vader uses the Force to grip the fighter, although Starkiller manages to break free.
The mission in the Wii version follows a different path through the facility, although the introduction is the same. Starkiller lands outside after escaping Vader by sliding down the side of the facility before fighting through Imperial troops. In one part of the facility, he uses Force lightning on a fan to stop its blades and safely pass through. In another part, he fights Vader, who Force chokes him. An explosion then knocks Starkiller down a turbolift shaft and outside the facility. After fighting through more troops, he finds himself in the training grounds, which are protected by pop-up turrets. Re-entering the facility, Starkiller fights more troops and faces Vader again. They fight, and Starkiller shoves him away to escape on a turbolift, which takes him to a corridor filled with troops. Past the corridor are two AT-STs, one of which he stabs with his lightsaber and the other he knocks aside after Force-gripping a tower. He then throws the tower at Vader, allowing him to escape aboard the TIE fighter.
The level for the Nintendo DS version is played in 2D mode, rather than in the 3D mode of the other versions of the game. As with the Wii version, the overall story remains largely the same, in that Starkiller fights his way through Imperial troops on Kamino. At certain parts, he must be careful not to touch a green-colored substance that could harm him. Starkiller also uses his lightsabers to destroy several fans along his way so that he may go through those sections of the level. After fighting through Imperial forces inside and outside buildings, Starkiller comes to a landing pad where Vader's TIE fighter is sitting. Although Vader comes out to confront Starkiller, the latter manages to escape in the starfighter.