Rescue of Rahm Kota
A rescue operation was launched to liberate Rahm Kota, the Rebel Alliance Jedi General, from the clutches of the Galactic Empire in 1 BBY, during the Galactic Civil War's initial period. Kota's capture occurred after a failed assault on the planet of Cato Neimoidia. He was subsequently transported to the city of Tarko-se and confined within the Tarko-se Arena, the local gladiatorial combat venue, where his execution was scheduled. As Kota faced a relentless barrage of creatures and gladiators, Starkiller, a renegade clone derived from the deceased Jedi Galen Marek, fled Darth Vader, the Sith Lord, on the ocean planet of Kamino. Unbeknownst to Kota, Vader had secretly initiated a program aimed at developing an enhanced version of Marek, his former Sith apprentice. The goal was to create a perfect clone, one that embodied all of Marek's strengths while lacking his weaknesses. However, the cloning process proved flawed, resulting in numerous unsuccessful attempts, including the creation of Starkiller.
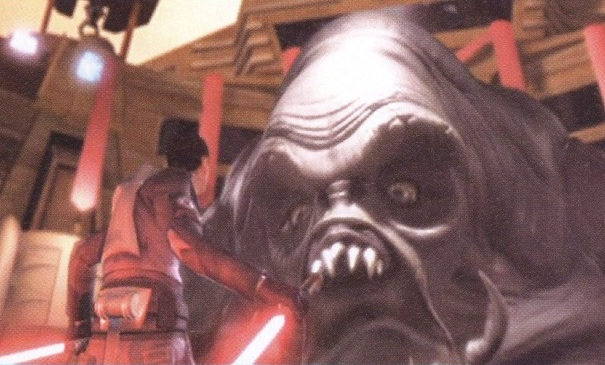
Driven by information unintentionally revealed by Vader, Starkiller journeyed to Cato Neimoidia with the objective of rescuing Kota. However, his primary motivation was to locate Captain Juno Eclipse, the woman who had captured the heart of his genetic predecessor. Starkiller battled against the forces of Baron Merillion Tarko as he advanced towards the arena, where he discovered a weakened Kota. In a desperate move, Tarko unleashed a monstrous creature known as the Gorog upon the two Force-wielders. The Gorog broke free from its restraints and attempted to eliminate Starkiller. Amidst the ensuing chaos, Tarko met his demise as he was devoured by the monster, leading to the destruction of both the arena and the city of Tarko-se. Starkiller and Kota were extracted from the collapsing wreckage by the Rogue Shadow, a starship operating on autopilot.
Background

During the initial stages of the Galactic Civil War, approximately around 1 BBY, Rahm Kota, the Rebel Alliance Jedi General, frequently acted independently of the Rebels, conducting military incursions against the Galactic Empire as if commanding his own private army instead of operating within a larger organizational framework. During one such raid on the planet of Cato Neimoidia, Kota's squad suffered fatalities, resulting in his capture. Merillion Tarko, the Imperial Governor of the local sector and also a Baron, devised a plan to execute Kota by forcing him to fight in the Tarko-se Arena, a gladiatorial combat arena situated within the bridge city of Tarko-se. However, Kota demonstrated remarkable resilience, enduring for several days as he battled against the numerous monsters and gladiators dispatched to eliminate him.
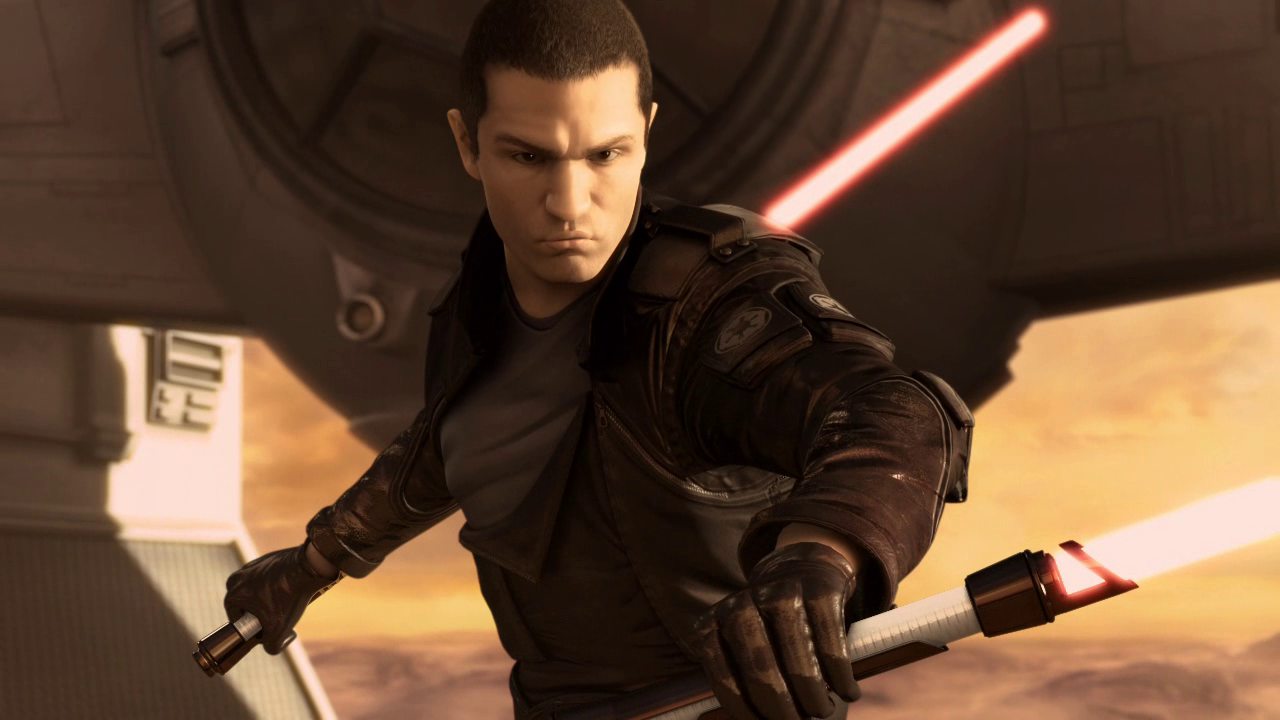
Concurrently, on the ocean world of Kamino, the Sith Lord Darth Vader was secretly undertaking a project to replicate his deceased apprentice, Galen Marek—who was previously known as "Starkiller" before his transformation into a Jedi. The challenges inherent in cloning individuals with Force-sensitivity led to numerous failures, with many clones exhibiting severe deformities or succumbing to clone madness. During a training session, Vader informed Starkiller, one of Marek's clones, about Kota's capture on Cato Neimoidia and instructed him to assassinate Kota upon completion of his training. However, the clone ultimately failed Vader's evaluations, proving unable to overcome the memory imprints inherited from the original Marek. Before Vader could carry out his execution, Starkiller retaliated against the Sith Lord and escaped from the facility. Starkiller commandeered Darth Vader's TIE Advanced x1 after fighting his way through the local Imperial garrison and fleeing the planet. Utilizing the information provided by Vader, Starkiller traveled to Cato Neimoidia to rescue Kota, hoping that the Jedi General could guide him to Captain Juno Eclipse, who had been Marek's lover during his lifetime.
The rescue operation
Starkiller's advent

Due to the unchanged transponder signal on the stolen TIE fighter, Starkiller was misidentified as Darth Vader and directed to a high-level landing platform on Cato Neimoidia. He was greeted with a full TIE fighter escort, a stormtrooper honor guard, and Tarko himself. When Starkiller disembarked and demanded Kota's location, Tarko grew suspicious and challenged Starkiller to provide the local Imperial security codes. Starkiller ignited his lightsabers, prompting Tarko to order the troopers to attack before retreating. Starkiller swiftly dispatched the stormtroopers, but Tarko managed to escape. After destroying a bipedal All Terrain Missile Platform walker and eliminating two Imperial Sith Acolytes guarding the entrance to the landing platform turbolifts, Starkiller descended into the suspended city of Tarko-se.
The clone Jedi initially navigated the streets, enduring taunts from Tarko via a loudspeaker system. However, Imperial resistance—including scout troopers, riot stormtrooper, and jumptroopers—forced him to ascend to the rooftop ledges to expedite his progress. As Starkiller continued his advance, he employed mind tricks to sway enemies to his side or induce them to self-destruct. However, he was soon forced down by a sudden assault from a Nemesis-class gunship, leading him to seek refuge within the Infinite Nebstar Casino. As the majority of patrons scattered, Imperial forces swarmed in. After defeating the Imperial forces in several of the casino's rooms, Starkiller descended to the lower levels via turbolift shafts, where he encountered further Imperial resistance before exiting the casino.
Securing a passenger tram bound for the western arch of Tarko-se, Starkiller leaped onto the vehicle's roof and used it for transportation. However, the tram came under attack from Imperial air forces, including several TIE fighters and the Nemesis-class gunship. Despite Starkiller's efforts to redirect the Nemesis's concussion missiles back to their source, the tram sustained significant damage. Nevertheless, Starkiller managed to destroy the gunship. Due to the extensive damage, Starkiller was compelled to jump the remaining distance to safety. Starkiller then fought his way through the remaining Imperial forces and destroyed a second Nemesis-class gunship that had joined the fray.
The Gorog confrontation
Upon entering the Tarko-se Arena floor, Starkiller approached a surprised Kota. Despite his exhaustion and injuries from days of combat in the arena, Kota resolved to settle his score with Tarko. Desperate to defeat the resilient Starkiller, Tarko ordered his Neimoidian aide to unleash the massive arena beast known as the Gorog, one of the largest creatures ever witnessed in a gladiatorial arena. The creature devoured a bull rancor released into the arena before emerging from its holding pit. Kota departed to pursue Tarko, leaving Starkiller to contend with the beast.
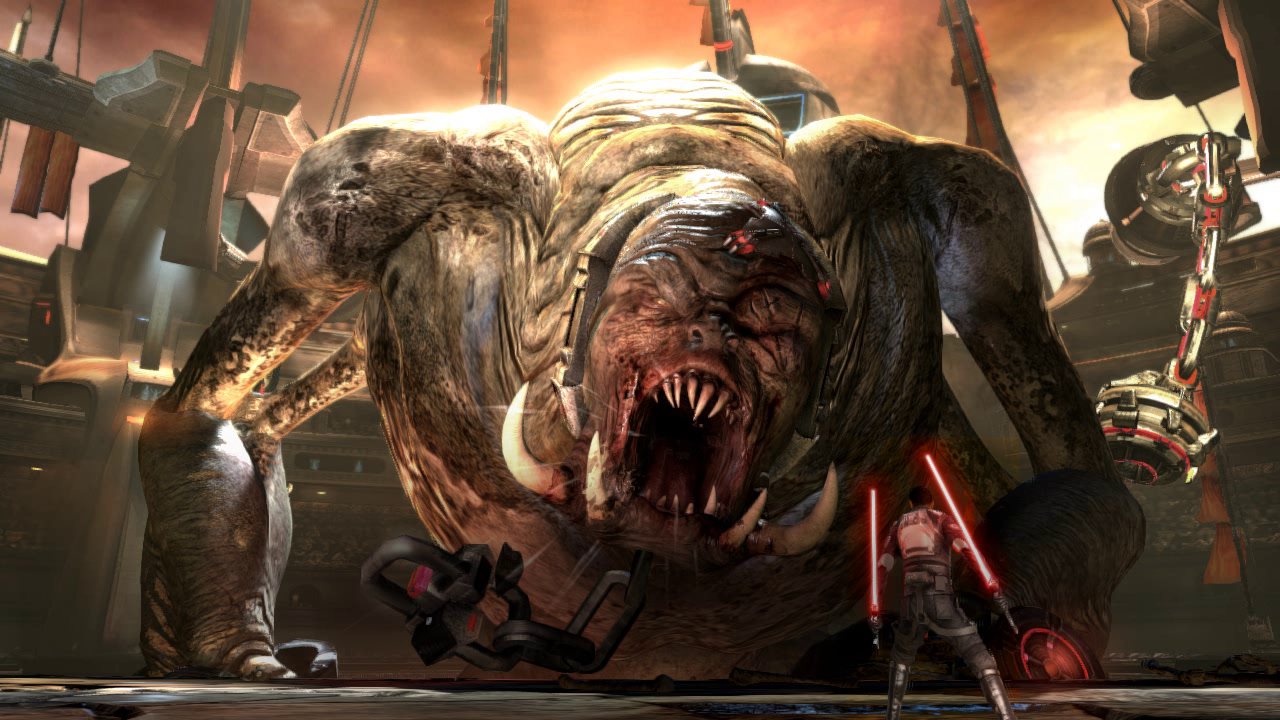
Starkiller initially harassed the beast with Force lightning and telekinetic attacks aimed at its feet, but these had minimal effect. Following Kota's tactical advice, Starkiller utilized the arena's restraint systems to ensnare the Gorog's arms and leaped onto the creature's head. Employing a combination of lightsaber strikes and concentrated blasts of Force lightning, Starkiller managed to injure the beast. In its agony, the Gorog broke free from its restraints and swatted Starkiller off its head, sending him crashing into the arena's upper supports. The Gorog aggressively pursued, and Starkiller maneuvered the creature into destroying the beams and cables supporting the Tarko-se Arena, attempting to bring the entire suspended city down. He succeeded, and the structure fractured before plummeting from the Tarko-se city arch. Anticipating the Gorog's fall with the arena, Starkiller headed directly for Tarko's executive box, which possessed its own independent support beam. Rejoining Kota, the two Force-wielders quickly overcame the Baron's guards before confronting him.
Before Starkiller and Kota could capture or kill Tarko, the Gorog seized the box in an attempt to avoid falling, causing it to tilt and deposit Tarko into its mouth. The Gorog reached in and grabbed Kota before losing its grip and plummeting. Starkiller leaped after the Gorog, using the Force to enhance his velocity and evade falling debris. He propelled himself onto the Gorog's back, where he unleashed a concentrated blast of Force lightning into its torso, stopping one of its hearts. The Gorog went limp and released Kota. As Kota and Starkiller fell, the Jedi General activated a remote transponder concealed on his person, summoning the Rogue Shadow, which was operating on autopilot. The ship swooped beneath Starkiller and Kota, enabling the pair to escape safely.
Aftermath
Shortly thereafter, the bounty hunter Boba Fett—who had accepted a bounty placed on Starkiller's head by Vader—arrived on Cato Neimoidia with his partner, Xasha. The two entered the ruins of Tarko-se, where they discovered the Gorog still alive. Despite its severe injuries, the creature attacked Fett. The bounty hunter fired a back-mounted rocket at the Gorog's second heart and used his jetpack to fly through the wound in the Gorog's torso, ultimately killing it. The encounter with the beast dissuaded Xasha from pursuing their prey any further, and she parted ways with Fett, who continued his assignment.
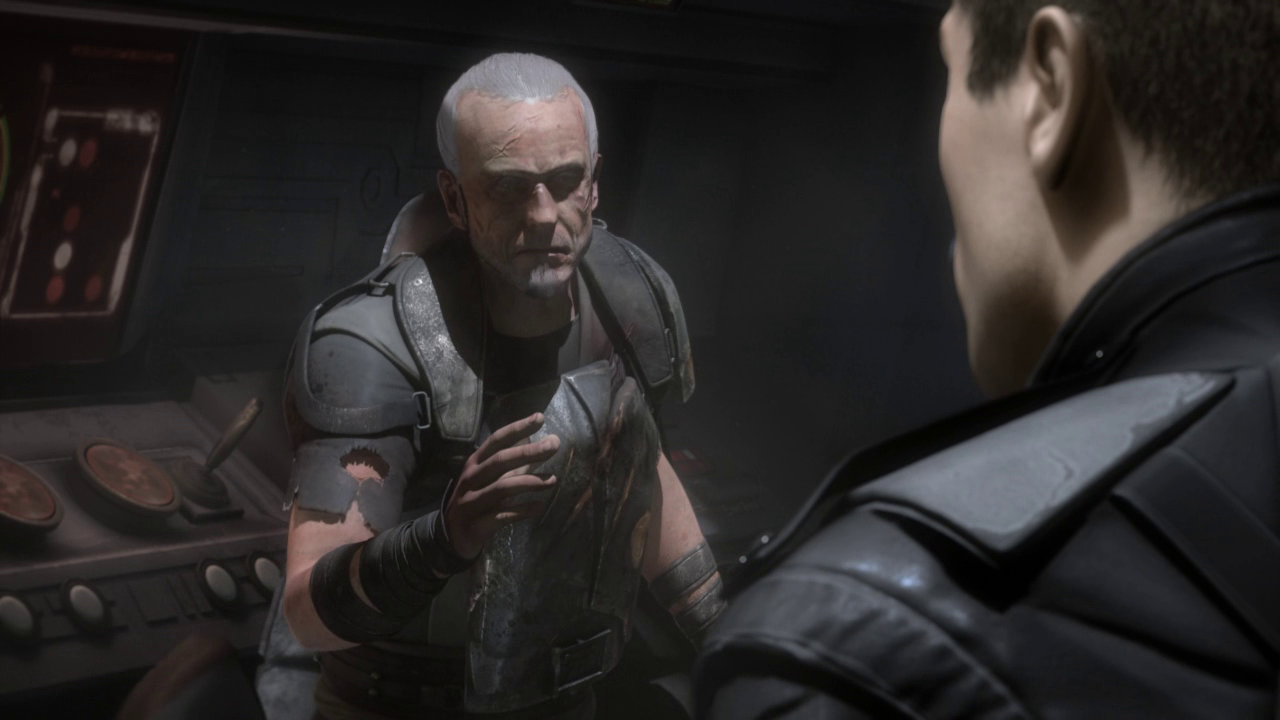
Meanwhile, unaware that Marek's former ship, the Rogue Shadow, was flying on autopilot, Starkiller rushed into the cockpit, expecting to find Juno Eclipse. Kota revealed that he did not know her whereabouts, as the Rebel Fleet had been scattered, but he agreed to provide the rendezvous coordinates with the Rebel Fleet in the Athega system. Upon their arrival, they were ambushed by an Imperial fleet and forced to flee. Kota attempted to persuade Starkiller to join the Rebellion, hoping to utilize Starkiller's powers in a large-scale counterattack against the Empire. However, Starkiller refused to comply with Kota's plan, driven solely by his desire to locate Eclipse. Kota dismissed Starkiller's claims of being a clone, asserting that cloning Force-sensitives was impossible, and attempted to extract information about the Kamino cloning facilities.
Despite Kota's assertions, Starkiller remained unconvinced that he was the true Starkiller, Galen Marek. However, he remained committed to finding Eclipse and requested a quiet place to meditate on his situation. Realizing that he could not convince or force Starkiller to change his mind, Kota relinquished the Rogue Shadow to Starkiller, believing that the ship rightfully belonged to him. Kota then demanded to be dropped off at the nearest spaceport before Starkiller continued his personal quest.
Starkiller dropped Kota off on the planet Malastare before pursuing a clue inadvertently provided by Kota, which led him to the planet Dagobah. Traversing the swamps of the world, Starkiller encountered Yoda, a Jedi Master in exile, who was guarding the planet's Dark Side Cave. Yoda convinced Starkiller to enter the cave, where he experienced a vision of Eclipse being attacked and wounded on the bridge of her warship, the Salvation. Determined to prevent this outcome, Starkiller retrieved Kota on Malastare, and the two rendezvoused with the Rebel Fleet near the Itani Nebula. However, they arrived too late; Eclipse had been captured by Boba Fett, who had been hired by Vader to bring her to Kamino in order to lure Starkiller there.
Behind the curtain
The rescue of Rahm Kota was first depicted in author Sean Williams's novelization of the Star Wars: The Force Unleashed II video game; the novel was released on October 5, 2010. The opportunity to play through the mission was presented in one of the game's levels, which was released on October 26, 2010. The Wii version of the game adheres to the novel's core storyline but diverges from the Xbox 360 and PlayStation 3 versions in terms of city layout and gameplay. As the Xbox 360 and PlayStation 3 versions remain more faithful to the book than the Wii version, this article is based on their versions. The Cato Neimoidia segment of the Wii version unfolds over two missions, City of Bridges and Baron Tarko's Palace. The introduction to the first mission mirrors that of the Xbox 360 and PlayStation 3 versions. The scene from the novel differs slightly from the one in the game, with adjustments to the dialogue and Starkiller's arrival, where he encounters Kota facing a stormtrooper instead of gladiators.
Following the introduction, Starkiller arrives and battles through Tarko's initial line of stormtroopers, led by a stormtrooper commander. Imperial riot stormtroopers then arrive. After dispatching the Imperials, Starkiller boards the elevator to ascend to the next level, where he faces more stormtroopers. Starkiller pursues the Baron, who escapes across a retractable bridge. Starkiller uses the Force to re-extend the bridge, and then fights through the next bridge. However, the Baron escapes onto a passenger tram. The nearby door opens into Tarko-se and Starkiller is met by riot stormtroopers. Starkiller throws his lightsabers at a panel on the far wall, which unlocks it and drops the door, turning it into a platform. Starkiller gets on it and then uses saber throw again on the next platform, which he jumps onto to gain access to the far platform. At that point, Starkiller is ambushed by jumptroopers. After defeating them, Starkiller Force jumps across the next platforms, and uses the Force to extend another bridge.
Once in the city, Starkiller fights through more stormtroopers and reaches a bridge which is protected by the city's defense turrets. The turrets destroy the bridge while Starkiller dashes across. In the next room, Starkiller Force jumps across three platforms. Once outside, Starkiller is met by reinforcements from a dropship. Starkiller crosses another bridge while a defense turret fires on him. Once across, Starkiller turns to the left and Force-jumps up three columns to the next part of the city and uses the Force to bring down another dropship. He then crosses another bridge, which was also destroyed by a laser turret, and turns to the left. He blows apart a door with a Force push and faces more Imperial troops, and then enters another elevator. On the next level, he destroys a large turret and the resulting explosion blows him down to the casino level.
In front of the casino, Starkiller dispatchs a carbonite war droid, and then uses his Force powers to unlock the door. Inside, Starkiller fights through more stormtroopers. He then takes an eleveator to the next level and fights another carbonite war droid. At the end of the casino, Starkiller uses Force Repulse to blow through the roof and goes outside. He uses his Force lightning to charge an elevator and rides it to the next level, where he faces a group of Ugnaughts. Starkiller then rides a passenger tram to the other side of the city while jumptroopers harass him. A TIE fighter blows the end of the track, and, as the tram crashes, Starkiller leaps off the tram and lands on the western edge of the city.
Starkiller fights his way through the assembled Imperials and ascends to another level of the Baron's Palace where he duels another carbonite war droid. Continuing along the corridor, the Imperials block the entrance. Starkiller uses Force Repulse to expand a crack in the floor and falls through it. In that room, Starkiller faces more Ugnaughts and Imperial troops. Starkiller then proceeds deeper into the palace and fights two more carbonite war droids. At the end of the room, Starkiller uses the Force to unlock the door. In the next chamber, he destroys another carbonite war droid, and then rides an elevator down. Starkiller then arrives in the Tarko-se Arena, and the Baron orders the Gorog to be released. Down in the main arena, Starkiller reunites with General Kota who had just struck down two gladiators with his lightsaber. The duel with the Gorog proceeds similarly to the other versions, except that Starkiller does not jump onto the Gorog's head, and the Gorog grabs and eats Tarko deliberately. The Gorog also lacks the head covering seen in the other versions.
In 2012, the mission was referenced in The Essential Reader's Companion, a guide to Star Wars books. The book mistakenly states that PROXY was piloting the Rogue Shadow during Starkiller's escape from Cato Neimoidia with Kota; The Force Unleashed II novel indicates that the ship was on auto-pilot. The 2014 StarWars.com article "Galactic Gladiators: Great Warriors of Star Wars" incorrectly placed the rescue in 1 ABY.