Arms Race
The Arms Race represented a brief period of conflict between the Galactic Empire and the Rebel Alliance. A new tractor beam weapon was nearing completion under the direction of Admiral Zaarin; this device would allow starfighters to maintain enemy fighters on a fixed trajectory, thereby enhancing weapons accuracy. Simultaneously, a Corporate Sector entity initiated the arming of Rebel Alliance fighters with an innovative projectile weapon capable of temporarily neutralizing enemy weapon systems. This confrontation ultimately led to further advancements in the TIE series starfighters, and supplied the Empire with supplementary weaponry for use against the Rebellion.
The campaign
Protecting the prototypes
Under orders from Lord Vader, Admiral Zaarin prepared six TIE Defender prototypes for evaluation by Emperor Palpatine. Zaarin arranged for Cargo ferries of the Sela group to transport Class-B cargo container group Xi, which housed the prototypes, to the Emperor. As TIE Avengers designated Alpha patrolled the area surrounding Zaarin's XQ6 Platform named Research, TIE Defenders Delta 5 and 6 were secured within their respective containers. Shortly thereafter, B-wing starfighters belonging to Blue group emerged from hyperspace, launching attacks from multiple vectors, closely supported by RZ-1 A-wing interceptors of Red squadron. Imperial Avengers divided their forces to address the incoming assault. Amidst the ensuing starfighter engagement, Cargo Ferries of the Sela group arrived from hyperspace, proceeding towards the designated containers. With the multifaceted attack unfolding around Platform Research, Avengers Alpha struggled to bridge the distance between the attacking forces. Having completed docking procedures, Ferries Sela proceeded to the jump point even as enemy fighters continued their pursuit. Following a desperate defense of the TIE Defender prototypes, Imperial Avengers successfully eliminated the enemy fighters shortly after Sela's departure.
Rebel Ambush
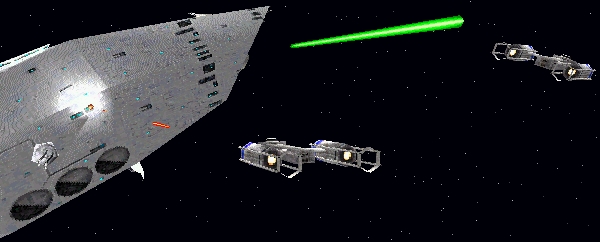
With the Cargo Ferries Sela safely en route, the subsequent objective involved a rendezvous between Sela and the Escort Carrier Hininbirg for a transfer operation in proximity to Vinzen Neela 5. Imperial fighters were tasked with clearing the area of enemy vessels while Carrier Hininbirg received the Defender prototypes from Ferries Sela. Imperial Intelligence uncovered Rebel intentions to disrupt the transfer, prompting the deployment of Imperial starfighters ahead of the convoy to neutralize the Rebel threat. Agents affiliated with the Prophets of the Dark Side alerted at least one pilot en route to battle about a potential "leak" originating from Zaarin's research facility. The Order sought further information to pinpoint the source of this leak, requesting inspections of Rebel starships for clues. Avengers Alpha emerged from hyperspace, preceding Sela and Hininbirg, to discover Rebel CR90 corvettes Mar Duun and Vop Hui positioned several kilometers away, deploying a minefield. Rebel A-wing and Y-wing starfighters were also present in the system, promptly engaged by the arriving TIE Avengers. Imperial starfighters prioritized the Y-wings of Blue group, aiming to eliminate the more formidable bomber craft. As opposing starfighters clashed, Hininbirg and Sela arrived to initiate transfer operations. As predicted, Rebel vessels had strategically positioned themselves to attack Escort Carrier Hininbirg, having materialized amidst a minefield and within range of the enemy Corvette's cannons. Avengers Alpha diverted to safeguard Hininbirg from the attacking Rebel starships, having neutralized the Y-wings of Blue. Discovering only mines onboard, TIE Avengers destroyed Corvette Vop Hui with a barrage of Concussion missile and laser cannon fire, shielding Hininbirg from its assault. As Imperial starfighters continued to defend the Hininbirg, TIE Defender prototypes began transferring from their cargo containers to Carrier Hininbirg. T-65 X-wing starfighters of Red squadron soon arrived to bolster the Rebel effort, as Cargo Ferries Sela departed the system, their mission accomplished. Avengers Alpha eliminated the remaining Type A Mines and Corvette Mar Dun before engaging the incoming X-wing fighters. Despite Rebel fighters briefly compromising the shields of the Hininbirg, the opposing Avengers raced against time; Hininbirg had successfully loaded all TIE Defender prototypes and was awaiting the jump to lightspeed. Rebel fighters managed to inflict minor hull damage on Carrier Hininbirg before succumbing to Imperial pilots.
Escorting the convoy
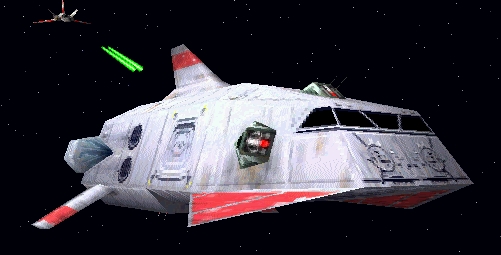
With the TIE Defender prototypes safely en route to Coruscant and Emperor Palpatine, Admiral Zaarin awaited the arrival of a convoy transporting new beam weapon equipment. Due to temporary vulnerability stemming from hyperlane locations, freighters Anterab and Degathem required armed escort from their jump point to Platform Research. Zaarin assigned Gunboats of Tau squadron to escort the freighters until their cargo could be offloaded. Flight group Tau patrolled around Zaarin's research facility as Freighters Anterab and Degathem arrived, accompanied by Escort Shuttle Omicron 5. Rebel forces acted swiftly as X-wings of Blue squadron emerged from hyperspace, launching a Proton torpedo attack on the research platform. Following Blue group, B-wings from Red attacked Shuttle Omicron 5. Deceived by a Rebel diversion, Assault Gunboats divided their attack force to counter the incoming fighters, as Rebel Assault Transports of Storm unit entered the system, firing their Ion cannons at the Imperial convoy. Imperial Gunboats scrambled to destroy the B-wings and Assault Transports as they attempted to seize the freighters. Rapidly expending their warhead reserves, Imperial fighters managed to eliminate the enemy transports, but continued to contend with the resilient B-wing starfighters. Imperial commanders observed unusual weaponry employed by the B-wing fighters, instructing the escort fighters to disable one for capture. With remaining B-wings disabled, Gunboats Tau focused on neutralizing the X-wing threat, only to be surprised by the arrival of A-wings Gold. Gold group began attacking the disabled B-wings, their own fighters. Once again astonished, Imperial starfighters diverted to disrupt the A-wing assault, managing to save at least one B-wing for capture by Heavy Lifter U3f14. The Heavy Lifter successfully docked and secured an enemy B-wing as Gunboats Tau returned to the remaining starfighter threats. Degathem and Anterab also completed their docking operations, returning to hyperspace as Imperial fighters destroyed the remaining rebel attackers.
The punitive raid
Admiral Zaarin received a communication following the rebel assault on his research convoy. Supplementing information regarding the mysterious B-wing fighter weaponry, Imperial Intelligence revealed the sale of the new Mag-pulse Torpedo to the Rebel Alliance by the Galactic Electronics Corporation. As instructed, Admiral Zaarin returned to his flagship, the Imperial-class Star Destroyer Glory, to conduct a raid on the primary Galactic Electronics research platform. Admiral Zaarin issued orders to confiscate all new technology from the facility as retribution for such treasonous behavior against the Empire. In addition to Zaarin's objectives, Secret Order agents directed pilots to disable any suspicious craft for capture, particularly those equipped with the new mag-pulse torpedo. Assault Gunboats from Tau squadron entered the system ahead of the main assault force to clear any starfighter screen protecting XQ2 Platform Pondut. Upon entering the system, Imperial Gunboats initiated their assault by attacking defending Z-95 Headhunters. The more advanced Gunboats quickly eliminated the initial group of outdated Z-95s designated Charlie, proceeding to group Adam. Galactic Electronics Transport GEC U47 departed the platform upon the arrival of Gunboats Tau, docking with a Type A container. With six Assault Gunboats, Tau divided their flight group to engage the archaic enemy starfighters, while disabling any escaping transports. Tau 2 successfully disabled Transport GEC U47 immediately after its docking operation, soon followed by Lambda-class T-4a shuttle Kalree. As Assault Gunboats continued to engage enemy fighters, Assault Transports of Omega unit arrived to capture the traitorous starships. YT-1300 Lucky Day departed the Pondut after the arrival of Transports Omega, soon encountered by Tau 2, diligently disabling fleeing craft, discovering an arms dealer onboard. With all fleeing craft disabled, Gunboats Tau eliminated the final waves of defending fighters before assisting Omega in disabling Platform Pondut. The Assault Transports began capturing craft as additional Rebel forces arrived, a Cargo ferry Bujiboi flanked by A-wings and Y-wings. Gunboats engaged the new arrivals, starting with the A-wings; followed by Bujiboi Imperial pilots discovered Y-wings of Blue squadron carried the Mag-Pulse torpedoes, requiring capture. Decimating the last of the enemy vessels, Gunboats Tau stood by as Assault Transports completed the final docking operations, and the captured vessels proceeded to the Imperial Star Destroyer Glory, including any Mag-Pulse armed Y-wings.
Aftermath
Following his successful raid on Galactic Electronics, and the acquisition of his Beam weapon technology, Admiral Zaarin focused on equipping his TIE Avengers with the new technology. TIE Avengers finally began to see combat, and this new technology enhanced the Imperial effort to suppress the Rebellion.
Behind the scenes
The Arms Race represents the sixth battle in Star Wars: TIE Fighter.
During this mission, Major Trace reveals his true allegiance to Maarek Stele. Stele chooses not to report Trace to the authorities, as he too is grappling with his moral principles at this juncture. This event is described in the Official Strategy Guide, although it is not depicted in any of the sequences within the game itself.