Q-7N
Q-7N, a mining droid of Malagarrian make, departed from his planet of origin, Malagarr, after the population's self-inflicted demise due to transforming the planet into a massive, highly radioactive reactor. He subsequently joined a pirate crew, functioning as a security droid. He was stationed on Yavin 4 to safeguard their hidden cache of valuables. However, Q-7N was ultimately abandoned, leading him to guard the treasure-filled temple for two millennia. In the year 0 ABY, a Rebel encountered him while attempting to neutralize Imperial activity in the temple's vicinity. Having grown weary of his security duties, Q-7N chose to assist the Rebel in their fight against the Empire. Over several months, Q-7N played a significant role in the Galactic Civil War, offering substantial support to the Rebel cause.
He was instrumental in uncovering a conspiracy involving tainted bacta and thwarting an Imperial assault on Delrakkin City. Furthermore, he aided the Yavin Four Alliance base in evading detection by the Liquidator through his contribution to its destruction. After helping expose an Imperial spy within the Yavin Four Alliance's ranks, he received an urgent message from Malagarr. Upon returning, he discovered the annihilation of his fellow mining droids. Subsequently, he was summoned to investigate the attempted Imperial theft of the freighter Stellar Manx. Following a journey that took him to Kwenn Space Station and then Bonadan, he found himself back on Malagarr, where Frap Radicon was plotting the development of new gravity well projector technology. Recognizing the detrimental impact this technology would have on the Alliance, and concluding that Malagarr's instability made its continued existence untenable, he destroyed his home planet by triggering the massive reactor, sacrificing himself in the process.
Biography
Creation
The Malagarrians, an advanced species inhabiting Malagarr in the Unknown Regions, were responsible for the construction of Q-7N. Forged from durite, equipped with sophisticated repulsors, and featuring a set of hidden appendages, Q-7N was designed to mine Malagarr's core, while also possessing security capabilities. The Malagarrians had already depleted the planet of its natural resources, leading to widespread pollution. Desperate for power, they tasked droids with mining the planet's core, effectively transforming the entire world into a colossal reactor. Within weeks of this transformation, millions of Malagarrians succumbed to the resulting radioactivity, forcing the survivors to seek refuge in underground installations. Ultimately, they too fell victim to the radiation, leaving only the droids behind.
Pirates of Yavin Four
Sometime later, Q-7N found himself on Yavin 4, where the Massassi, under the influence of the Sith Lord Naga Sadow, had erected imposing temples and fortresses. The Massassi eventually vanished, but around 2000 BBY, a band of pirates established their own fortress, mirroring the Massassi's architectural style, to store their accumulated treasure. Q-7N's security expertise was utilized to guard both the temples and the pirates who sought shelter within them. Eventually, the pirates either departed or perished, leaving Q-7N undisturbed for two millennia. He lost all memory of his Malagarrian origins, dedicating himself solely to his security duties, even without the direction of a master.
Incursion on Yavin Four
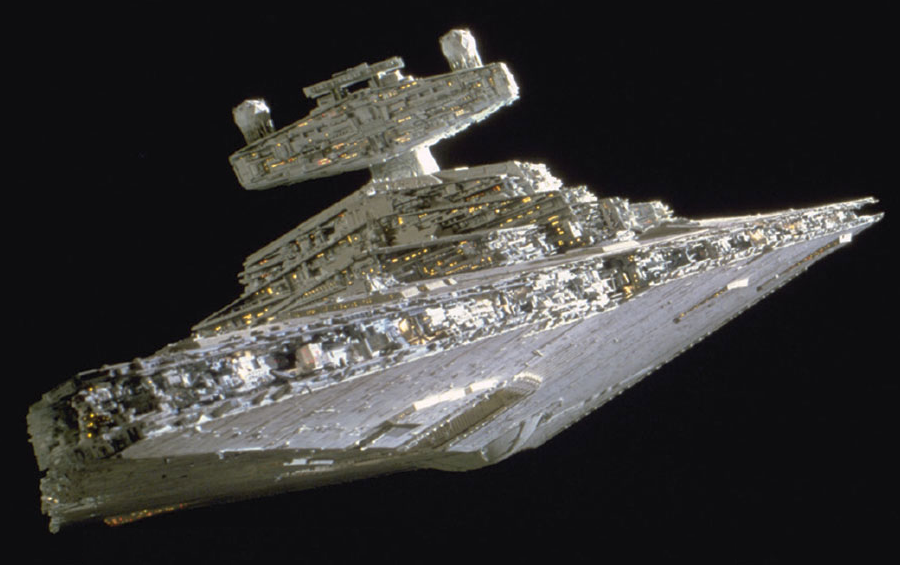
During the Imperial Period, the Alliance to Restore the Republic established their primary base on Yavin Four, unbeknownst to Q-7N. In the early days of 0 ABY, Yavin Four experienced an intrusion by the Galactic Empire. Captain Skeezer had been sent by Admiral Termo to assess the aftermath of the Battle of Yavin. Skeezer's task force was compelled to land their Carrack-class light cruiser near Q-7N's temple after an attack by Captain Han Solo aboard the Millennium Falcon. Although Skeezer's troops did not enter the temple, Q-7N maintained surveillance of their movements using a photoreceptor.
General Jan Dodonna dispatched a Rebel soldier to investigate. This Rebel managed to infiltrate Skeezer's makeshift camp, but their cover was compromised, forcing them to seek refuge in Q-7N's temple. The Rebel bypassed Q-7N's makeshift battle droids and proceeded to the temple's main chamber. There, Q-7N scanned the Rebel's image and confronted them, demanding to know their intentions. Q-7N was suspicious, as the Rebel wore the same white armor as the recent arrivals. When the Rebel mentioned their "friends," Q-7N assumed they were assisting the Imperial invaders and activated a trap door, dropping them into a pit filled with treasure. Subsequently, Q-7N projected an illusion of two Imperial stormtroopers to gauge the Rebel's reaction. When the Rebel shot the two "troops" for stealing, Q-7N realized their intentions differed from Skeezer's and concluded that the treasure was safe for the time being.
After two millennia, Q-7N had grown weary of Yavin 4. He desired to explore the outside world and the surrounding galaxy, so he requested that the Rebel take him along. The Rebel agreed, on the condition that Q-7N remain close and avoid trouble. Observing the Rebel's battle with stormtroopers, Q-7N offered assistance, activating a nearby battle droid and programming it to attack the Imperials. However, after a few steps, the droid malfunctioned and disintegrated, alerting the Imperials to the Rebel's presence. The Rebel and Q-7N managed to find cover, but the diminutive droid was deeply apologetic. Blasting their way out of the camp, the Rebel retrieved the speeder bike they had used to reach Skeezer's camp and attempted to escape with Q-7N in tow. Skeezer and his troops pursued them, forcing the Rebel to make a stand. When the Rebel was knocked off their speeder bike by blaster fire, Skeezer moved in for the kill, but Q-7N swiftly attacked the Imperial captain's hand, disarming him. However, the stormtroopers opened fire on the droid, inflicting severe damage. The Rebel eventually incapacitated all the troopers, and Skeezer was taken into Alliance custody. Q-7N's chassis was recovered and taken back to the Great Temple, where the astromech droid, R2-D2, restored him to proper working order.
Excursion to Thyferra
Han Solo interrogated Skeezer, discovering that the Death Star I had been transporting a large shipment of contaminated bacta. Leia Organa suspected that the bacta was intended for use against the inhabitants of a planet the Empire might need for experimentation. General Dodonna concurred, believing that uncovering the truth was paramount. Solo, Organa, Chewbacca, Luke Skywalker, C-3PO, and R2-D2 embarked on a journey to Thyferra, the source of bacta production, aboard the Millennium Falcon. R2-D2 brought along the damaged Q-7N, completing his repairs during the Falcon's transit. Q-7N, initially curious, was informed that Solo was a former smuggler, which put him at ease, as Q-7N's former masters had been of a similar profession.
Upon reaching Thyferra, the Falcon deployed the BTL Y-wing starfighter they were carrying onto a rooftop in Zalxuc City. Proceeding to the local spaceport, Organa explained that the Alliance had a contact in Zalxuc, Voralla Morbo, who reserved Docking Bay 72 for Rebel operations. After landing in Docking Bay 72, Q-7N expressed his excitement about working for the Alliance and his eagerness to investigate the bacta scandal. As the group exited the Falcon, they were ambushed by Imperial stormtroopers. Q-7N managed to avoid detection by staying close to everyone's feet before ducking into a small hole.
One of the Rebels managed to break free, and Q-7N joined the escapee. Leveraging his knowledge of the labyrinthine temples of Yavin Four, Q-7N was confident he could help the Rebel evade the Imperial compound. However, his "shortcut" led the Rebel to encounter a group of technicians. While the Rebel was amused by Q-7N's choice of exit, the droid was indignant, claiming he could not have detected the presence of the Humans. The Rebel made his way to Docking Bay 72, where a stormtrooper discovered that the Falcon might be of interest to Grand Moff Tarkin. News of the Death Star's destruction had not reached Thyferra, so the Rebel swiftly dispatched the trooper and retrieved his datapad. This, however, attracted the attention of the other stormtroopers, forcing Q-7N to find a new escape route. The small droid led the Rebel to the rooftops of the docking bay and showed him to the Y-wing that had been left earlier.
The Rebel only sought to distance himself from the Imperials, however, and landed the Y-wing nearby. Venturing into Zalxuc City, the pair sought Morbo, enlisting the services of a local Kubaz. The Kubaz led the Rebel to a cantina, but the cantina did not permit droids. Unbeknownst to the pair, the cantina was actually the Plastoid Pitt. Q-7N waited outside while the Rebel ventured in, eventually throwing caution to the wind when he heard the Rebel yell. He found his friend standing over the body of a Gamorrean, and the Rebel explained that people were lured into the cantina, captured, and sold into slave labor. Concluding that the cantina was certainly not Morbo's Place, the pair navigated the underground chambers of the cantina, battling guards and avoiding traps.
After defeating an abrasive Brubb, the pair entered a hidden stockroom. Sending a pair of Rodian guards tumbling into a vat, the Rebel encountered Plurra, a Vratix slave. Q-7N found the Vratix's habit of referring to himself as "we" curious, before the Rebel explained the collective mind of the Vratix species. Plurra explained that he produced bacta in the warehouse, and after the Rebel defeated the healed Rodians, the Vratix showed him and Q-7N the way out. The Rebel, however, barged straight back into the Plastoid Pitt, interrogating the Devaronian owner about the real location of Morbo's Place. Plurra then offered to assist the Rebel in freeing his friends, and Q-7N led them back to Docking Bay 72.
The Rebel decided he needed to return to the room with the technicians to save his friends. Instructing Q-7N to hover high above the docked Millennium Falcon, he had Plurra create a diversion to lure the Imperials into the open, allowing him to dispatch them. The Rebel then entered the communication room, ordering all stormtroopers to attack The Plastoid Pitt, claiming that Rebels had been sighted there. Once all the troops had left, he contacted the cells, instructing his friends to look for Q-7N in the sky and head to the Falcon. The group reunited, and Plurra was sent on his way.
At Morbo's Place, the Rebels met Voralla Morbo. She informed them that a Carrack cruiser, similar to the one commanded by Captain Skeezer, had collected a supply of alazhi and was en route to Delrakkin, a remote world beyond the Outer Rim Territories. Believing that the Imperials intended to contaminate the Delrakkin populace, the Rebels prepared to journey to the Outer Rim.
The Delrakkin Massacre
Upon entering the Delrakkin system, the Falcon was attacked by T-65 X-wing starfighters, flying in a characteristic Imperial formation. Solo, a former Imperial pilot, recognized the formations and evaded the enemy pilots by descending into the planet's atmosphere and firing a concussion missile at a cliff face, creating the illusion of the Falcon's destruction. The group quickly realized they needed to investigate the intentions of the Imperial X-wings.
One of the Rebels prepared to pursue the fighters using the Y-wing they still had in tow, and Q-7N insisted on accompanying them. The Rebel agreed, and the pair flew towards Delrakkin City, the likely focus of Imperial activity. After defeating the Imperial TIE Fighter patrol guarding the city, the Rebel flew up the side of the mountain upon which Delrakkin City was situated. Battling through the Imperial defenses and breaking through Delrakkin's cloud cover, the pair gained a clear view of the high-altitude city, witnessing the Imperial X-wings razing their own buildings. The Imperials clearly intended to make the attack appear to be a Rebel terrorist operation. As Q-7N watched in horror, the Rebel engaged the enemy fighters, leading to a harrowing chase through the streets of Delrakkin City.
In the heat of battle, Q-7N constantly reminded the Rebel of the number of enemy ships remaining, which began to irritate the Rebel. Eventually, the remaining X-wings converged on the Y-wing, forcing it to crash-land in the jungle. The pair continued to be harassed by the Imperials, who chased them through the jungle. Q-7N detected that the Imperials had landed and were advancing on foot. After the Rebel defeated one of the pilots, Q-7N spotted a cave, and the pair entered. As the cave grew darker, one of Q-7N's mining utilities, a set of high-powered lights, proved useful. The pair eventually encountered a group of native Delrakkins who had been forced out of their homes in Delrakkin City by the Empire years earlier. While one of the Delrakkins, Untrilla, welcomed the Rebel, Gwann, a warrior, did not. Q-7N watched as the Rebel fought and defeated Gwann in combat, earning the Delrakkin's respect.
Explaining the situation to the Delrakkins, the Rebel learned that Skeezer had visited Delrakkin in the Carrack, posing as a Rebel. He had convinced the natives to help him plant alazhi, hoping to create a non-Thyferran source of bacta. The natives, eager to aid the Rebellion, agreed. The Rebel revealed the deception, but one of the Imperial pilots entered the cave. The Rebel dispatched the pilot and instructed the Delrakkins to warn the others that he might be leaving Delrakkin to investigate the Imperial presence. Disguised as an Imperial pilot, the Rebel joined the remaining pilot in returning to his station, the Star Destroyer Liquidator. Q-7N remained hidden in the cockpit of the commandeered X-wing.
The Rebel, creating a diversion, used the craft to detonate a fuel tank in the Star Destroyer's hangar before informing the bridge that Rebels had boarded and were disguised as stormtroopers. Q-7N, confused by the action, questioned the trooper, who explained that he hoped the troops would start firing on each other. Meanwhile, the pair navigated the capital ship, searching for clues about the bacta scandal. They reached Admiral Termo's quarters and stole a pair of holotapes from his safe. Hastily escaping the ship in their X-wing, the pair were attacked by TIE Fighters. Using the craters and ravines of Delrakkin's moon to evade the craft, the Rebel returned to Delrakkin upon detecting the Liquidator's jump to hyperspace.
The Rebels and the Delrakkins convened at the Falcon to discuss the Imperial attack on Delrakkin City. Viewing the holotapes, the group witnessed the holographic image of Grand Moff Wilhuff Tarkin discussing gravity well technology, attacks on the Delrakkins, and contaminated bacta supplies. Termo had apparently viewed the tape, attacked the city, and was awaiting the Death Star's arrival, complete with the contaminated bacta supply. The contaminated bacta was intended to be used on the survivors of the attack, killing them and leaving Delrakkin vacant for gravity well experiments. Rebel X-wings were used to discredit the Rebellion and portray them as terrorists in the eyes of the galactic community. The most alarming revelation for the group, however, was that Tarkin had ordered Termo to proceed to the Yavin system if the Death Star failed to arrive on schedule. Departing Delrakkin with the Imperial X-wing in tow, the Falcon raced back to the Rebel base.
Admiral Termo and the Liquidator
Upon entering the Yavin system, Solo detected the Liquidator orbiting Yavin 8, searching for Alliance presence. Setting course for Yavin Four to warn the Alliance, his scanners detected an Imperial probe, and he sped to intercept it. The Falcon destroyed the probe and sent a false transmission back to the Liquidator. Q-7N, who had been waiting in the passenger hold, went to the cockpit, seeing his home of over two thousand years from space for, apparently, the first time. Closing in on the moon, they were met by the captured Carrack cruiser—under the command of the escaped Captain Skeezer. Skeezer managed to disable the shielding on the Falcon, but the Rebels resolved to capture him in one of their starfighters.
One of the Rebels chose to pursue Skeezer, and Q-7N, eager for combat once more, accompanied them. The Rebel managed to reach the Carrack, disabling its sensor array and defensive capabilities. Skeezer attempted to evade pursuit, entering a meteor field. The Rebel gave chase, disabling the Carrack's hyperdrive, but Skeezer had detected the Imperial presence on Yavin Eight. He lured Q-7N and the Rebel there, where the TIE Fighters of the Liquidator attacked the intruders. The Rebel evaded them once again, and Q-7N spotted the Imperial campsite. The Rebel then proceeded to demolish the Imperial camp, along with the accompanying fighters and walkers.
After destroying the last Imperial vehicle, an All Terrain Armored Transport, Q-7N spotted an Imperial distress beacon, headed for the Liquidator. The Rebel destroyed the beacon but was caught in the Star Destroyer's tractor beam. Q-7N surmised that the Imperials would not be looking for a droid and believed he could evade capture and rescue the Rebel upon his capture. The Rebel agreed, and when he was captured and brought before Admiral Termo, the small droid fired the Rebel starfighter's weapons, tearing through the landing bay and killing numerous troopers and hangar crew. The Rebel used the distraction to escape, and Q-7N quickly caught up with him, undetected.
Remembering the layout of the Liquidator from their previous visit and stolen blueprints of Star Destroyers, the pair made their way to the weapons storage room, battling stormtroopers along the way. Retrieving a thermal detonator, the Rebel proceeded to the solar ionization reactor, hoping to destroy the entire ship with a single explosion. Destroying the guard droid outside the reactor room, the pair were confronted by Admiral Termo and a squad of stormtroopers, demanding the Rebel's surrender. The Rebel refused and, dropping the detonator into the reactor, escaped the Admiral's clutches. They made their way to the escape pods, but at the last minute, were once again confronted by Termo. The Rebel incapacitated the Imperial before entering one of the pods with Q-7N and jettisoning it. The Liquidator was destroyed, and the pair landed on Yavin Eight, only to be confronted once again, this time by Skeezer. The Rebel was forced to kill Skeezer before being rescued by the Millennium Falcon.
Back on Yavin Four, Q-7N was startled by the fact that the Humans were "yelling at us." C-3PO quickly explained that Humans tended to do that when celebrating. At that point, Q-7N considered himself a member of the Rebel Alliance and was eager to help them in their fight against Palpatine's New Order. The bacta mystery had not been fully resolved, but answers would emerge later that year.
Thievery and Droid Revolts
The droid officially began serving the Alliance as a translator. One day, at the Alliance base, Q-7N discussed his heritage with C-3PO and R2-D2. Captain Solo overheard this, and his interest was piqued by the fact that the small durite droid had once guarded a vast treasure hoard. Realizing that such treasure could finance the Rebel fleet and restore the ships lost at the Battle of Yavin, the Corellian set out for Q-7N's temple. When Organa realized they were gone, she questioned Skywalker, but the young Jedi-in-training had no answers. When C-3PO heard this, he mentioned that Solo had been nearby when Q-7N was talking about the Massassi treasure.
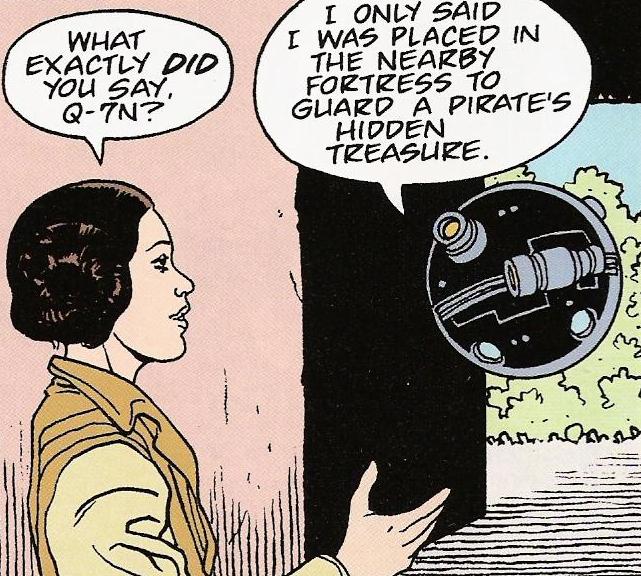
When Organa confronted him, Q-7N explained what he had said, prompting Organa and Skywalker to head for the temple. Q-7N also reminded the Rebels that he was not the only one who had guarded the fortress. At the temple, Solo did encounter some of the old Malagarr security droids but managed to retrieve the treasure and sell it, much to Organa's chagrin. She believed he had acted selfishly, but he revealed that he had simply done it to finance a new batch of starfighters for the Alliance.
Shortly after this, Skywalker noticed that the Alliance had failed to receive a shipment of supplies from the mining world of Vactooine. He, Q-7N, C-3PO, R2-D2, Solo, Organa, and Chewbacca set out to Vactooine to investigate, discovering that a renegade droid army, under the command of Olag Greck, had attacked the colony in an attempt to transform it into a world of droid factories. Greck's plan was thwarted, but Q-7N opted not to actively participate in the mission this time.
Counter-intelligence work
When Captain Solo and Princess Leia traveled to locate Vors Voorhorian to acquire new X-wing fighters, Q-7N remained on Yavin 4, in the company of Chewbacca and C-3PO. With no problems occurring in their absence, Q-7N kept C-3PO occupied while R2-D2 was elsewhere. Upon the return of Leia, Solo, and Luke Skywalker with the anticipated X-wings, a spy's presence began to negatively impact the Alliance. The Rebels, in search of a fresh location for their base, were troubled by sabotaged files, throwing their relocation plans into chaos.
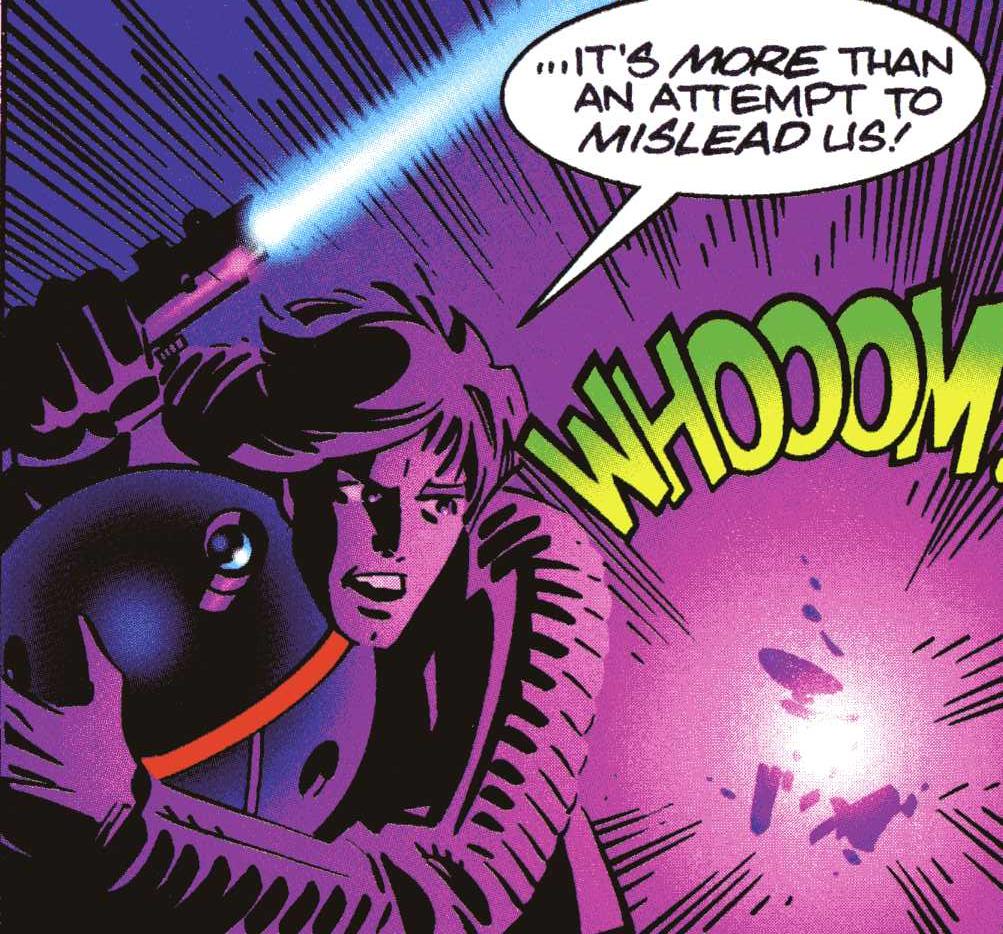
To unmask the spy, Leia and Luke turned their suspicions towards Captain Solo. In reality they knew Solo was innocent, but they hoped to trick the real spy into revealing themselves. After Solo and Chewbacca had taken off in the Falcon, Q-7N received coordinates from them, indicating an unauthorized transmission originating from the jungle. Accompanied by Luke and Leia, Q-7N headed to the transmission's source, discovering Alderaanian refugees, Darlen and Tolok, who had recently married. Choosing to grant the newlyweds privacy, Q-7N pinpointed the transmission's exact location, finding an autobeacon. Assuming it was a mere diversion, Q-7N approached the device for a closer look, but Luke swiftly pulled him back, shielding him from an explosion. The beacon was rigged with explosives, designed to eliminate anyone investigating it.
Homecoming
It was eventually revealed that the spy was Rogor, who had been disguised as a Rebel lieutenant. As the Rebels prepared to leave Yavin Four, Q-7N received a distress call from Malagarr, reporting an attack on his homeworld by Imperial forces. With his memories of his life on Malagarr restored, Captain Solo took him back home, along with Leia, Luke, C-3PO, R2-D2, and Chewbacca. Exploring the old underground caverns, he found nothing of value and no signs of life. The Imperials had destroyed his fellow mining droids, so Q-7N saw no reason to stay on Malagarr. Soon after, the group received a message from Wedge Antilles, who, alongside Tycho Celchu and Wes Janson, had been investigating the Stellar Manx. The Manx had attracted seemingly undue Imperial attention at Kwenn Space Station, leading Leia to believe that Antilles might need their assistance.
Before they could arrive, one of the Rogue Squadron pilots managed to seize the Manx from the Empire and return it to its owner, Kar Lamoran. It was discovered that the Imperials wanted a discreet civilian freighter for a mission to Bonadan in the Corporate Sector, for reasons unknown. The group, disguised as Imperials, set off for Bonadan to take the place of the real Imperials. During the journey, Luke asked Q-7N to assist him with his lightsaber training. Q-7N agreed, acting as a stand-in for a training remote.
Recognizing that R2-D2, Q-7N, and Chewbacca couldn't convincingly pose as Imperials, the Rebels left them in the Millennium Falcon, which was hidden inside the Manx's cargo hold. Outside, events unfolded that resulted in Imperial engineer Frap Radicon taking control of the Manx. His forces loaded gravity well projector equipment onto the ship, and the Imperials set a course for Malagarr. Q-7N, R2-D2, and Chewbacca were unaware of the Imperial presence, but R2 suspected something was wrong. Solo, Luke, Leia, Lamoran, and C-3PO were stranded on Bonadan, but they were determined to rescue their captured companions. Q-7N confirmed that Malagarr was indeed their destination, and transmitted this information back to C-3PO on Bonadan.
Radicon intended to use Malagarr as a testing site for his new gravity well technology, as his previous attempt to use Delrakkin had been foiled by Q-7N and the Rebels months before. General Mordak's troops had cleared the planet of resistance, allowing him to begin assembling his new device. Q-7N and R2-D2 struggled to prevent Chewbacca from launching a solo attack on the Imperials, but they received unexpected help from Mordak and Communications Officer Tix, who had grown disillusioned with the Empire. They wanted to defect and assist the Rebellion in destroying Radicon's machine. Solo managed to commandeer a Marauder-class corvette on Bonadan, and entered the system as Q-7N and company departed Malagarr on the Falcon.
Mordak explained Radicon's plan to the Rebels, and also revealed that an Imperial craft, a Y-4 Raptor-class transport, had delivered troops and supplies to the planet. The Rebels chose two pilots to fly the Marauder's IRD-A starfighters to the planet's surface and destroy Radicon's operation. Q-7N, believing his knowledge of Malagarr would be valuable, secretly boarded one of the IRDs. He revealed himself to the pilot shortly after takeoff, and despite the Rebel's initial displeasure, he allowed the small droid to come along.
After a rough landing in a storm, Q-7N warned the Rebel about the various dangers and traps on Malagarr that could be hazardous to outsiders. He helped locate the other Rebel pilot, "Scout Two," who had crashed. The Rebel helped Scout Two out of his burning vehicle, but the pilot had broken his leg. Q-7N and his companion proceeded alone, promising to get help for Scout Two. They encountered a giant worm in the wilderness, but managed to defeat it. They reached Radicon's camp, infiltrated it, and disabled the assembled gravity well projector. Radicon spotted them, however, and the pair were forced to escape. Q-7N led his companion into one of the subterranean complexes, which housed some of the advanced Malagarrian technology. Q-7N decided that Malagarr was simply too dangerous to continue existing: even millennia after the Malagarrians' destruction, the planet's radioactivity remained deadly. Believing that destroying the planet would also eliminate Radicon's gravity well designs, he urged the Rebel to retrieve Scout Two as quickly as possible. He activated the planet's self-destruct sequence, an action that would also cost him his life in the resulting explosion. The Rebel, after rescuing Scout Two, quickly left Malagarr, but Radicon and his team were left behind, and perished along with Q-7N, in the planet's destruction.
Personality and traits
Q-7N, despite being built as a mining droid, possessed a diverse set of skills and abilities, making him a versatile droid. He served effectively as a security droid for a pirate group for over two thousand years, protecting against intruders and coordinating other security droids. Upon joining the Rebel Alliance, his topographical scanning abilities and long-range sensors proved valuable to the war effort. His mining skills were rarely used later in his life, although they were employed in the underground caverns of Delrakkin.
He had a curious nature, similar to his friend R2-D2, and was always eager to learn about different cultures and practices. He frequently found himself in dangerous situations and was generally appalled by the actions of the Galactic Empire, but he was always willing to assist those in need. He risked himself twice for the benefit of his allies, and while he was successfully repaired the first time, the second instance resulted in his death. He held a low opinion of his creators, the Malagarrians, criticizing them as "fools" for failing to ensure their own safety, and openly condemned their greed and pursuit of technological advancements.
Behind the scenes
Q-7N was created by Ryder Windham, and first appeared in the game book Star Wars Missions 1: Assault on Yavin Four. The character appeared in the next three books of the Missions series, and made cameo appearances in the comics within the associated Star Wars Kids magazine. The character was killed off at the series' conclusion in Star Wars Missions 20: Total Destruction.
In the Missions books, the player character can be either male or female. For editorial reasons, this article assumes the player character is male, although they could be female. Most of the characters that the player can play as in the Missions books are male, however.
A potential continuity error was created by Imperial Spy, which placed Q-7N at the Evacuation of Yavin, and the preceding evacuation preparation. This conflicts with Star Wars Missions 20: Total Destruction, which depicts Q-7N's destruction, and subsequently, the Rebels returning to Yavin Four. However, Q-7N does not appear in the final frames of Imperial Spy, which show the Rebels after the evacuation. It's possible that the events of the final Missions arc occurred during the events of Imperial Spy, although this hasn't been confirmed.