Evacuation of Yavin
The Yavin Evacuation represented a confrontation between the forces of the Rebel Alliance and the Galactic Empire, occurring a half-year following the celebrated Battle of Yavin during the year 0 ABY. This engagement marked the conclusive phase of the extended siege that had been imposed upon the moon before the Alliance's strategic retreat from their base.
Initial Events
In what would later be recognized as the inception of a new chronological system by the New Republic, the Rebel Alliance achieved the destruction of the Galactic Empire's formidable Death Star near their established stronghold on the moon known as Yavin 4. Despite the celebrations that ensued following the annihilation of the superweapon, the Rebels commenced preparations for a strategic withdrawal from their base. The Empire, however, initiated a blockade of the system. Despite this, smaller ships managed to navigate through the blockade, and prominent Rebel leader Leia Organa embarked on several critical missions in service of the Rebellion. Prior to the full establishment of the blockade, significant pieces of equipment were relocated from the Yavin base. Nevertheless, the base's commander, General Jan Dodonna, determined that personnel could be evacuated swiftly. He then successfully persuaded the Rebellion's leader, Mon Mothma, to permit the base to continue operations as a symbol of defiance. Consequently, the Imperial command faced a challenging predicament with the Yavin base remaining active. They had to consider whether to prioritize the elimination of the base, potentially exposing themselves to a devastating raid elsewhere by the Alliance Fleet, or to risk a less stringent blockade, which could allow Mothma's forces to breach their lines. The blockade was subsequently formed from a rapidly assembled task force originating from the House of Tagge and was requisitioned from Nox Vellam, the Grand Moff overseeing the Bright Jewel Oversector, which encompassed the Yavin system.
Throughout the duration of the blockade, Yavin 4 became the epicenter of multiple battles and retaliatory strikes. The Rebels also engaged in combat against smaller raiding parties. The blockade proved effective in capturing several Rebel units. This blockade persisted for six months, causing frustration among Imperial fleet commanders. However, the Supreme Commander and Sith Lord, Darth Vader, refrained from ordering the destruction of the Yavin base while construction continued on his flagship, the Super Star Destroyer known as the Executor. Upon its completion, the Executor was deployed toward the blockade. The Rebels strategically employed a power gem mounted on an attack ship piloted by Vrad Dodonna to impede the flagship's progress. This maneuver achieved its objective but resulted in Dodonna's sacrifice. The main body of the Alliance Fleet was not present at Yavin, enabling them to stage a diversion aimed at disrupting the blockade.
The Confrontation
Defending the Temple Complex

Under the command of Admiral Gial Ackbar, Rebel forces engaged Imperial vessels at three distinct locations—Kli'aar, Pinoora, and the Vallusk Cluster. The purpose of these engagements was to deceive the Imperial blockade into redistributing its ships to reinforce the targeted positions, thereby creating an opening for the Rebel fleet to initiate a jump to hyperspace.
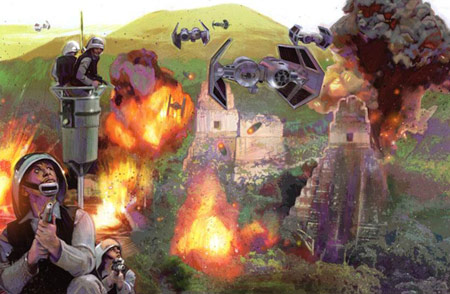
However, the fully operational Executor ultimately arrived at Yavin 4, accompanied by Lord Vader's Death Squadron fleet, as well as elements from Baron Tagge's personal fleet, marking the commencement of the battle. TIE/LN starfighter and scouts utilizing 74-Z speeder bikes meticulously combed the moon in search of isolated individuals.
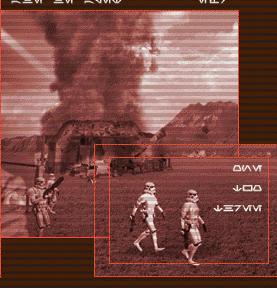
The surviving personnel from the Death Star united their forces and advanced toward the Rebel's main base. Imperial All Terrain Scout Transports, stormtroopers, shock troopers, scout troopers, and Imperial Army pilots engaged in combat against Rebel troopers, snipers, Wookiee soldiers, and vanguard divisions in the vicinity of ruins and a fountain near the base. The Rebels successfully repelled these forces, thereby providing crucial time for the evacuation to proceed. General Dodonna issued orders for the base's fighters and transports to evacuate, while he himself remained behind until all personnel had departed.
During the assault, the Empire deployed an array of vehicles, including A5 Juggernauts. Rebel operatives X2 and Shara participated in the battle against Imperial forces. X2 played a role in the destruction of a TX-130T fighter tank and entered the base to activate the evacuation signal. However, a TIE bomber destroyed the comm tower, forcing X2 to activate turrets to eliminate the bombers before venturing out to repair the tower. X2 commandeered a T4-B heavy tank to reach the waterfall. Subsequently, he utilized his Force powers to ascend to the top of the tower and employed a fusioncutter to repair the tower. He then assumed control of an anti-air gun to defend the tower against further bomber attacks. X2 eventually retreated to the hangar and boarded an X-wing starfighter.
Lord Vader personally led a contingent of stormtroopers and dewback troopers in an assault on the main Rebel base, but he became embroiled in a conflict with Rebel forces from two other bases, Falcon Base and Raven Base. Despite being harassed by scouts on swoops, he proceeded to destroy both outposts, which were defended by troopers, cavalry units, and T1-B hovertanks. After eliminating the Rebel troop centers and Mech factories, he received reinforcements, including 2 AT-STs and TIE bombers. This force advanced to the Rebel's Massassi Temple and destroyed the missile turrets, paving the way for an aerial bombardment. Vader remarked that they had a "special surprise" prepared once the air defenses were neutralized.
The Evacuation Process
Following the issuance of the evacuation order, a smaller Imperial force managed to penetrate the Massassi Temple. However, Commander Col Serra and his newly formed fighting unit, Renegade Squadron, successfully repelled the Imperials and established a defensive perimeter to keep them occupied while the evacuation continued. When the temple door jammed, a Squadron member equipped with a jetpack jumped through a hole and repaired the door, as well as a turret to defend the temple. Subsequently, another TX-130T fighter tank arrived, prompting Serra to order the squadron to destroy it. The group then seized a position near the Pyramid, eliminating at least four stormtroopers. A scout trooper managed to steal communication logs from the Temple, leading the Squadron to pursue and recover the logs. Serra then instructed the Squadron to destroy three Data Banks containing sensitive information to prevent them from falling into Imperial hands before their own escape.
General Dodonna and Lieutenant Bren Derlin found themselves trapped within the Massassi Temple as Imperial ground forces occupied the base. They were rescued by Red Squadron's Luke Skywalker, Wedge Antilles, and Sarkli Piett. Dodonna, however, refused to board an escape transport, having planted several concussion charges that decimated an entire squadron of TIE Interdictors as they attacked the Temple. It was initially believed that the General had perished in action, but it was later revealed that he had been captured and imprisoned in the Star Dreadnought and prison Lusankya. A mind-scan conducted on the captive officer revealed the Rebel's plan to attack the agriworld Reytha.
Above the moon, X2 joined forces with Commander Serra and disabled a communications array on a Star Destroyer to prevent the arrival of reinforcements. They then boarded the ship, and X2 sabotaged the reactor core. Both escaped before the ship exploded.
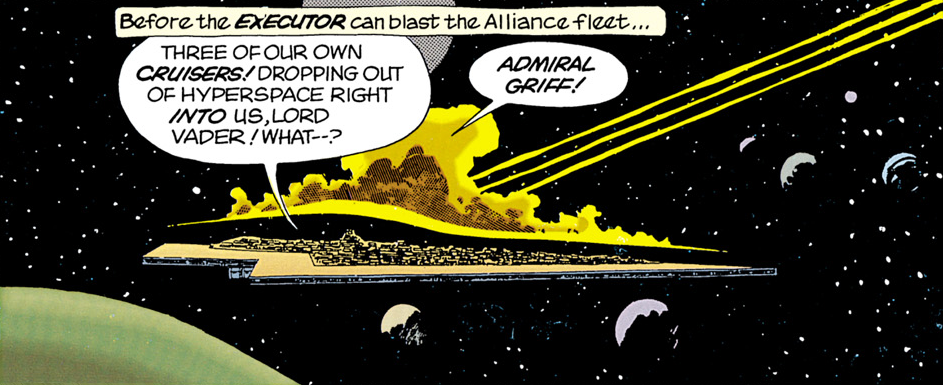
The evacuated Rebels assembled in orbit to attempt to breach the blockade. Vader, aboard his flagship, intentionally created a weak point in the blockade in an attempt to ensnare Luke Skywalker, the pilot responsible for the destruction of the Death Star. As the Rebel fleet approached within range of the Executor, Admiral Amise Griff, commanding three Star Destroyers, executed a hyperspace jump to cover the opening. His three starships collided with Vader's flagship, providing the Rebels with a critical opportunity to escape into hyperspace.
Concurrently, Commander Keyan Farlander, having been reassigned from the Independence to the Defiance to assist in the Rebel evacuation, was tasked with piloting an R-22 Spearhead under the call sign Red 1 to escort the five CR90 Corvette group Crescent, which was transporting the remaining evacuated personnel from Yavin. Upon emerging from hyperspace at the Frigate's designated rendezvous point, while verifying the location of the corvettes on his inflight map, Farlander observed a squadron of Imperial Alpha-class Xg-1 Star Wing Assault Gunboats attacking a group of four supply freighters located 16 kilometers away. Due to his distance and the failing shields of the freighters, he was unable to intervene in time and prioritized his orders to guard the corvettes. He then reviewed his mission start-up procedures and cycled through the corvettes to inspect their contents before assigning the lead ship to memory. Farlander then maximized his own shields, just as the Nebulon-B Frigate Red Wind exited hyperspace 10 kilometers away. The Red Wind subsequently launched two TIE/LN starfighters from Eta squadron and four TIE/sa bombers. Farlander engaged the TIE Bombers, also intercepting several TIE fighters (including inflicting hull damage on the TIE fighter Eta 1). He maintained his focus on the TIE bombers, considering them the primary threat. Subsequently, the Red Wind launched Beta Squadron of TIE Bombers. He also had to evade the Red Wind's gunners while pursuing the bombers, due to his proximity to the frigate. Farlander continued to defend Rebel transports as they reached one hyperspace jump point and was eventually supported by the arrival of Blue Squadron.
Subsequent Events
During the blockade, Skywalker discovered an ice world known as Hoth. He proposed that it could serve as a command center for the Alliance if necessary. The evacuated Rebels hoped to establish a base on Hoth but first needed to replenish their supplies. After escaping the blockade, the Heroes of Yavin were compelled to confront the starship Hungry Ghost. Renegade Squadron embarked on a search for a new base. Following his failure to capture the Rebel leadership, Vader continued his pursuit of Skywalker. In 2 ABY, the Rebels successfully established a refuge on Hoth, initiating the construction of a new base.
Behind the Production
The Yavin evacuation was first alluded to in Star Wars: Episode V The Empire Strikes Back and featured in the comic strips Doom Mission and Race for Survival in 1983. Later sources have since expanded upon the details of the battle.
In the Darth Vader campaign of the 2001 video game Star Wars: Galactic Battlegrounds, Mara Jade can be observed on the game map during the battle. Upon her detection, Vader exclaims, "What's this?!" and Jade departs on a Sentinel-class landing craft. However, given that cheat codes are required to witness her appearance, it is likely an easter egg, and its canon status is questionable. Furthermore, the same game implies that Darth Vader killed Jan Dodonna shortly after learning about Rebel activities on Raythar. Additionally, if the TIE Interdictors are positioned far enough from the temple when it explodes, they will not be destroyed.
One source that includes the evacuation is the 2004 video game Star Wars: Battlefront, although its storyline is considered S-canon by Leland Chee, the Keeper of the Lucasfilm Holocron continuity database. The battle also appears in the game's 2009 sequel, Star Wars Battlefront: Elite Squadron, but only in the PlayStation Portable version.
A potential continuity inconsistency was introduced by Imperial Spy, which placed Q-7N at the Evacuation of Yavin and the preceding evacuation preparation. This conflicts with Star Wars Missions 20: Total Destruction, which depicts Q-7N's destruction and, subsequently, the Rebels' return to Yavin Four. However, in Imperial Spy, Q-7N is absent from the final set of frames, which depict the Rebels after the evacuation. It is plausible that the events of the final Missions arc occurred during the events of Imperial Spy, although this has not been confirmed. However, it is also possible (but unlikely) that Imperial Spy depicts a separate event, after which the Rebels returned to Yavin.