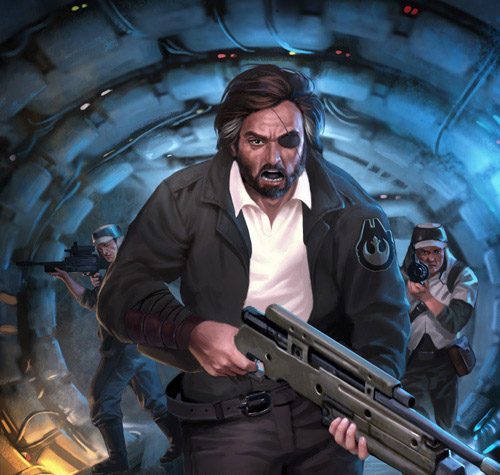
Col Serra
Col Serra, a male Human from Legends continuity, was a smuggler during the Galactic Civil War era, and a long-time acquaintance of the smuggler Han Solo. After the Battle of Yavin, Solo, now a member of the Rebel Alliance, requested Serra to form a fresh squad of skilled soldiers for the Rebellion. Serra journeyed across the galaxy, enlisting a diverse group of scoundrels, pirates, bounty hunters, and other lawbreakers, ultimately establishing Renegade Squadron. Serra himself assumed the role of commander for this newly formed unit. Renegade Squadron's initial combat engagement occurred during the evacuation of the Rebel base situated on Yavin 4. There, they provided cover for the retreating Rebel troops as they escaped the invading forces of the Galactic Empire. During this conflict, Serra received assistance from X2, a Force-sensitive clone trooper, and together they successfully destroyed an Imperial-class Star Destroyer by targeting its reactor core. Following the evacuation, Serra and Renegade Squadron aided Commander Gial Ackbar in locating a suitable site for a new Rebel base. However, after establishing the base on the planet Boz Pity, the Rebels were forced to flee once more due to the Empire having followed them to the planet.
Once the Alliance had finally established itself on Hoth, Serra and Renegade Squadron initiated continuous strikes against the Empire. They attacked an Imperial starship repair facility located on Rori, as well as an Imperial weapons depot on Naboo. During this latter mission, Serra and his team discovered evidence of a new Imperial superweapon, the superlaser-equipped Star Destroyer known as the Conqueror. Serra and Renegade Squadron then embarked on a daring mission to the Mustafar system to destroy the Conqueror, successfully achieving their objective despite the intervention of the Dark Lord of the Sith, Darth Vader himself. When the Empire eventually discovered Echo Base on Hoth in 3 ABY, Serra and the Renegades once again took on the role of a rear guard during the Rebel evacuation, planting explosives throughout the base and escaping just before its destruction.
A year later, Serra's squadron played a vital role in the events leading up to the Battle of Endor, as well as the battle itself. During the battle, they supported Solo's strike team in destroying the shield generator bunker responsible for projecting the deflector shield that protected the second Imperial Death Star. On Endor, Serra once again partnered with X2, and together they assisted Rebel ground and space forces by sabotaging the Imperial communications network and disabling the shields of enemy Star Destroyers. Following the Alliance's victory in the battle, Serra and his team disbanded Renegade Squadron, returning to their previous underworld activities. Many years later, Serra was located by Tionne, a Jedi archivist who was compiling information on Renegade Squadron. Serra recounted to her the role he and his squadron played in the Rebellion's fight against the Empire.
Biography
From smuggler to Rebel

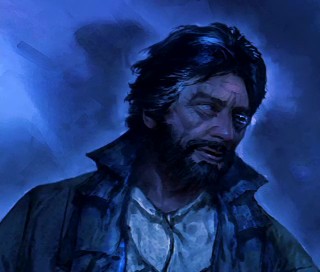
During the Galactic Civil War, Col Serra, a male Human operating as a smuggler, maintained a friendship with Han Solo, another smuggler. Serra had a cybernetic patch replacing his left eye, which he had lost sometime before. In 0 ABY, Solo, now fighting for the Rebel Alliance, requested Serra to find soldiers who were already skilled and did not require further training. These soldiers were needed to strengthen the defenses of the Alliance base on Yavin 4, which was soon to be attacked by the Galactic Empire as revenge for the Rebels' destruction of the Death Star superweapon. At this time, the Alliance primarily consisted of farmboys and idealists, so the Rebellion required a force of capable fighters who understood military tactics and could follow orders without hesitation. Serra accepted the task and began searching the galaxy for a suitable mix of pirates, bounty hunters, and other outlaws willing to fight for the Alliance. This proved to be relatively easy, as many individuals in the galaxy harbored resentment towards the Empire. Surprisingly, many recruits even brought their own stolen starfighters to support the cause.
Before long, Serra completed his mission and assembled the right number of soldiers. Most of them were wanted individuals who had been evading bounty hunters and were accustomed to maintaining a low profile, ensuring that no records of them existed in the Alliance archives. Serra then became the commander of Renegade Squadron, the name given to the newly formed unit. Together with Solo, he began preparing them for combat against the Empire. Shortly after the squadron was formed, the Yavin base was invaded, forcing the Alliance to initiate a full-scale evacuation. Renegade Squadron provided cover for the retreating forces and pushed back the invading enemy from the Alliance's main base temple. However, an Imperial scout trooper infiltrated the temple and stole the Alliance communication codes. Renegade Squadron tracked down the trooper and returned the logs to the temple. After destroying all databanks containing sensitive information to prevent it from falling into enemy hands, the Renegades and Serra boarded their X-wing starfighters and joined the battle in space, where they engaged an Imperial-class Star Destroyer.
However, the squadron was unable to handle the Star Destroyer on their own, so Serra contacted X2, a Force-sensitive clone trooper and the leader of Grey Squadron, requesting his assistance. X2, who was still on the ground when Serra contacted him, quickly joined the space battle in his X-wing. Serra instructed him to help Renegade Squadron disable the Star Destroyer's communications array to prevent the ship from calling for reinforcements. Once the array was destroyed, X2 and Serra landed their X-wings inside the Star Destroyer's hangar and fought through stormtroopers to reach the ship's reactor core. X2 destroyed the core, and the two returned to their starfighters, successfully evacuating just as the Star Destroyer exploded, providing the necessary time for the Alliance to complete the evacuation.
On the run
Following the retreat from the Yavin base, the Alliance faced the difficult task of finding a new central base of operations. However, it was discovered that before the planet Alderaan was destroyed by the Death Star, Rebel leader Bail Organa had encrypted a list of potential base locations into a holocron made of phrik, a material strong enough to withstand the planet's destruction. To this end, an operation was organized to recover the holocron, with Solo commanding a Rebel fleet consisting of a Mon Calamari Star Cruiser, two EF76 Nebulon-B escort frigates, and a Corellian corvette. Renegade Squadron pilots also participated in the attack, stationed with their starfighters aboard the Mon Calamari Cruiser. However, when Solo's fleet reached the remains of Alderaan, they encountered an Imperial force. Despite the presence of the Imperials and the unexpected intervention of bounty hunter Boba Fett, the Renegades managed to retrieve the holocron, and Serra transmitted its contents to Rebel Commander Gial Ackbar, who was responsible for finding a new base.
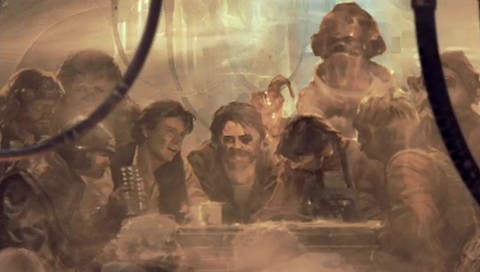
Serra was then ordered to meet Solo on Ord Mantell, where Solo was repairing his starship, the Millennium Falcon, after the damage it sustained during the battle at Alderaan's remains. Ord Mantell was a remote world with a small Imperial garrison, so Serra and Renegade Squadron believed they would be safe there and decided to rest. However, while Serra, Solo, and the Renegades were relaxing in a local cantina, bounty hunter IG-88 arrived, intending to collect the bounty on them. A firefight broke out, and soon the entire Imperial garrison was pursuing Serra and Renegade Squadron. The Renegades needed to leave the planet quickly before Imperial reinforcements arrived. However, the Falcon still needed repairs, so the Renegades, along with Solo's co-pilot Chewbacca, had to search the nearby junkyard for spare parts. After completing the repairs, defeating IG-88 in a shootout, and destroying an anti-aircraft turret, Serra and Renegade Squadron evacuated on the Falcon just as Imperial Star Destroyers appeared above the planet.
Still shaken from their disastrous vacation, Serra and Solo received more bad news from Alliance Command. While examining the sites listed in the holocron, Commander Ackbar had been captured by the Empire and was being transported to the prison world of Kessel. Many of Serra's friends from his smuggling days had been sent there and never returned, so he was determined to prevent the same fate from befalling Ackbar, the Alliance's greatest tactician. A rescue operation was quickly launched, and the Rebel fleet attacked the Star Destroyer transporting Ackbar over Kessel. During the battle, Renegade Squadron used an LAAT to land in the Star Destroyer's hangar. They located Ackbar, escorted him to the LAAT, and flew back to the Rebel Mon Calamari Cruiser. Once safe, Ackbar recounted his capture. He had been investigating the world of Boz Pity and found it to be an ideal location for a new base. Deciding to visit other worlds on Organa's list, he took a group of scouts and droids to the planet of Saleucami. However, they never reached their destination, as their transport was attacked by Boba Fett, and those aboard were captured. Fett sold Ackbar to the Imperials and took the rest of Ackbar's crew to Tatooine to sell them to the Hutts.
Determined to rescue the scout team, Serra, Solo, and Renegade Squadron traveled to Tatooine to rescue them. After landing in the planet's Mos Eisley spaceport, the Renegades, following Serra's advice, eliminated the Imperials stationed in the local Chalmun's Cantina. Inside the cantina, they found a Rodian who told them that the prisoners were being held in a nearby shipyard and offered to show them the way. Serra was initially skeptical of the Rodian's information but agreed to follow him, as he was Renegade Squadron's only hope of finding the prisoners. The squadron soon reached the shipyard but found it sealed by a force field. After destroying force field generators scattered throughout Mos Eisley and clearing the shipyard of enemy troops, the Renegades found the prisoners held in a small sealed cell inside the shipyard. Solo used his fusioncutter to break them out, and after destroying two AT-ST walkers, Renegade Squadron and the rescued prisoners evacuated on the Falcon.
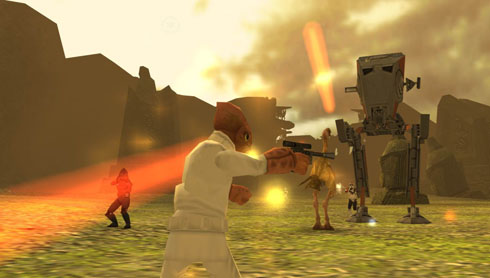
After rejoining the rest of the Alliance forces, Serra and Renegade Squadron traveled to Boz Pity, where the Alliance established a new base. However, only a few hours later, an Imperial assault force attacked the base. It turned out that Fett had placed a tracking beacon on an R5 droid that Renegade Squadron had rescued from Tatooine. The Rebels had to fight against a large Imperial force, complete with AT-AT walkers, but managed to stall the enemy by cleverly using particle cannon turrets and booby traps. While Renegade Squadron held their line, Solo and Chewbacca prepared the evacuation craft for takeoff. Ultimately, the Alliance was able to safely evacuate from Boz Pity. Eventually, Rebel Jedi-in-training Luke Skywalker discovered the remote ice planet of Hoth, which became the site of the new Rebel base for the next few years. Renegade Squadron used Hoth as their base of operations, continuously undertaking missions against the Empire, which led Emperor Palpatine to assign his elite storm commandos to hunt them down.
Later missions
In 1 ABY, a shipment of ryll intended for a Rebel medical facility went missing, prompting the Rebels to send several agents to locate it. Sometime later, Solo was tasked with meeting Major Coret Bhan, one of the agents, on Corellia. Serra and a group of Rebels accompanied Solo to Corellia. While Serra and Solo waited for Bhan in a local cantina, the rest of the Rebels took positions outside. However, instead of Bhan, a mysterious smuggler appeared in the cantina. He offered Solo a drink and began questioning him about the ryll shipment. Serra somehow discovered that the smuggler was an agent of the Imperial Security Bureau who was also tracking the shipment and had subdued Bhan on Tatooine. Serra warned Solo about the agent, and the remaining Rebels entered the cantina with their blasters drawn. A fight ensued, and the Imperial agent emerged victorious, subduing Solo and the Rebels but releasing them immediately afterward. Unbeknownst to Solo, the agent had planted a homing beacon on him during the fight. When the shipment was finally located in the asteroid field Smuggler's Run, and Solo set out to retrieve it, the agent followed him and ambushed him while Solo, Chewbacca, and Solo's friend Lando Calrissian were loading the cargo into the Millennium Falcon. Solo escaped with only a few crates of ryll, while the agent claimed the rest for the Empire.
Some time passed, and Serra spearheaded Renegade Squadron's attack targeting an Imperial starship repair facility located on Rori. They descended in an assault shuttle, and the Renegades commenced their assault on the facility, anticipating a swift victory over the stationed troops. Serra and his team, however, were taken aback by the presence of a squad of storm commandos, who were in the process of repairing their own starship. These commandos mounted a strong defense, compelling Serra and Renegade Squadron to retreat to their assault shuttle and withdraw from the planet. Fortunately for Serra, the storm commandos' vessel remained unrepaired, preventing them from pursuing Renegade Squadron. With the Renegades no longer on Rori, a secret Rebel outpost situated there was left almost completely vulnerable. The storm commandos launched an attack and discovered crucial intelligence pertaining to Rebel sympathizers within the Royal Naboo Security Forces.
Renegade Squadron's subsequent mission involved the elimination of an Imperial weapons depot on Naboo. Prior to this operation, Serra personally reached out to a Rebel who had already built a reputation in the fight against the Empire and recruited them into his squadron. With the new recruit on board, Renegade Squadron initiated their mission. Upon reaching a position near the depot, Serra and the new Renegade surveyed the area using electrobinoculars, only to discover that it was guarded by storm commandos led by Captain Sarkli, the very same commandos that Renegade Squadron had previously encountered on Rori. Fully aware of the threat posed by the storm commandos, Serra still opted to proceed with the attack on the depot. The Renegades managed to advance halfway to the depot building before the storm commandos detected them, triggered an alarm, and began firing from the building's rooftop. Serra and his team sought cover and engaged Sarkli's forces, ultimately driving them into the wilderness.
Inside the depot, the Renegades discovered multiple crates containing weapons and ammunition, as well as a crate filled with datafiles, which they decided to examine. One of the datafiles displayed an image of an Imperial-class Star Destroyer. Serra initially found nothing remarkable about it, but the new recruit noticed an unusual weapon mounted on the Star Destroyer's bow. Serra then made the decision to gather all the files from the depot and have Rebel slicers analyze them. Upon examining the data, the slicers determined that the Star Destroyer was equipped with a powerful superlaser, similar to the one found on the Death Star. The files also indicated that the superlaser had been developed at a research facility on Naboo, which Serra designated as Renegade Squadron's next target, hoping to gain further information about the Star Destroyer. Infiltrating the facility, Renegade Squadron began searching for the main control room but were soon confronted by Sith Acolyte Namman Cha, who was determined to protect the facility's secrets and engaged the Renegades. Despite Cha's fierce resistance, Serra's team overwhelmed him with their numerical advantage, forcing him to retreat. Renegade Squadron then resumed their mission and quickly located the main control room. The slicers downloaded all the data stored there, which revealed the Star Destroyer's name, the Conqueror, as well as its location—the Mustafar system.
One less superweapon
The data also showed the Conqueror firing its superlaser at an uninhabited planetoid within the Mustafar system as a test, completely obliterating the celestial body. Serra was taken aback by the starship's destructive capability, and Renegade Squadron set course for Mustafar to destroy the vessel. Upon arriving, the Renegades encountered a Rebel intelligence officer, who informed them that supply shuttles from the Conqueror landed on Mustafar once a day. Armed with this information, Serra and Renegade Squadron resolved to use a shuttle to infiltrate the Conqueror. They proceeded to the shuttles' landing site and established an ambush. They soon witnessed the arrival of the Director of Imperial Intelligence Ysanne Isard at the site, accompanied by a group of Blackguard Dark Jedi. Serra deduced that the collaboration between Imperial Intelligence and the Blackguard indicated the paramount importance of the Conqueror project to the Empire. Deciding to eliminate Isard before the shuttle arrived, Renegade Squadron launched an attack. After a brief exchange of fire, Isard retreated along with the Blackguard.
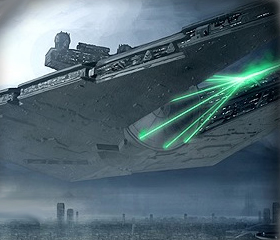
Serra and Renegade Squadron then returned to their concealed positions. When the shuttle arrived, the Renegades swiftly subdued the crew and donned their uniforms. Aboard the shuttle, Serra learned that the Conqueror was commanded by Victor Strang, a former storm commando. Having heard of Strang, Serra cautioned his team to prepare for significant resistance. The shuttle soon docked in the Conqueror's landing bay. Renegade Squadron's Imperial disguises provided the necessary diversion, enabling Serra's team to quickly eliminate the landing bay's guards. Discarding the stolen uniforms, Serra and Renegade Squadron advanced towards the ship's reactor core but were halted by a set of blast doors. On Serra's orders, his troopers planted explosives on the doors, detonating them and revealing Strang and a squad of storm commandos waiting on the other side, having been warned of Renegade Squadron's mission by Isard. The ensuing battle was intense but brief. Renegade Squadron employed overlapping support fire, gaining an advantage and forcing Strang to retreat.
Before the Renegades could pursue him, another blast door sealed shut behind Strang, and Serra instructed his troops to proceed with their original objective. Inside the reactor core chamber, Renegade Squadron's demolition experts placed explosive charges on the reactor core, and the squadron began their return to the landing bay. As they prepared to board the shuttle that had brought them aboard, they were surprised by the appearance of the Dark Lord of the Sith Darth Vader, escorted by a squad of elite stormtroopers. Vader was determined to ensure the safe delivery of the Conqueror to the Emperor. Another battle erupted, and when Vader's forces took cover behind one of the Lambda-class shuttles stationed in the landing bay, the Renegades launched missiles at it. The shuttle was destroyed, and Vader and his stormtroopers were momentarily hindered by the explosion. Serra and the Renegades swiftly capitalized on this opportunity, boarding the supply shuttle and launching from the Conqueror. Explosions began to tear the Star Destroyer apart, but a TIE Advanced and an Incom gunship also managed to escape before the Conqueror was completely destroyed. Serra believed that Vader had been killed in the explosion, but the new Renegade correctly surmised that the TIE Advanced had been piloted by the Sith Lord. The trooper also speculated that Strang might have escaped on the gunboat. Nevertheless, the Renegades' mission was a success, and the Conqueror no longer posed a threat to the Alliance.
A bitter winter
In 3 ABY, the Empire discovered the Rebels' Echo Base on Hoth and initiated a full-scale invasion. Once again, Renegade Squadron was selected to provide cover for the retreating Rebel forces. Having destroyed the base's shield generator, the Imperial forces entered the base. Following orders from General Carlist Rieekan, Serra directed his unit to the base's control room to destroy databanks containing sensitive information, preventing it from falling into Imperial hands. Simultaneously, Serra planted explosive charges throughout Echo Base. After Renegade Squadron destroyed the databanks, they activated the timers on the explosives planted by Serra. The Renegades were then tasked with protecting the crew of the Rebel ion cannon, which was used to clear a path for the retreating Rebel transports. Once the ion cannon crew had evacuated, Serra and the Renegades proceeded to the extraction point as well, becoming the last squadron to evacuate from Hoth as the explosives detonated, destroying Echo Base and leaving the Empire with nothing but debris.
While the ground battle concluded, the conflict in space above Hoth persisted, with the Rebel fleet, consisting of a Mon Calamari cruiser and Nebulon-B frigates, safeguarding the last transport that had yet to evacuate. The Renegades escorted the transport, ensuring its safe jump to hyperspace. Serra's squadron engaged the Empire's experimental TIE Defender as the rest of the fleet prepared to make a hyperspace jump. Serra then instructed the Renegades to seize one of the TIE Defenders for study. The Renegades accomplished their mission, and after defeating Darth Vader himself in his TIE Advanced, they fled Hoth and rejoined the remaining Alliance forces. The defeat at Hoth, coupled with the loss of Solo, who had been encased in carbonite and captured by Fett, significantly impacted the Rebels' morale. Nevertheless, the Renegades continued their service, participating in numerous battles and striving to demonstrate through their actions that hope for the Rebellion remained.
Approximately a year after the Battle of Hoth, Solo was eventually rescued by Skywalker and his allies. Furthermore, it was discovered that the Empire was constructing a new Death Star in orbit around the forest moon of Endor. However, the Death Star was protected by a defensive energy shield projected from the planet's surface. Solo, now promoted to general, decided to lead a strike team to the planet's surface, utilizing the stolen Imperial shuttle Tydirium to disable the shield, enabling the Rebel fleet to destroy the Death Star. Before proceeding with the mission, the Rebels needed to gather more information about the Imperial positions on Endor. When it was learned that the Emperor intended to make a pilgrimage to the Sith tomb world of Korriban, a mission was organized to obtain information about Endor's defenses from his personal shuttle. Every member of Renegade Squadron volunteered for the mission, which Serra described as "crazy" and "foolhardy."
The Renegades arrived on Korriban before Palpatine and seized control of the Sith Academy and a Sith tomb. Serra then placed explosive charges on all three exits from the tomb, intending to collapse them and trap Palpatine inside upon his entry. To entice the Emperor into the tomb, the Renegades destroyed several Sith artifacts within. Enraged, Palpatine entered the tomb and was trapped when the exits collapsed, allowing the Renegades to retrieve the data from his shuttle. The data revealed that Palpatine was scheduled to visit the Death Star for an inspection in the near future. The Alliance decided to seize the opportunity and destroy both the second Death Star and the Emperor with one single blow. To divert at least some of the Imperial forces away from Endor, a diversionary assault on the Imperial-controlled planet of Sullust was planned, and Renegade Squadron was assigned to execute the mission.
The Renegades were disappointed that they would not be present on Endor but agreed to participate in the Sullust raid, recognizing its significance. Upon arriving on the planet, Renegade Squadron captured the Imperial garrison building without encountering any resistance, leading Serra to suspect that something was amiss. He then decided to contact Alliance Command to share his concerns. Serra's suspicions proved accurate—the Renegades had fallen into a trap on Sullust. Soon, IG-88 appeared, having been hired by Vader, as Serra had suspected, due to the problems Renegade Squadron had caused him on Hoth. Furthermore, the Empire was employing gravity well projectors to prevent the Renegades from escaping Sullust. Renegade Squadron managed to defeat IG-88 in combat once more and destroyed the generators, ultimately securing Sullust.
The last battle
Serra's team immediately traveled to Endor, arriving just in time to slip past the shield through a gap created for Solo's strike team. Renegade Squadron landed some distance from Solo and soon discovered that he had been pinned down near the shield generator bunker by Imperial troops. To compound matters, the entire Death Star operation was revealed to be a trap orchestrated by Palpatine, as the Death Star was operational and the Imperial fleet emerged at Endor to engage the Rebels. As the full-scale battle commenced, Renegade Squadron fought their way through Imperial forces on the surface, hoping to reach Solo's team and assist them in destroying the bunker. Serra himself chose to pilot his X-wing to provide air support to his team. Serra then contacted X2, who was also participating in the battle and was currently defending Admiral Ackbar's flagship, Home One, from invading enemy forces. Serra requested that X2 assist Renegade Squadron on the surface. After securing Home One, X2 used an escape pod to reach Endor's surface. Serra then contacted X2 again, informing him that several of the native Ewoks who had been assisting Solo's team and Renegade Squadron had been captured by the Empire. After X2 rescued them, Serra decided to join him on the ground.
However, as he began his landing approach, his X-wing was shot down by a turbolaser battery, and Serra crashed the starfighter into a tree. He survived the crash and rendezvoused with X2, and together, they made their way into the bunker. They sabotaged the Imperial communications network, leaving Solo to destroy the bunker itself. Soon enough, Solo's strike team and Renegade Squadron destroyed the bunker, lowering the Death Star's shield. This created an opportunity for Lando Calrissian—now also a Rebel general—to fly the Millennium Falcon into the Death Star's inner structure and destroy its reactor core, triggering a chain reaction that destroyed the superweapon. Prior to the Death Star's destruction, Skywalker had turned Darth Vader back to the light side of the Force, and Vader had killed Palpatine, although he had sacrificed his own life in the process. Nevertheless, both the battle in space and on the ground continued. While Renegade Squadron mopped up the remaining Imperial Army forces, Serra and X2 made their way to an Imperial ion cannon, using it to disable the shields of two Star Destroyers in orbit, leaving them vulnerable for Ackbar's fleet to destroy.
Meanwhile, two AT-ATs attacked the nearby Ewok village, and Serra instructed X2 to destroy them. X2 used a rocket launcher, targeting the AT-ATs' cranial sections, ultimately destroying the vehicles. Renegade Squadron managed to defeat the remaining enemy troops, and the battle was won by the Rebels. Following the Battle of Endor, Renegade Squadron decided to disband, believing that the fledgling New Republic needed heroes like Skywalker, Solo, and Calrissian, rather than the ragtag group that was the Renegades. After disbanding the unit, its members, including Serra, returned to a life of crime.
Post-war
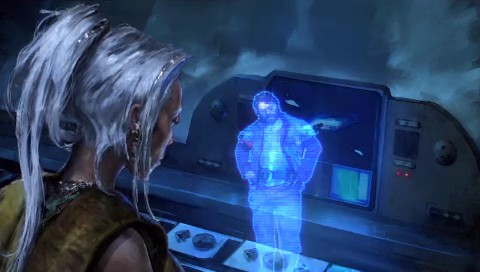
Years later, Serra was contacted via hololink by Jedi Knight Tionne, the jedi archivist of the Jedi Temple on Coruscant. She had discovered old, encrypted data concerning Renegade Squadron, but it provided little information. After considerable effort, she located Serra and inquired about Renegade Squadron. Believing that enough time had passed since the end of the Rebellion and that the public deserved to know about Renegade Squadron, he proceeded to recount the squadron's exploits.
Personality and traits
Serra, a gruff and battle-hardened individual, possessed a noble character. He maintained a cordial relationship with Han Solo, readily agreeing to his request to form a new squadron. He was cautious and detail-oriented, distrusting the Rodian's information on Tatooine and suspecting a trap on Sullust after Renegade Squadron captured the garrison building with unexpected ease. However, while examining the datafiles on Naboo, he failed to notice the unusual weapon mounted on the Star Destroyer's bow. He later believed that Renegade Squadron had killed Vader, unaware that the Sith Lord could have escaped on the TIE Advanced. Serra resented constantly fleeing from the Empire after the evacuation of Yavin and was relieved when the Rebel Alliance finally established a base on Hoth and began retaliating against the Empire. Following the defeat at Hoth, Serra and his squadron did their utmost to maintain the Rebels' morale.
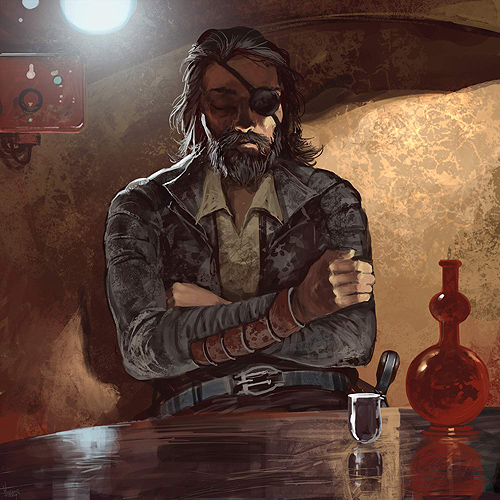
In contrast to Solo, who preferred not to shoot first when dealing with bounty hunters, Serra exhibited the opposite approach. Having endured numerous battles alongside Renegade Squadron, he developed complete trust in his team and was even willing to entrust them with his life. In turn, Renegade Squadron and Serra's reputation was such that the elite storm commandos considered them a formidable threat. As a smuggler, Serra preferred to maintain a low profile and avoided discussing his illicit activities over an open hololink, believing that this approach had contributed to his longevity. Serra had light skin and brown eyes. His brown hair had begun to gray by the time of Renegade Squadron's formation.
Behind the scenes
Col Serra was created for the video game Star Wars Battlefront: Renegade Squadron, developed by Rebellion Developments and released in 2007, exclusively on the PlayStation Portable. Within the game, he narrated the campaign mode. In June of 2009, Serra made a brief appearance in the dark side scenario campaign of Agents of Deception, an expansion set for the Star Wars Galaxies Trading Card Game. A card featuring Serra was also included in the set, although it erroneously stated that he commanded Rogue Squadron instead of Renegade Squadron. This error was subsequently corrected in a later patch. In November of the same year, Serra was featured in the PSP version of another Battlefront game, Star Wars Battlefront: Elite Squadron. However, in this instance, Serra served as an NPC, appearing in two levels of the game. Finally, in 2010, Serra and Renegade Squadron played a significant role in both the dark side and light side scenario campaigns of another expansion set for the Star Wars Galaxies Trading Card Game, Threat of the Conqueror. This set also included a card depicting Serra.
Despite being clearly depicted with a cybernetic replacement over his left eye in Renegade Squadron, Elite Squadron, and in Rebellion Developments' artwork, Serra is shown with a simple patch on both of his Trading Card Game cards.
Development
In Renegade Squadron, if the player does not select a name for their profile, the name "Col Serra" will be automatically assigned. When questioned about this in the game's official development blog, Chris Baker, the blog master, responded that it could be interpreted that the character the player controls in the game is Col Serra. However, this contradicts the fact that the player's character receives orders from Serra throughout the game.
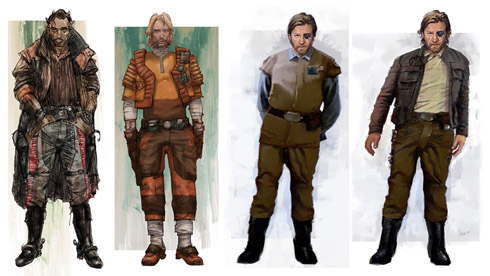
During the initial planning phases for Renegade Squadron, the early designs of Serra portrayed him as a robust Zabrak smuggler. This design was abandoned because the producers felt that it bore too many similarities to the movie Blade Runner and because they believed that players would connect more readily with a Human character than a Zabrak. The Human character also underwent two more changes in appearance before the final design was chosen. According to an early story outline, Col Serra's squadron was originally named Phantom Squadron, but this was later changed to Renegade Squadron. Serra was also initially intended to be questioned by a new Jedi named Hes Jor-Sharu, not Tionne.