Skirmish at Peragus II
The clash known as the Skirmish at Peragus II unfolded during the era of the Old Sith Wars, as the Jedi Exile, Meetra Surik, found herself hunted by Sith forces, leading her to a prominent mining installation situated within the Peragus II asteroid belt. Darth Sion orchestrated the destruction of the colony as Meetra desperately tried to escape the complex.
Capture of Harbinger
This initial confrontation took place aboard the Republic warship, the Harbinger. A concealed Jedi hunter from Goto's HK-50 series was operating covertly as a protocol droid. This droid was assigned to Meetra Surik by the ship's captain, acting under orders from Admiral Carth Onasi to ensure her safe passage to Telos IV with the utmost diplomatic importance.
Subsequently, a distress transmission was intercepted from a freighter under assault by Sith forces, prompting a deviation from the Telos route for investigation. Both the freighter and the Sith warship were discovered seemingly deserted, feigning inactivity in anticipation of rescue. The freighter's identification signature matched that of the Ebon Hawk within Republic databases and was subsequently brought aboard the Harbinger. The warship was boarded, allowing concealed Sith assassins to infiltrate the Republic vessel. Reports indicated that only Kreia's lifeless body and the severely damaged T3-M4 were found aboard the Ebon Hawk.
While HK-50 orchestrated Meetra's drugging during a medical appointment, Darth Sion was discovered unconscious on the warship and placed within a kolto tank. Kreia emerged from her hibernation trance and found Meetra confined within one of the cargo holds. Unbeknownst to her, the Sith had already infiltrated the Harbinger, systematically murdering personnel and crippling the ship. As soon as Kreia and Meetra escaped on the Ebon Hawk, the Sith fired upon the freighter, nearly destroying it. With assistance from 3C-FD, T3-M4 managed to repair the damaged vessel while the two Jedi remained unconscious, guiding it towards the Peragus Mining Facility.
Mining Facility massacre
Upon the Ebon Hawk's docking at the Peragus Mining Facility, HK-50 launched an assault on T3-M4, temporarily disabling him. The assassin droid had stealthily infiltrated the ship's storage compartment. Kreia was relegated to the morgue, while Meetra was placed in a kolto tank for recuperation. The miners were in disarray, with some contemplating claiming the bounty offered on Jedi by the Exchange, while others opposed such actions. Accidents were occurring, and smuggling operations kept the security officer occupied. Simultaneously, HK-50 acquired crucial information about the facility from the maintenance officer. Disguised as the maintenance officer, he struck a deal with a miner named Coorta to facilitate Meetra's delivery to the Exchange.
The assassin droid reprogrammed the mining droids, resulting in numerous injuries and fatalities among the miners, compelling many to seek refuge alongside Meetra Surik in the medical bay. The maintenance officer attributed the droids' behavior to binary decay but was unable to diagnose the issue due to the malfunctioning droids' self-destructive tendencies. Detonations occurred within isolated gas pockets in the facility's lower levels, forcing miners into emergency sectors, initiating a lockdown, and damaging specific components of the ventilation systems. This led to a buildup of toxic fumes in the dormitory level, where the remaining miners, cut off from communication and facility control, were left to perish. Coorta and his men were among the last to be killed, attempting to flee the facility. However, HK-50 reversed the turbolift codes, preventing Coorta from reaching the administration level, and then directed the droids to eliminate Coorta and his men. As a final act, HK-50 administered a potent dose of sedatives to Meetra and the miners in the Medbay. This sedative overdose proved fatal for the miners but rendered Meetra unconscious, facilitating her easy transport to Goto upon his transport's arrival.
The skirmishes begin
Upon hearing Kreia's voice through the Force, Meetra regained consciousness and emerged from her kolto tank. She gained entry to the facility morgue and encountered the elderly woman, who greeted her upon awakening. With no time for explanations, Meetra was urged to locate the Ebon Hawk to escape the impending danger Kreia had sensed during her slumber.

Dressed scantily and armed with only a vibroblade and a mining laser, Meetra battled her way through hostile mining droids, gradually regaining Force-sensitivity with Kreia's guidance. She discovered Atton Rand confined within a force cage on the administration level. Despite his evasiveness regarding the charges against him, they engaged in a brief exchange about the events leading up to his arrest, providing Meetra with an overview of the situation. Meetra freed Atton and accepted his assistance in finding a means of escape. Atton managed to restore communications but found the system disconnected from the main hub. However, T3-M4 had been left in standby mode in storage near the hangar bay, and Meetra was able to contact him using a communication terminal. T3 provided a route from the administration level to the hangar bay, passing through the mining tunnels and the fuel depot, where Meetra would ultimately be thwarted by force fields and forced to seek alternative routes through the dormitory level.
During a spacewalk across the asteroid's surface, Meetra was contacted by Atton via comlink and informed that the Harbinger was about to dock with the facility. Upon Meetra's return to Atton, Kreia joined them, leading to a confrontation with HK-50 prior to boarding the vessel. Their plan involved traversing the Harbinger in an attempt to reach the hangar, passing through the fuel pipe adjacent to the engine room.
Skirmishes aboard the Harbinger
On the Harbinger, the trio fought their way through stealthed Sith Assassins to reach the bridge and download the orbital drift charts necessary to navigate the Peragus asteroid field. They stumbled upon Meetra's quarters on the ship, where she retrieved her belongings from a footlocker. On the engine deck, Darth Sion confronted Kreia while Meetra and Atton escaped. Kreia, having just left the morgue and armed only with her crude vibrosword, stood little chance against Sion's lightsaber. She attempted a sneak attack using a Force cloak, but Sion severed her left hand. The pain resonated through the Force bond that had formed between her and Meetra during their long slumber, causing Meetra to writhe in pain as she and Atton reached the engine room. Utterly defenseless, Kreia was spared by Sion.
The escape
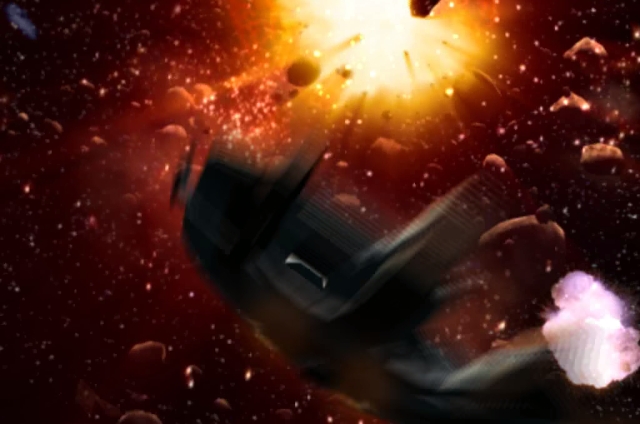
Atton and Meetra were joined by T3-M4 in the fuel depot, and the three made their way to the Ebon Hawk. As Atton powered up the engines, Sith troopers attempted to board, but Meetra repelled them using the Hawk's gun turrets. Kreia barely made it to the ship before they took off.
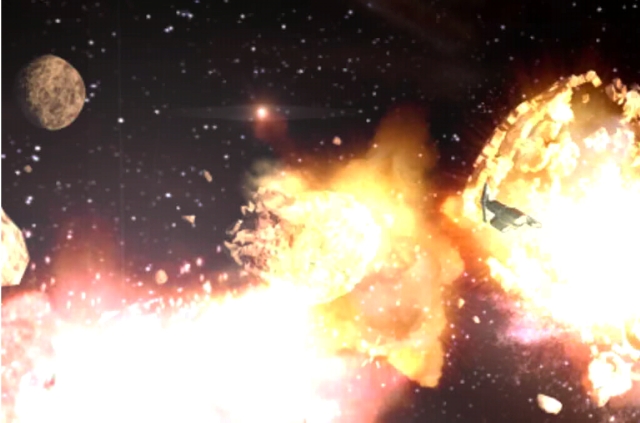
As the Hawk prepared to jump to hyperspace, Sion and the Harbinger pursued them through the asteroids. The Republic warship fired upon the asteroids, detonating one and triggering a chain-reaction explosion that obliterated every asteroid in the field, including the facility. Meetra then set course for Telos, where she would be placed under house arrest pending the outcome of an investigation into the Peragus disaster, which had significant ramifications for the planet and the Republic.
Behind the scenes
The Skirmish at Peragus II was initially depicted in the video game: Star Wars: Knights of the Old Republic II: The Sith Lords. Later in the game, during the player's first visit to the Telosian Jedi Academy, Atris informs the player that 150 miners perished on Peragus II. Upon departing Peragus II, the player is presented with two options: either shoot at the asteroids to clear a path or attempt to evade them. This decision does not influence the player's light or dark side alignment but does unlock achievements. If the player opts to destroy the asteroids to clear a path, they will receive the achievement: "It Was Like That When I Got Here!" Conversely, if the player allows the Sith to destroy the asteroids, they will receive the achievement: "I Didn't Do It!"