TIE Experimental Project
The TIE Experimental Project represented a clandestine initiative by the Imperial forces, aimed at pioneering innovative, remotely-operated starfighters derived from established TIE technologies. This program, backed by Grand Admiral Demetrius Zaarin and overseen by Director Lenzer, operated from the base located at Research Station Obsidian. The Rebel Alliance intervened, bringing the project to an abrupt halt before its objectives could be realized.
History
As Grand Admiral, Zaarin held responsibility for several highly classified programs centered on creating cutting-edge starfighter technology for the Empire. While the TIE Defender and TIE Avenger programs were focused on producing starfighters for the Empire's most skilled pilots, the TIE Experimental Project's goal was to create unmanned TIE vehicles able to engage in combat while linked to a central battle computer.
Shortly following the Battle of Hoth, the project advanced to a point where five distinct experimental starfighter models could be remotely controlled by pilots stationed on modified Escort Transports. These Escort Transports were designed to remain outside of active combat zones, while their computers recorded and analyzed the performance of the remote pilots, with the data intended for integration into the AI systems of future fully autonomous fighters.
Zaarin permitted Lenzer's prototype starfighters to attack commercial vessels in the Vilonis Sector to gather combat information for later stages of the TIE Experimental Project. While this data was essential for the project's continuation, these skirmishes also served Zaarin's other objectives. Firstly, the disruption of commercial shipping made it significantly harder for Rebels in the area to obtain supplies, due to the reduction in civilian traffic that their agents could use for cover. Secondly, the increased perception of lawlessness and piracy was likely to increase public support for a greater Imperial presence in the sector, which would allow Zaarin to escalate his activities, possibly in preparation for his attempted coup against Emperor Palpatine. Lastly, these attacks were intended to lure Rebel forces operating in the region.
Investigation by the Liberty
The Rebel Alliance became aware of the TIE Experimental Project after receiving many reports regarding unusual spacecraft conducting raids on commercial shipping within the Vilonis sector. These disturbing reports described entire convoys vanishing after being attacked by swarms of these unknown ships. The attacks happened so quickly that by the time Alliance fighters arrived, only burning wreckage remained. As a result, local shipping companies became hesitant to operate in the sector, and Rebel High Command tasked the Mon Calamari Star Cruiser Liberty, commanded by Admiral Yamarus, with investigating the situation.
The first substantial intelligence was gathered during a staff transfer from the Calamari Cruiser Defiance to the Liberty. While traveling through realspace in the Belat system, the staff convoy picked up a distress signal from nearby, and two RZ-1 A-wing interceptors from Blue squadron (one of which was flown by Ace Azzameen) were sent to investigate.
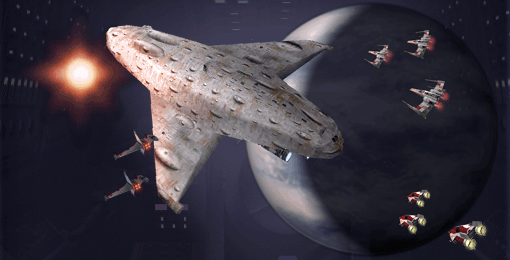
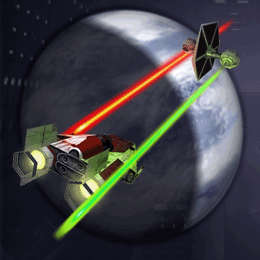
Upon arrival, they found a convoy under attack by starfighters that resembled "some weird new TIE design". As they moved to intercept the attackers, the pilots speculated that these new fighters could be a "secret weapon of the Empire". The Rebels also noticed Escort Transports far from the battle, but these ships jumped to hyperspace when approached. After the raiders were either destroyed or driven off, the A-wings returned to the Liberty. There, technicians immediately began analyzing the flight recorders for data, and discovered that the enemy craft had "exceptional speed and maneuverability," as well as a surprisingly powerful turbolaser (a weapon typically found on capital ships). Due to its unusual design, this fighter was named the TIE Bizarro.

After analyzing the A-wing data, the Liberty technicians decided that capturing actual examples of these prototype craft was necessary for further research. To achieve this, a plan was devised where the Alliance would stage a fake convoy of cargo ships to lure the controllers of these raiders into attacking. Cargo group Sulin consisted of computer-controlled MB-C1 medium transports programmed to avoid Imperial customs checkpoints and transmit false transponder data. The hope was that this would be an effective lure for the Imperial prototypes. Rebel starfighters equipped with ion pulse warheads, designed to disable rather than destroy the attackers, would escort the convoy. However, secrecy was crucial, and it was deemed necessary to hide Alliance involvement. Therefore, a flight of 6 Z-95 Headhunters, designated Bandit Squadron, was assigned to this mission.
The lure was extremely successful, and two squadrons of the experimental TIEs attacked the convoy, along with two mysterious escort transports in the background. Surprised by the skill of the Rebel pilots, even in a low-performance craft like the Z-95, an escort transport and one of each type of experimental TIE were quickly disabled. Bandit Squadron not only captured the enemy craft, but also managed to save most of the MB-C1s and destroy all the remaining attackers before Heavy Lifter group Atlas arrived to retrieve the disabled prototypes. The experimental TIEs captured during this mission were of two types. The first was a variant of the standard TIE/LN starfighter, but with additional twin laser turrets mounted on the wings, matching the description of an attack force that "came as a deadly surprise to a B-wing group patrolling too close to an Imperial base". It was named the TIE BigGun due to its distinctive features. The second was a variant of the TIE/IN interceptor, modified with two heavy missile magazines attached outside the wing panels, matching the description of raiders encountered by Rebel forces: an T-65 X-wing starfighter squadron had been "severely crippled by this new TIE starfighter". It was named the TIE Warhead because of its missile armament. Finally, the captured escort transports of Suluk group were found to be carrying pilots for the experimental TIEs. However, the life support systems on these vessels had been rigged to "malfunction" if disabled, and the entire crew died before the Alliance could interrogate them. However, the communications equipment found on board strongly suggested the role played by these pilots.
The next encounter with the TIE Experimental Project occurred due to a fortunate intelligence discovery. Rebel agents located an Imperial cargo facility called Bretie Facility in orbit around Nomlis III in the Kurdin. The intelligence indicated that the Imperial station was a production center for the clandestine project. The Alliance decided to send in a commando strike team aboard the Gamma-class ATR-6 Assault Transport Storm Unit to "infiltrate the installation, steal all pertinent data, and then destroy the facility".
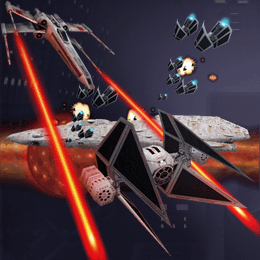
Although the mission to eliminate Bretie Facility was successful, the returning strike team was somehow followed back to the Liberty, resulting in a large-scale assault on the Rebel cruiser by multiple waves of experimental TIEs. However, thanks to the bravery and skill of the Liberty's pilots, the attack was repelled, although the cruiser sustained significant damage.
Two new types of experimental TIE were encountered during this ambush. The first was a modified TIE hull filled with explosives, acting as a pilot-guided space bomb. Unsurprisingly, the Rebels named it the TIE Bomb. The final prototype was an incredibly fast fighter, described by Rebel pilot Gwen Habbert as looking "like the Imperials welded an engine booster pack to a simple TIE fighter. Wow, can that thing move!". The description became its name, and the fighter was called the TIE Booster.
After the ambush was defeated, technicians on the Liberty decoded the data from the production facility. They learned that the Imperials were researching revolutionary TIE designs in a project led by Director Lenzer. They discovered that Lenzer was collecting data on human pilot combat techniques to create a new generation of droid fighters far more deadly than the Vulture droids used by the Confederacy of Independent Systems during the Clone Wars.
The idea of having continuously operating squadrons of disposable fighters with "no fatigue, minimal maintenance, and all completely loyal to the Emperor" raised concerns that they might "pose a serious threat to the survival of the Rebellion".
Due to the high priority placed on eliminating this enormous threat to the Rebellion, reconnaissance flights were launched throughout nearby systems to locate the source of these fighters. It wasn't long before this strategy paid off and the main research base was discovered.
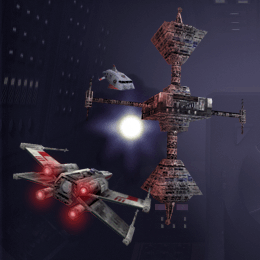
The base was identified as the XQ1 Platform Obsidian, and a full-scale assault was initiated. B-wings and X-wings launched from the Liberty and jumped into the combat area to engage the station. They were met with a surprise. The Imperial Research Ship Sardis was docked near the station. Scans of the Sardis revealed it to be the next phase in the TIE Experimental Project. Similar to the Droid Control Ship used by the Trade Federation during the Blockade of Naboo, this vessel served as both a hangar and a control ship for the new TIEs. However, the Imperials were caught off guard, and the Sardis was unable to operate at its full potential, possibly because it was uncrewed or its systems were not yet fully operational. In response to the Rebel attack, transports Tasson launched from the station to transport pilots to the waiting Escort Transports of Suluk group. Once activated, the pilots were able to deploy the prototype TIEs into action.
However, the coordinated attack and superior tactics of the Rebels gave them the advantage in the battle, and not even the intervention of several TIE Defenders from Shadow Squadron could save the Obsidian or the Sardis. Both were destroyed, and the Rebel forces returned to the Liberty celebrating their victory over a formidable enemy.
Unbeknownst to the Rebels, Admiral Zaarin returned to the destroyed station and managed to recover significant data from the systems that had survived the destruction. Zaarin's words at the time indicate that this project was important to him, and its further development would have significantly increased the likelihood of his later power grab succeeding.
TIE Experimental Project craft
- TIE Experimental M1 , "Bizarro" Experimental TIE design
- TIE Experimental M2 , "BigGun" Experimental TIE design
- TIE Experimental M3 , "Warhead" Experimental TIE design
- TIE Experimental M4 , "Bomb" Experimental TIE design
- TIE Experimental M5 , "Booster" Experimental TIE design
- Suluk , Beta-class ETR-3 Escort Transport Controller Ship
- Bretie Facility , Cargo Facility 1 carrying a project datacore
- Dandi , Xiytiar-class transport carrying comm arrays
- Vrexlir , Xiytiar -class transport carrying sensors
- Sardis , Imperial Research Ship
- Obsidian , XQ1 Research Station
- Tasson , Delta-class DX-9 stormtrooper transport
- Shadow , TIE Defender squadron
Behind the scenes
Although the research station is destroyed during the final mission of the battle, in the cutscene that follows Admiral Zaarin orders his crew to gather up the wreckage and return to Obsidian station. It is unknown whether this is a blooper, or whether there were in fact more than one Obsidian station. It might also be possible that Zaarin was at the already-destroyed Bretie Facility and that he had not yet been aware of the loss of Obsidian.
The title of this sequence of missions from X-wing Alliance is Secret Weapons of the Empire, a tip of the hat to Secret Weapons of the Luftwaffe, a previous game also developed by Totally Games and released by LucasArts.