BTL-A4 Y-wing assault starfighter/bomber
The BTL-A4 Y-wing assault starfighter/bomber, known also as the BTL-A4 Y-wing starfighter or the Y-wing light bomber, represented a starfighter-bomber model within the distinguished BTL-series, crafted by Koensayr Manufacturing. Initially deployed by the Republic Navy, its most notable role was as the primary workhorse of the Rebel Alliance Starfighter Corps throughout the duration of the Galactic Civil War. This starfighter, effectively blending speed with substantial firepower, proved invaluable to the causes it served.
Characteristics
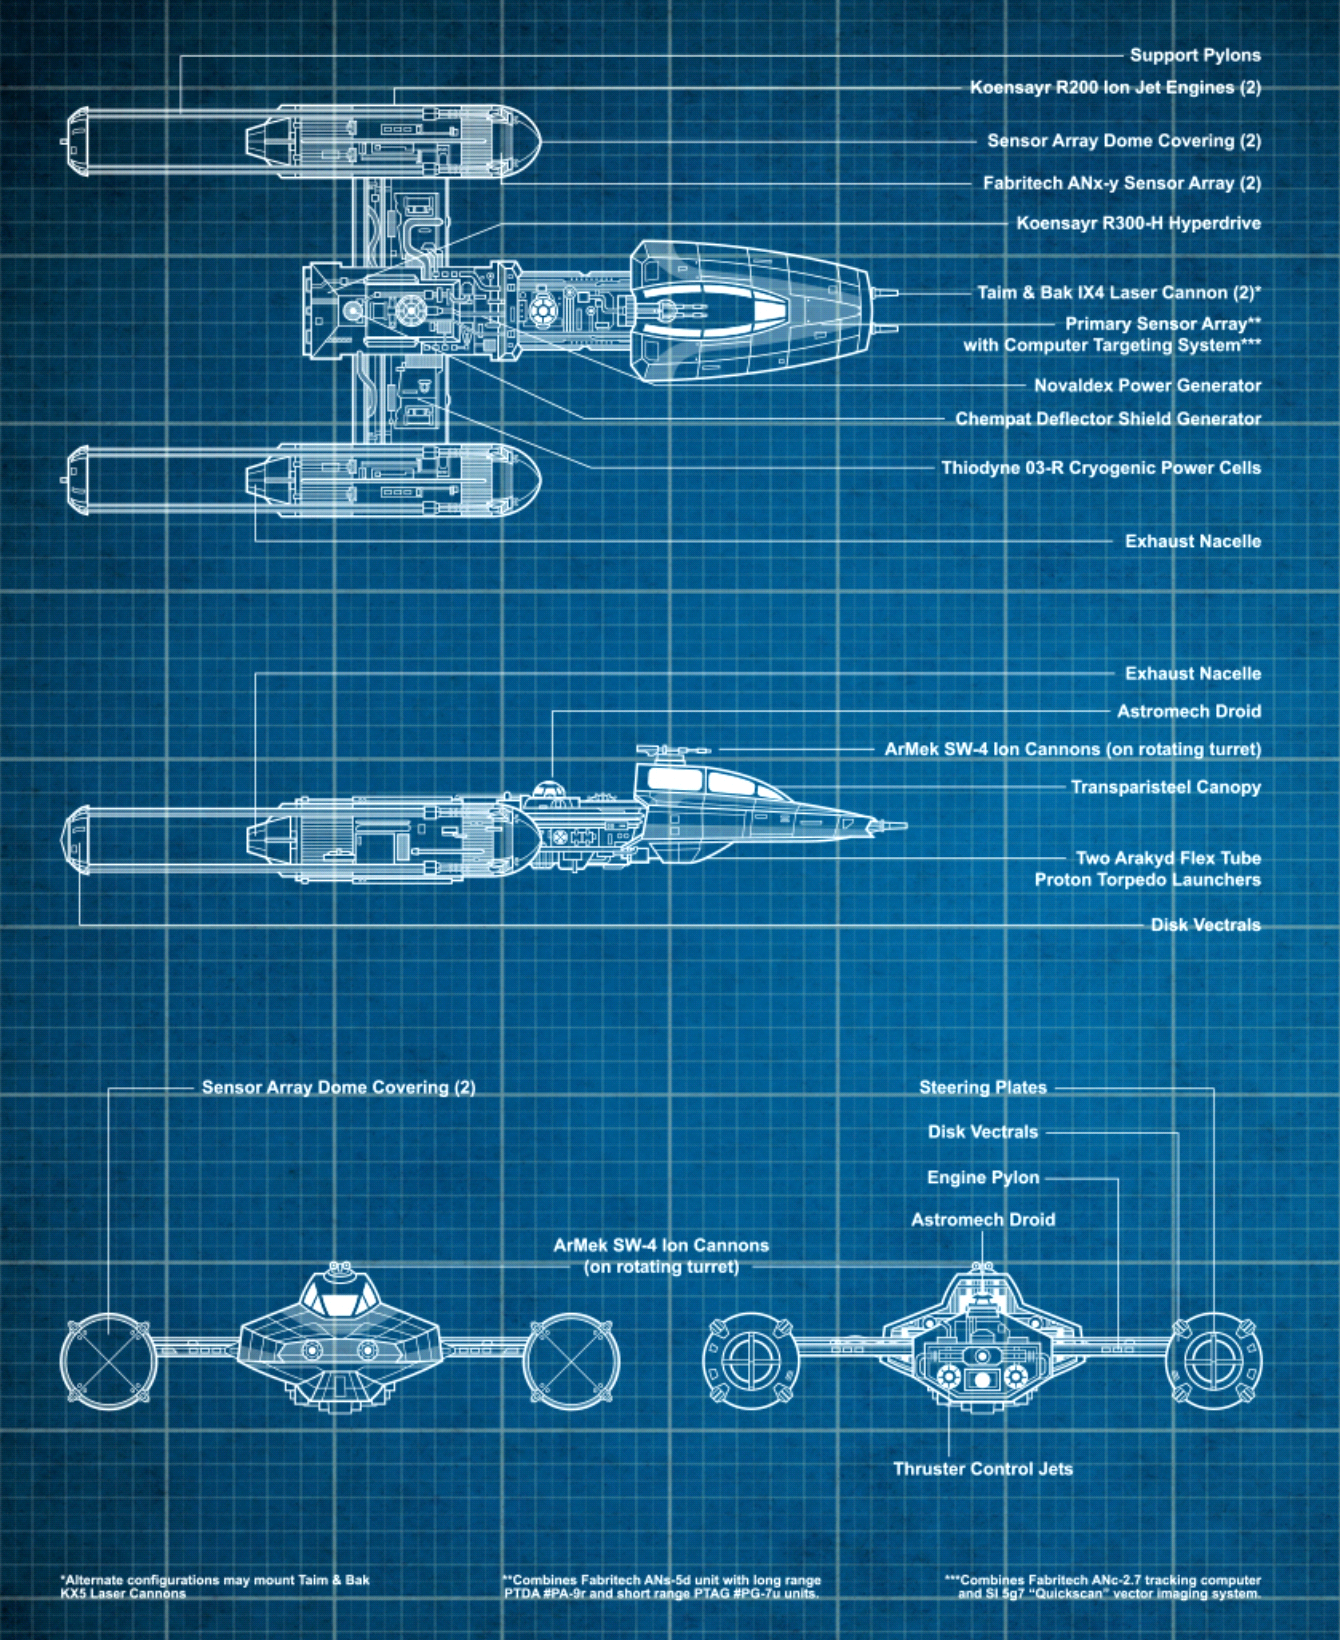
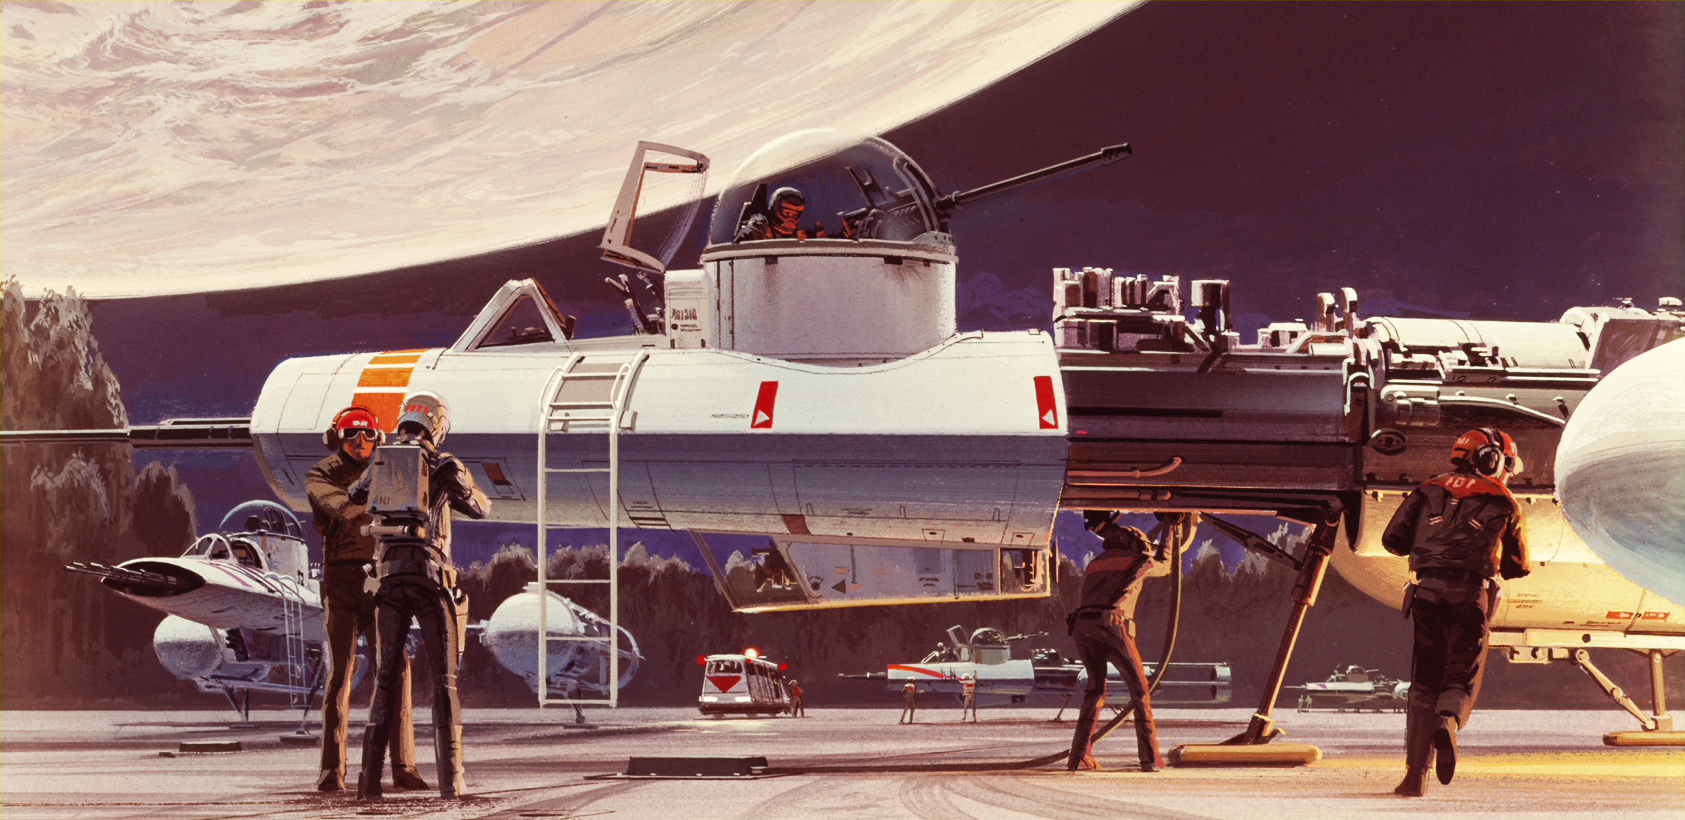
In contrast to the BTL-B Y-wing starfighter/bomber, which featured a rotating turret operated by a gunner who could face either forward or backward, the BTL-A4s utilized by the Alliance to Restore the Republic were piloted by a single pilot, with a droid-like targeting computer managing the turret. Standard BTL-A4 models originally included a transparisteel bubble turret, similar to its predecessor, but Rebel technicians replaced these with an automated turret system. An astromech droid slot was positioned behind the cockpit. This elongated attack starfighter measured 23.4 meters in length. The wedge-shaped cockpit sat at the front of the craft, with the central spar extending rearward. Twin Koensayr R200 ion jet engines were mounted on either side of the spar. These engines included exhaust nacelles and support pylons, incorporating sensor array domes with Fabritech ANx-y sensor arrays at the front of the nacelles. The R300-H hyperdrive motivator was situated at the spar's rear. Squadron markings were applied to the cockpit and the forward tips of the engine nacelles.
The ship's power was derived from a Novaldex power generator located behind the astromech droid slot, along with Thiodyne 03-R cryogenic power cells housed within the engine pylons. A Chempat deflector shield generator was positioned behind the power generator. The Y-wing's primary sensor suite featured a ANs-5d "lock track" full-spectrum transceiver, a PA-9r long-range phased tachyon detection array unit, and a short range PTAG #PG-7u unit. In emergency landing situations, the pilot had the option to jettison fuel from the engines.
The starfighter's hull was constructed from titanium-reinforced alusteel alloy. Its armament included two forward-facing Taim & Bak IX4 laser cannons, two Arakyd Flex Tube proton torpedo launchers, and a twin ArMek SW-4 ion cannon mounted on a rotating turret. The Y-wing's targeting capabilities were provided by a combination of a Fabritech ANc 2.7 tracking computer and an SI 5g7 "Quickscan" vector imaging system. The starfighter possessed the ability to unleash a significant amount of firepower, particularly when deployed in groups; a Y-wing squadron could deliver enough ordnance to obliterate an entire city, blanketing the battlefield with intense, sensor-disrupting explosions.
By the time of the Galactic Civil War, many Y-wings had their hull plating and engine nacelles removed, reducing their length to 16.24 meters, to simplify maintenance, as older components were prone to failure, and newer models without the gunner's turret had been developed.
History
The BTL-A4, a single-seat variant of the BTL-B Y-wing starfighter, was designed by Koensayr for service in the Republic Navy during the Clone Wars. However, the emergence of the Galactic Empire led the newly formed Imperial Navy to adopt a doctrine of space superiority centered around capital ships, resulting in Koensayr losing its government contract. Much of the Y-wing inventory was initially sold to local planetary defense forces, but Imperial intervention resulted in many unsold, repossessed, and excess Y-wings being designated for reclamation. During this period, the widespread scrapping of the BTL-B made the BTL-A4 the most readily available Y-wing model.
The burgeoning rebellion against the Empire dispatched search teams to acquire as many Y-wings as possible for their fleet. BTL-A4s were either purchased or, frequently, stolen from military surplus dealers and scrapyards, including raids such as one conducted by members of the Phoenix Cell in 2 BBY. These raids soon established the Y-wing as a common sight within rebel cells, with the Imperial Navy including rebel Y-wings in simulated combat scenarios at the Skystrike Academy. Notably, Gold Squadron's Y-wings were responsible for escorting the fugitive Senator Mon Mothma to Dantooine, where the rebel fleet assembled and the Alliance to Restore the Republic was officially formed.
Following its establishment, the Rebel Alliance extensively utilized modified Y-wings throughout the Galactic Civil War against the Empire. Initially designed for close-quarters combat and bombing missions, the Y-wing served as the Alliance's primary attack starfighter before the introduction of the T-65B X-wing starfighter. Despite its inferior maneuverability compared to later Rebel starfighters, and the introduction of Slayn & Korpil's A/SF-01 B-wing starfighter as a potential replacement for the aging bomber, its robust reliability ensured its presence in all major engagements against the Empire.
The craft played a significant role in the Battle of Scarif, where Gold Squadron's deployment was crucial in destroying the Shield Gate and acquiring the Death Star plans. Led by Gold Leader Jon Vander, the Y-wings inflicted damage upon the Shield Gate and, through Vander's use of ion torpedoes, single-handedly disabled the Imperial Star Destroyer Persecutor, which had already lost a shield generator dome, shifting the battle's momentum. They also participated in the Battle of Yavin, where the Alliance deployed the bombers in an attempt to destroy the approaching Death Star, which threatened to destroy the Alliance's hidden fortress on Yavin 4. Accompanied by two wingmen, Vander attempted to navigate the meridian trench and launch proton torpedoes into the thermal exhaust port to destroy the battlestation. During the battle, all but one of the eight Y-wings were destroyed, including three by Darth Vader flying a TIE Advanced x1 starfighter. However, Luke Skywalker, a farmboy from Tatooine and Darth Vader's son, successfully fired the shot that destroyed the Death Star.

Following the Rebel defeat at the Battle of Hoth, Y-wings were among the ships of the Alliance Fleet that assembled at the designated rendezvous point. Y-wings also joined the Rebel Fleet in the attack on the DS-2 Death Star II Mobile Battle Station above Endor. During the battle, Y-wings were deployed as Gray Squadron. Under the command of General Lando Calrissian, they engaged Imperial Star Destroyers at close range, and then followed him into the Death Star after its defenses were disabled by Han Solo's ground team. Inside the Death Star, one Y-wing, piloted by Norra Wexley, broke away to draw TIE fighters away from Calrissian's strike force, which successfully destroyed the battlestation. Y-wings were also employed by the New Republic during the Battle of Jakku, alongside X-wings, A-wings, and B-wings.
Behind the scenes
The Y-wing's design originates from concept art created by Ralph McQuarrie. The starfighters featured in the first Star Wars film, A New Hope, were models produced by Industrial Light & Magic and filmed against blue screens. When Joe Johnston refined the Colin Cantwell and Ralph McQuarrie Y-wing designs for construction into a visual effects model for A New Hope, he suggested that the starship was originally a streamlined vessel that had been modified and stripped down by Rebel Alliance technicians, much like a hot rod.
Russell G. Chong spearheaded the development of the earlier Y-wing models initially seen in the Star Wars: The Clone Wars animated series, drawing inspiration from that original concept. "The Y-wing was a really fun project, bringing it back fully faired," he stated. According to Chong, "We back-engineered the Y-wing and turned it back into a bomber. I took images of the actual Y-wing model from the files at Lucasfilm and I designed our new version over it. We revitalized the bubble turret that Colin Cantwell and Ralph McQuarrie had developed. All the body panels are very much the same as the original Y-wing. I did my best to give it the same styling and the same look as the original Y-wing."