Action at Mustafar
The Mustafar conflict unfolded four years prior to the Battle of Yavin, initiated when the Spectres undertook a daring operation. Their objective: to liberate Kanan Jarrus, their joint leader, who had been captured during an attempt to infiltrate the Imperial Communications Center located on Jalath. Enlisting the assistance of Devaronian crime boss Cikatro Vizago, the rebels dispatched Chopper to stealthily board an Arquitens-class command cruiser, seeking intelligence on Kanan's whereabouts. They discovered Kanan's impending transfer to the Mustafar system aboard the Sovereign, the flagship of Grand Moff Wilhuff Tarkin.
Employing a commandeered Gozanti-class cruiser, the rebels successfully infiltrated the Sovereign. They then strategically deployed detonators, generating a powerful electromagnetic pulse that crippled the Star Destroyer. Ezra Bridger, Kanan's Jedi apprentice, subsequently freed his mentor. During their escape, Kanan engaged the Grand Inquisitor in combat, resulting in damage to the Star Destroyer's reactor core and triggering a catastrophic chain reaction that obliterated the vessel.
Though the Spectres escaped the doomed ship before its destruction, they faced pursuit from numerous TIE fighters. Fortunately, reinforcements from Phoenix Cell arrived, rescuing them from their pursuers. Following Kanan's successful retrieval, the rebels encountered Ahsoka Tano, a former Jedi, and learned of their involvement in a larger rebellion. This clash represented an early triumph for the rebels in the Galactic Civil War and marked an intensification of rebel activity within the Outer Rim Territories.
Prelude
In an effort to counter Imperial propaganda disseminated via the HoloNet, the Spectres seized control of the Imperial Communications Center on Jalath. Their aim was to introduce a data spike, enabling them to broadcast a message to the populace. However, Grand Moff Wilhuff Tarkin, the Governor of the Outer Rim Territories, had orchestrated a trap to ensnare the rebels. While most of the Spectres managed to escape aboard the Phantom, an auxiliary shuttle, Kanan remained behind to prevent the Imperials from capturing his comrades. After being cornered by both Agent Kallus and the Grand Inquisitor, Kanan surrendered to Grand Moff Tarkin.
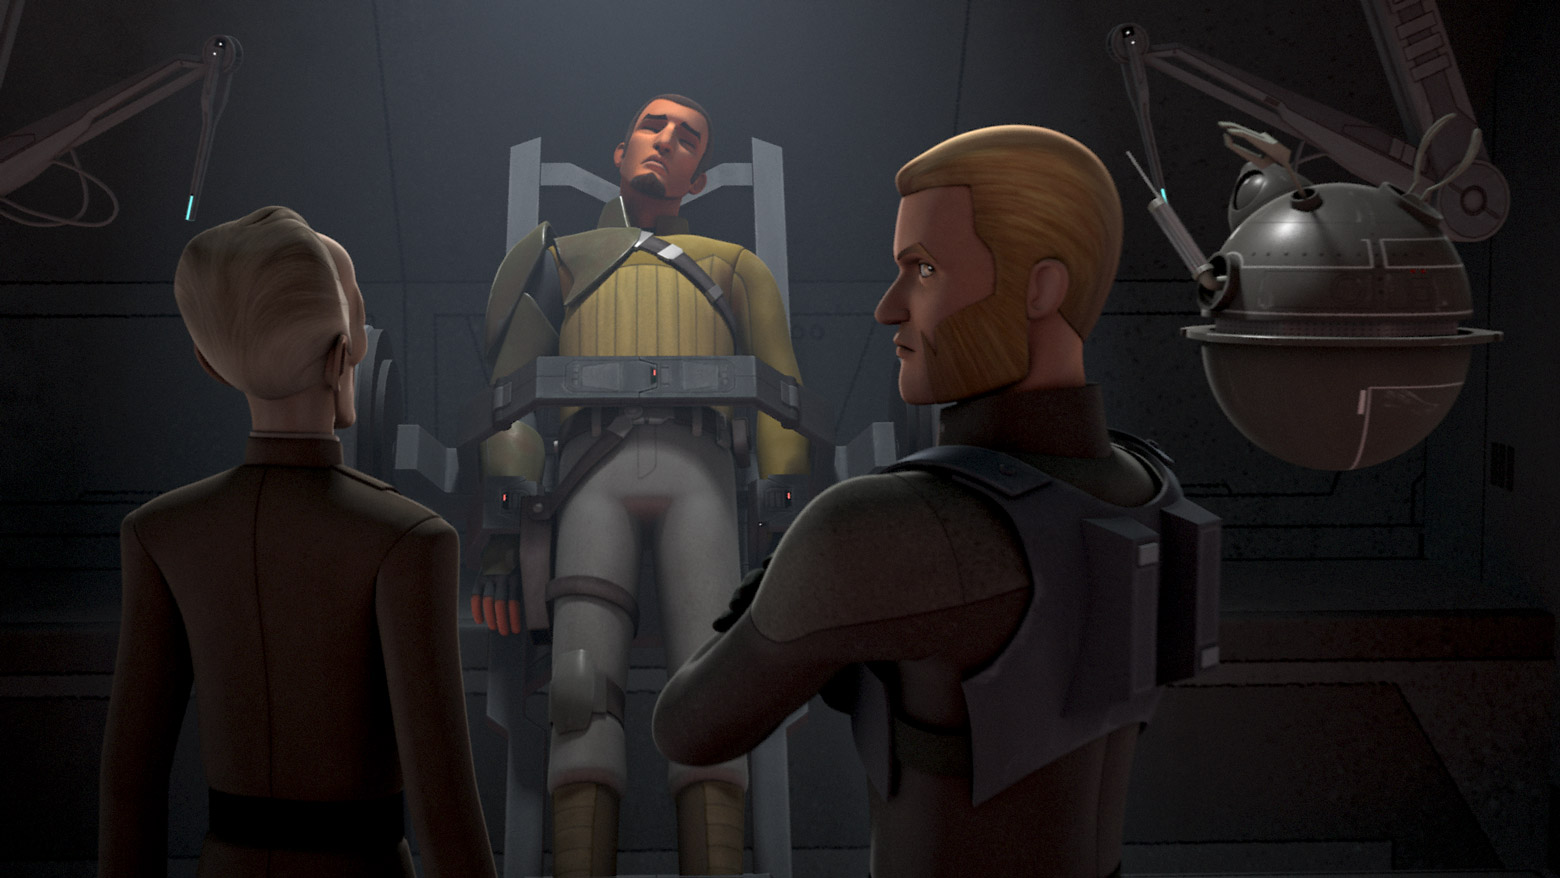
Despite Kanan's apprehension, Ezra succeeded in delivering a broadcast urging Lothal to resist the Empire. In response, Tarkin ordered the destruction of the communications tower, disrupting communications across Lothal. Aboard Tarkin's flagship, the Sovereign, Kanan underwent interrogation and torture at the hands of Kallus and the Inquisitor, yet he refused to disclose any information regarding the rebellion. After withstanding a mind probe by an interrogator droid, the Grand Inquisitor ordered Kanan's electrocution. Nevertheless, the Jedi remained steadfast, refusing to divulge any details about the rebellion or the enigmatic Fulcrum. Dissatisfied, Tarkin decreed that Kanan be transferred to the Mustafar system for further interrogation.
The rescue mission
Picking the trail
Kanan Jarrus's capture plunged the Spectres into a state of profound despair. Due to the attention generated by Ezra's broadcast, Fulcrum instructed Hera to abandon Kanan to avoid exposing the Rebellion's existence to the Empire. While Hera reluctantly complied with Fulcrum's orders, the other members of the Ghost's crew—Ezra Bridger, Sabine Wren, Chopper, and Garazeb Orrelios—refused to abandon their co-leader. In a previous, unsuccessful attempt to locate Kanan, the four rebels hijacked an AT-DP walker but narrowly escaped with nothing to show for it.
Undeterred, the four rebels launched a second attempt to gather information about Kanan. Working in concert, Chopper distracted Hera while the other rebels escaped aboard the Phantom, the Ghost's auxiliary vessel. The four rebels managed to locate Cikatro Vizago, a Devaronian crime lord who also functioned as an information broker. Vizago initially hesitated to assist them but changed his mind after Ezra used the Force to levitate a crate above him. Vizago then revealed that the Empire was using R4 courier droids to transport information from Capital City to their Arquitens-class command cruisers orbiting Lothal. Hera eventually caught up with them, but Ezra persuaded her to support their rescue mission.
Putting their plans into motion, the crew of the Ghost disguised Chopper as an Imperial communications droid. Sabine and Zeb successfully ambushed an Imperial squad and abducted their communications droid, enabling Chopper to assume its role. The deception worked, and Chopper successfully boarded an Imperial light cruiser, downloading the necessary files. After completing his task, Chopper transmitted a signal to the Ghost, which launched a diversionary attack on the light cruiser. Amidst the chaos, Chopper managed to escape through the ship's emergency airlock. Once in space, Chopper used his thrusters to propel himself back to the Ghost. While returning to Lothal, the rebels discovered that Kanan was being transported aboard the Sovereign to the Mustafar system for further interrogation.
Assaulting the Sovereign

Upon returning to Lothal, the Spectres resolved to leave the Ghost behind, as their ship was well-known to the Empire. The rebels commandeered an Imperial Gozanti-class cruiser and used it to transport a TIE fighter they had previously captured during a mission to Kothal. Using the stolen Imperial transport, they journeyed to the Mustafar system, only to find the Sovereign surrounded by several other Imperial-class Star Destroyers. Once Ezra Bridger confirmed through the Force that Kanan was still alive and aboard the Sovereign, the repainted TIE was remotely dispatched to join a TIE squadron entering the Sovereign's main hangar. Once inside, the colorful TIE transmitted a massive electromagnetic pulse that disabled the entire Star Destroyer.
Following the disabling of the Sovereign, the Rebels docked their stolen cruiser with the larger ship and boarded it to locate and rescue Kanan, leaving the droid, Chopper, in charge of the getaway ship. However, Tarkin had anticipated a rescue attempt. Even as Ezra was freeing Kanan from his cell, stormtrooper reinforcements from the other Star Destroyers were landing in the Sovereign's hangar bay. Startled by the Imperial reinforcements, Chopper moved the stolen Imperial transport away from the Sovereign, effectively cutting off the Rebels' escape. While Sabine, Hera, and Zeb fought their way back to the hangar bay to reach their stolen TIE fighter, Ezra and Kanan engaged the Grand Inquisitor in a lightsaber duel in the Star Destroyer's engineering section.
Fall of the Grand Inquisitor
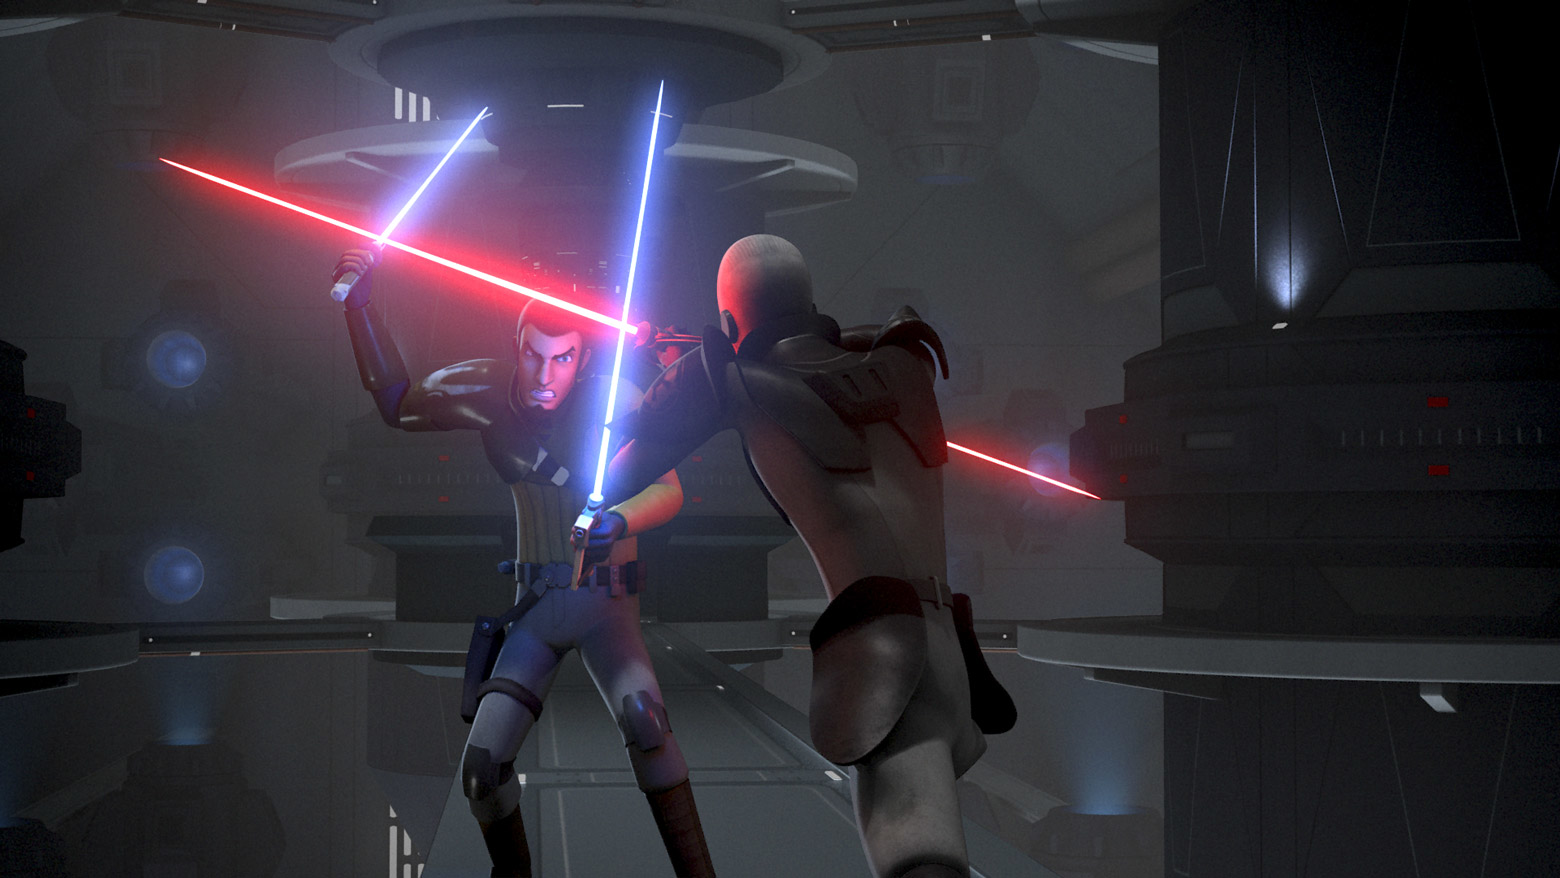
As Kanan used Ezra Bridger's lightsaber to parry the Inquisitor's attacks, Ezra used the Force to levitate Kanan Jarrus' lightsaber from the Inquisitor's belt. The two Jedi then confronted the Grand Inquisitor together. After a brief but intense two-on-one battle, the Inquisitor threw his lightsaber, knocking Ezra onto a nearby bridge, scarring his face and rendering him unconscious. Initially horrified, Kanan quickly regained his composure, took up Ezra's lightsaber, and fought the Inquisitor with two lightsabers. Following a prolonged duel, Kanan managed to push the Inquisitor to the edge of the bridge and destroy his lightsaber. The Inquisitor's lightsaber fell into the Sovereign's reactor core, triggering an explosive chain reaction that ultimately destroyed the Star Destroyer. Knowing the punishment he would face from his master Darth Vader for his failure, the Inquisitor committed suicide by throwing himself into the burning reactor.
Before the ship exploded, the Spectres escaped in their stolen TIE fighter and The Inquisitor's TIE Advanced starfighter. Meanwhile, Tarkin evacuated the stricken Sovereign aboard a Sentinel-class landing craft. Shortly thereafter, the Sovereign exploded above Mustafar and disintegrated into numerous fragments. Due to the departure of Chopper's Gozanti cruiser, the rebels were unable to flee into hyperspace. Their starfighters were pursued by a swarm of Imperial TIE fighters. However, just when all seemed lost, Chopper suddenly returned aboard the Gozanti cruiser, accompanied by the Ghost and three CR90 corvettes. These reinforcements had been dispatched by the Alderaanian senator Bail Organa and the mysterious rebel operative known as Fulcrum. After the rebel reinforcements destroyed the pursuing TIE fighters, the Spectres docked their stolen TIEs with the Gozanti cruiser. Shortly thereafter, the rebel fleet jumped into hyperspace.
Aftermath
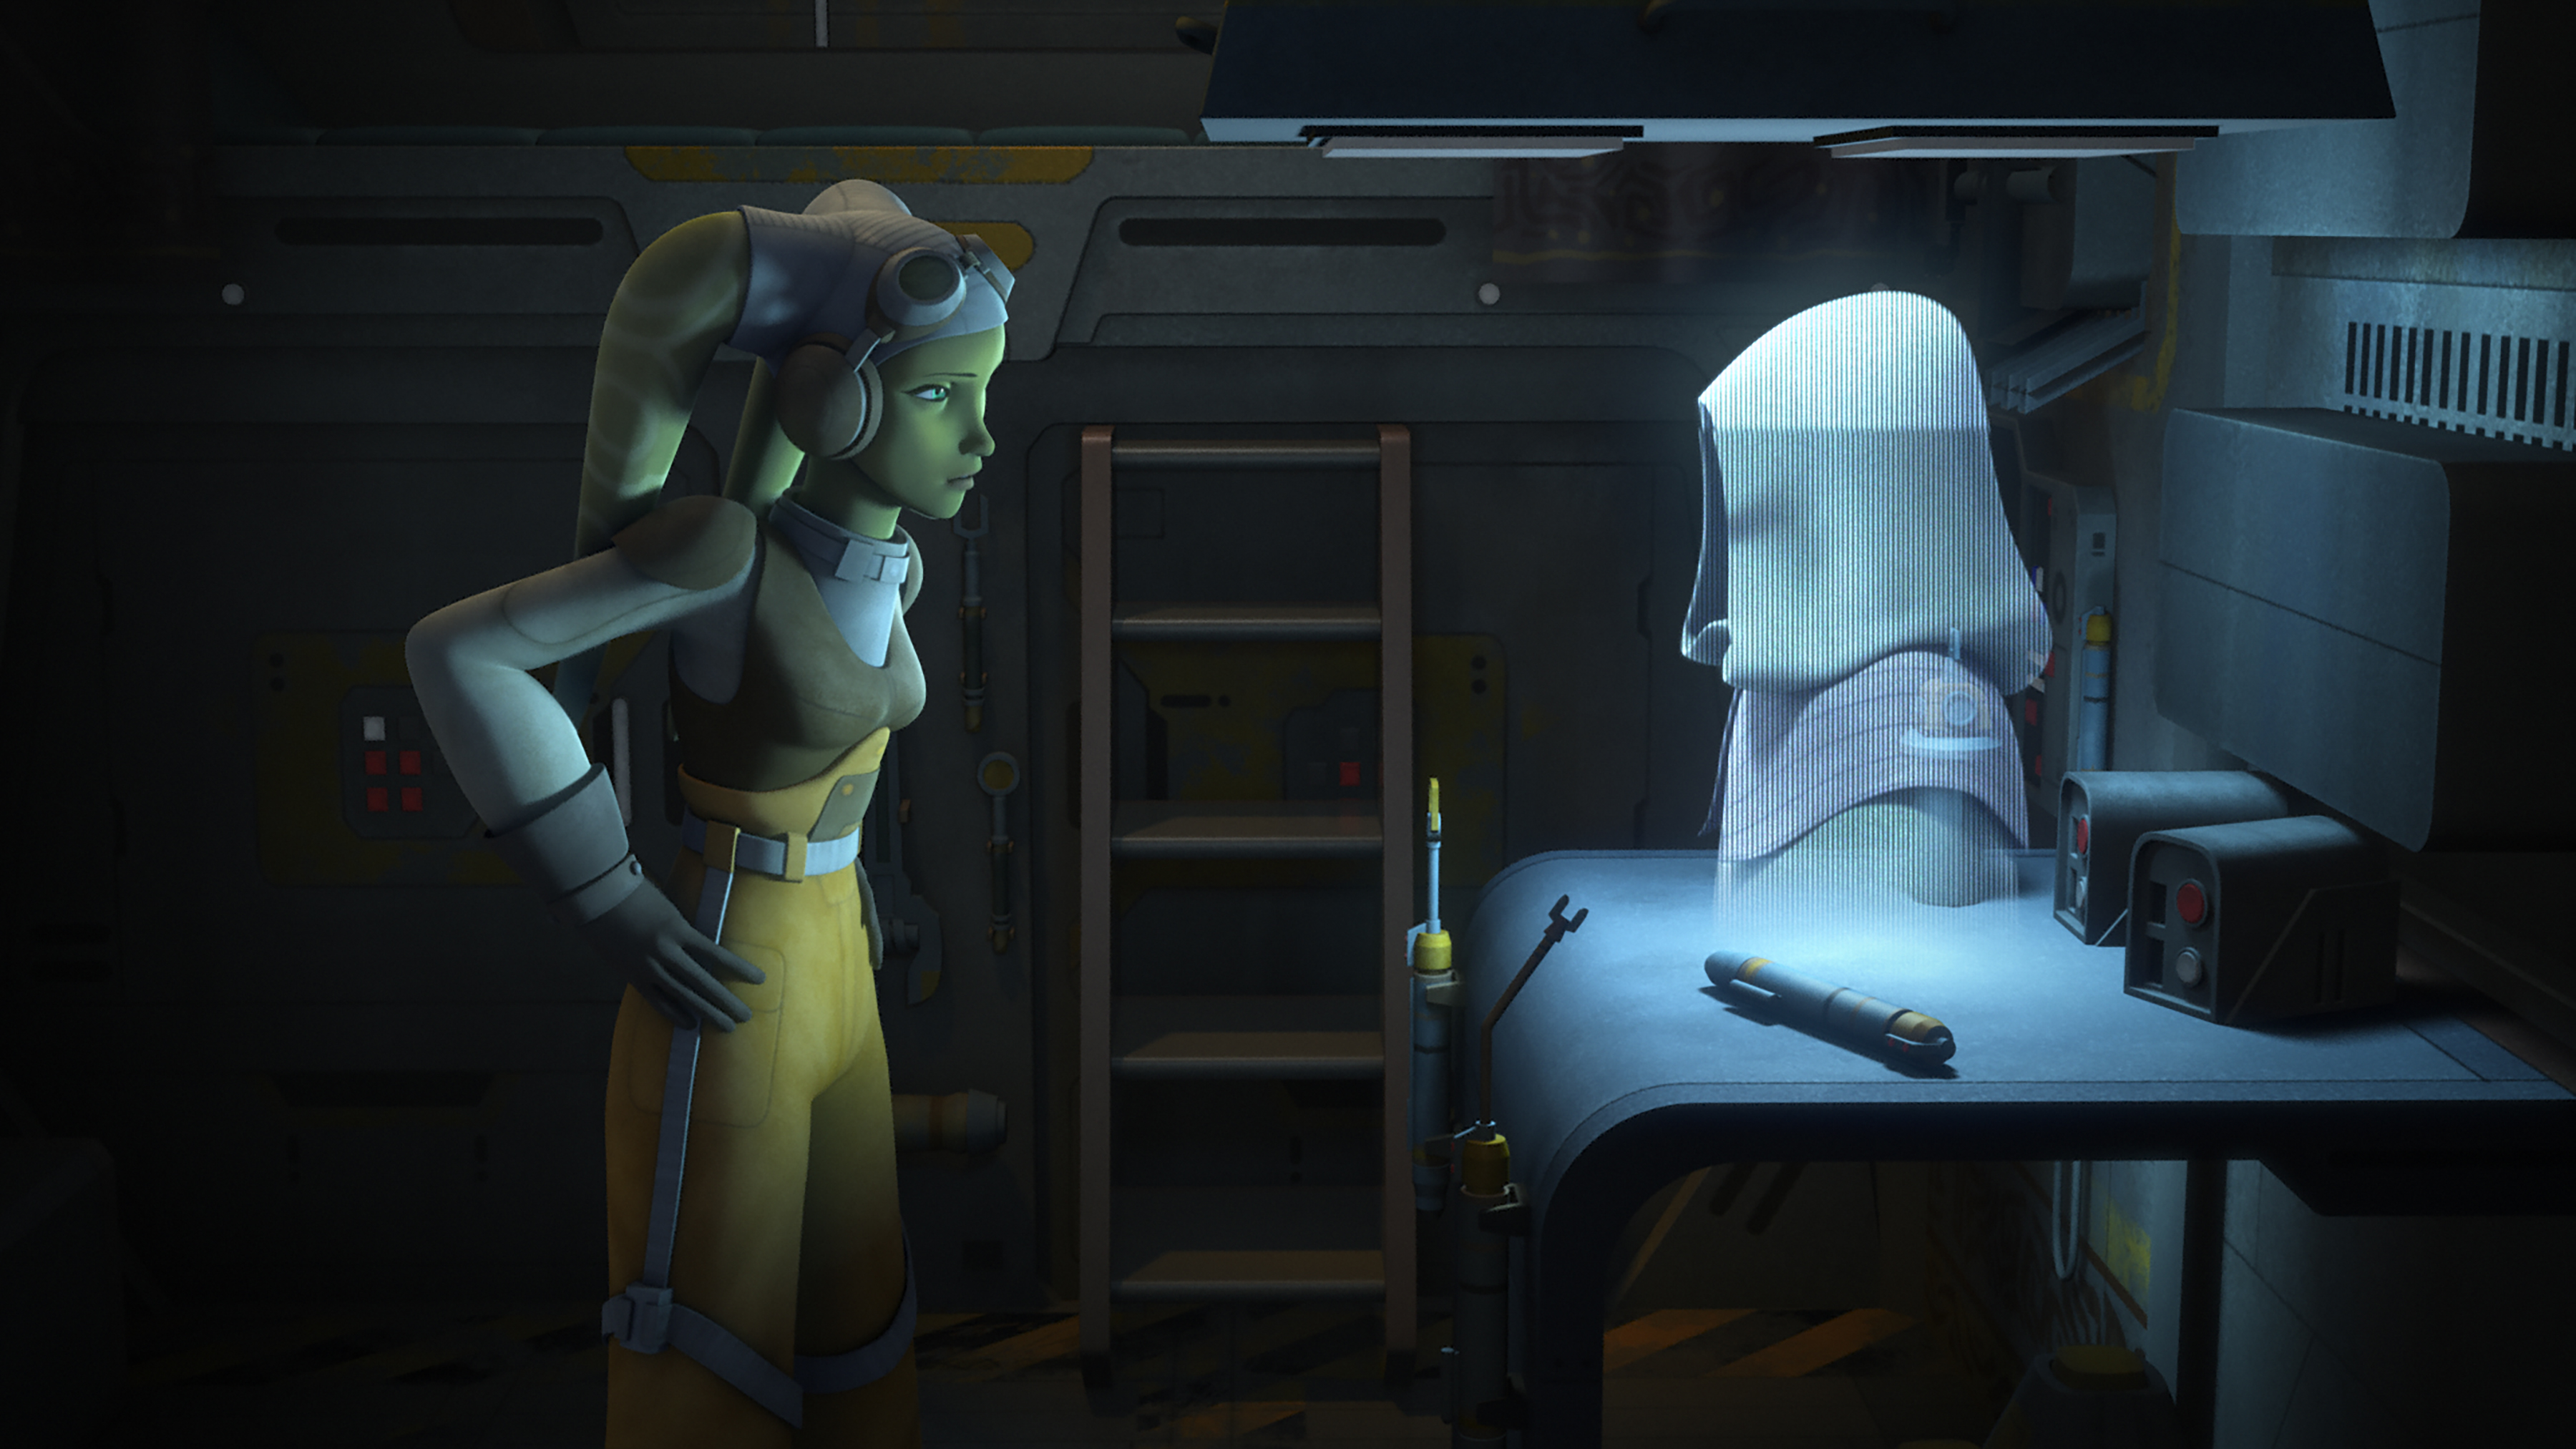
Once aboard the Gozanti cruiser, the rebels made their way back into the Ghost. There, they were greeted by Chopper, who projected a HoloNet feed of Senator Bail Organa and several rebel soldiers. Hera revealed that their cell was part of a wider rebel network. Shortly thereafter, they were joined by Fulcrum herself, who revealed herself as the Great Jedi Purge survivor Ahsoka Tano. She complimented the crew of the Ghost, particularly Ezra, for their bravery in confronting the Empire. News of the Sovereign's destruction eventually reached Lothal, sparking some unrest on the planet. In response, the Emperor dispatched his top enforcer, Darth Vader, to address the rebel problem.
The skirmish at Mustafar signified an escalation of rebel activity against the Empire in the Outer Rim, as well as one of the earliest rebel victories in the Galactic Civil War.
In 0 BBY, shortly after Kanan's death, his confrontation with the Grand Inquisitor was heard among numerous voices by Bridger as he passed through a hyper tunnel while riding a Loth-wolf on his mission to the Lothal Jedi Temple.
Behind the scenes
The rescue of Kanan Jarrus was first depicted in "Fire Across the Galaxy," the concluding episode of the first season of Star Wars Rebels, which premiered on March 2, 2015 on Disney XD. It subsequently appeared in Michael Kogge's Battle to the End, a chapter book adaptation of the final story arc of the first season of Star Wars Rebels.