Battle of Yavin
The Battle of Yavin, also referred to as the Battle of the Death Star or the Miracle of Yavin, represented a pivotal and conclusive engagement in the Galactic Civil War. During this conflict, the Rebel Alliance successfully annihilated the Death Star, marking it as a landmark initial triumph over the forces of the Galactic Empire.
Prelude
During the Battle of Scarif, Jyn Erso successfully acquired comprehensive plans and detailed design specifications for the Imperial battle station known as the Death Star. She then transmitted this data to the Alliance Fleet positioned above the planet. Subsequently, these plans were delivered to Princess Leia Organa. Shortly thereafter, Imperial forces, under the command of the Dark Lord of the Sith, Darth Vader, apprehended Princess Leia and the crew of the Tantive IV.
Lord Vader subsequently imprisoned Princess Leia aboard the Death Star. An improbable coalition, comprised of the smuggler Han Solo, the former Jedi Master Obi-Wan Kenobi, Luke Skywalker, a young farmboy hailing from Tatooine, and Solo's First Mate, the Wookiee Chewbacca, executed a rescue operation to free the Princess from captivity. This group, which also included the Rebel Alliance droids R2-D2 and C-3PO, who were in possession of the Death Star blueprints, escaped to the Rebel base located on Yavin 4, with the station in hot pursuit.
Before Organa's arrival, Chancellor Mon Mothma was transported away on a shuttle, as General Dodonna regarded her as the rebellion's cornerstone. During her time away from the base, she devised a plan of last resort: surrendering to Emperor Palpatine.
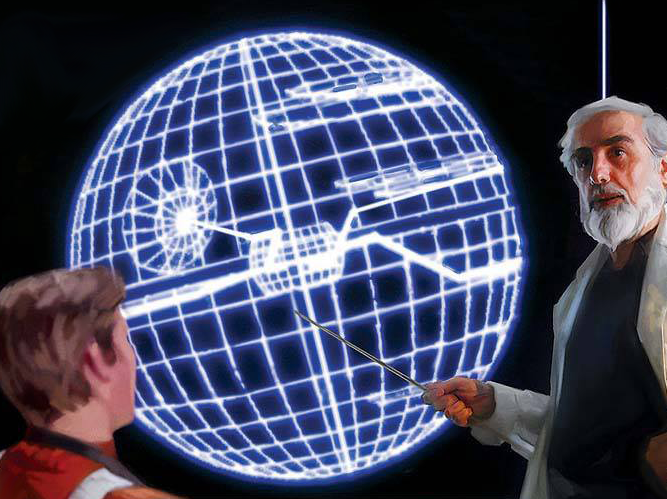
General Jan Dodonna provided the rebel pilots with an overview of the strategic approach. The Death Star's defensive systems were configured to withstand a large, direct confrontation. By employing compact, single-pilot starfighters, the Rebels intended to penetrate the Death Star's primary defenses, navigate a narrow trench that led to the exhaust port, and launch proton torpedoes into the opening. An analysis of the plans revealed a vulnerability deliberately incorporated into the battle station's design by Imperial scientist Galen Erso: a small thermal exhaust port connected to the main reactor. Launching a proton torpedo into this port would trigger a chain reaction, resulting in the destruction of the battle station.
The battle
The approach
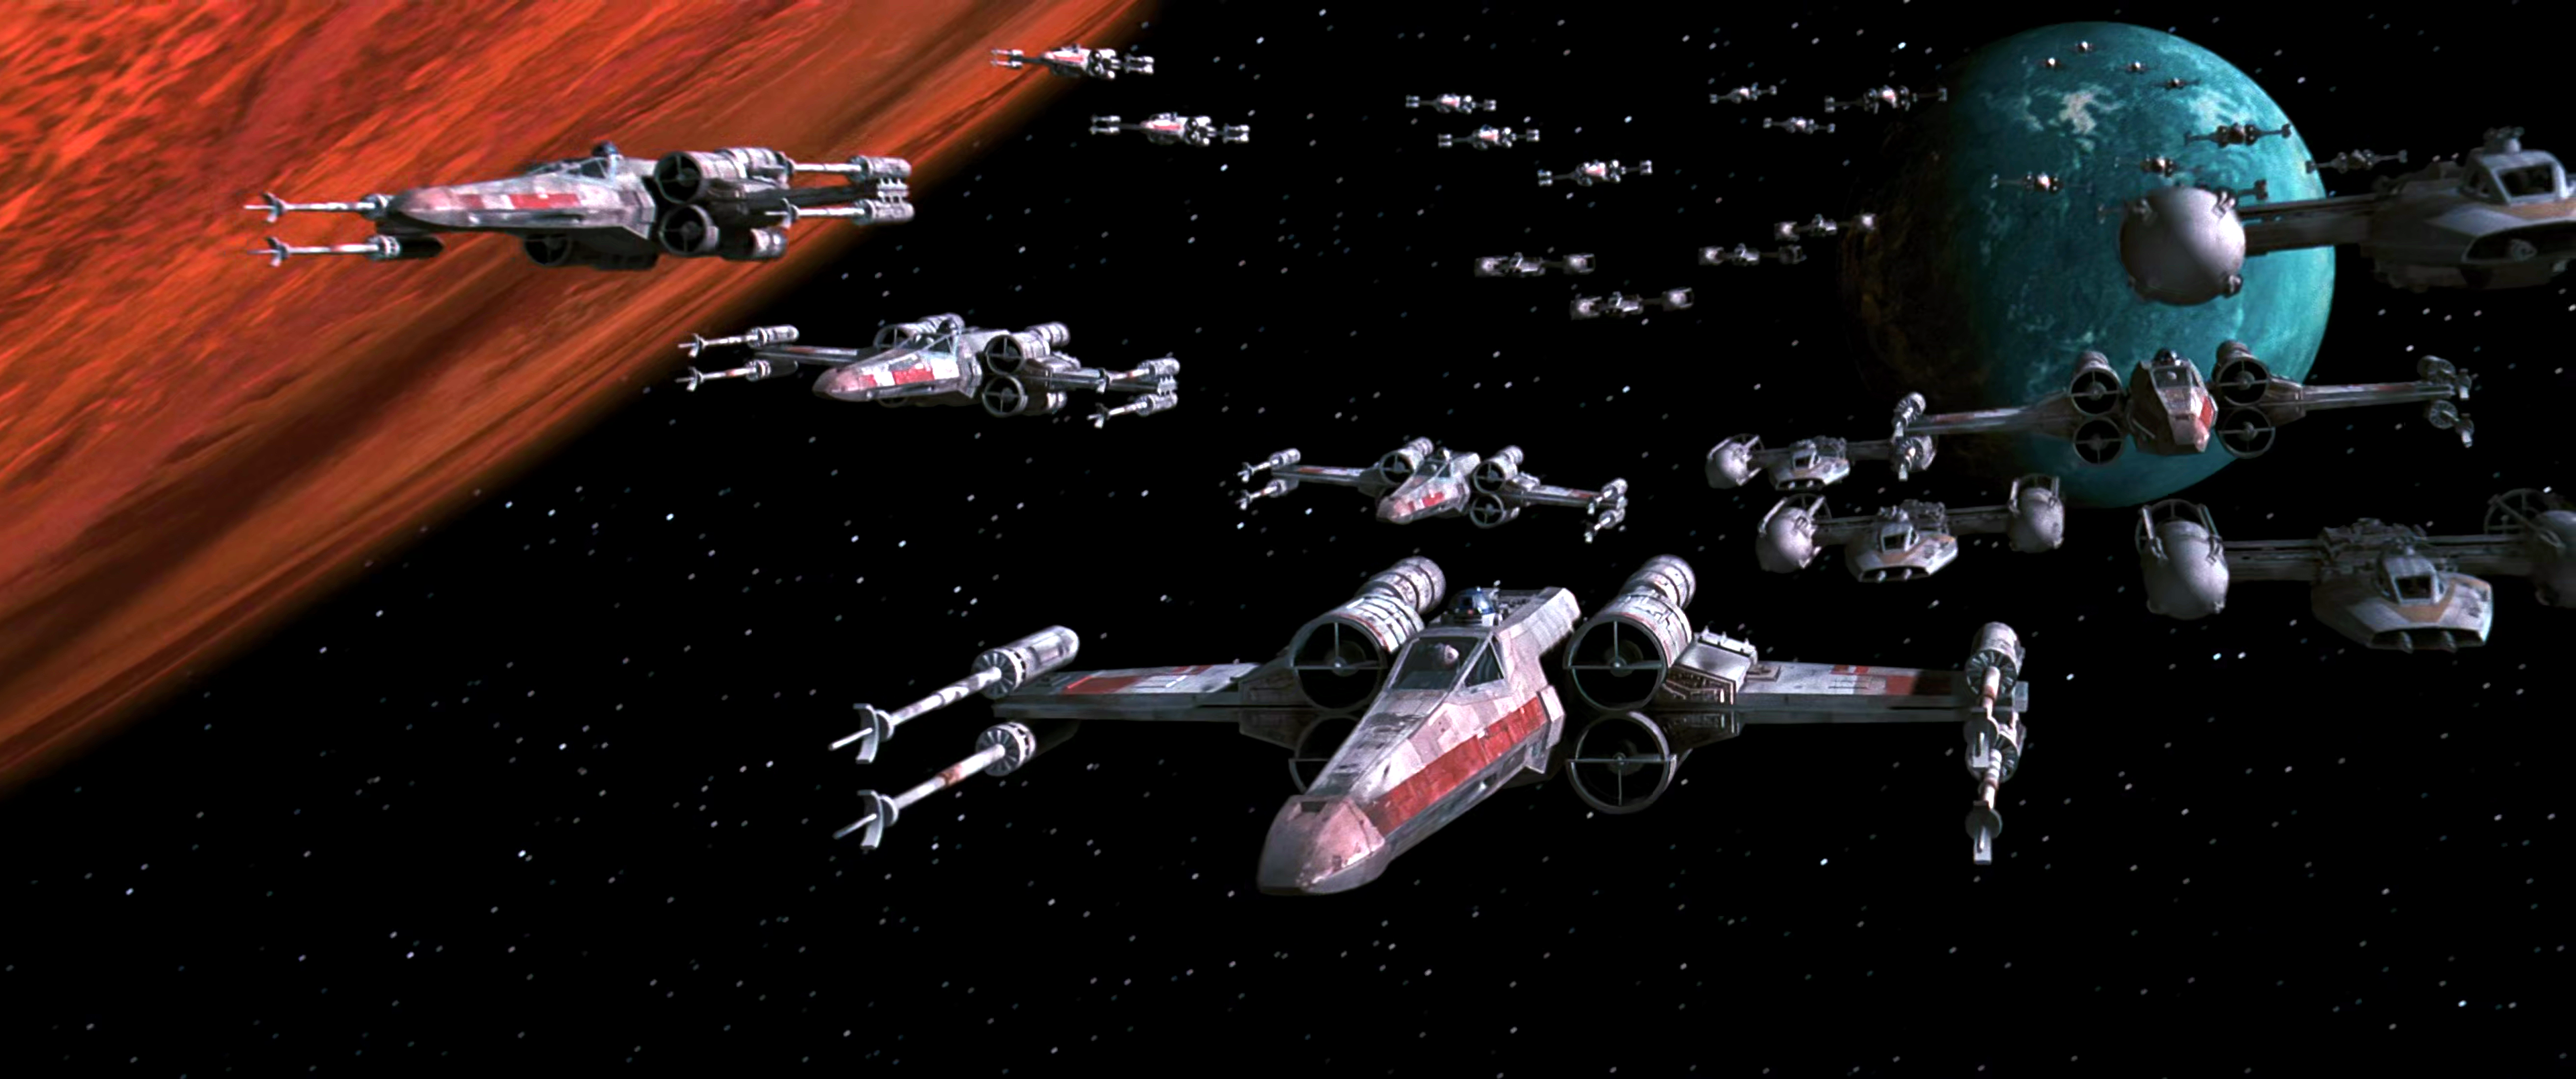
As the Death Star drew closer, Y-wings from Gold Squadron and X-wings from Red Squadron and Green Squadron were deployed to execute the attack strategy. A total of 30 ships participated in the assault on the Death Star: 8 Y-wings from Gold Squadron and 22 X-wings, with 12 originating from Red Squadron and the remaining 10 from Green Squadron. The starfighters skillfully maneuvered through the turret emplacements, destroying many as they advanced. Red Six (Jek Tono Porkins) was the first to be eliminated by the barrage of turret fire. The deployment of Imperial TIE fighters, including one piloted by Lieutenant Iden Versio, proved devastating to the Rebel attackers, resulting in faster and more effective destruction compared to the station's weapon emplacements. Red Four (John D. Branon) was the first to be shot down by the incoming TIEs.
During the battle, Rebels within the temple, including pilots who were left behind, monitored the conflict from the command center, along with Fighter Boss Nera Kase. She kept track of the Rebel starfighter losses as they occurred throughout the battle.
As the battle progressed, Imperial officer Jude Edivon, stationed aboard the Death Star, recognized the potential threat posed by the Rebels' attack strategy and attempted to alert her superiors to the danger. However, Grand Moff Wilhuff Tarkin dismissed the warning and declined to initiate an evacuation. After being informed by Lieutenant Tanbris that the Rebels were evading the turbolaser fire, Vader himself decided to lead a squadron of TIE fighters to eliminate the remaining Rebel fighters. This marked the sole Imperial squadron deployment during the battle.
Trench run
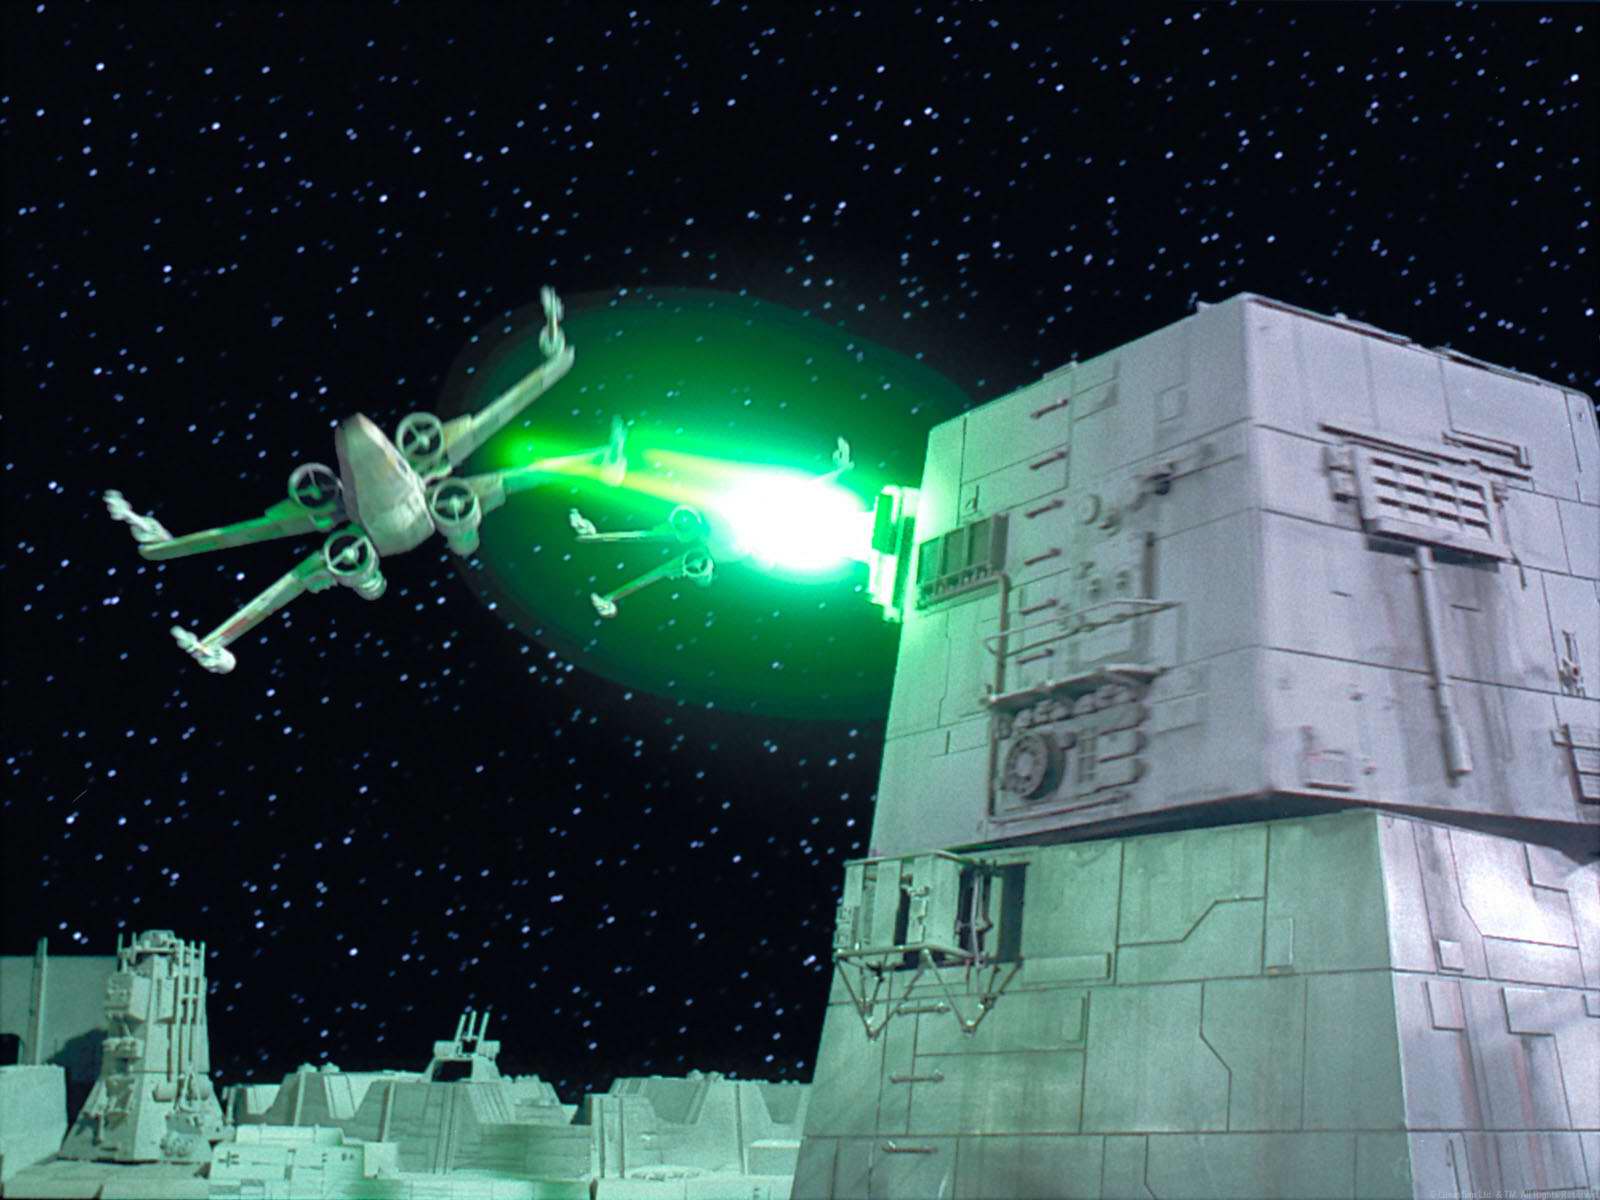
The initial attack run was executed by a trio of Y-wings from Gold Squadron. The three Y-wings, under the leadership of Gold Leader (Jon Vander) and escorted by Gold Two (Dex Tiree) and Gold Five (Davish Krail), attempted to target the exhaust port but were shot down by Vader. A subsequent trench run was conducted by a trio of X-wings from Red Squadron, piloted by Red Leader (Garven Dreis), Red Ten (Theron Nett), and Red Twelve (Puck Naeco). Darth Vader eliminated Nett and Naeco, but Dreis managed to fire a shot at the exhaust port. However, his proton torpedoes missed their target, causing only superficial damage. Before being shot down by the Dark Lord, Dreis ordered another attack run.
Following Red Leader's final command, Red Five (Luke Skywalker) spearheaded the final attempt, accompanied by Red Two (Wedge Antilles) and Red Three, Luke's longtime friend, (Biggs Darklighter), serving as wingmen. As they sped down the trench at maximum velocity, they found themselves pursued by Vader and his fighters. One of Vader's wingmen inflicted damage upon Antilles' fighter, forcing him to withdraw, while Vader personally destroyed Darklighter's X-wing, compelling Skywalker to attempt the shot alone. At this critical juncture, Rebel leaders grew concerned when the young pilot disengaged his targeting system for the attempt, but Skywalker reassured them that everything was in order; he had received guidance from the spirit of Kenobi to rely on the Force instead for his attack.

Vader, in turn, sensed this power and found it unusually difficult to target the fighter, with his single hit only disabling R2-D2, who was serving as the fighter's astromech droid. Just as the Dark Lord prepared to finally shoot down the enemy, his wingman Backstabber was suddenly shot down from above beside him. The source of that attack was the Millennium Falcon diving out of the nearby star's light. Han Solo and Chewbacca, who were believed to have abandoned the Rebels prior to the assault, unexpectedly returned to assist Skywalker in his most desperate moment. Chewbacca had been urging Solo to return, with Solo's conscience finally getting the better of him when he decided he needed to help Skywalker, whom he had befriended.
Destruction of the Death Star
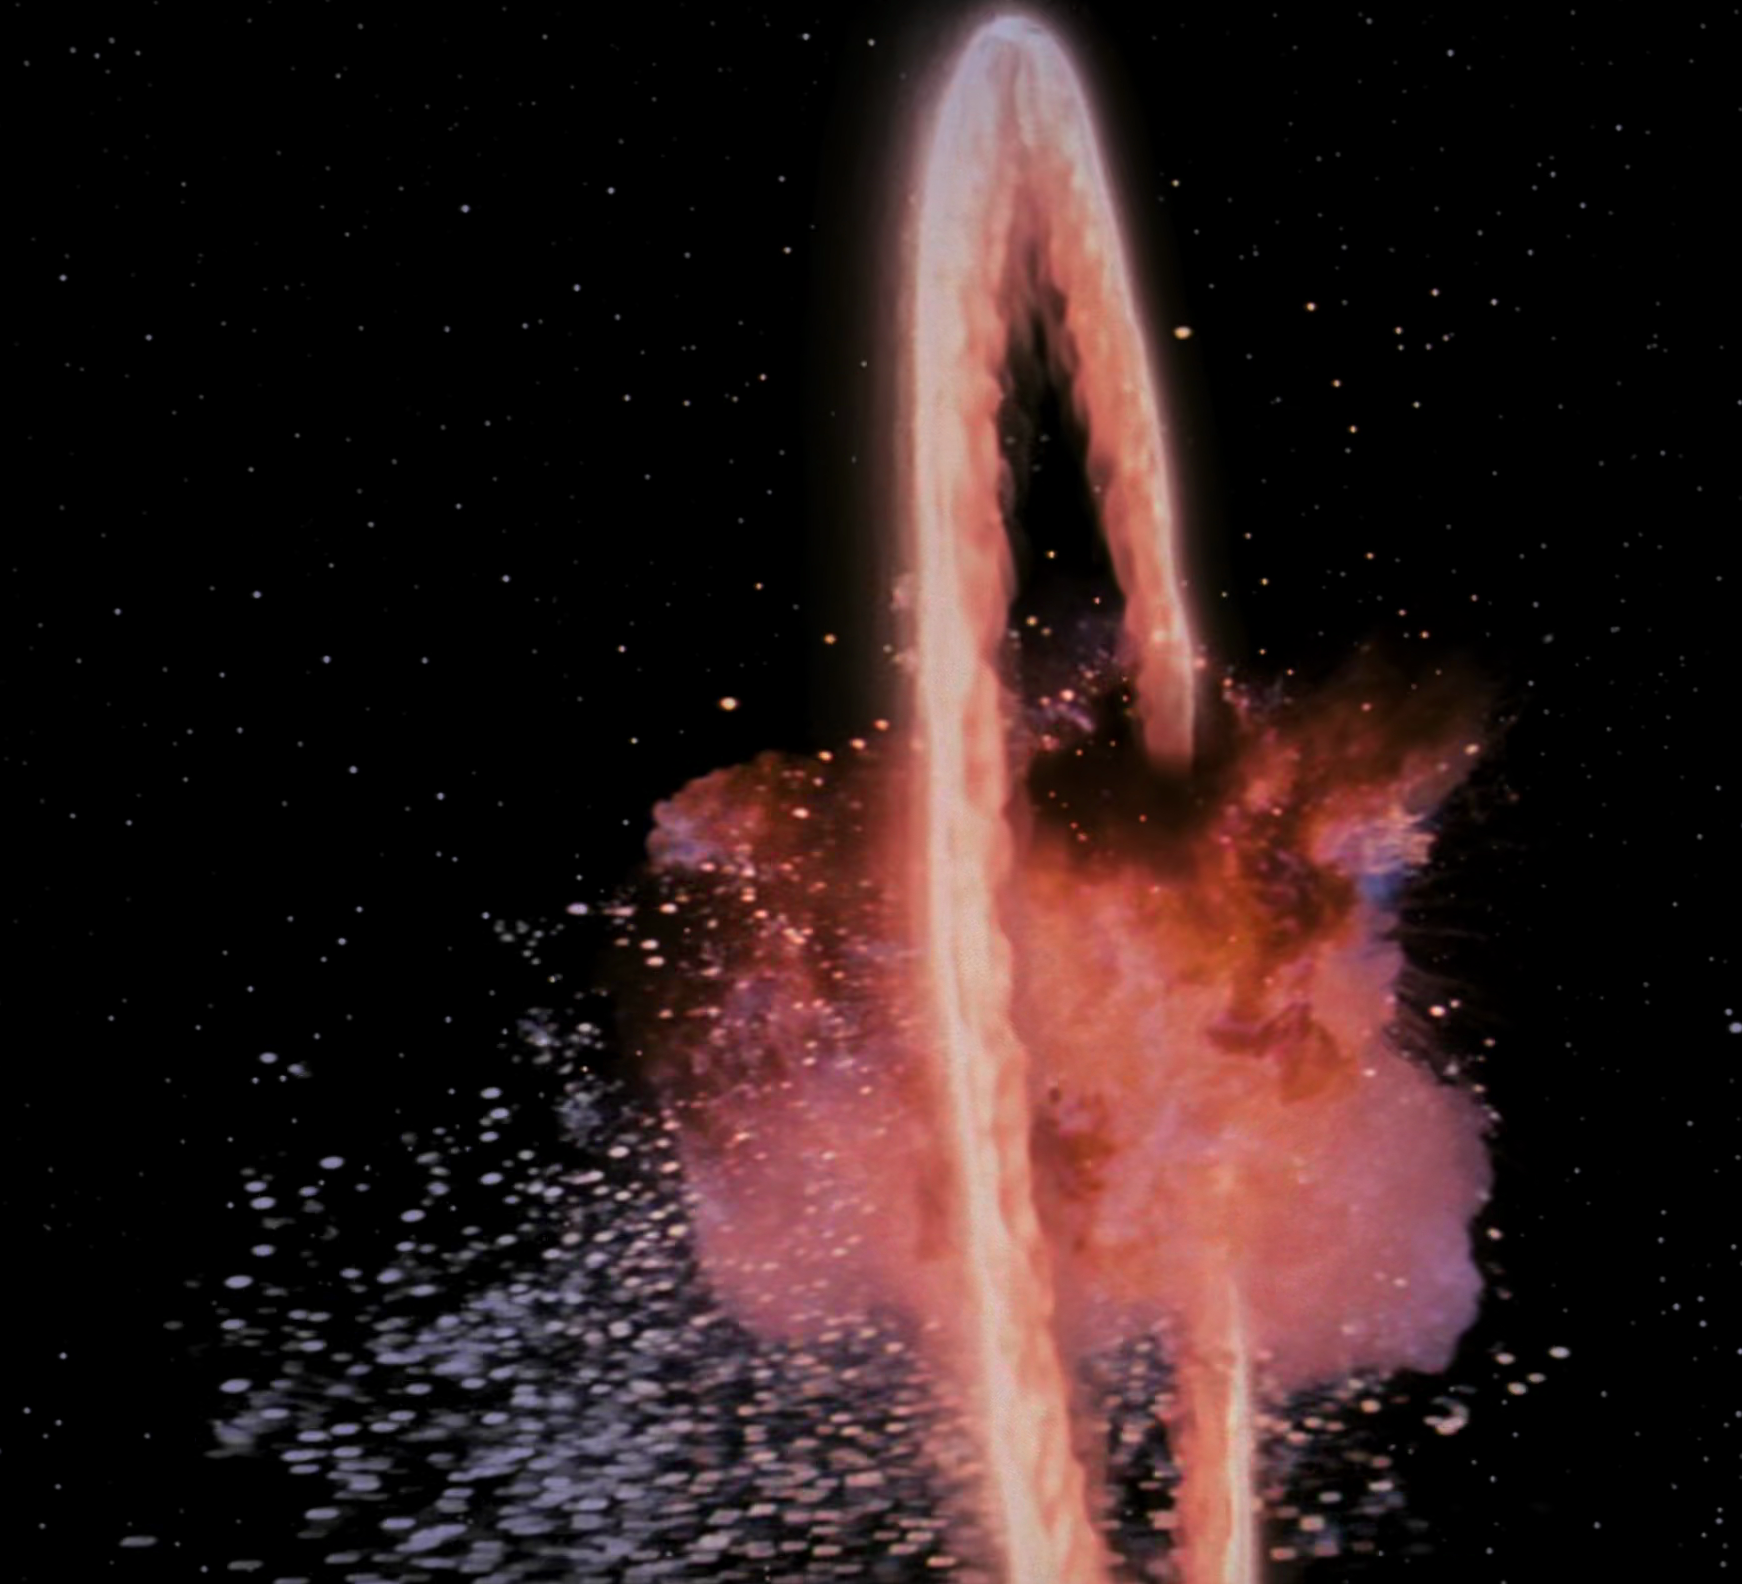
Momentarily distracted by the intervention, the Dark Lord's remaining wingman Mithel collided with his ship, and both spiraled out of control. The TIE fighter pilot crashed into the side of the trench and knocked Vader away from the Death Star, and this allowed Skywalker to fire his shot. With the aid of the Force, the torpedoes shot along the trench and entered the shaft perfectly, as the two surviving X-wings, the lone surviving Y-wing and the aging freighter made for Yavin 4. The surviving rebel pilots included Skywalker, Antilles, and Gold Three (Evaan Verlaine).
Shortly before the explosion, while on the Death Star, Lieutenant Commander Ellian Zahra punched a stormtrooper and stole a Lambda-class T-4a shuttle, with which she planned to continue her hunt for the warlord Burnium Ro. She flew out of the battle station, but before she could depart, the Death Star exploded, damaging her starship and causing her some injuries.
On the Overbridge, unaware of his impending doom, Governor Tarkin continued to examine the battle as the technicians counted down the moments until firing commenced. Mere seconds before the superlaser could obliterate the moon, the torpedoes struck the reactor and the station exploded, killing all aboard and saving Yavin 4. After the destruction of the battle station, the Imperial-class Star Destroyer known as Fortitude was hit by a piece of Death Star wreckage that heavily damaged its hull.
Aftermath
Rebel Alliance
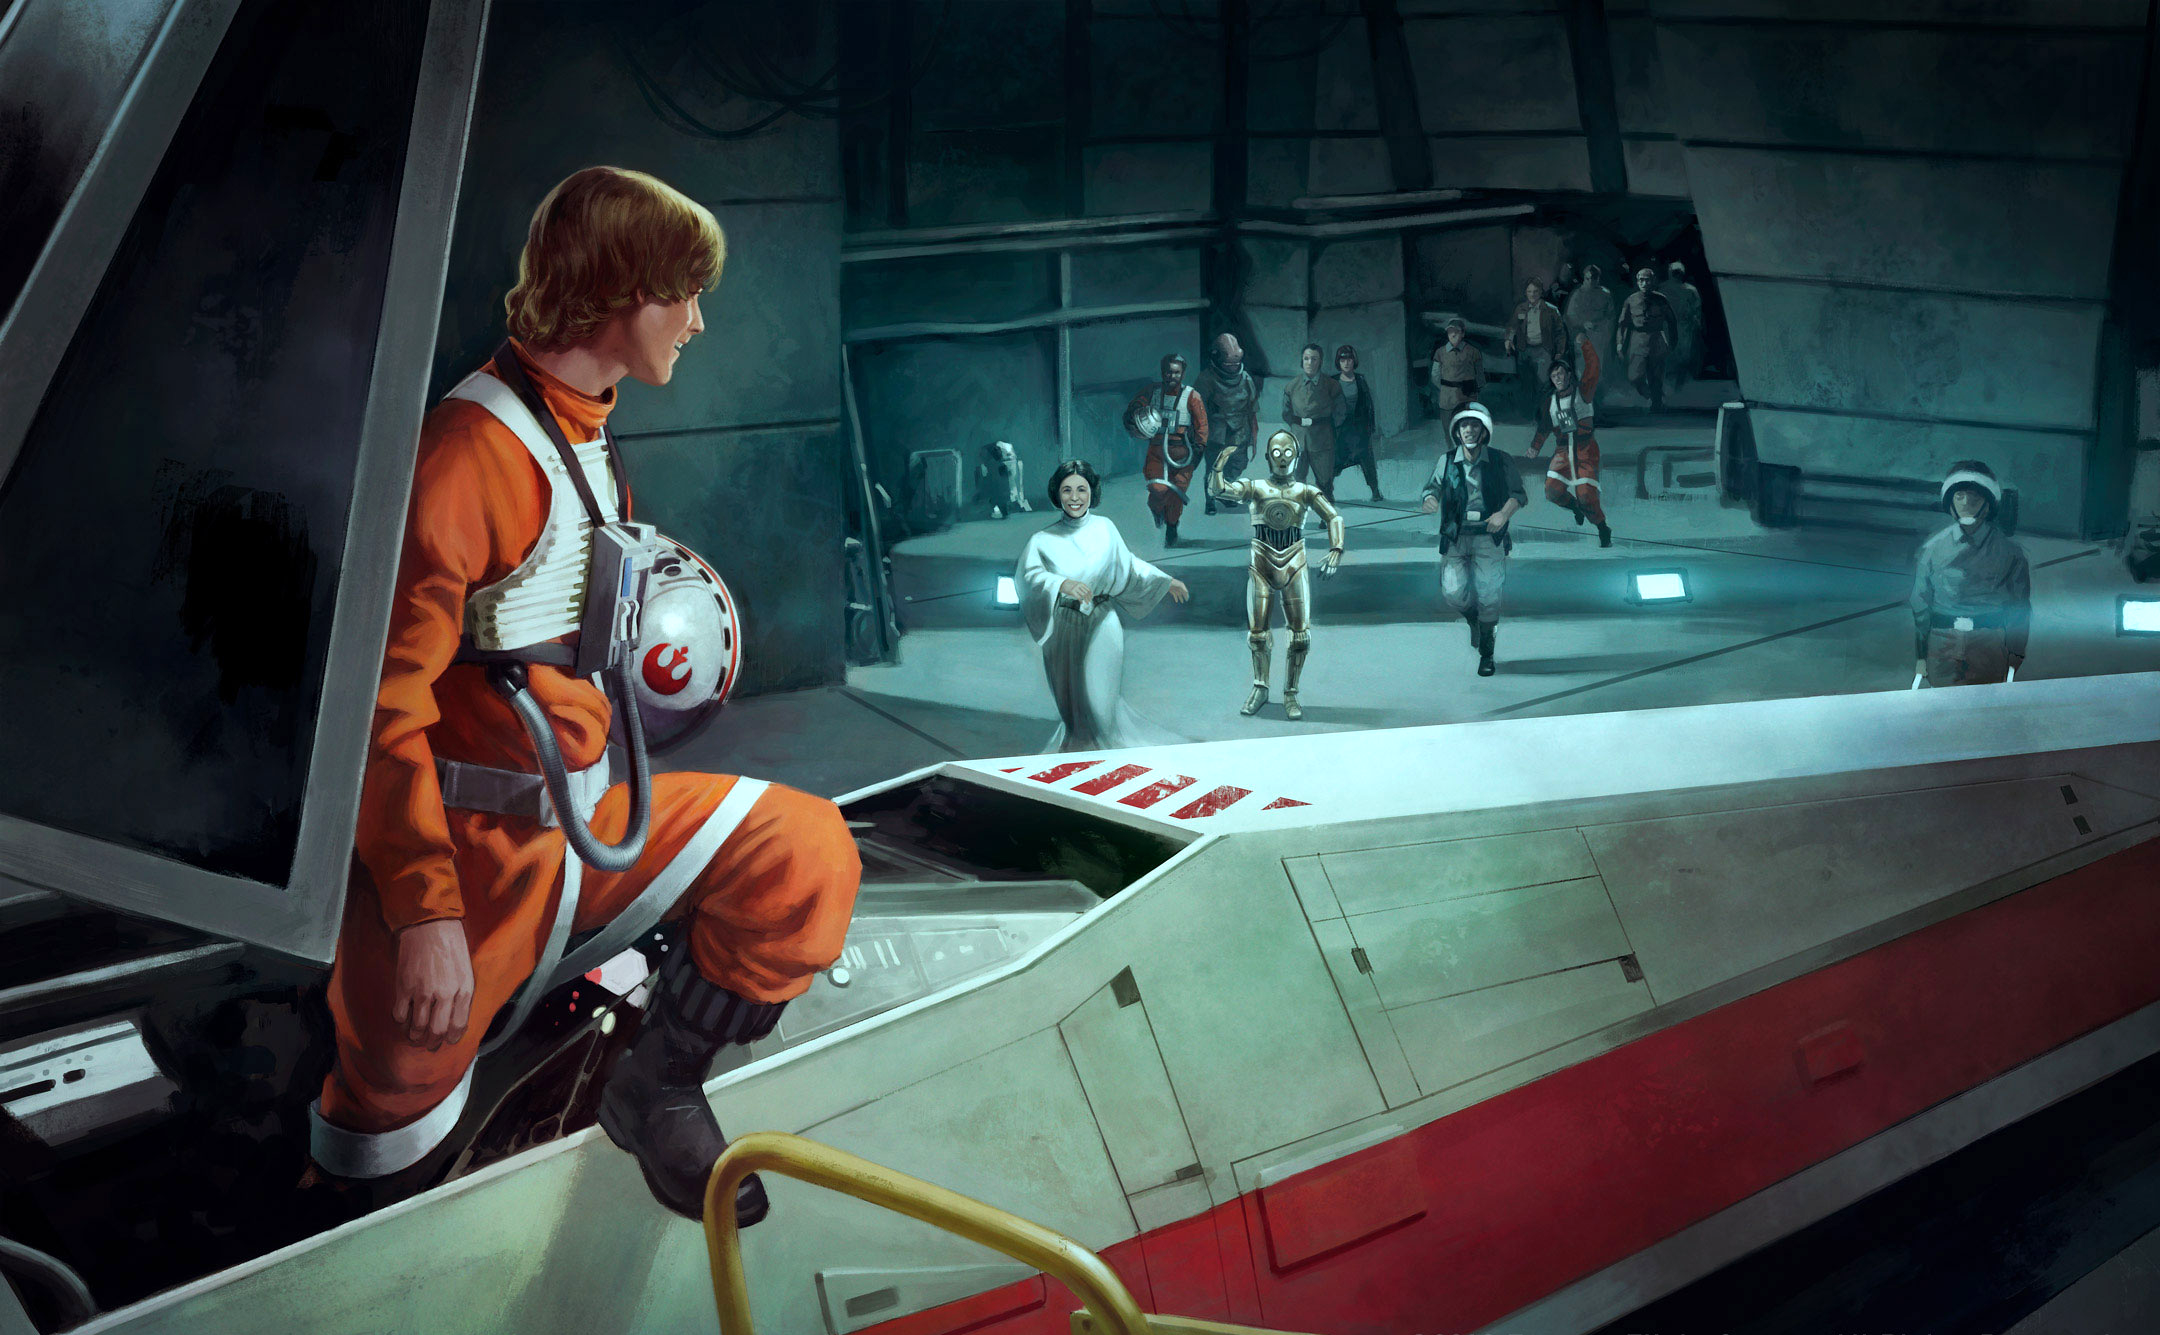
Skywalker, Solo, and the surviving Rebel fighters returned to Yavin, where they held a celebration ceremony and awarded the pair with medals for their achievement in saving the Rebellion. Mothma, having heard of the victory, permanently discarded her contingency plan to surrender to Palpatine. Antilles' move with which he saved Skywalker's life during the battle would be remembered as the Antilles Maneuver.
Shortly after the battle, the Rebels were forced to leave the site of their victory, fleeing the Empire once again. According to the Wild Space cartographer Emil Graf, in the days after the battle, the rebels' evacuation was briefly interrupted by an Imperial Star Destroyer which threatened to destroy the base before the evacuation could be completed. The rebels managed to disable the crew of the Star Destroyer, however, they soon discovered that its weapons were primed to fire at the base within minutes. Thanks to Verlaine's efforts, the ship misfired at its intended target, with the evacuation being resumed. Some time later, the Imperials regained control of the Destroyer.
To capitalize on the Empire's weakness following the destruction of the Death Star, the Rebels began to conduct dozens of raids against Imperial targets to weaken the now-vulnerable Empire. In addition to attacks carried out on the shipyards of Kuat and a supply base on Imdaar, a Rebel team composed of Leia Organa, Han Solo and Luke Skywalker assaulted and destroyed the Empire's largest armament factory on Cymoon 1, severely undermining Imperial military production.
Galactic Empire
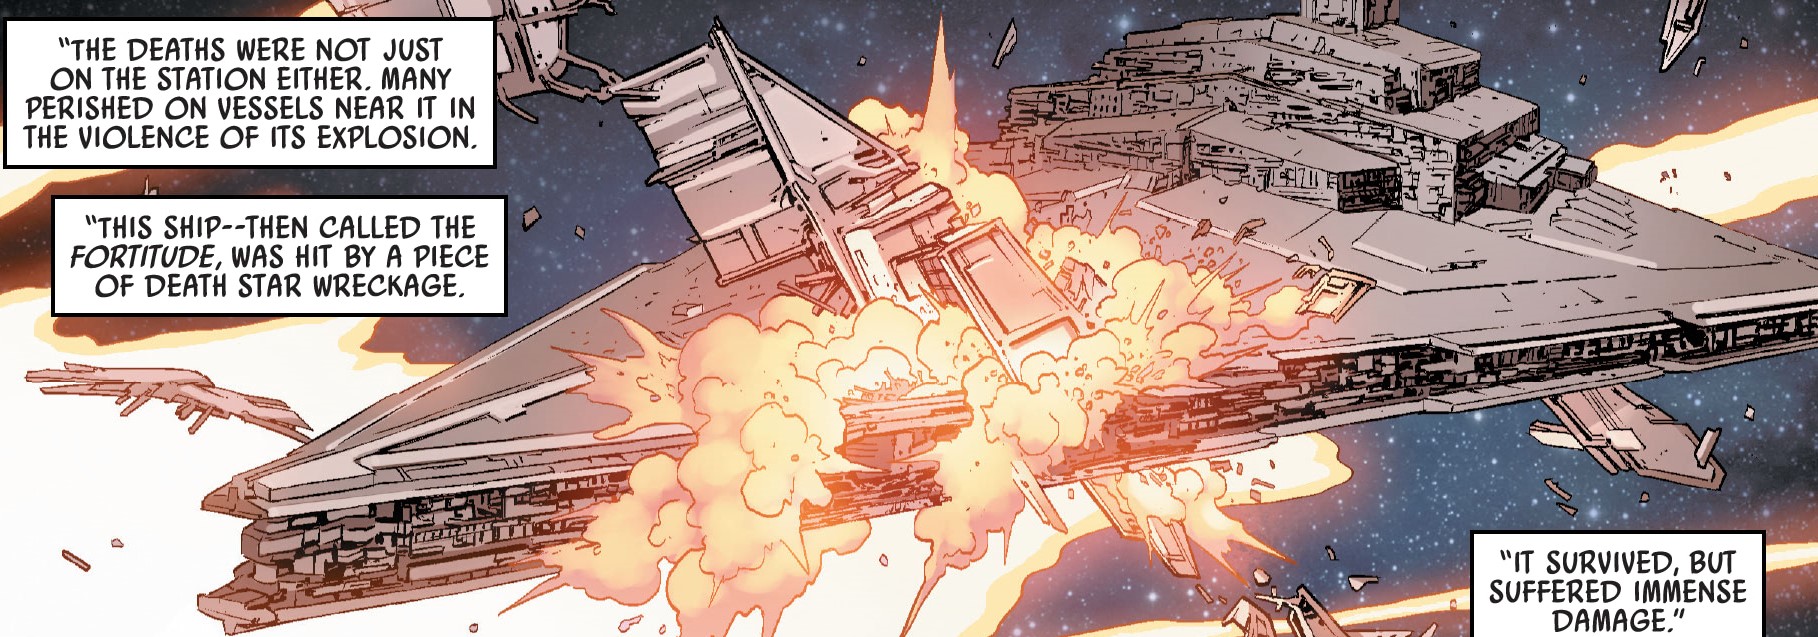
The Star Destroyer Fortitude was caught in the ensuing blast of the Death Star's destruction. Despite surviving the blast, the ship incurred significant damage and loss of life. In spite of the damage, the ship was never brought to a shipyard for repairs, with the damaged sections and the bodies of the fallen Imperials being retained as a sort of memorial while the ship continued its service to the Empire under the new name Tarkin's Will. Lord Vader, one of the few notable Imperials who survived the battle, was recovered in his damaged TIE Advanced x1 by Imperial pilots Ciena Ree and Berisse Sai. Iden Versio, who was outside of the Death Star's explosion, managed to pilot her damaged TIE Fighter to Yavin 4, where she ejected before it crashed into the jungle. There, she patched her wounds and stole a transport from the Rebel Base during the festivities.
Nearly all blame on the defeat was placed on Tarkin and his overconfidence. He had assumed that the station would not need an escort, and had launched no TIEs. The only group had been the single squadron Vader had launched on his own authority. Regardless, the Grand Moff was no longer alive to defend himself, and the Empire would never engage the rebels without exploiting their larger numbers compared to their opponent again. The destruction of the Death Star was a major blow to the Empire and represented the threat that was the Alliance to Restore the Republic. Cassio Tagge was given the rank of Grand General, as Emperor Palpatine had taken note of his argument against using the Death Star as the sole weapon of the Empire, and his awareness of the degree of the rebel threat. Vader was chastised and personally reminded by Palpatine about how he alone was alive to bear the blame of the destruction and failure of the Death Star. He was then ordered to act upon the will of Tagge.
Thane Kyrell and the other Imperials stationed at the abandoned Rebel base on Dantooine during the battle were cut off from communication with Coruscant after the Death Star was destroyed. Unconfirmed rumors spread through the ranks that the new weapon was gone. Early on, these rumors were dismissed as an Imperial trap to lure the Rebels out of hiding. Meanwhile, the destruction of the Death Star caused chaos within the Imperial ranks, leading to deliberate oversights on internal investigations and the rapid promotion of many young officers and lieutenants such as Ciena Ree to replace the higher-ranked officers killed on the Death Star.
Additionally, according to Everi Chalis, Palpatine was convinced that the incompetence of high-ranking Imperials was responsible for allowing the Death Star to be destroyed, which led to a culling of officers including Moff Coovern and Minister Khemt. Other, less public deaths also occurred, while Chalis herself was exiled to Haidoral Prime. Darth Vader carried out at least some of the killing personally. Though the Death Star and its purpose had disgusted Ciena Ree, who was horrified when she discovered the Empire was in the process of constructing the battle station's replacement, its destruction also cost the life of Jude Edivon, one of Ree's close friends, and Ciena, though she would grow to understand why her lover, Thane Kyrell, had chosen to abandon the Empire, nevertheless she doubted she would ever forgive the Rebel Alliance for its role in Jude's demise.
Further influence
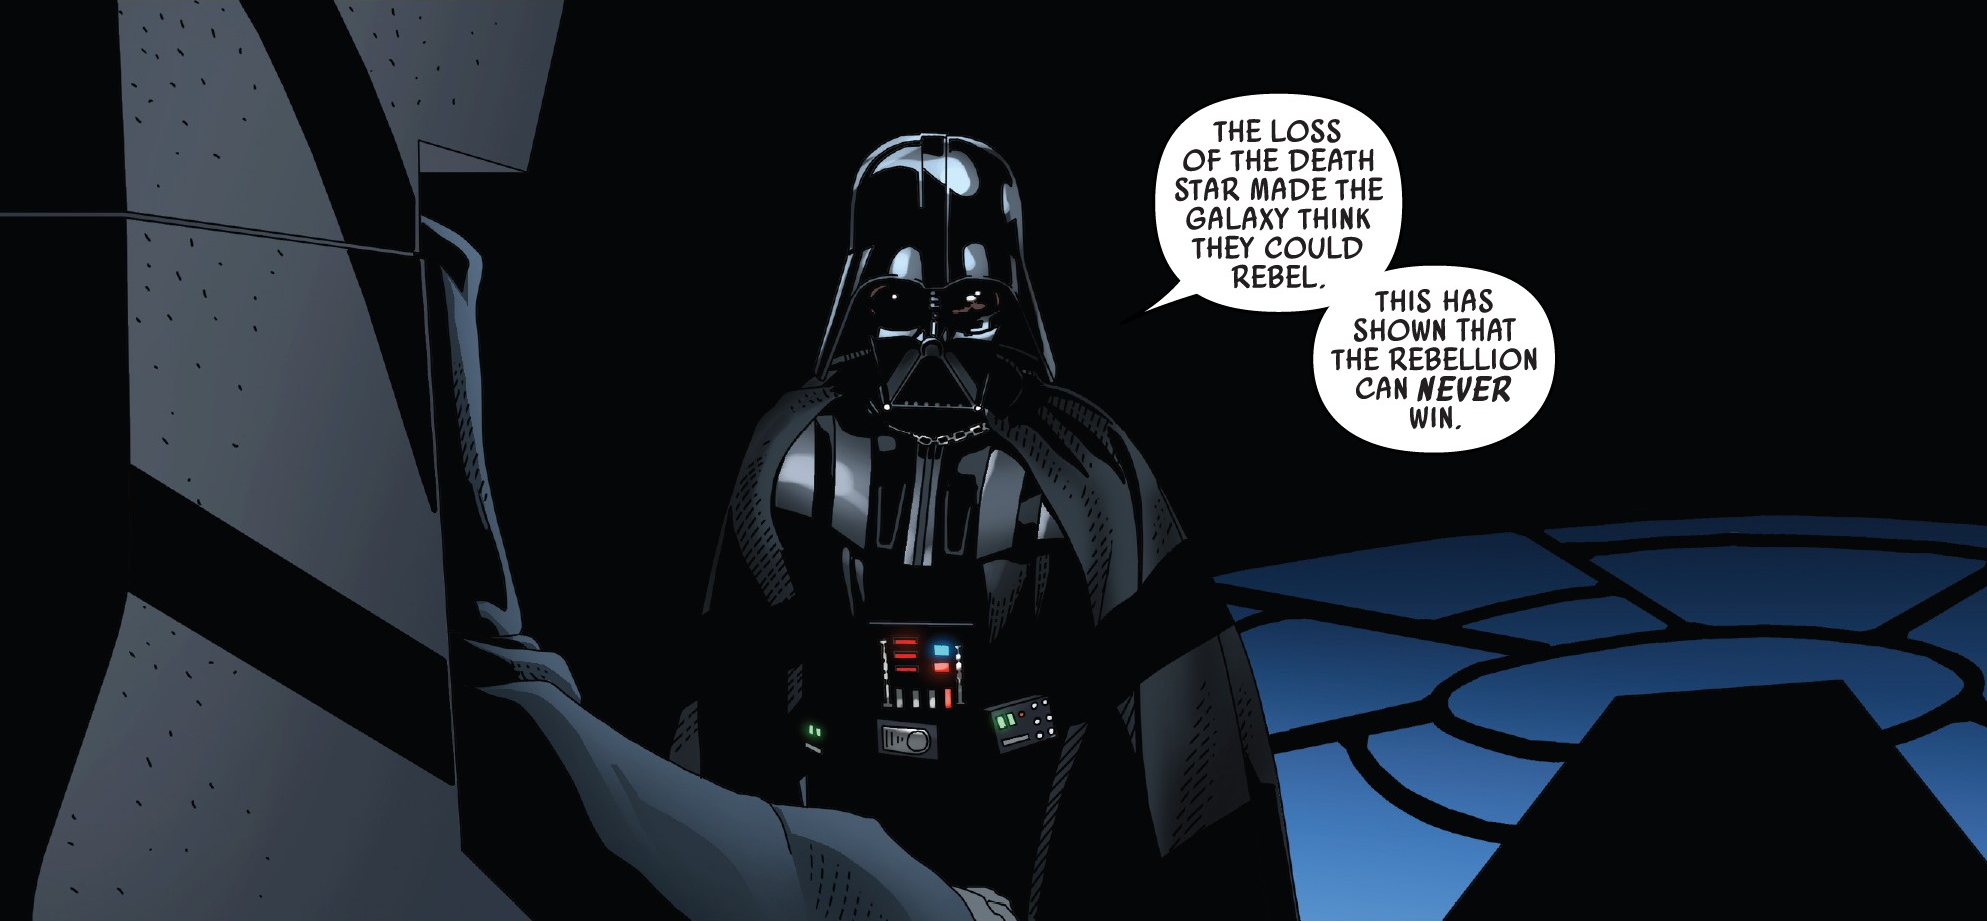
In 1 ABY, Vader sprung a major trap against the rebellion in the Battle of Mako-Ta, which he described as an attack on the Alliance's hope itself to Admiral Kendal Ozzel. The battle would end with major rebel leaders dead, over half of the cruisers in the Alliance Navy destroyed, and over ninety percent of the Rebel Alliance Starfighter Corps lost. In his report to Palpatine, Vader argued his "master stroke," as Palpatine called it, was a success despite some rebel forces managing to escape: whereas the Battle of Yavin had shown weakness in the Empire, the Battle of Mako-Ta did the same for the rebellion, with Vader declaring the galaxy would see it as proof the Alliance would never succeed in its crusade. Ultimately, however, galactic sentiment continued to turn against the Empire as the war continued.
Even years after the Battle of Yavin, Imperial supply lines remained thinly stretched after to the rebellion's victory at Yavin and as the Galactic Civil War continued. Due to those thinly stretched supply lines, the elite stormtroopers of Task Force 99 found themselves left to their own devices while performing their duties. The squad's leader, Sergeant Kreel, truly believed in the Empire and thought its victory in the Galactic Civil War was inevitable even despite the loss of the Death Star; as he reasoned, the Empire would be able to build twenty more battle stations to make up for the loss of one, whereas the rebels lacked such firepower and could not match Imperial numbers. However, upon landing on the once-Imperial loyal world of Horford at some point during or after 2 ABY and seeing how its populous had turned on the regime, Kreel came to believe the war was lost: in seeing people flee from his squad in fear and watching children play as the Heroes of Yavin, he believed the hearts and minds of the galactic populous were what mattered, instead of weapons like the Death Star, and realized stormtroopers like himself had hurt the Empire's reputation. Consumed by fear that they would be remembered as villains once the histories of the war were written, the squadron turned its weapons on the population.
In 3 ABY, Lieutenant Gorr of the Tarkin's Will, formerly known as Fortitude, proposed to Commander Ellian Zahra to execute repairs on the Star Destroyer's hull. Zahra replied that the ship represented a memorial to the destruction of the Death Star and told the lieutenant the ship's history during the Battle of Yavin. The commander also mentioned that when Vader offered her any vessel in the fleet to hunt for the rebel remnants, she chose the Fortitude because of what it represented. Zahra continued, saying that she picked the ship's crew among those who had lost someone close to them during the Battle of Yavin. After hearing the story, Gorr asked Zahra if she had lost someone during the battle as well and offered his sympathies to her.
New Republic Era
Six years before the destruction of the Hosnian system, an unofficial political faction in the New Republic's Galactic Senate known to admire the Galactic Empire's rule, the Centrists, questioned the official New Republic historical accounts of the Battle of Yavin and the Galactic Civil War. They believed that the Death Star was destroyed by an Imperial traitor and not by Luke Skywalker and the Rebel Alliance. Another Centrist, Senator Ransolm Casterfo, would later remind Leia Organa how the destruction of the Death Star had cost thousand of fairly-innocent workers and employees their lives while listing the flaws of the Rebellion.
Some time during the New Republic Era, the Ithorian cartographer Gammit Chond created a collection of maps that used a calendar system dating all events in reference to the Battle of Yavin.
Behind the scenes
The Battle of Yavin first appeared in the 1977 film, Star Wars: Episode IV A New Hope.
The timeline of Star Wars is most often based upon this event, where events are dated as happening so many years "Before the Battle of Yavin" (BBY) or "After the Battle of Yavin" (ABY).
The short stories in From a Certain Point of View are inconsistent regarding some elements of the battle. "Sparks" establishes that Green Squadron fought at the Battle of Yavin, whereas "Grounded" states that only Red Squadron and Gold Squadron fought at the battle. This article assumes "Sparks" is correct, because "Grounded" additionally establishes that there were 22 T-65B X-wing starfighters that fought in the battle, and "Duty Roster" states that Red Squadron had twelve pilots at the Battle of Yavin. "Grounded" additionally established that 5 X-wings, 1 Y-wing and 1 U-Wing were left behind at the Massasi base because there was no available pilots, whereas "Duty Roster" stated that several pilots stayed behind at the base during the battle. This article assumes that Duty Roster is correct.
The reference book Star Wars Super Graphic: A Visual Guide to a Galaxy Far, Far Away says a Red Squadron pilot flying as Red 16 took part in the battle, which cannot be possible if only twelve Red Squadron pilots were involved. Additionally, the Battle of Yavin Scenario Pack released by Fantasy Flight Games claimed that the TIE/IN interceptors of Sigma Squadron took part in the battle. However, other sources confirmed Tarkin refused to send out reinforcements beyond the group of TIE fighters, Black Squadron, Vader ordered into battle.