Assault on Cymoon
The Cymoon Assault, alternatively known as the Cymoon 1 attack, transpired during the Galactic Civil War, shortly after the Battle of Yavin. In this engagement, the Rebel Alliance launched an offensive against the Imperial Weapons Factory Alpha located on Cymoon 1. The operation commenced with an act of subterfuge: Han Solo impersonated an envoy of Jabba the Hutt, engaging in purported arms negotiations with the Empire, while Luke Skywalker and Leia Organa played the roles of his protectors. Once inside the complex, the Rebels revealed their true allegiance, engaging the Imperials in combat, liberating numerous slaves, and initiating the facility's self-destruction sequence by overloading the power core. However, their strategy was disrupted by the arrival of Darth Vader, who promptly placed the entire facility on high alert. To facilitate their escape, the Rebels commandeered an AT-AT, during which Skywalker briefly engaged the Dark Lord of the Sith in lightsaber combat before the walker arrived.
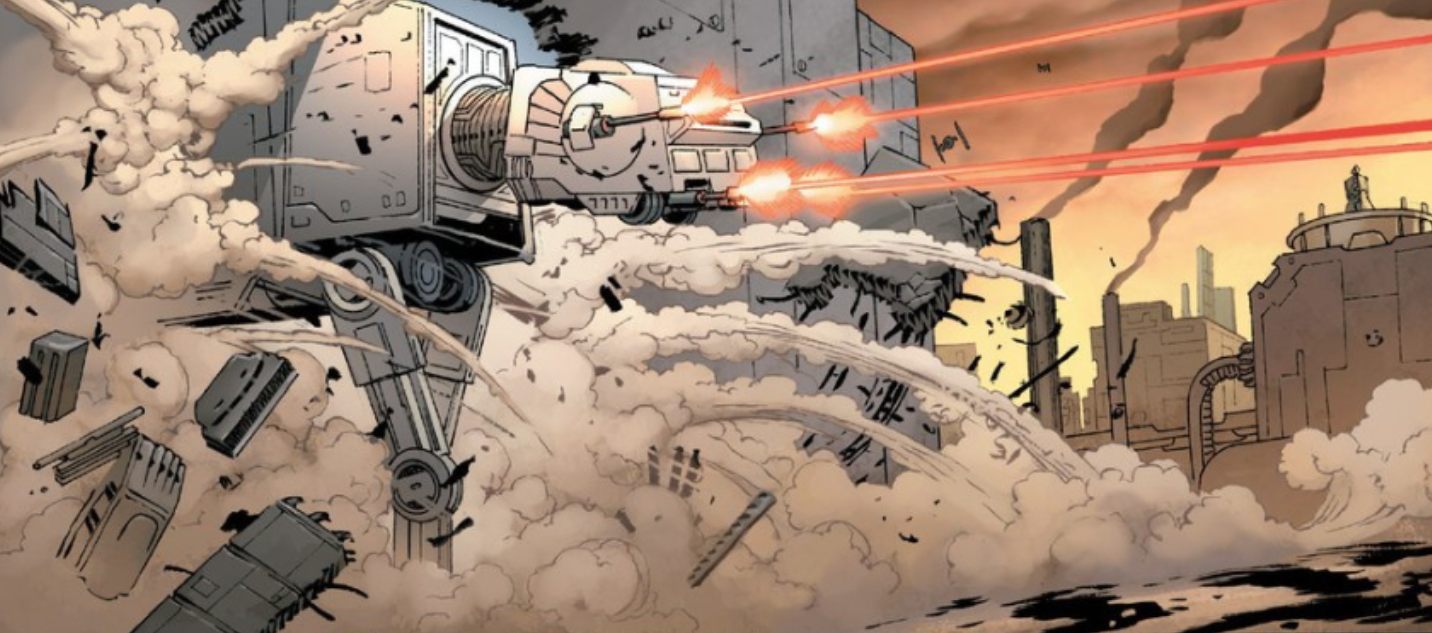
Solo then drove the AT-AT through the factory's barriers, creating a path for the Rebels and the freed slaves to flee the premises. During their retreat, the Rebels engaged Vader and the Imperial forces in direct combat. The Dark Lord killed several of the liberated slaves. Skywalker utilized the weaponry of a speeder bike to eliminate some of the Imperial troops, while Solo employed the AT-AT to fire upon the Dark Lord, inflicting only minor injuries.
The Cymoon Assault concluded with the destruction of Weapons Factory Alpha and the successful escape of the Rebels. Vader subsequently reported the events to the Emperor, Darth Sidious, and faced a reduction in his authority for allowing the Rebels to destroy the facility. Vader then initiated an investigation into Skywalker's identity, ultimately discovering that the young man was his son.
Background
Amidst the Galactic Civil War, the Rebel Alliance acquired the schematics for the Death Star, the Galactic Empire's mobile space-based weapon capable of obliterating entire planets. They analyzed the data, delivered to the Rebel base on Yavin 4 by Princess Leia Organa of Alderaan, to devise a strategy to attack the station. This strategy led to the Battle of Yavin, which commenced after the Death Star identified the Rebel base. During the battle, Rebel starfighters launched an assault on the Death Star, exploiting a weakness identified in the schematics. Although the majority of the Rebel forces were annihilated, X-wing pilot Luke Skywalker—aided by Han Solo and Chewbacca aboard the Millennium Falcon—fired a proton torpedo into the Death Star's thermal exhaust port. The torpedo penetrated the station's main reactor, causing the Death Star to explode and granting the Rebellion a crucial victory against the Imperial war machine.
The destruction of the Death Star instilled renewed hope in the Rebellion's struggle against the Empire. Recognizing that the loss of the Death Star likely entailed the loss of numerous support craft like TIE Fighters, transports, and combat vehicles, Rebel General Davits Draven decided to capitalize on this advantage by striking a decisive blow against the Empire's manufacturing capabilities before these losses could be compensated.
Consequently, they targeted Weapons Factory Alpha on Cymoon 1, a moon located within the Corellian Industrial Cluster. This weapons factory was the largest in the galaxy, and its significance was amplified after the loss of the Death Star. The Rebels intercepted information about impending negotiations between the Empire and Outer Rim crime boss Jabba the Hutt, as the Empire sought Jabba and the Hutt Clan's assistance in providing raw materials for weapons and starship construction. A Rebel team—Solo, Skywalker, Organa, the Wookiee Chewbacca, the astromech droid R2-D2, and protocol droid C-3PO—intercepted a shuttle from Tatooine carrying Jabba's representative. They commandeered the shuttle and proceeded towards Cymoon 1, where Solo would impersonate the envoy, leveraging his past association with Jabba, while Skywalker and Organa would pose as his bodyguards. In a slight alteration to the original plan, Solo arranged for Chewbacca and Threepio to travel separately to Cymoon 1 aboard the Millennium Falcon, landing in a refuse field surrounding the factory, while Artoo remained with Solo.
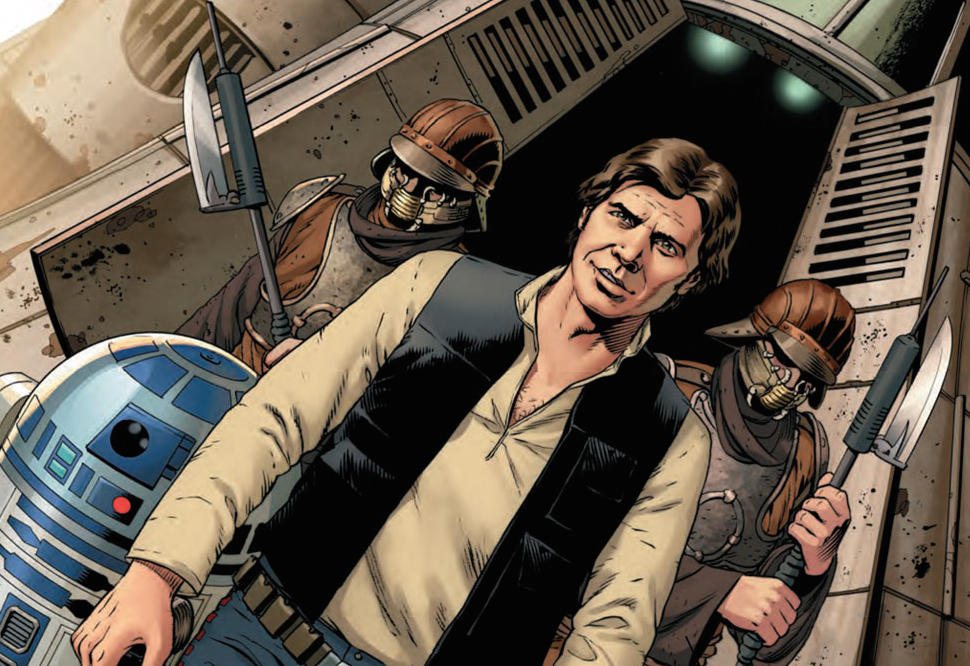
Upon reaching Cymoon 1's orbit, the Rebels received clearance to land at Weapons Factory Alpha, where an Imperial delegation awaited them, including Overseer Aggadeen, a LOM-series protocol droid, and several stormtroopers. Solo introduced himself upon arrival, asserting his continued affiliation with Jabba. The protocol droid verified his identity and purported association, and, at Aggadeen's request, the Rebels surrendered their weapons to the Empire. As Aggadeen escorted them into the facility, Organa contacted Chewbacca and Threepio, instructing them to maintain their positions.
The Attack
Infiltration Phase
Once inside the facility, the Rebels were guided through a TIE/ln space superiority starfighter assembly area, where the Overseer explained that the factory was fully automated. Solo asserted that Jabba would be a difficult negotiator, to which Aggadeen responded that there would be no negotiations. The Imperial negotiator—who, unbeknownst to the Rebels, was Darth Vader, the Dark Lord of the Sith—would instead present terms to Solo that the Empire expected Jabba to accept. The Overseer led them to a conference room where he intended them to wait for Vader's arrival, but Solo declared that he was correct and that there would indeed be no negotiations. Instead, Artoo sprayed a liquid onto the facility's floor and electrocuted it, incapacitating the stormtroopers standing on it. Skywalker and Organa engaged the remaining stormtroopers, while Solo seized a blaster from a fallen trooper and aimed it at the Overseer. Solo demanded to know the location of the factory's power core, but Aggadeen refused to comply. Artoo threatened to electrocute him, prompting Aggadeen to reveal the direction before Organa struck him across the jaw, rendering him unconscious.
The Rebels navigated through the facility towards the power core. En route, Solo contacted Threepio, who remained aboard the Millennium Falcon, for a status update. The droid reported their landing location and expressed uncertainty about maintaining their concealment, as automated scanners were present in the area. Nonetheless, Solo instructed him to remain on alert, as the plan required Threepio to engage the ship's autopilot and retrieve the Rebels once they were ready to escape. They ceased communications upon reaching the power core, where Organa instructed Artoo to hack into the Imperial computer and disable the safety restraints surrounding the core.

Meanwhile, Skywalker monitored for additional stormtroopers and attempted to utilize the Force to detect nearby presences. The Force guided him towards a cage containing slaves held by the Empire, indicating that the factory was not as automated as the Overseer had claimed. While at the cage, Skywalker was confronted by a guard who demanded his identity. The Jedi trainee attempted to employ a mind trick on the guard, attempting to compel him to leave, replicating an action he had witnessed Obi-Wan Kenobi perform on stormtroopers in Mos Eisley on Tatooine. However, due to his limited training, Skywalker failed to manipulate the guard. Instead, Skywalker activated his lightsaber and severed the guard's hand, providing him with the opportunity to liberate the slaves from their cage and escort them back to the other Rebels.
Artoo successfully deactivated the safety restraints, and Solo programmed the power core to overload in ten minutes, allowing the Rebels time to reach the Millennium Falcon. Skywalker returned to the group, accompanied by the slaves. Solo instructed Threepio to activate the ship's autopilot so the Falcon could retrieve them before the core overload, but they were interrupted by Chewbacca, who reported the arrival of an Imperial shuttle. Vader disembarked from the shuttle, and, despite Solo's objections, Organa ordered Chewbacca to fire upon and eliminate the Dark Lord. Chewbacca fired, but Vader deflected the shot with his lightsaber. The Wookiee continued to fire on the Dark Lord, but Vader used the Force to throw stormtroopers into the line of fire, causing them to be hit while Vader remained unharmed. The Dark Lord used the Force to dismantle the building that Chewbacca occupied, forcing Chewbacca to flee. On Vader's orders, the facility and the entire moon were placed on high alert. Vader also sensed Skywalker, recognizing his presence as the individual who had destroyed the Death Star.
Confrontation with Darth Vader
The Rebels lost contact with Chewbacca, and Solo instructed Threepio to engage the autopilot and retrieve them. However, the droid was unable to comply, as native scavengers had discovered the Falcon in the refuse and were dismantling its systems, including the autopilot. With their escape plan compromised, the Rebels were confronted by a squadron of stormtroopers, forcing them to fight their way to safety. They retreated, along with the slaves, from the Imperial troops and entered a hangar containing a group of AT-AT walkers. Solo instructed the others to board one of the walkers, as he intended to pilot it and fight their way out of the factory before it exploded.
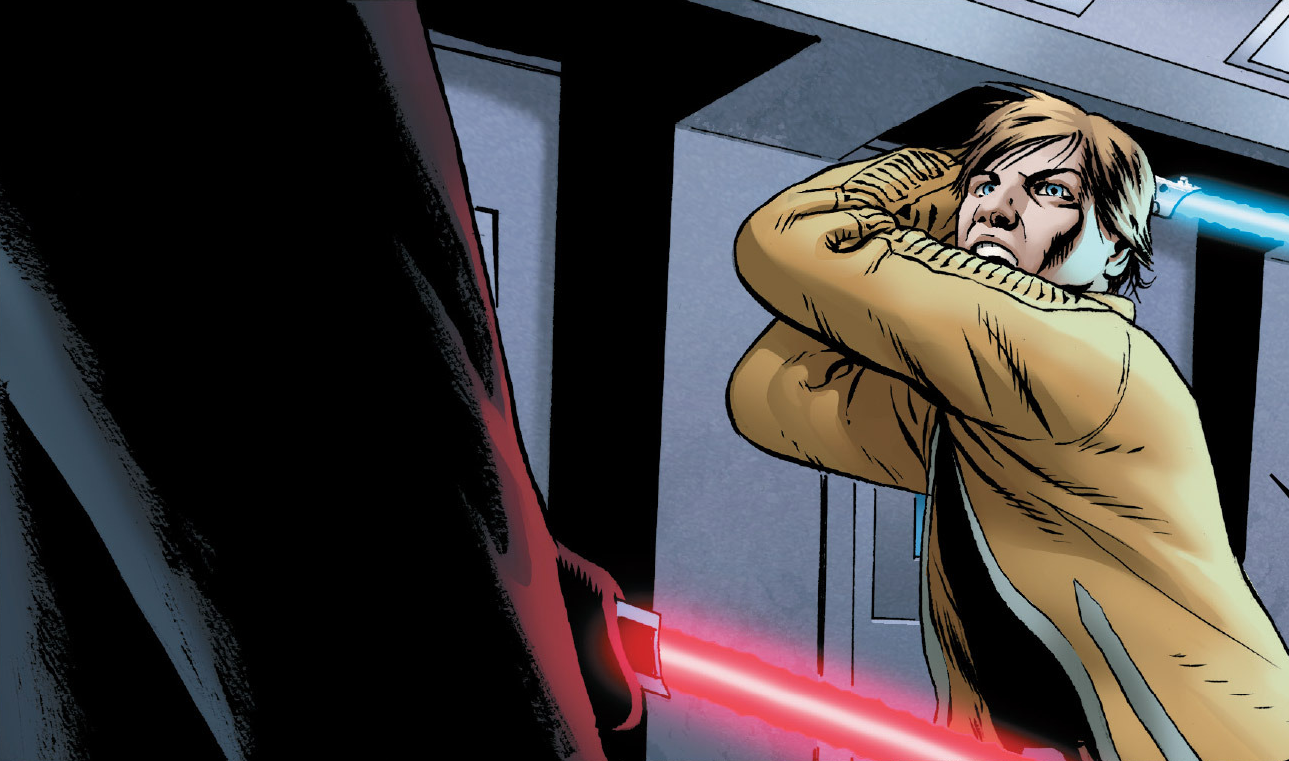
While Solo and Organa boarded a walker, Skywalker remained in the facility, searching for Vader; Skywalker was unaware that Vader was his father, just as Vader was unaware Skywalker was his son, and still believed—as Kenobi had once told him—that Vader had killed Anakin Skywalker. As the Jedi trainee approached Vader, Kenobi called out to Skywalker from beyond and warned him to flee from the Dark Lord. Despite the warning, Skywalker briefly engaged the Dark Lord in lightsaber combat, but the young Rebel was quickly and easily defeated. Vader used the Force to disarm Skywalker and demanded the identity of the pilot who had destroyed the Death Star. Skywalker refused, and Vader prepared to execute him. As he did so, however, he noticed that the weapon he had taken from Skywalker had once been his own. He did not yet know, however, that Skywalker was his son or the Rebel who destroyed the Death Star.
Skywalker managed to escape from the Dark Lord when Solo brought the AT-AT's foot crashing down into the middle of the confrontation. The slaves Skywalker freed also turned against the Imperial forces, and Solo piloted the walker through the facility. The Dark Lord, meanwhile, killed the slaves who were in his path—using Skywalker's lightsaber—and ordered all stormtroopers to his position so the Rebels could be eliminated. Inside the AT-AT, Artoo and a pair of freed Jawas attempted to enable the walker's weapons, which had not yet been fully assembled inside the factory. The Rebels contacted Threepio in the hopes that the threat to the Falcon had been ended, but the native scavengers were still ripping the ship apart. Following the Rebels' orders, Threepio went outside of the Falcon in an attempt to stop the scavengers, but he surrendered and was captured after dropping his weapon.
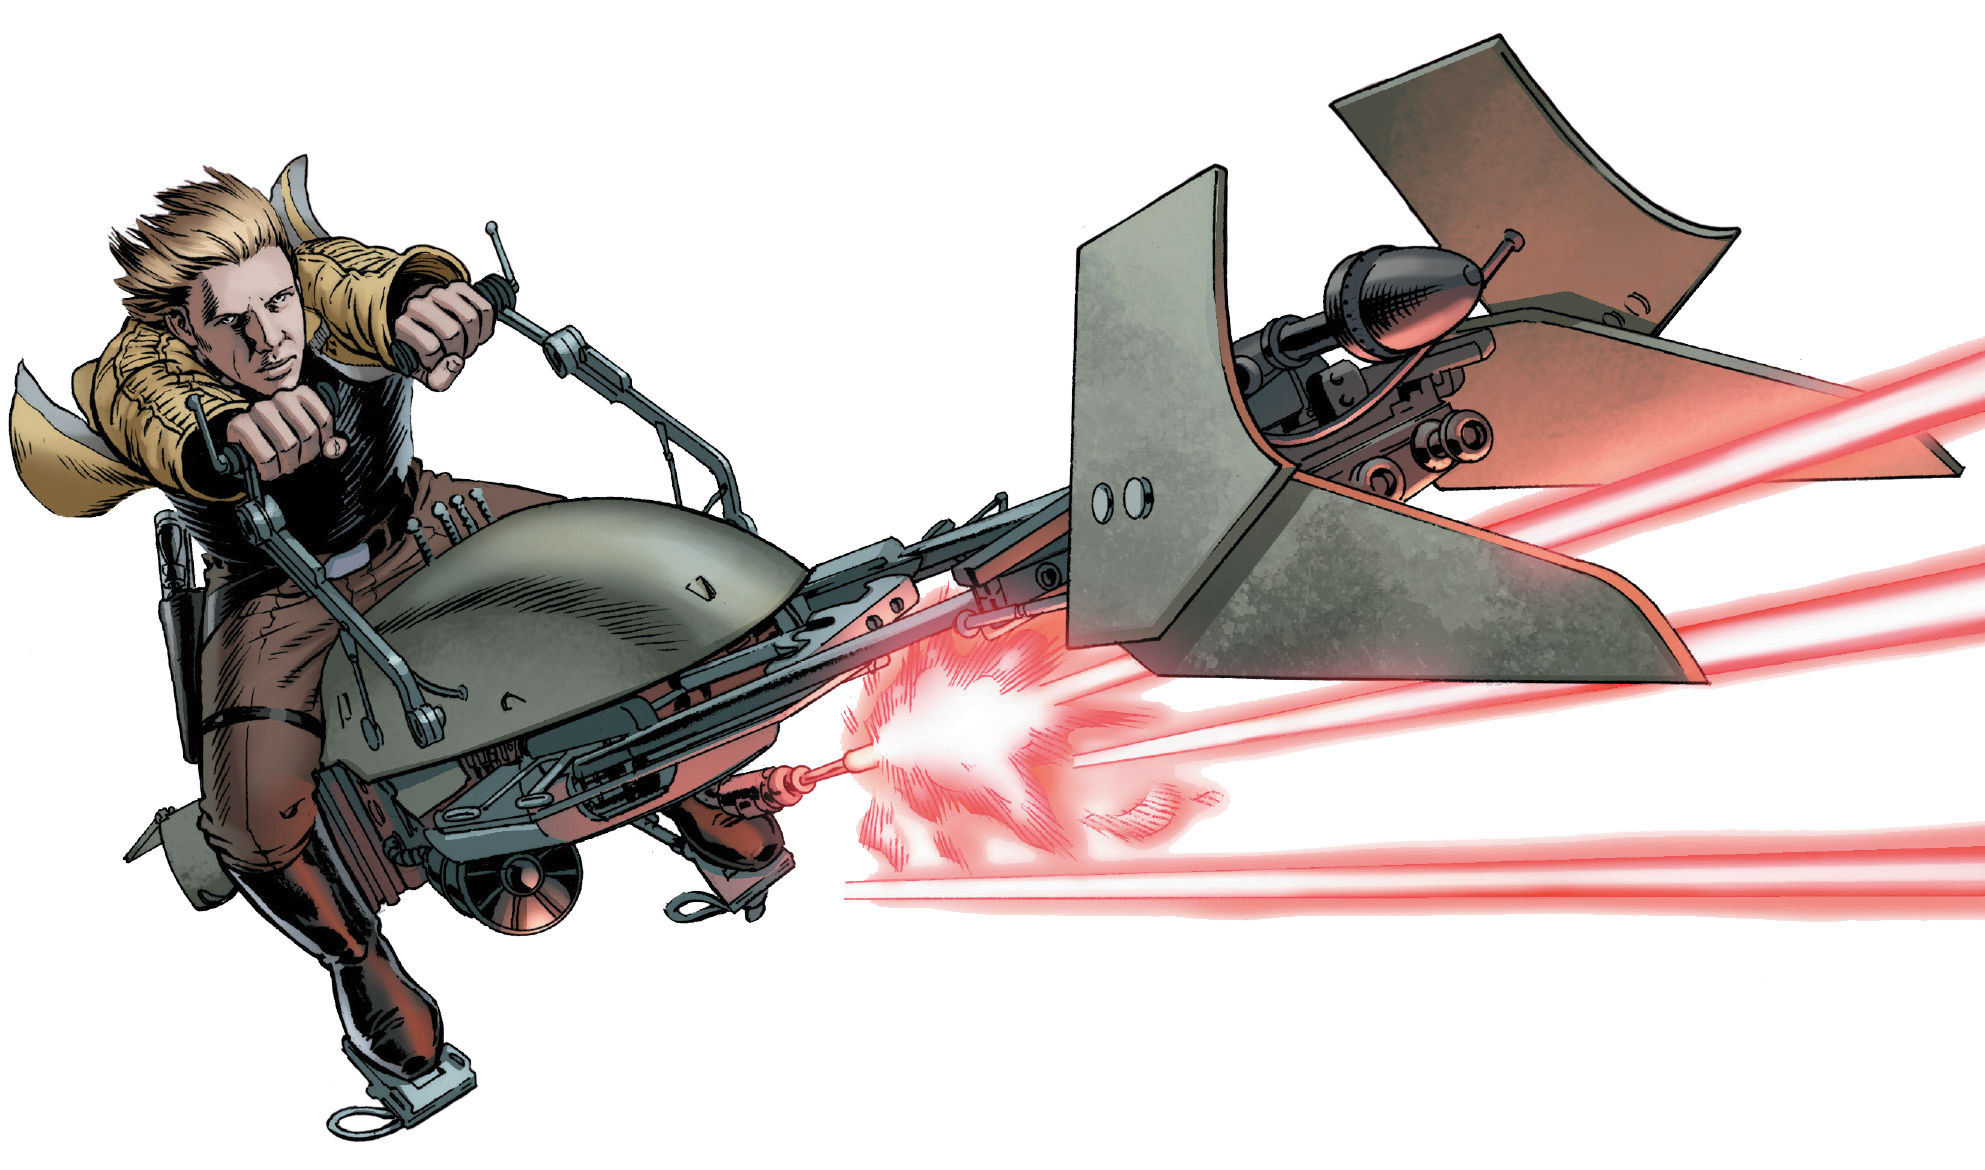
The slaves and Skywalker continued fighting against Vader and the stormtroopers, but the Dark Lord was able to kill many more slaves. Skywalker doubted his ability to protect the slaves, questioning whether a farm boy from Tatooine could be a Jedi, until he saw a speeder bike he knew he could pilot. He mounted the bike and sped towards Vader and his forces, taking out the stormtroopers in his path. Vader remained standing, however, and was confronted by the AT-AT. Solo, at Organa's urging, aimed the AT-AT's foot at the Dark Lord, but Vader used the Force to hold the walker's leg in place and prevent it from stepping on him. As the power Vader used began tearing the walker apart, Artoo and the Jawas successfully enabled the AT-AT's weapons. Organa fired on Vader's position, but the Dark Lord, although slightly injured, survived the encounter.
Skywalker retrieved his lightsaber from where Vader dropped it and sped towards the AT-AT, which exited the factory. After he did so, Aggadeen contacted Vader and told him that they were unable to stop the power core's meltdown. Aggadeen requested permission for his forces to evacuate, but Vader denied the request, saying that if the factory was to explode, the Imperials would explode with it for their failure. Vader intended to kill the Rebels, but had other plans for Skywalker.
The Escape
As Organa and Solo pressed on, they encountered more Imperial reinforcements. Solo contacted Skywalker, who was busy fighting several pursuing stormtroopers and walkers, for assistance. Organa then realizes that the factory hasn't exploded yet and that the Imperials must have stopped the meltdown. Just then, Aggadeen contacted Vader and reported that the meltdown has been halted. Vader then ordered Aggadeen to send troops to his location to prevent the rebels from escaping. Vader proceeded to attack the AT-AT Organa and Solo are in by slicing its legs. Skywalker looked on in horror as the AT-AT's legs were destroyed, causing it to collapse with Solo and Organa inside it.
With the AT-AT down, Vader orders his troops to move in for the kill. Skywalker quickly arrives and strikes down Vader's troops. Organa then pulls an injured Solo out of the wreckage and orders the slaves to head for the trash fields. Vader orders his troops to ignore the slaves and capture the rebels. As Organa, Solo and the slaves head to the Falcon, Skywalker decides to go back and destroy the factory. Commandeering a speeder, Vader then orders his troops to go after the rebels and slaves while he deals with Skywalker. With Vader in pursuit, Skywalker re-enters the factory and fires his speeder's blasters on the power core, causing it to overload. Vader relentlessly continues his pursuit, inadvertently striking Aggadeen in the process. He manages to damage Skywalker's speeder, but Skywalker is able to escape when the reactor explodes, burying Vader's speeder.
Vader emerges from the wreckage and sees Skywalker's destroyed speeder. Vader then sees the Millennium Falcon flying off. With an injured Skywalker in tow, Organa pilots the Falcon out of Cymoon 1. Coming across the Imperial blockade, Leia activates the hyperspace drive and makes the jump to lightspeed.
Captain Kronn of the Adjudicator then informs Vader that the rebels have escaped the blockade, to which the Dark Lord responds by telekinetically strangling Kronn. Vader realizes that the boy is Kenobi's last hope and why he sacrificed himself to protect him. Vader reminds Kenobi that the boy was still untrained and that there was no one left but the Dark Lord to train him and he vows to find Skywalker and make him his weapon, assuring Kenobi that the Dark Side always wins.
After the Battle
Following the conclusion of the assault, Vader journeyed back to the Imperial Palace on Coruscant, where he presented a report to the Emperor, Darth Sidious. He also informed his master that the Rebels had successfully destroyed Weapons Factory Alpha. Sidious reprimanded Vader for his failures, both in allowing the Rebels to destroy the Death Star and then Weapons Factory Alpha, which caused a setback in Imperial Military operations. Vader, who had brought Overseer Aggadeen with him to Coruscant, presented his master with the Overseer, who was being tortured for his failures to prevent the Rebel assault. As a consequence of his own failures, Vader had some of his authority revoked and was dispatched to Tatooine to engage directly with Jabba, rather than relying on an envoy as an intermediary. However, the Dark Lord did not disclose to his master the existence of Skywalker or his suspicions regarding why the boy had been trained by Obi-Wan Kenobi.
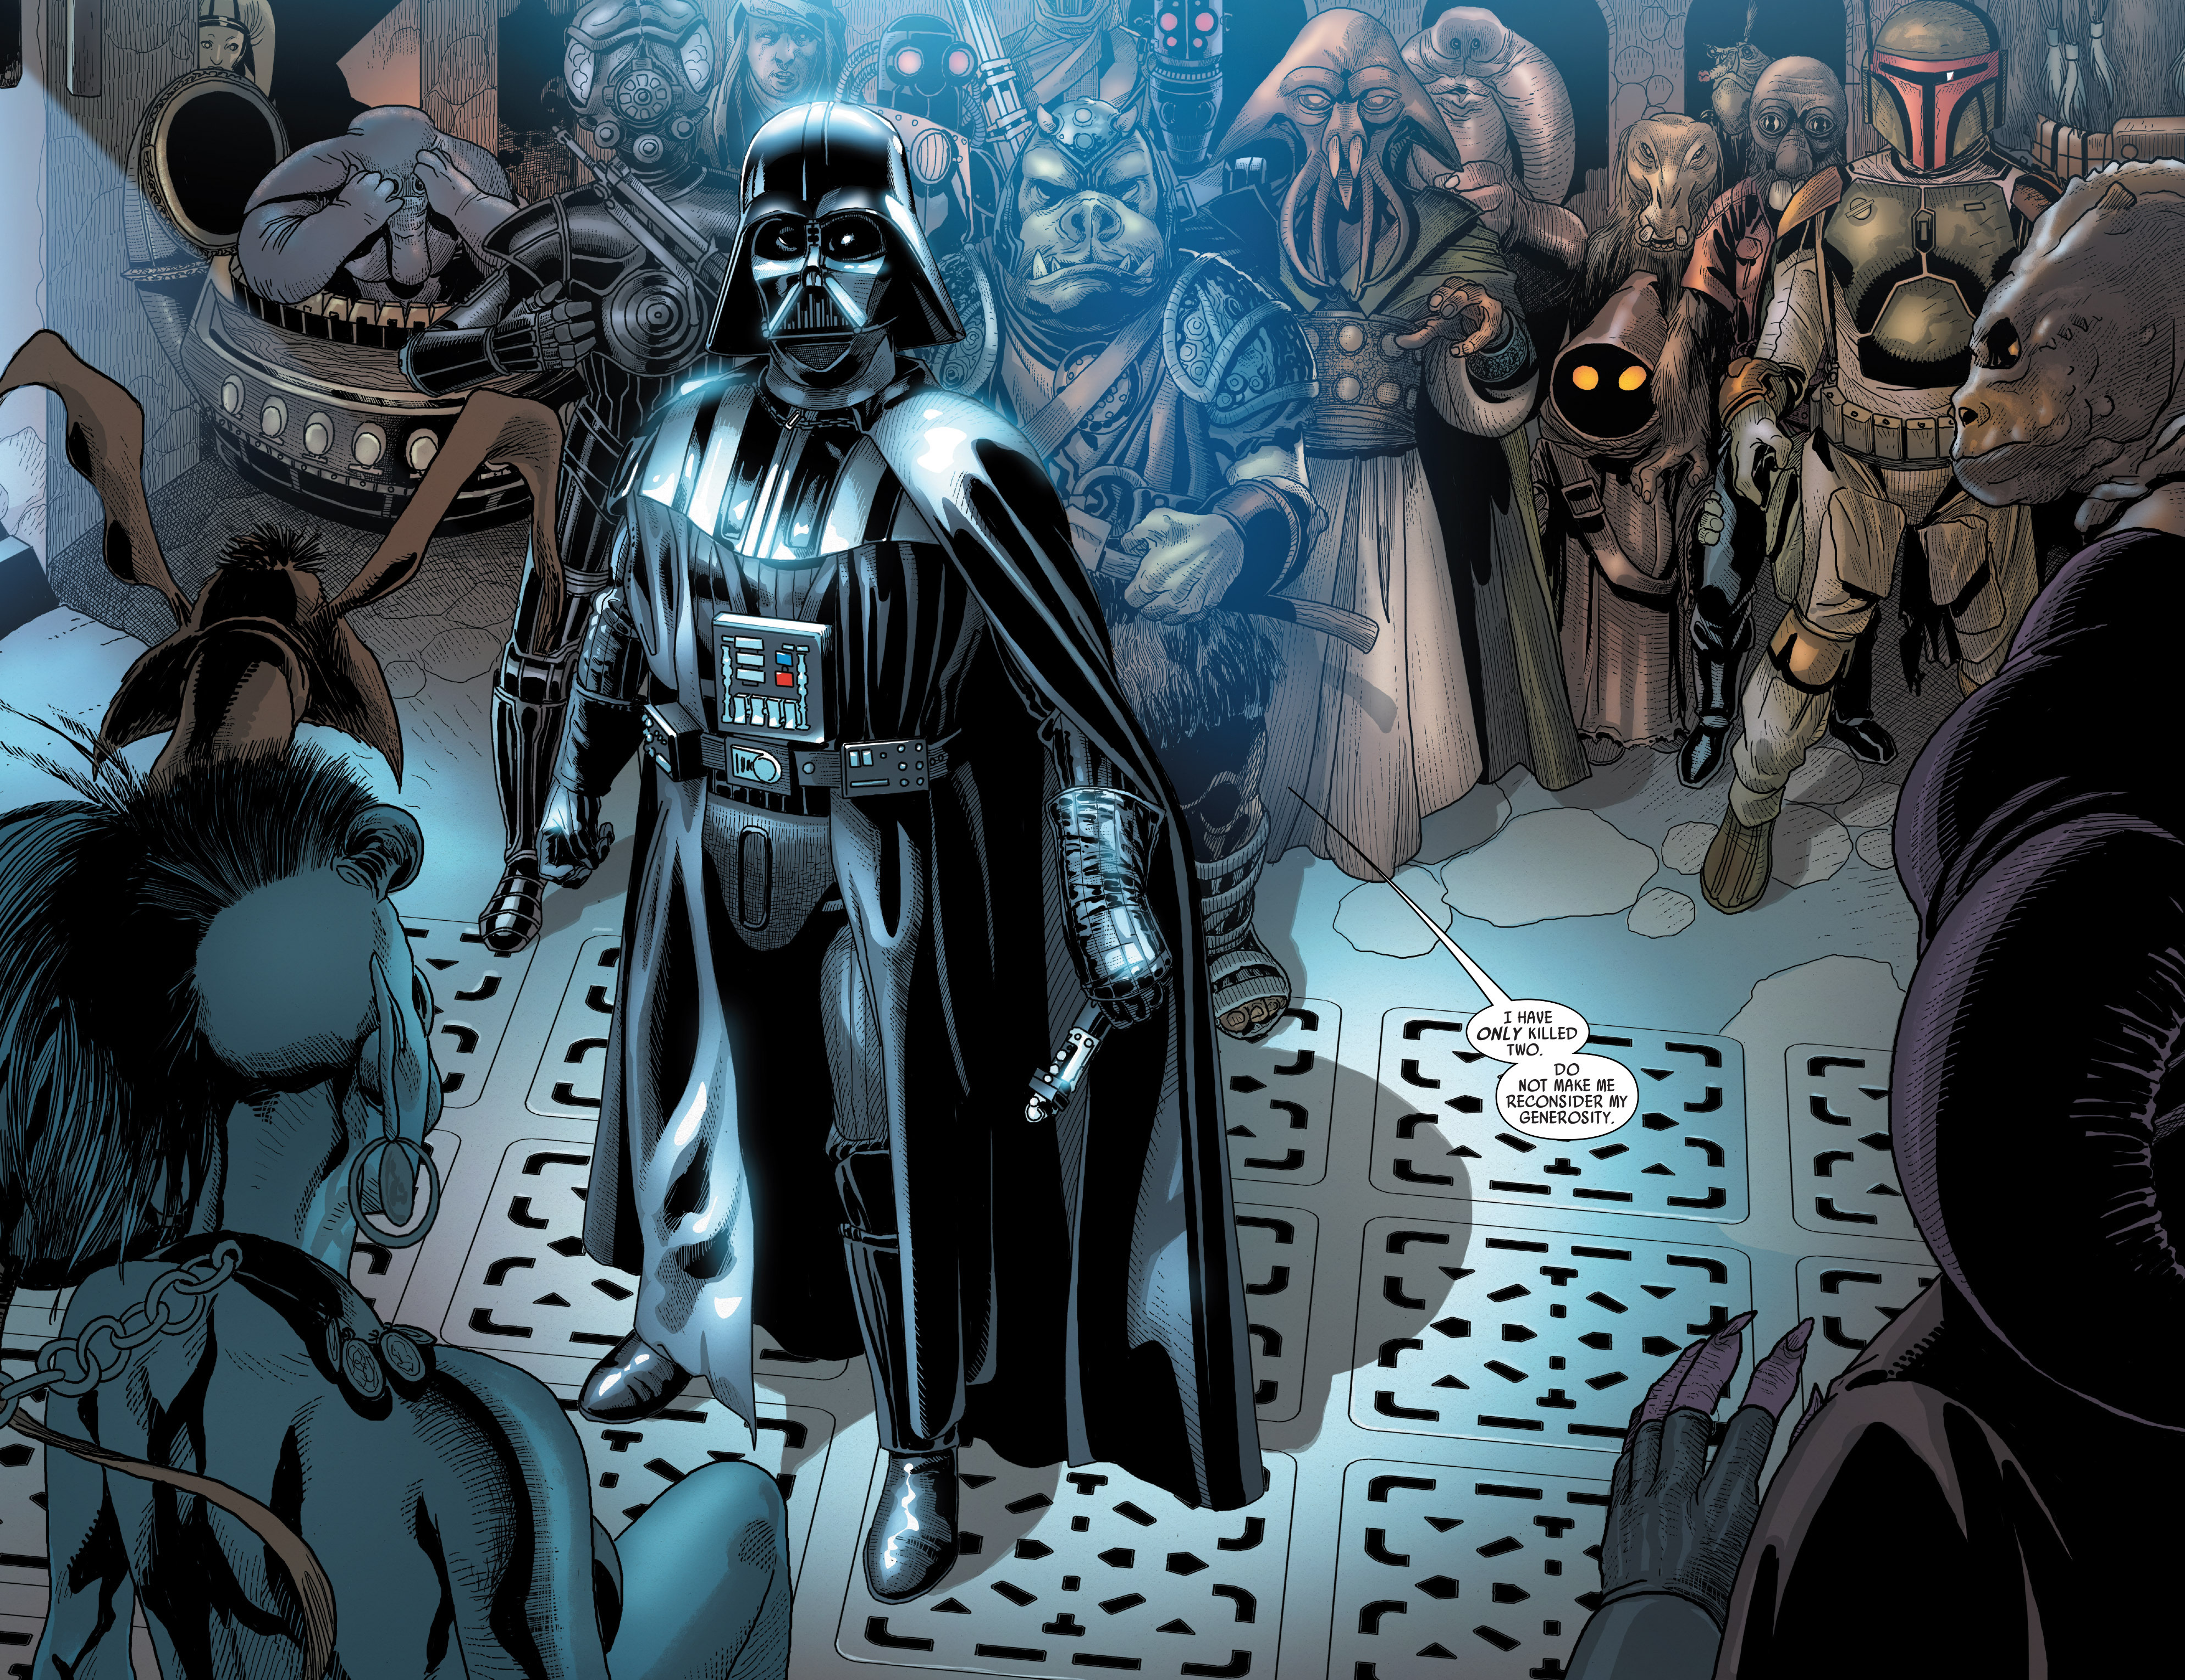
Vader arrived on Tatooine one day ahead of schedule, using the extra time to negotiate a personal mission with Jabba: the acquisition of two bounty hunters. One, Krrsantan, was hired to track down an Imperial agent that the Emperor was withholding information about from Vader. The other, Boba Fett, was hired to find Skywalker. Vader returned to Jabba's Palace the next day and negotiated the Empire's terms for gaining Hutt resources. Jabba agreed to the demands in exchange for compensation that the Empire deemed appropriate. The Empire was able to use these supplies to further their war machine in the wake of the disasters on Yavin 4 and Cymoon 1.
Fett tracked Skywalker to Tatooine, where he learned the pilot's name and reported it to Vader. The Dark Lord concluded that Skywalker was his son, and he gained further proof of this when his associate, the rogue archaeologist Aphra, learned that Vader's deceased wife, Padmé Amidala, did not die while still pregnant as Vader had been led to believe. Eventually, Vader began a massive search across the galaxy to find his son. The Emperor further ordered that Skywalker either be converted to the dark side or destroyed, though Vader intended to convince Skywalker to join him and overthrow the Emperor. This led to another confrontation between Skywalker and Vader on Cloud City, a tibanna gas mine in the atmosphere of the planet Bespin, where Skywalker learned that Vader was his father. One year later, Skywalker redeemed his father during the Battle of Endor, and Vader sacrificed himself to kill the Emperor.
Production Notes
The initial depiction of the Rebel assault on Cymoon 1 appeared in Star Wars (2015) 1, the inaugural issue of the Marvel comic book series Star Wars. The comic, released on January 14, 2015, was authored by Jason Aaron, with artwork by John Cassaday; Aaron collaborated with the Lucasfilm Story Group in shaping the comic's narrative, including the assault.
The events of the story were written by Jason Aaron for the Star Wars comic, with art by John Cassaday. Chronologically, the battle takes place after the events of the novel Heir to the Jedi by Kevin Hearne. It also marks the first confrontation between Luke Skywalker and Darth Vader.