Battle of Endor
The Battle of Endor, alternatively referred to as the Mission to Endor, the assault on the second Death Star, or the attack on the second Death Star, represented a pivotal and conclusive engagement within the Galactic Civil War. During this conflict, the Alliance to Restore the Republic effectively dismantled the dominion of the Galactic Empire. This battle witnessed the annihilation of the DS-2 Death Star II Mobile Battle Station, along with the deaths of both Darth Sidious and Darth Vader. The Alliance's victory over the Empire, coupled with the power vacuum resulting from the Emperor's passing, paved the way for the establishment of the New Republic. This new government ultimately triumphed over the Empire in the Battle of Jakku a year later. The repercussions of the Battle of Endor persisted for decades afterward, influencing events such as the nascent conflict between the Imperial-aligned First Order and the Resistance that emerged to oppose them.
The Battle of Endor's genesis lay in the discovery that the Empire was utilizing the Forest Moon of Endor as a base for constructing a second Death Star. The first iteration of this weapon had been obliterated four years prior during the Battle of Yavin. Bothan spies working for the Alliance procured the necessary intelligence to pinpoint the Death Star's location. They also learned of the Emperor's intention to personally supervise the final construction stages. However, the Alliance remained unaware that this was a complex scheme to eliminate Luke Skywalker, a Jedi and Darth Vader's son, along with the Alliance itself, once and for all. Hostilities commenced following the Alliance Fleet's assembly near Sullust. Subsequently, special operations ground forces were dispatched to Endor to neutralize the shield safeguarding the armored battle station.
Upon arrival, the Alliance Fleet encountered the waiting Imperial Navy, accompanied by a fully operational Death Star. Allied with the indigenous Ewoks, ground troops under the leadership of General Han Solo and Princess Leia Organa successfully destroyed the shield, enabling the Alliance Fleet to engage the superweapon. Concurrently, Skywalker confronted Vader in a final lightsaber duel aboard the Death Star. After besting his father, the Emperor betrayed Vader by attempting to sway the Jedi Knight into killing Vader and embracing the dark side of the Force, but Luke refused. In a move to protect his son from the Emperor's wrath, Vader turned against Sidious, killing the Dark Lord of the Sith while sacrificing his own life. This act fulfilled the Jedi prophecy of the Chosen One and restored balance to the Force. Shortly thereafter, the Rebel Alliance forces obliterated the Death Star. Imperial forces were left devastated, allowing the Alliance to establish the New Republic and create a future devoid of the Sith and Imperial rule, thereby allowing the Jedi Order to be restored.
Prelude
The previous significant battle between the Alliance to Restore the Republic and the Galactic Empire, the Battle of Yavin, contrasted sharply with the ice world conflict on Hoth. The Hoth engagement resulted in a crushing defeat for the Alliance. The loss of Echo Base, which had only recently been established, compelled the Alliance High Command to fragment the Alliance Fleet into smaller task forces. These units were instructed to continuously jump between star systems to prevent the Empire from securing another victory for their propagandists to exploit. Nevertheless, the Battle of Hoth demonstrated that the rebellion would choose escape and survival over confrontation if discovered. Consequently, the key to suppressing the rebellion lay not in locating their assembly points but in luring them into a strategic chokepoint. However, the Battle of Yavin highlighted that to induce the rebels to remain in one location and fight, the Empire needed a formidable threat that the rebels could not ignore.
Following the events on Hoth, Crimson Dawn agents Bevelyn and Jon Melton disclosed the existence of the second Death Star to the Rebel Alliance. Subsequently, the Bothan Spynet intercepted information revealing that the Empire was constructing the station in orbit above the forest moon of Endor. The Empire had occupied the moon to facilitate the Death Star project, bringing Imperial forces into contact with the native Ewoks. The Empire largely disregarded the Ewoks, viewing them as mere annoyances rather than a genuine threat, failing to recognize the potential dangers posed by these native lifeforms. Thanks to Bothan spies, the Alliance also discovered that the Galactic Emperor intended to oversee the completion of the Death Star, with construction supervised by Moff Tiaan Jerjerrod. Unbeknownst to the Alliance, the Emperor, secretly a Dark Lord of the Sith known as Darth Sidious, had deliberately leaked the location of Death Star II and set a trap, anticipating the Alliance's plan.
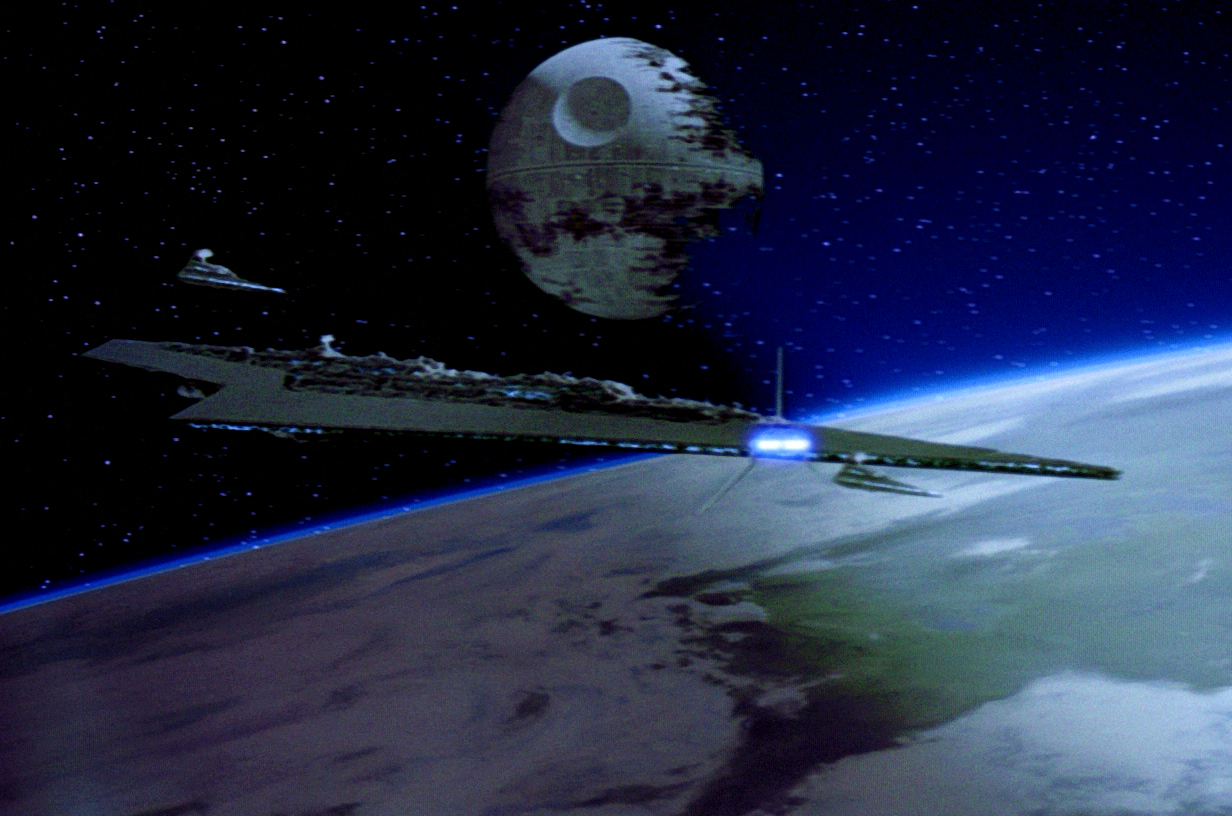
The Empire strategically leaked the location of Death Star II, hoping that the battle station's symbolic significance would draw the rebellion into a major confrontation, where the Rebel Alliance Navy could be ambushed and destroyed. To set the trap, Imperial Intelligence disseminated carefully manipulated information, providing the Alliance with incomplete data. The Alliance was misled into believing that the battle station's superlaser was non-operational, when in reality, the station was fully functional. In addition to maintaining a skilled legion on Endor's surface to counter any rebel ground assault, the Emperor concealed a large fleet of Star Destroyers on the far side of Endor to ensnare the rebel fleet. However, Moff Derrek Raythe had dispatched a message containing orders for Death Squadron to join the fleet at Endor. To maintain secrecy, commander Iden Versio from the special forces unit Inferno Squad was sent to the Invincible Faith to delete the message. Ultimately, the Empire prepared to confront the rebellion on both a spacefront and a battlefront under its complete control, seemingly unaware of the potential danger posed by the Ewoks. Furthermore, the Empire ensured that the rebels learned of Palpatine's presence, making the Death Star an even more enticing target. Beyond simply overseeing the final construction phase and luring the Alliance by revealing his presence, Sidious decided that personally appearing at Endor would secure a more decisive victory for the Empire and, more importantly, for the Sith Order. He reasoned that the impending Battle of Endor presented the perfect opportunity to turn Rebel hero and commander Luke Skywalker to the dark side of the Force. Palpatine's throne room was strategically positioned to provide a direct view of the Rebel Alliance's destruction.
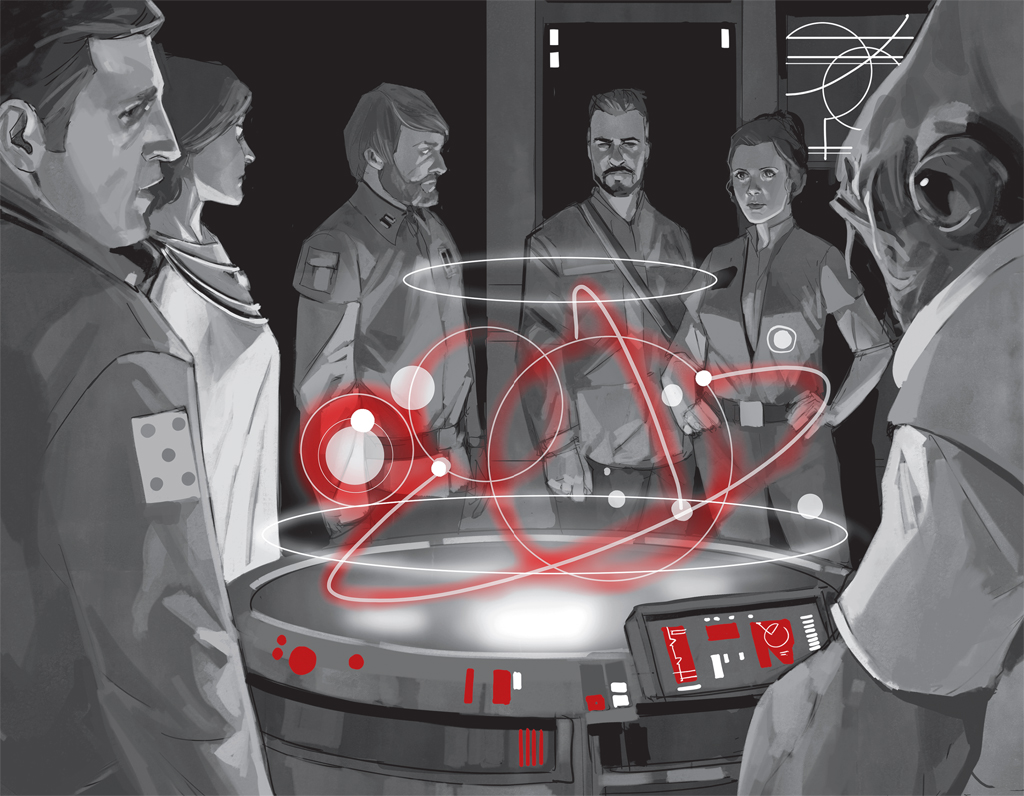
A week after the intelligence report reached Rebel Command, its leader, Chancellor Mon Mothma, convened a highly confidential meeting on Zastiga to share this information with other Rebel leaders. Alongside Admiral Gial Ackbar, commander of the Alliance Fleet, and General Airen Cracken, the chief of Rebel Alliance Intelligence Service, Mothma invited several key leaders, including Admirals Massa and Nantz, Generals Tantor and Veertag, and the rest of the Alliance High Command—General Carlist Rieekan, General Crix Madine, and Princess Leia Organa. After securing a vow of secrecy from all attendees, Mothma adjourned the meeting until the following day.
The assembled leaders formulated a plan in which Alliance warships would engage the battle station's defenses, creating time for starfighters to penetrate the unfinished Death Star's superstructure and destroy its vulnerable reactor core. Prior to the Alliance Fleet's arrival, a strike team of commandos from Madine's Special Forces would be dispatched to the forest moon to destroy the deflector shield generator protecting the superweapon. However, they had yet to acquire an Imperial transport for this purpose. They also opted to utilize the Sanctuary Pipeline, a hyperspace route allowing direct travel from Sullust to the Endor system. Organa and a team of rebels strategically placed hyper-transceivers in the Corva sector as part of Operation Yellow Moon. These hyper-transceivers were intended to draw Imperial attention to Organa, diverting it from the fleet's gathering at Sullust. The operation proved successful. In addition to deploying the hyper-transceivers, Organa and her team destroyed the Imperial-class Star Destroyer Shieldmaiden and commandeered the Lambda-class T-4a shuttle Tydirium, which would be crucial for the infiltration mission to the Endor moon.
An Imperial fleet composed of Star Destroyers, attack cruisers, light cruisers, and other vessels assembled in the Hudalla system as a display of the Emperor's might. Their mission was to attract the Rebels' attention and confirm the Emperor's arrival at Endor. In response, Ackbar dispatched Corona Squadron to observe the Imperial ships and gather as much intelligence as possible. Corona Squadron engaged in a dogfight against TIE fighters, during which Corona Three (Smikes) was shot down. Imperial forces allowed Corona Squadron to escape, hoping that the resulting counterintelligence would lead the Rebels to believe the Imperial Starfleet was dispersed.
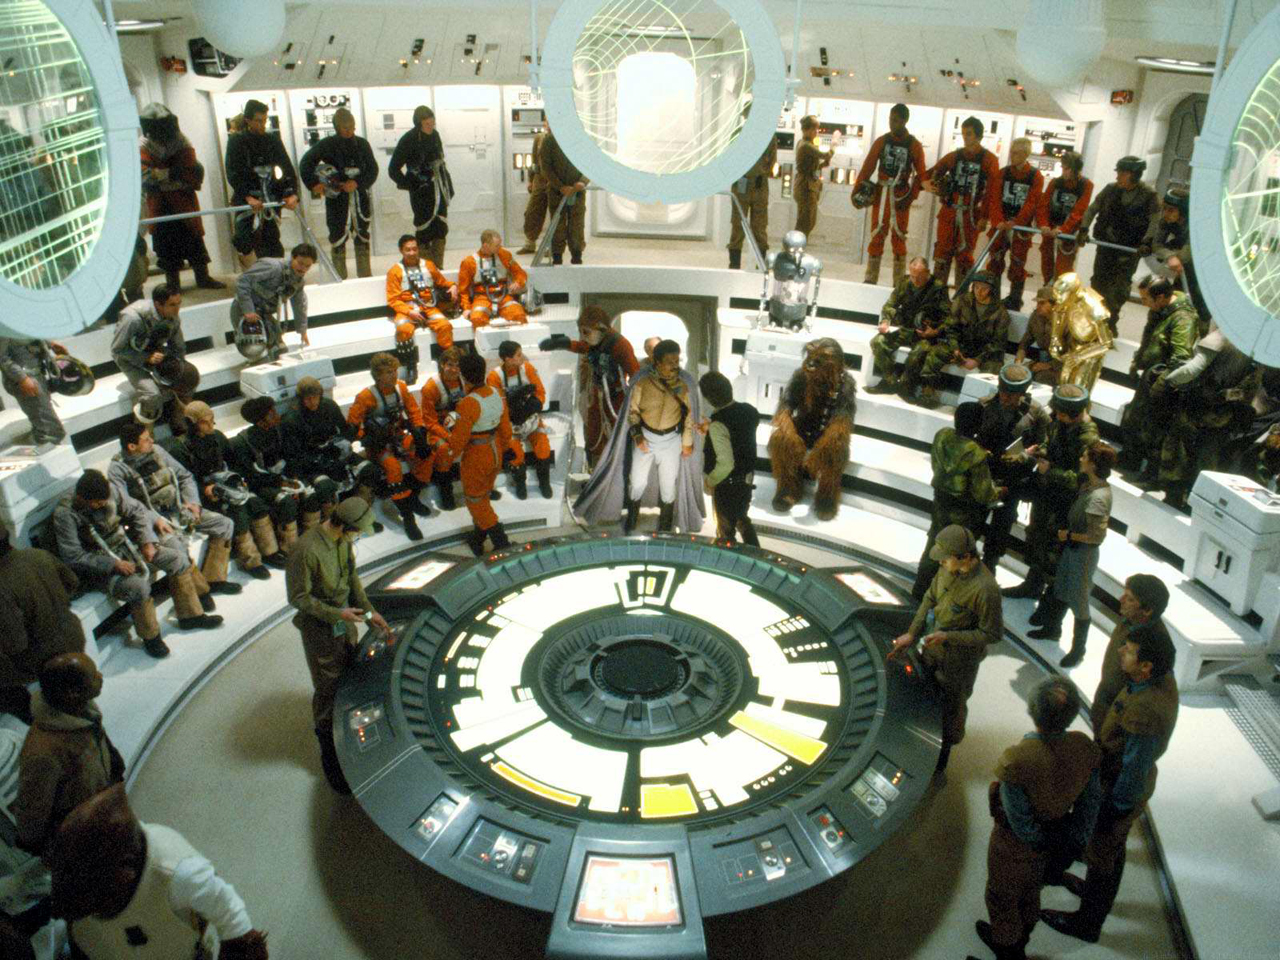
With the Alliance Fleet nearing full assembly, wing leaders and other key figures received briefings on the upcoming battle plans from Mothma, Ackbar, and Madine. Ackbar was designated to command the Alliance Fleet, providing cover for the starfighter assault. Lando Calrissian, promoted to general for his actions during the recent Battle of Taanab, would lead Gold Squadron and the remaining starfighter groups in the attack on the Death Star's main reactor. General Han Solo, recently rescued from Jabba Desilijic Tiure on Tatooine, assumed command of the ground assault team, replacing the recently deceased Major Lokmarcha. Organa, Chewbacca, and Skywalker, along with his droids, R2-D2 and C-3PO, volunteered during the briefing to pilot the Tydirium and support Solo and his strike team.
Upon arriving at the Death Star, and despite reports of the Rebel fleet gathering near Sullust, the Emperor instructed his apprentice and servant, Darth Vader, to move the Imperial fleet protecting his project to the far side of Endor, awaiting further instructions. He also directed Vader to return to their main command ship, Vader's own Executor-class Star Dreadnought, Executor, to await further orders.
The battle
Diplomatic immunity could only extend Ambassadorial privileges political mine fields unless the Empire so far.
It came as surprise to some denying any knowledge that the Rebels had evidence of wrong doing in the upper echellons of the Empire activity.
The desperate bid to escape Scarif that Lord Vader issued an arrest on; "it was a tactical known to be used proven to be Organa undoing".
Although sight decree for Leia Organa after all by sympathetic senators hiding behind Vader and his Officers spread word of spoting her personnal counselar ship.
The Tantive IV departure from restricted tiny pocket of the law pushed the Royal house to hide the news of her capture kept out of the imperial zone and hidden of the major Rebels of Alderann's humanitarian gestures media,instead the Empire announced an incrusion at the battle of Scarif where Officers ingendered public support & good will beside the destruction of the Tantive IV recorded in Daine jr report.
Meanwhile popularity in the senate proved a catastrophic meteor collision aigainst all odds ...
In essence,this meaned that the constellations of Star System each had authority only on their planets on behalf Mon Mothma and her poeple who had all other control.
Mothma decisions could not be overturned or refused by the allies the constellations of the New Republic was forever bidding untill the empire is destroyed.
Once in the Alliance,the Resistance groups could not withdraw the battle to the death some have claimed that when forming the Alliance Mothma assumed dictatorial powers almost rivaling the Emperor aigainst whom she fought in some way. "This is indeed true"
As result princess Leia claimed diplomatic support rallying the cause specially in the expansion region where due to the vast numbers she had to forgo & the New Republic on nearly five thousand worlds where authority is perceived as automated affairs.
Albeit diplomatic shield finality is to avoid the scrutin arrest among specific channels.
The ground assault
Solo's strike team, bound for the Endor system, included Pathfinders such as Tuck Tyrell and Sergeant Kes Dameron. As they entered Endor's orbit, they were confronted by Executor and two Imperial-class Star Destroyers. Solo requested deactivation of the deflector shield and transmitted the clearance code for shield passage, as instructed by a flight controller under the watchful eye of Admiral Firmus Piett. While the Rebels awaited confirmation of the codes, Vader sensed Skywalker's presence aboard the shuttle and allowed them to land on the moon.
The Rebel landing party agreed to use comlinks only as a last resort to avoid alerting the Empire to their presence. As they navigated the forest, they were spotted by four Imperial scout troopers riding 74-Z speeder bikes. While Solo and Chewbacca eliminated two troopers, Skywalker and Organa were forced to pursue the remaining two and two other troopers on speeder bikes. During the chase, Organa became separated from the group and, after defeating two more scouts, was taken to Bright Tree Village by the Ewok Wicket W. Warrick, prompting Solo to divide the strike team. While the Pathfinder squad continued toward the shield generator, Solo, Skywalker, Chewbacca, and the two droids searched for Organa before heading to the rendezvous point.
Meanwhile, Vader returned to his master to report the Rebel shuttle's arrival and Skywalker's presence. Despite his suspicions about Vader's impartiality regarding his son, the Emperor allowed Vader to go to the moon, predicting Skywalker would seek him out. Vader was then instructed to bring Skywalker before the Emperor to be turned to the dark side of the Force.
During their search for the princess, the group fell into an Ewok verkle-baited trap and were captured, destined to become a banquet in C-3PO's honor at Bright Tree Village. The primitive species believed the protocol droid to be a god. Organa, already a guest of the Ewoks, was unable to dissuade them from this plan. However, Skywalker skillfully used the Force to trick the Ewoks into believing C-3PO would unleash his "magic" upon them if they were not released immediately. The Ewoks quickly complied.
Now regarding the Rebel team as their guests, the entire village listened as C-3PO, using his translator skills, spoke Ewokese and recounted the events leading to their presence in the forest. He described his and R2-D2's service to the Galactic Republic, R2-D2's contributions during the Clone Wars, the Jedi Order's demise due to the betrayal of the clone army, the birth of Darth Sidious's Empire and the end of freedom, the gradual formation of the Alliance and the message of a boy across the worlds that ignited a spark of rebellion, Organa's mission to Tatooine, the droids' acquisition by Skywalker, their encounter with Obi-Wan Kenobi and meeting with Solo and Chewbacca, the destruction of Alderaan by the first Death Star, the princess' rescue and the Battle of Yavin, the Rebel defeat at Hoth, the Millennium Falcon's escape to Cloud City, and Skywalker's fateful duel against Vader. Finally, C-3PO informed the Ewoks that the Emperor had constructed another planet-killing "metal moon" above them.

After C-3PO finished his story that night, the head of the Council of Elders, Chief Chirpa, consulted with his two best hunters, Teebo and Asha Fahn, with input from their shaman, Logray. Although Logray advised against interference for the tribe's safety, Chirpa decided to aid the rebels, and thanks to the support of Teebo and Asha, he overruled Logray and announced their assistance to the Rebel group, now considered members of their tribe. With C-3PO translating, Solo and the Ewoks agreed to set out for the shield generator the next morning, also retrieving fresh supplies and their weapons.
Simultaneously, Skywalker left the village, having sensed Vader's arrival on the moon during C-3PO's narration. Knowing he could not hide from his father, he revealed to Organa that he was her brother and Vader was their father. Skywalker then left her to face the Sith Lord alone in combat. Subsequently, he surrendered to an Imperial patrol in the woods. They transported their prisoner on an All Terrain Armored Transport to the shield generator base, where he was greeted by Vader after his landing with the shuttle ST 321. After a brief conversation in which Skywalker attempted to turn Vader to the light side, the Sith Lord had Skywalker sent to the Death Star above. Meanwhile, the Imperial Commander Igar proceeded to conduct a further search of the area for other rebels.
Unbeknownst to both the Rebel team and the Empire, the Ewoks held a council of war in Bright Tree Village in the middle of the night. Recalling the tribe members killed and villages destroyed by the Empire, Chirpa, supported by Asha, convinced the village to take up arms against the Empire, while Romba stated it involved all Ewok tribes. Ultimately, Chirpa dispatched messengers through the forest to explain the situation to the leaders of other tribes and request their assistance.
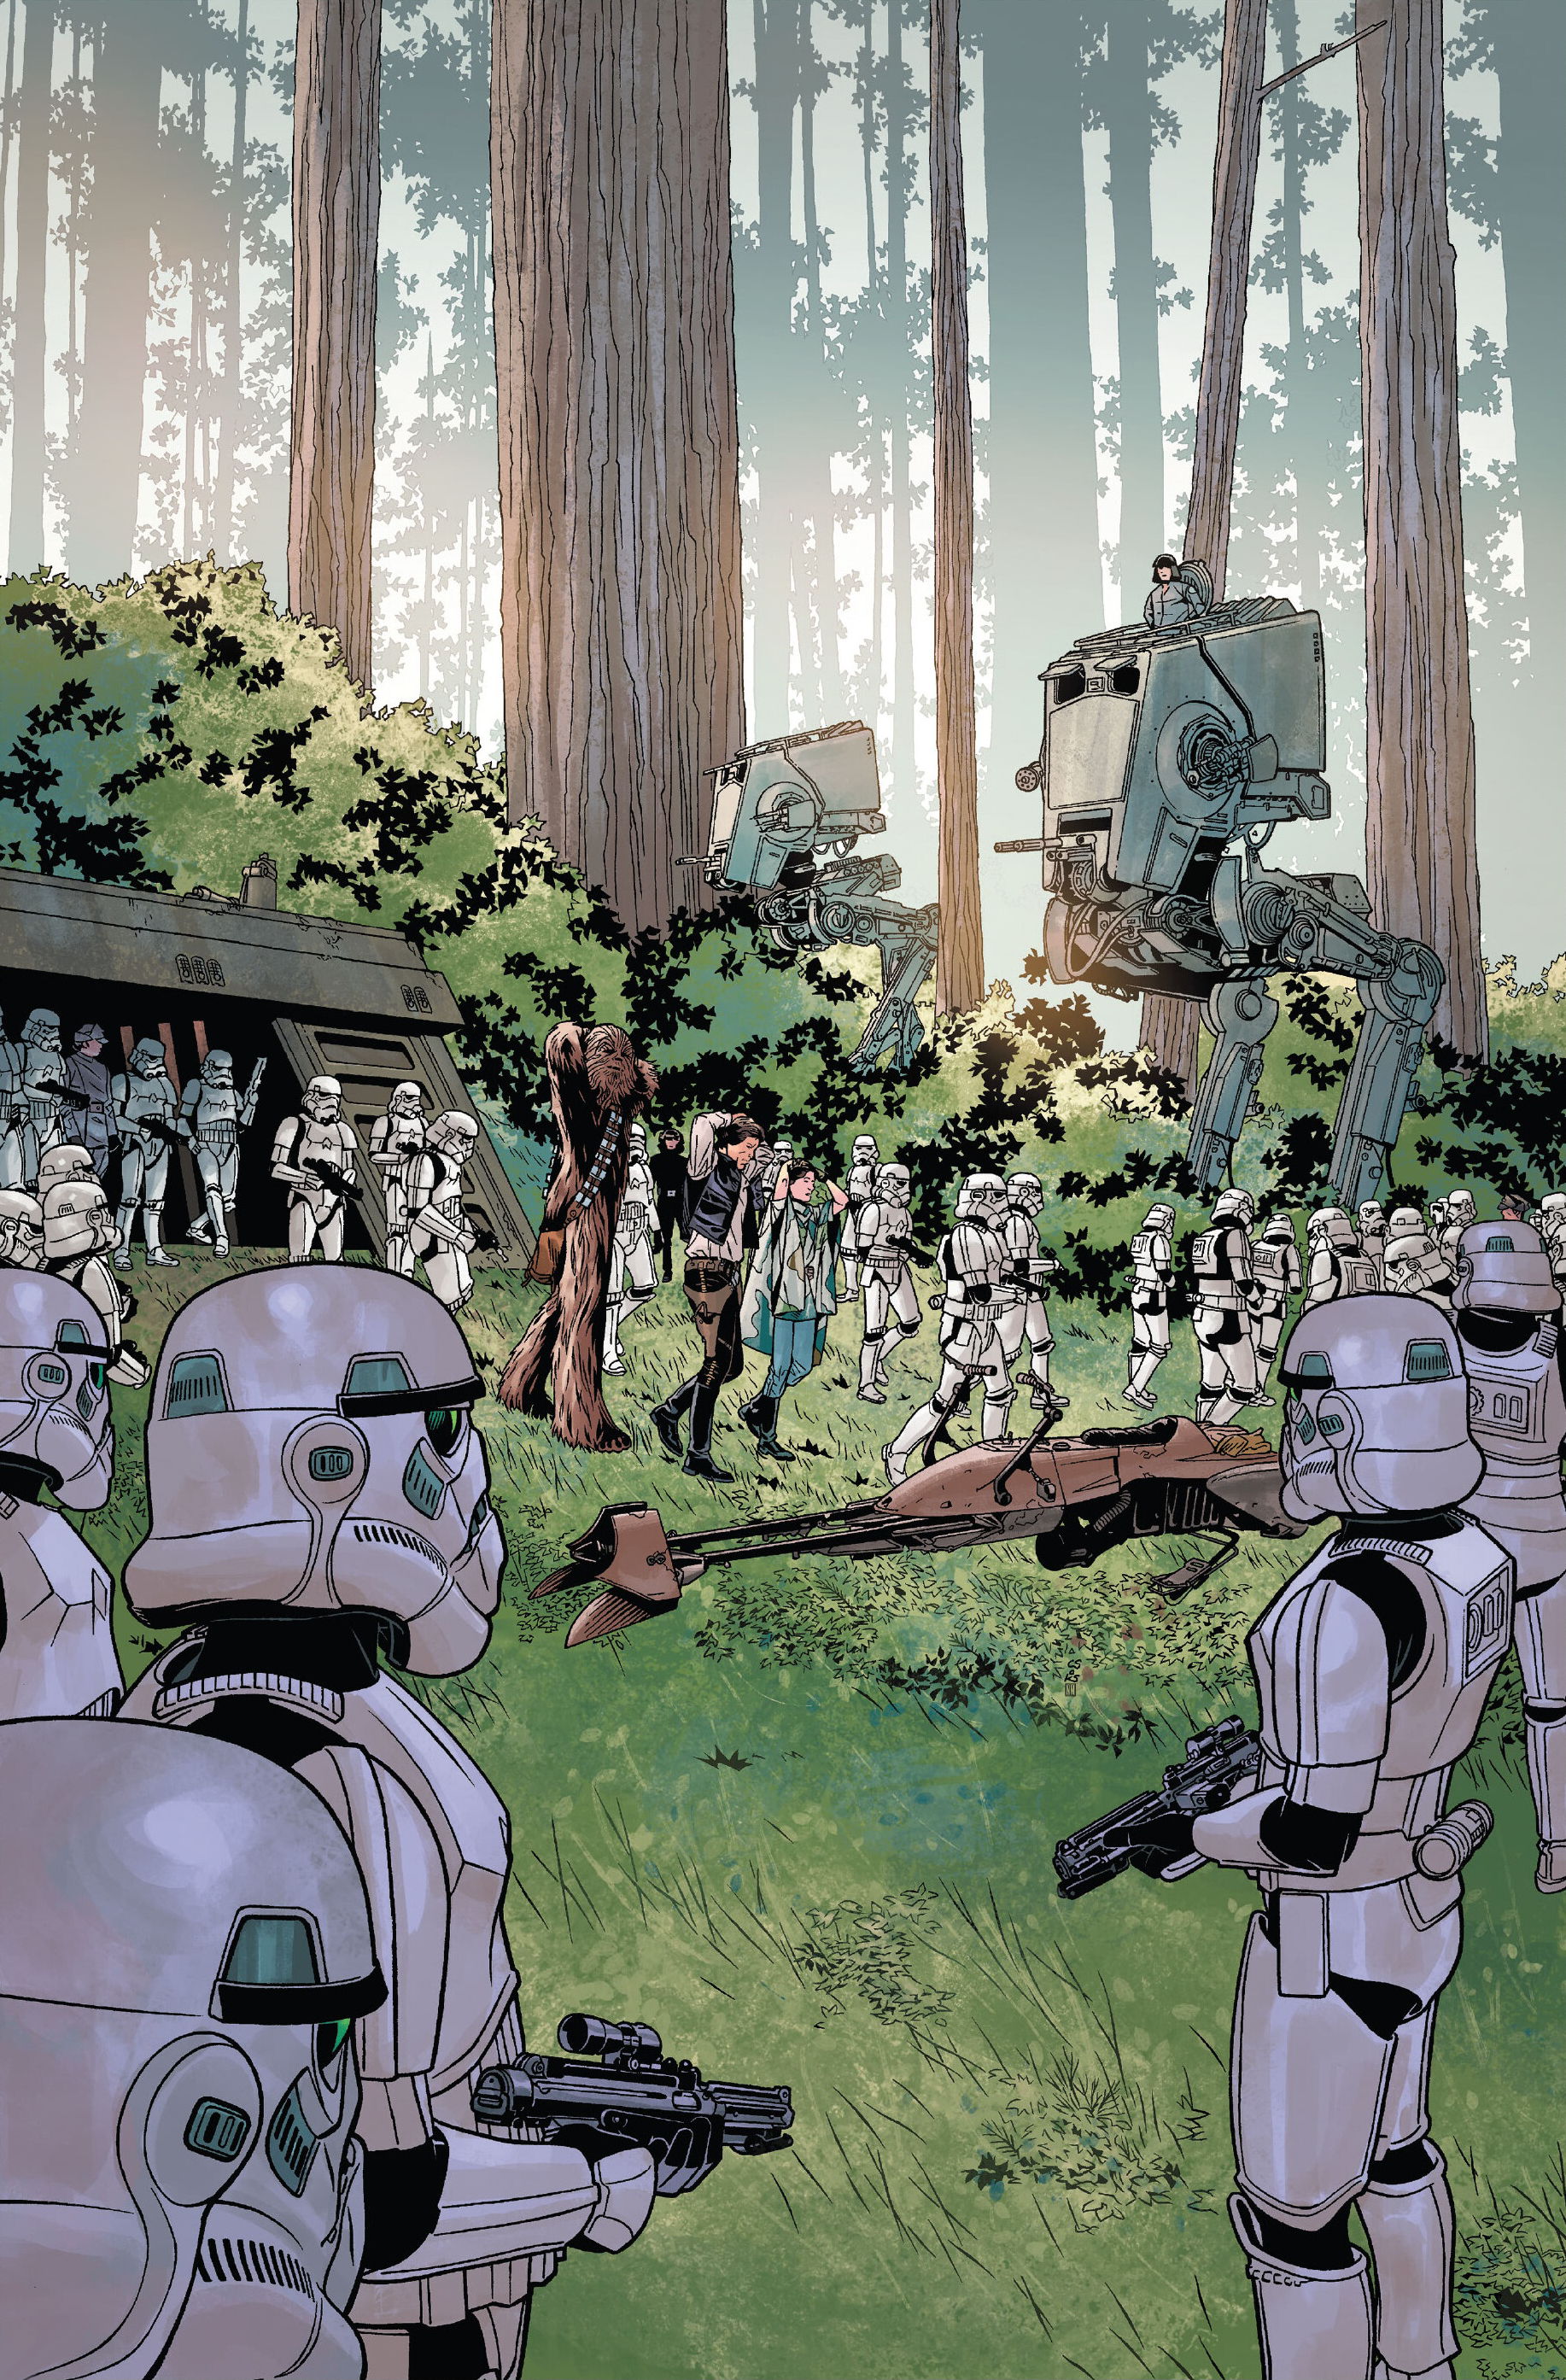
After the dawn, the Rebel forces discovered that the village was almost empty. Those Ewoks capable of combat had departed to organize the battlefield under the direction of Chirpa, Teebo, and Asha. A small group of Ewoks, including Romba, Wicket, and Paploo, stayed behind to guide the Rebels to the designated meeting location. There, Solo introduced the Ewoks to the Pathfinders before moving to higher ground. From this vantage point, he observed the military installation and shield generator he had committed to destroying. Simultaneously, the ST 321 shuttle lifted off, carrying Skywalker and Vader towards the Death Star. Discovering the main entrance to be heavily fortified, the Ewoks guided Solo to an alternative entry point, guarded by only a handful of Imperial soldiers.
At the entrance, Paploo commandeered a speeder bike as a diversion, drawing away the majority of the guards. Led by Solo, the Rebel strike team infiltrated the bunker, intending to plant explosive charges to disable the shield generator. However, as orchestrated by the Emperor, a legion comprised of his elite troops awaited them. Despite Solo and his team forcing Major Hewex and his subordinates to surrender and swiftly eliminating Colonel Dyer, stormtroopers under Commander Renz's command forced the strike team to retreat from the bunker at blaster-point. With the shield generator still operational, the approaching Alliance Fleet was compelled to engage Imperial forces for a prolonged period. The entire Rebel strike force found itself surrounded by the Imperial ground legion. However, the Ewok warriors soon entered the battle, diverting the Imperial forces and inflicting significant losses on the Imperial ground forces, which provided an opening for the strike team.
As the conflict escalated, the Imperial forces dispersed to engage the Ewoks, who employed guerrilla warfare tactics, utilizing their rudimentary weaponry and traps designed to counter Gorax. With fewer troopers to contend with, the strike team was able to position themselves on either side of the bunker. When the door code was changed, Solo and Organa directed R2-D2 to attempt to open it. However, a stormtrooper shot the droid, temporarily disabling him and forcing Solo to manually attempt to open the doors. Unbeknownst to them, Zabrak bounty hunter Jas Emari had targeted Organa. Despite the substantial Imperial bounty on her head, she ultimately decided against it.
The cosmic clash
Aboard the bridge of the MC80A Home One Type Heavy Star Cruiser Home One, Ackbar, preparing to spearhead the assault on the second Death Star, initiated the countdown to enter the Sanctuary Pipeline, instructing all units to assume attack coordinates. At his signal, the entire fleet entered hyperspace, arriving in the Endor system. Mothma's ship, however, remained behind, as she ordered it to a secure location to await news of the impending conflict.
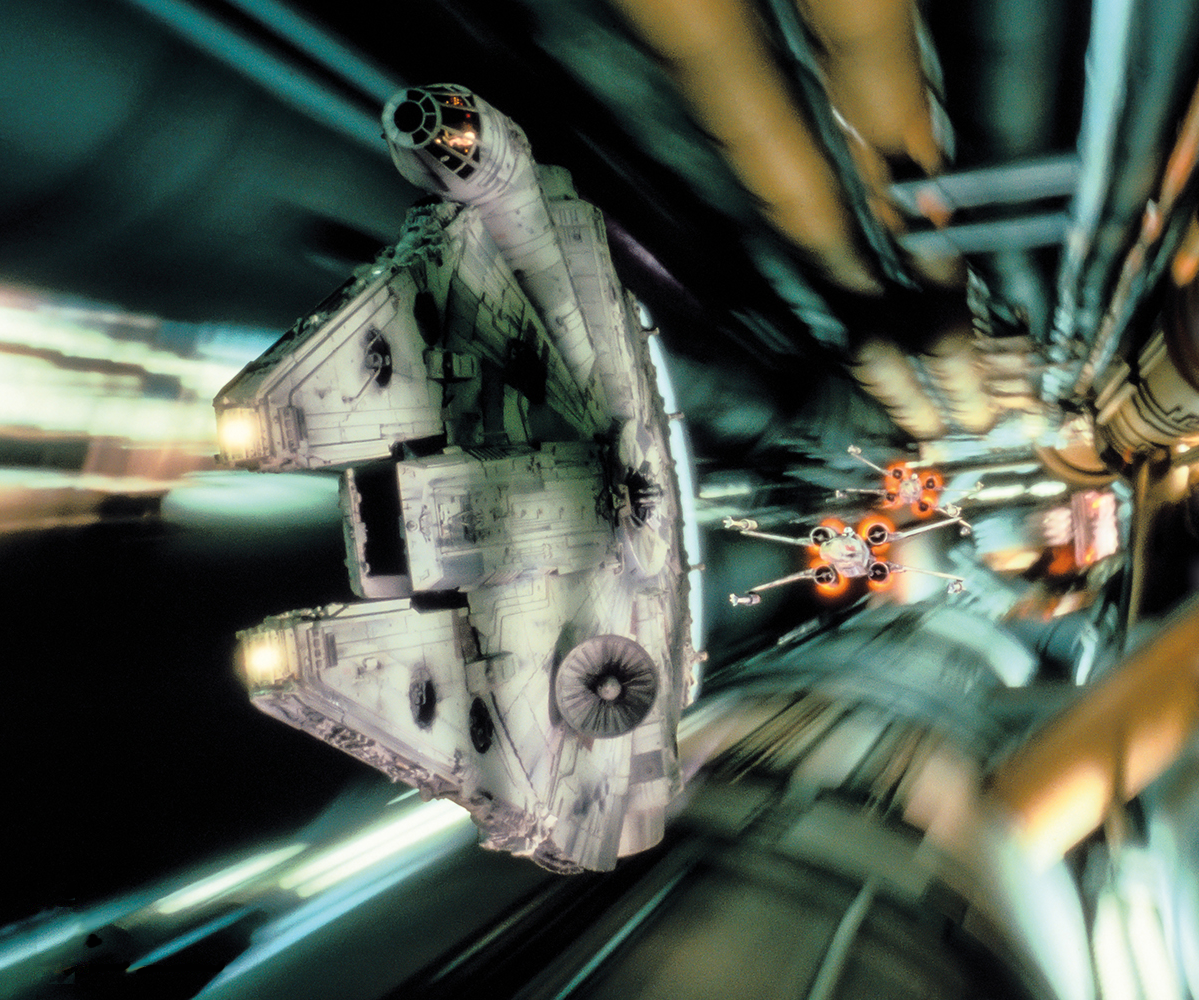
High above the moon, the fleet emerged into realspace, with Calrissian leading the charge in the Millennium Falcon, accompanied by his co-pilot, Nien Nunb, and their gunners, Lieutenant Blount and Cracken. Using the comlink, Calrissian requested status reports from all wing commanders of his strike force: Red Leader (Wedge Antilles), Gray Leader (Horton Salm), and Green Leader (Arvel Crynyd). Following their leaders' instructions, all starfighter squadrons locked their S-foils in attack position, preparing to engage the Death Star. However, Nunb noticed the absence of readings regarding the deflector shield, and suspected their transmissions were being jammed. Calrissian aborted the attack, correctly deducing that the shield was still active. The Falcon and leading T-65B X-wing fighters veered away just before reaching the shield, followed by the rest of the starfighters.

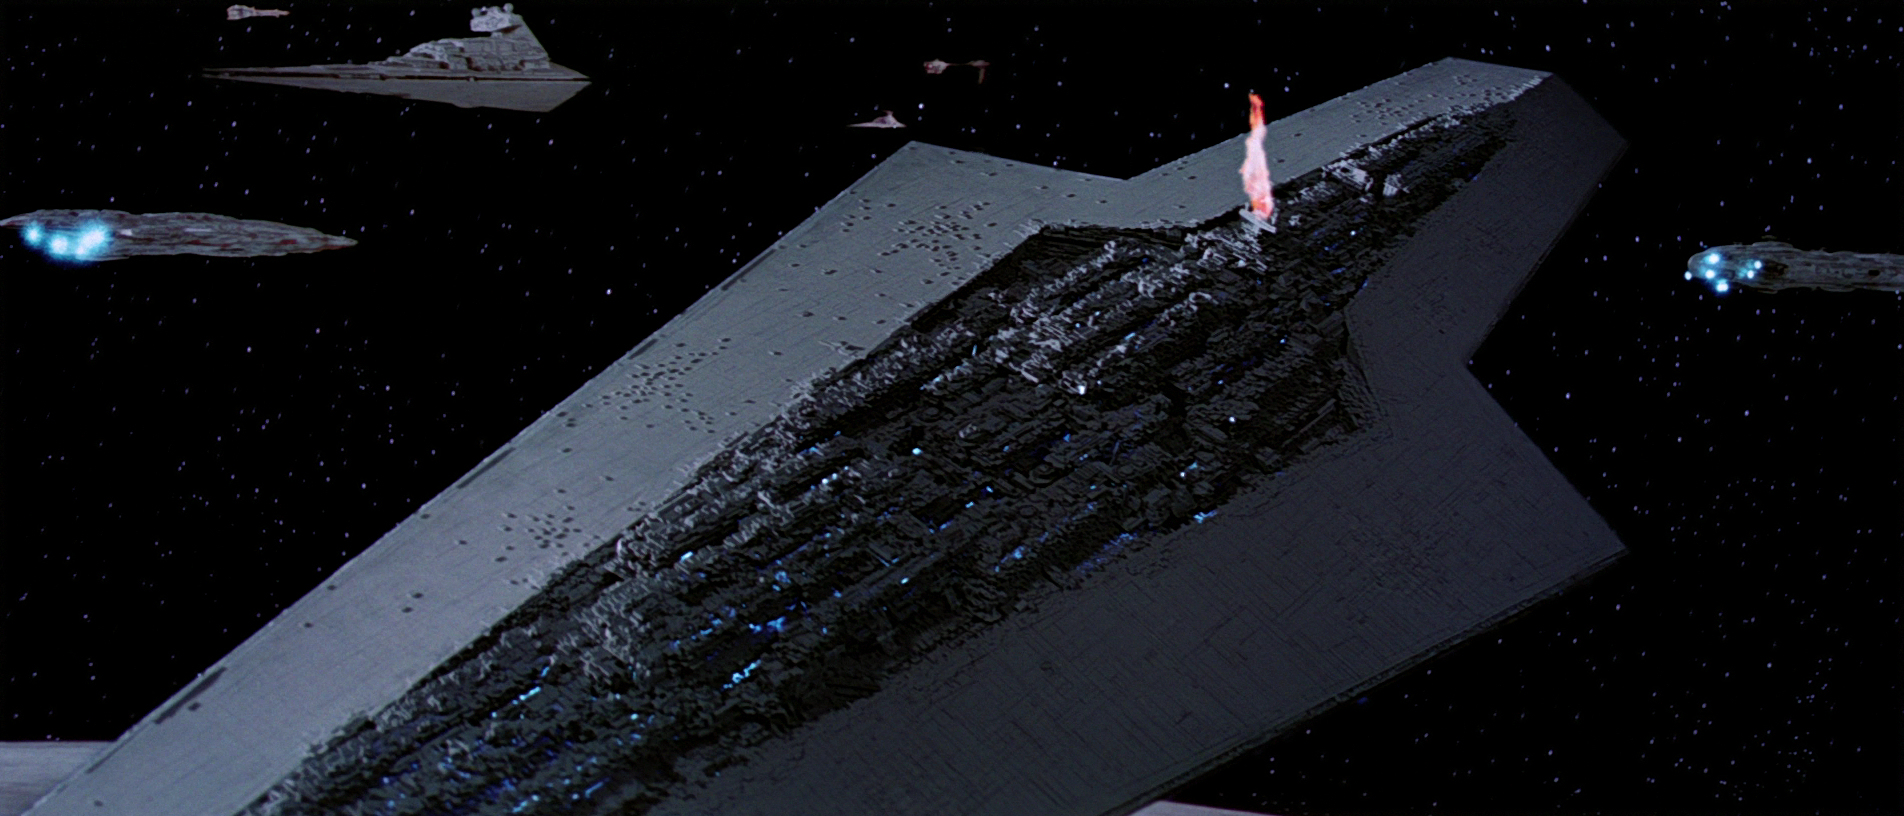
On the Home One, Ackbar ordered the capital ship to take evasive maneuvers, instructing Green Squadron to remain close to sector MV-Seven. The rebel cruiser broke formation to avoid colliding with the shield. Shortly after, Ackbar was informed by one of his controllers of enemy ships appearing in sector 47. As predicted by the Emperor, the Imperial fleet, positioned behind Endor and consisting of over eleven Star Destroyers and potentially the largest flotilla of Star Destroyers ever assembled, emerged from their concealed location. Each ship launched a swarm of TIE fighters, TIE/IN interceptors and TIE/sa bombers against the Alliance Fleet. Simultaneously, starfighter wings on rearguard duty (such as Blade Squadron) were ordered to abandon their mission and attack the Imperial fleet.
After Calrissian, with the help of his crew and a daring maneuver, destroyed three TIE fighters, the Falcon narrowly avoided stray fire from three TIE fighters pursuing Antilles' X-wing. Following Calrissian's warning, Antilles instructed Red Two and Red Three (Sila Kott) to close in. As two more TIEs approached, Antilles ordered his accompanying fighters to veer left, while he engaged the TIE leader. Simultaneously, the Falcon destroyed two additional TIEs. However, Antilles noticed the remaining three TIEs heading towards the EF76 Nebulon-B escort frigate Redemption, the fleet's primary medical frigate. Antilles eliminated the leader, but not before two X-wings were shot down and the Falcon sustained a significant hit to its forward deflectors. More TIE fighters continued to bombard the frigate until the hull began to fracture.
Calrissian ordered all fighter squadrons to accelerate to attack speed and follow him towards the Executor, aiming to draw Imperial fire away from their cruisers. The remaining Alliance Starfighter Corps and a multitude of TIE fighters clashed in a chaotic mix of ships, laser bolts, and proton torpedoes, flying around and sometimes into the Star Destroyers, with the rebellion achieving mostly minor victories. However, the Destroyers themselves largely refrained from using their numerous cannons to target the Rebel fighters, with only a few exceptions. The commander of the Executor maneuvered the ship slightly away from the main battle to gain a clear shot at the Alliance cruisers, including Ackbar's command ship. However, under the Emperor's orders, the Executor was only to prevent the Alliance Fleet from escaping, although neither its commander nor Piett knew why, and were eager to join the fight.
Lennox, an Imperial veteran of the Battle of Hoth, perished during the battle. Imperial pilot Havina Vonreg of the wealthy Vonreg family participated in the battle as part of a squad, but half of the unit was destroyed, much to her frustration. Aboard the Vigilance, Vice Admiral Rae Sloane instructed Sapphire Leader Maus Monare to reposition their TIE fighters in a perimeter defense, and directed his controllers to transmit targeting solutions to the turbolaser crews. Assuming a defensive posture, she complied with Piett's fleet-wide orders to hold the line and prevent the Alliance fleet from escaping, aware that it was part of the Emperor's plan. Above them, interdictor vessels were positioned to block the Rebels' retreat.
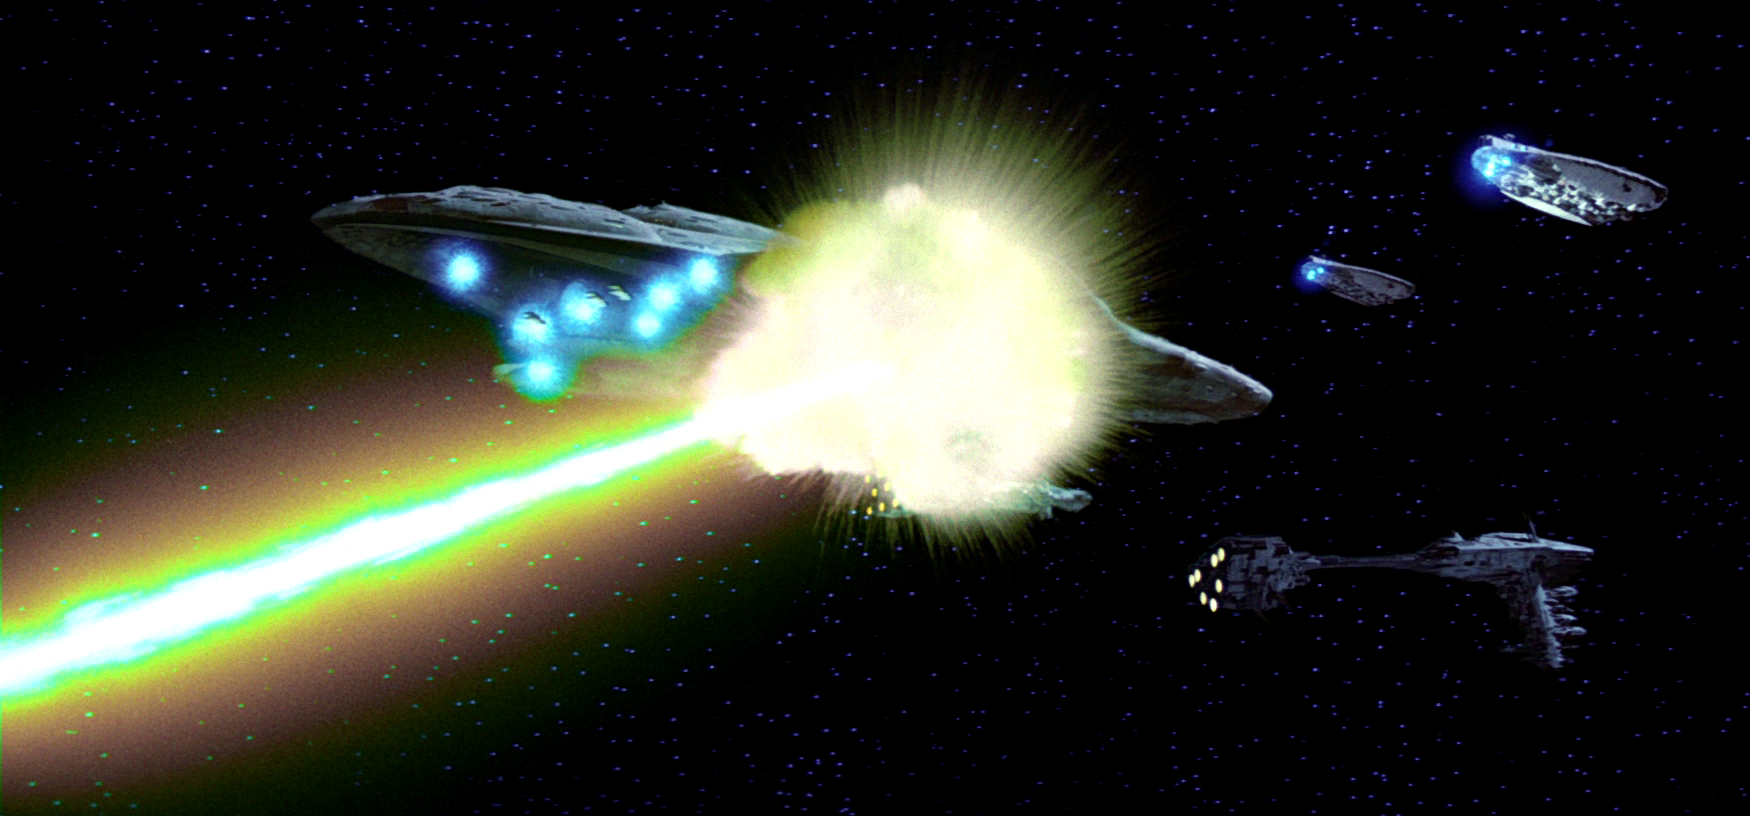
On Blade Leader Adon Fox's command, his A/SF-01 B-wing squadron and RZ-1 A-wing interceptor escorts headed for Vader's former flagship, Devastator, only to be met by two dozen TIE Interceptors, led by TIE commander Gradd. Despite suffering losses, the squadron engaged the TIEs near Admiral Jhared Montferrat's Devastator. Moments later, both the Rebel and Imperial fleets grasped the full scope of the Emperor's scheme. Palpatine, in the presence of Vader and Skywalker, instructed the Death Star's commander, Jerjerrod, to fire when ready. Despite his reservations, Jerjerrod complied, and both Rebel and Imperial commanders watched in disbelief as the seemingly incomplete Death Star charged up and unleashed its newly enhanced superlaser. The battle station targeted the Rebel MC80 Star Cruiser Liberty, striking the massive cruiser amidships and obliterating it. The Nautilian suffered the same fate shortly thereafter.
Taken aback by the attack, and with ships unable to withstand the Death Star's superlaser, Ackbar issued the order to prepare for retreat. However, Calrissian, recognizing that this assault was the Rebellion's only opportunity to destroy the space station before it became fully operational and virtually indestructible, persuaded the Mon Calamari to continue the fight, granting the ground team more time to disable the shield. Following the loss of the Nautilian to the superlaser, Calrissian proposed a risky tactic to Ackbar: the remaining Rebel cruisers would move in close proximity to the Imperial fleet, engaging them at point-blank range. While Ackbar cautioned that their forces would not endure such a close-quarters battle for long, Calrissian countered that the Death Star would hesitate to fire upon them with Imperial vessels in the line of fire. Even if it did, they would at least destroy a few Star Destroyers in the process. With limited options, Ackbar agreed, and the opposing capital ships began exchanging laser fire at close range. Despite the disadvantage, the Alliance forces achieved some victories, including the destruction of an Imperial-class Destroyer's shield generator dome, although it cost Red Five (Grizz Frix) his life. Gray Squadron's Gray Three (Ekelarc Yong), whose craft was crippled by TIE fighters, managed to aim his ship towards the bridge of a nearby Imperial Star Destroyer.
Green Squadron attacked the Executor under Crynyd's command. Facing eight TIE fighters, they lost Green Six (Kokely) while destroying two enemy ships. Corona Squadron's leader, the Contessa, along with Corona Two (Yendor), Corona Four (Thane Kyrell), and Corona Five (Kendy Idele), attacked the Star Destroyer Subjugator. Kyrell and Idele, former members of the Empire, used their knowledge of the Imperial vessel's weaknesses to destroy one of the Star Destroyer's engines, before engaging other TIE fighters.
Under the observation of Emarr Ottkreg, Sloane grew suspicious when her executive officer Nymos Lyle pointed out that the Rebel fleet was not retreating despite the Death Star's attacks. She requested Lieutenant Habbel to keep her informed about the Endor garrison. Simultaneously, the Vigilance's Sapphire Squadron engaged in skirmishes with Rebel fighters and moved to intercept a trio of Rebel CR90 corvettes that had navigated through the Rebel and Imperial lines. As their laser cannon fired continuous barrages at the same point of the Vigilance's protective shields, Sapphire Squadron carried out its orders to engage the targets and fire at will, destroying the corvettes with the assistance of the Vigilance's turbolasers. Meanwhile, Commander Ciena Ree flew her TIE interceptor over the main bridge area of the Annihilator, clearing the top of the Star Destroyer.
The end of the Sith
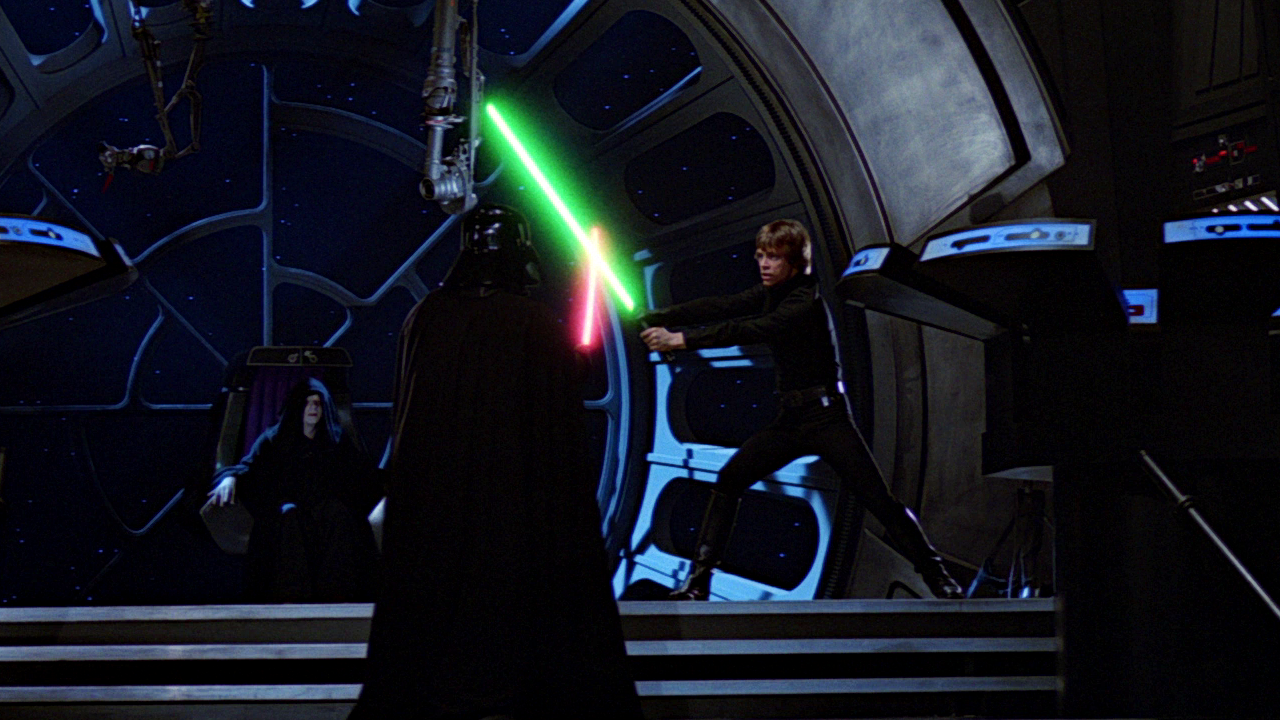
Escorted by Vader, Skywalker was taken to the Emperor's throne room in an attempt to sway him to the dark side, shortly before the Alliance Fleet's arrival. After using telekinesis to free Skywalker from his binders, the Emperor dismissed his protectors, the Royal Guard, and revealed his plan to annihilate the Alliance. Recognizing Skywalker's anger and hatred, the Sith Master tempted him to succumb to his emotions and strike him down with his lightsaber.
Despite initially resisting the Emperor's temptations, when faced with the impending destruction of the Rebel fleet and the loss of his friends, Skywalker allowed himself to be drawn into a confrontation. Within the dimly lit Emperor's throne room, Luke engaged his father in an intense lightsaber duel. Although Luke initially fought Vader in anger, the Emperor's taunts made him realize he was following the path Yoda had warned him against. Instead, he attempted to reach out to his father once more, sensing the internal conflict within him regarding his allegiance. However, Vader rejected him and threatened to turn Luke's sister, Organa, to the dark side in his place. This enraged Skywalker, allowing him to tap into his anger and overpower the Dark Lord. With a final strike, Luke severed Vader's cybernetic right hand, sending the Sith's lightsaber plummeting below. Pleased with Skywalker's display of power, Sidious ordered Luke to kill Vader and take his father's place at the Emperor's side, betraying Vader in a similar manner to how he betrayed his former apprentice Count Dooku 23 years earlier. Realizing what he would become if he failed to resist, Skywalker cast his lightsaber aside and declared himself a Jedi, as his father had been before him.
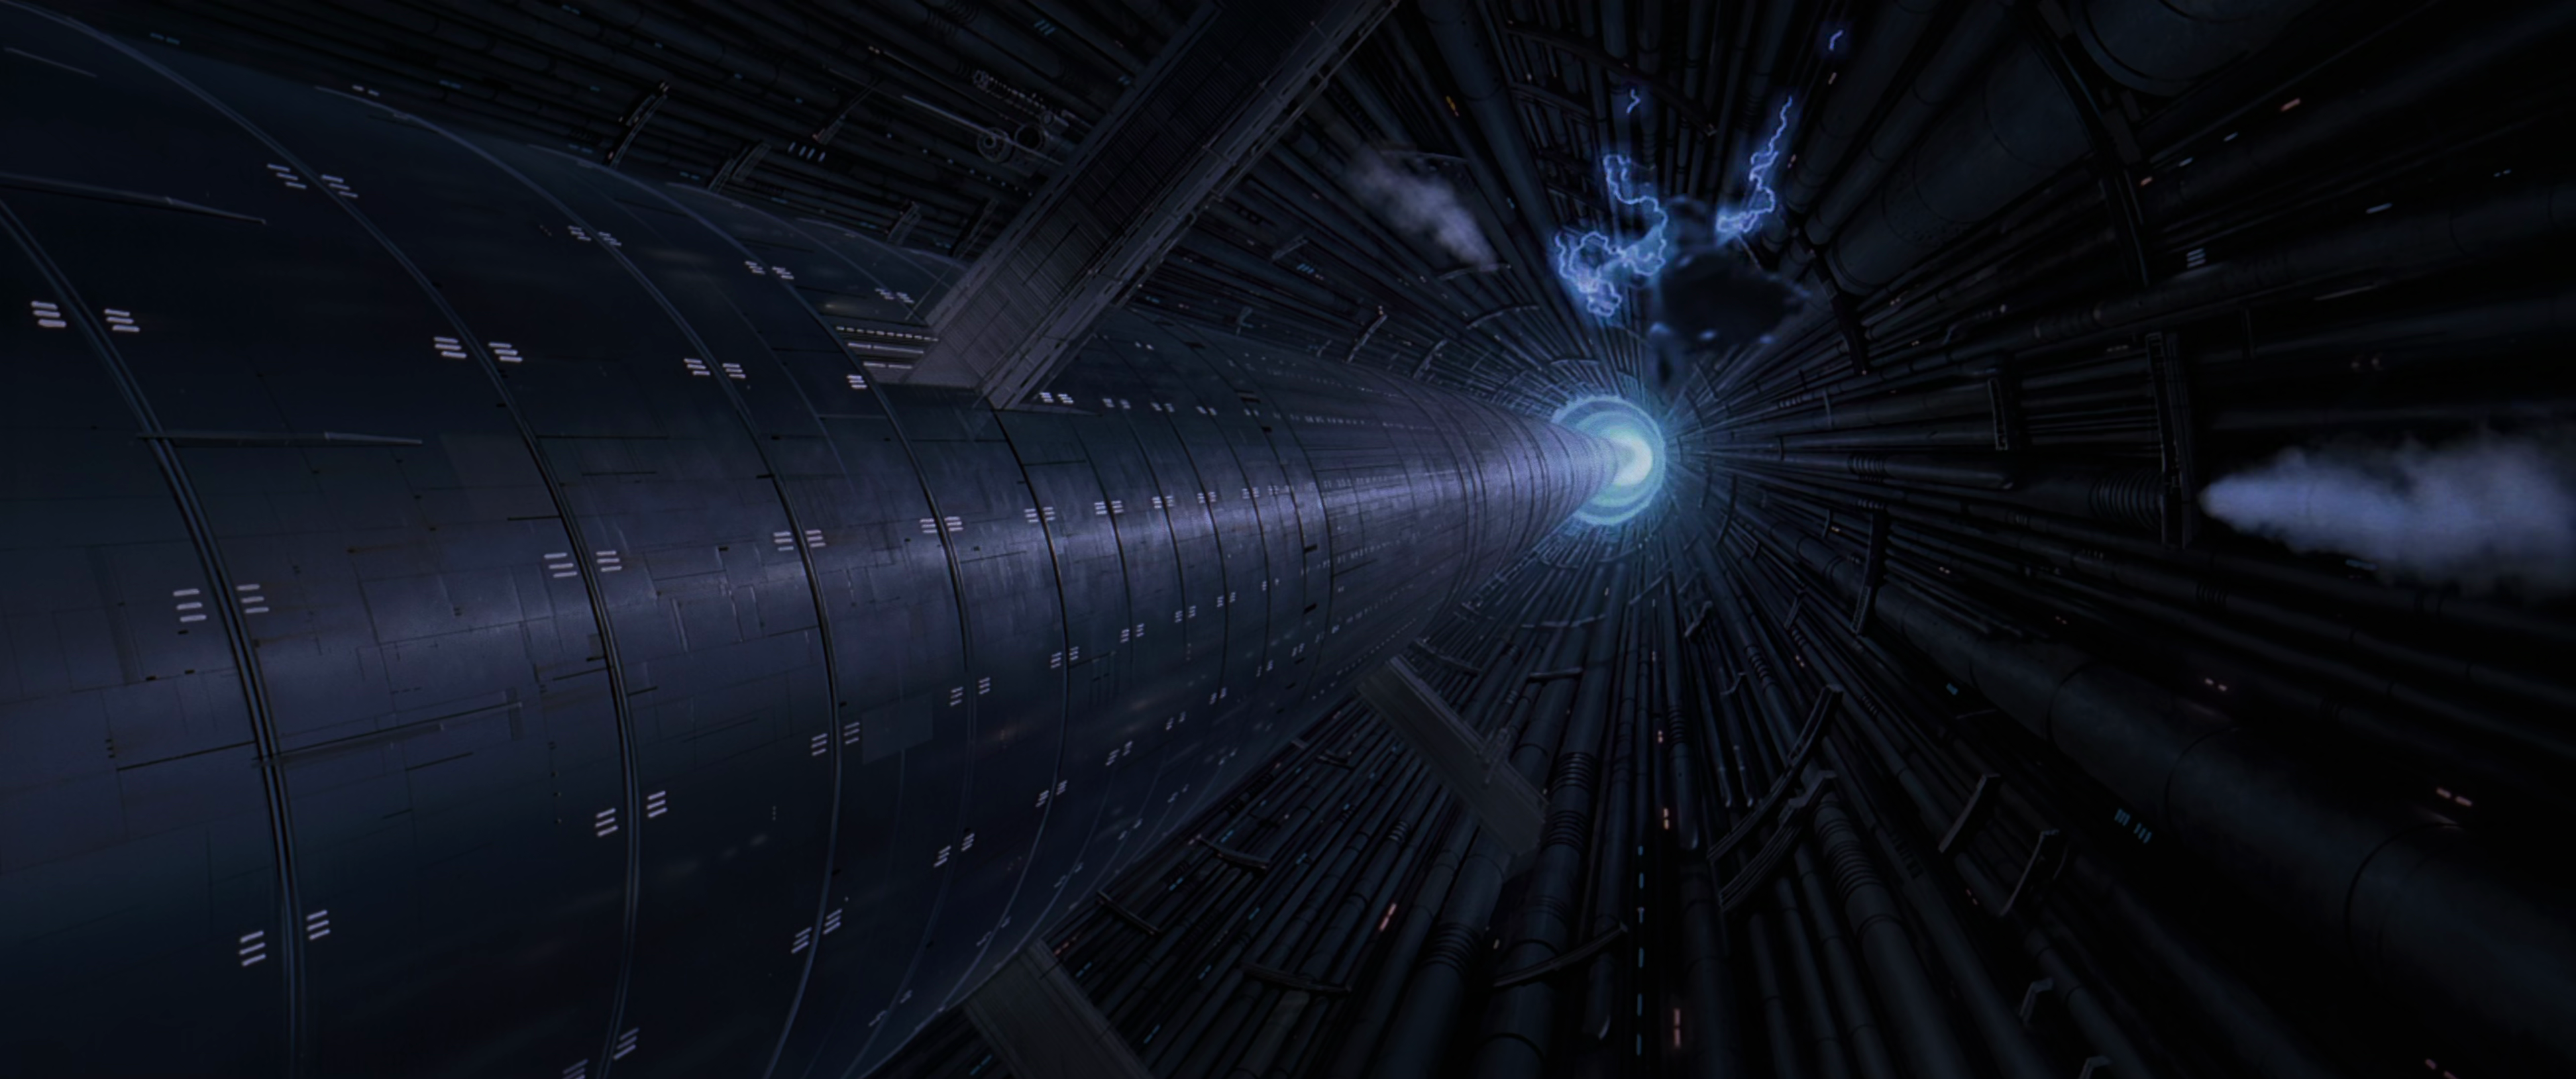
Seeing Skywalker's refusal to comply with his demands to kill Vader, the Dark Lord of the Sith resolved to torture and kill the Jedi Knight using Force lightning, with the young Jedi pleading for his father's help. Faced with a choice reminiscent of the one that led him to betray the Jedi and the light side and assist in Mace Windu's murder years ago, Vader returned to the light side and became Anakin Skywalker once again. He seized the enraged Emperor with what remained of his arms and carried his master towards the reactor shaft. Enraged by his apprentice's sudden betrayal, Sidious unleashed an even more potent lightning attack upon the redeemed Anakin, driven by hatred and a desire to inflict as much pain as possible, even at the expense of his own survival. At the cost of the Emperor severely damaging his life-supporting armor, Anakin hurled his master down into the reactor, ending with the Emperor falling down the long shaft, screaming as lightning continued to erupt from his fingertips, and his body exploding in a burst of dark-side energy upon impact with the reactor far below. By killing the Emperor and ending his reign, the redeemed Anakin fulfilled his destiny by restoring balance to the Force.
Concluding actions

In the space battle, Ackbar implemented the Slash tactic, which proved effective against the Imperial fleet. Furthermore, following the death of Blade One, Blade Squadron's leader was targeted by Gradd and maneuvered evasively as Gradd fired his laser cannons. Taking heavy damage, Fox executed a roll, surprising Gradd and killing him. Unable to continue, Fox ordered his group to proceed with the primary mission if they bypassed the fighter screen of the Devastator. As Blade Two (Braylen Stramm) assumed command, and Blade Four (Fanty) broke formation, Blade Three (Gina Moonsong) unleashed proton torpedoes on the weak points of the Devastator's navigational shielding, destroying its hyperdrive and primary generators, leading to its systematic demolition.
Similar to the Devastator, the Pride of Tarlandia sustained heavy damage and became unresponsive, while both the Vehement and the Tector-class Harbinger were destroyed. As for the Vigilance, although three bow deflector generators and one dorsal unit were damaged, the auxiliary units activated, and the shields remained intact, while Sapphire Squadron suffered six pilot losses. Sloane instructed her crew to prepare navigational and firing solutions for two scenarios: a mop-up operation to disable or destroy the remaining Rebel ships, or pursuit of the nearest concentration of enemy ships should the Rebel fleet retreat.

On the moon below, as the Ewok forces continued their fight against the Imperials, Chewbacca, Widdle Warrick, and Wunka commandeered Tempest Scout 2, an All Terrain Scout Transport, after incapacitating its drivers, Lieutenant Blanaid and Major Newland. The trio then used the hijacked walker to advance towards the bunker, destroying another AT-ST and firing on other Imperial forces along the way. After Solo's attempts to hotwire the bunker doors open only resulted in further locking them, Organa was wounded by a blaster shot from stormtrooper GR-792, who approached with fellow stormtrooper RZ-440 and demanded the Rebel leaders' surrender. Concealing her blaster until the opportune moment, Organa instead shot both troopers, killing GR-792 and incapacitating RZ-440. Immediately after, Chewbacca and his Ewok companions arrived in Tempest Scout 2. Solo used the vehicle's video comlink to impersonate an Imperial officer and deceive the bunker personnel into believing that the Rebels had been routed and were fleeing into the woods. By claiming they needed reinforcements to continue the pursuit, Solo convinced Renz and Hewex to open the door and dispatch three squads, who were promptly captured by the Rebels. Solo and his men then planted the explosives and destroyed the shield generator.
High above the exploding generator, Ackbar announced the deactivation of the shield and ordered the commencement of the attack on the Death Star's main reactor. As Stramm informed Ackbar that Calrissian's path was clear following the Devastator's destruction, he instructed all surviving units of his group (himself and Moonsong) to regroup, and the squadron proceeded to assist the other fighter wings in their attack against the battle station. Another B-wing pilot, Blue Five (Ten Numb), contributed to the assault. Under Crynyd's orders, his squadron's members—Green Four (Shara Bey), Seven, and Three—protected the Millennium Falcon during its attack run to enter the Death Star. Fulfilling its original mission, Corona Squadron also protected the Falcon and its accompanying squadrons as they approached the battle station. Additionally, around this time, the Rebels deployed two more strike teams on the moon, along with a recovery team to salvage the remains of the shield generator.
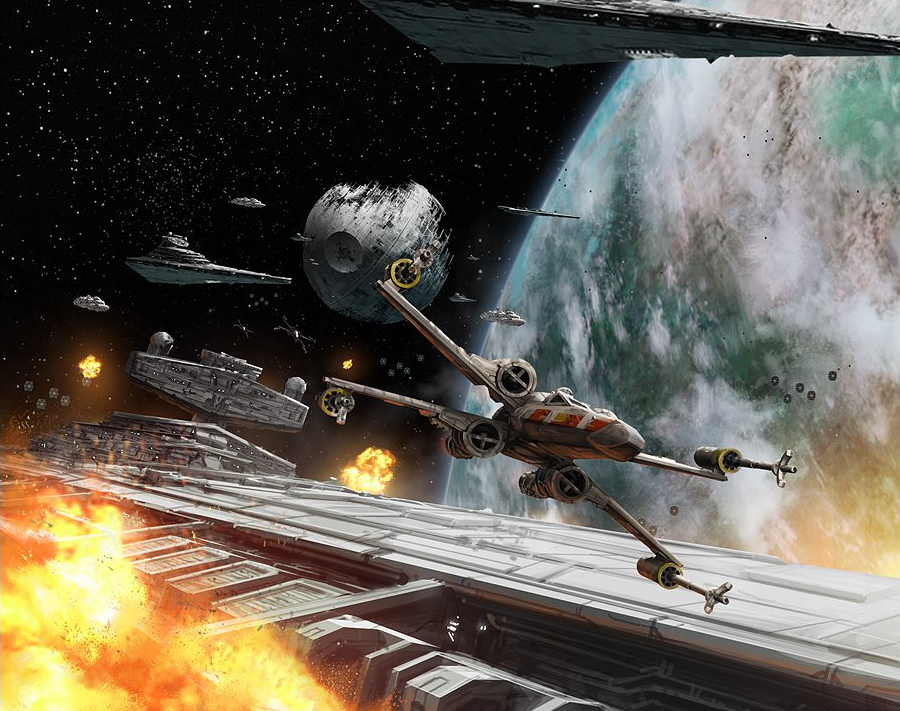
Capitalizing on the opportunity, Calrissian summoned the remaining fighters from Red Group and Gold Squadron to follow him into the Death Star's superstructure to destroy its reactor core. Leading the charge was Red Leader Wedge Antilles, followed by the Millennium Falcon and two A-wings, one of which was piloted by Gold Four (Jake Farrell). The sole Y-wing, flown by Gold Nine (Norra Wexley), and another X-wing, piloted by Keir Santage, trailed behind them.
The group was pursued by several TIE fighters of the Scythe Squadron and TIE interceptors of the 181st Imperial Fighter Wing as it navigated through the station's unfinished ventilation shafts, and an Imperial pilot shot down Keir Santage's X-wing. Calrissian instructed the rest of the group to separate and head to the surface. As they diverted some of the pursuing TIE fighters, he and Antilles continued towards the core. Simultaneously, Sloane forbade Flight Leader Monare from entering the Death Star and recalled all Sapphire Squadron fighters.

The fierce attack shook the entire Death Star, causing Skywalker to grab his lightsaber, pull his father toward the turbolift, and navigate using his memory to the hangar level. Vader's shuttle, ST-321, had dropped him off there just hours prior. Upon reaching the correct level, Skywalker found the Death Star in utter disarray, with troopers, officers, subordinates, and construction crews running amok. Some were desperately trying to repair the damage, others were preparing to defend the station, and still others awaited evacuation orders. Luke escorted Anakin to the shuttle without resistance. The redeemed Anakin would soon pass away, but not before confirming to his son that there was still good within him.
To provide Calrissian's team with additional time, Ackbar instructed his forces to focus all firepower on the Super Star Destroyer Executor. Rebel cruisers converged on the ship, bombarding it from all angles. A strafing run by a pair of A-wings caused the Dreadnought's bridge deflector shields to fail. Piett, upon learning this, commanded the ship to intensify its forward batteries to prevent any exploitation of this vulnerability. Although the Executor's gunners managed to destroy a Rebel X-wing, they also damaged Arvel Crynyd's fighter, sending it into an uncontrollable spin. Ree attempted to prevent Crynyd's crash, but the fighter's speed and distance made it impossible to target. The Rebel pilot's crippled A-wing starfighter then slammed into the Executor's bridge, resulting in a massive explosion that killed Piett, Commander Gherant, and the entire bridge crew. The Vigilance maneuvered to flank the Executor, as Sloane recognized that it would become the pivotal point of not only the battle, but also the balance of power in the entire Outer Rim. Consequently, the flagship had to be defended with every available Imperial asset.
Regrettably, it was too late. The loss of the bridge caused the Executor to lose its primary power and control systems. The massive warship was then drawn into the Death Star's gravitational pull and crashed onto its surface, erupting in a colossal inferno. Upon being informed that the Death Star's command structure had been fractured without the Emperor's direction, Sloane, now the highest-ranking officer, instructed her Communications Officer, Ives, to order the surviving captains to recall their TIE fighters and assemble around the Vigilance. Ree obeyed the order, but also provided cover for her comrades in damaged TIEs. In response, Admiral Garrick Versio, aboard his Star Destroyer, the Eviscerator, requested a report from the Special forces Inferno Squad, who were already deployed on the moon. The group's commander, Iden Versio, confirmed that the shield generator was irreparably destroyed. The admiral then ordered them to eliminate any Rebels encountered near the shield generator and return to their ship, the Corvus. Inferno Squad complied, eliminating the Rebel recovery team and both strike teams.
Inside the Death Star, Calrissian and Antilles soon arrived at the main reactor. Antilles launched proton torpedoes at the station's power regulator on the northern tower, destroying it. This prompted Ackbar to order the Alliance Fleet to retreat from the Death Star. As the Alliance Fleet disengaged from the Imperial line and accelerated away from the Death Star, Sloane eliminated Ottkreg to prevent him from interfering with her plans. Calrissian followed Antilles by firing a pair of concussion missiles through a small rectangular exhaust vent in the main reactor cone, causing the northern tower to destabilize and collapse into the southern tower in a massive explosion. Receiving orders from Home One, the remaining elements of Green Squadron and Yellow Squadron were tasked with intercepting Imperial launches from the collapsing battle station. Green Four (Shara Bey) initially targeted shuttle ST 321, piloted by Skywalker, but ceased her attack upon his identification. Bey then provided cover for him against several TIE fighters.
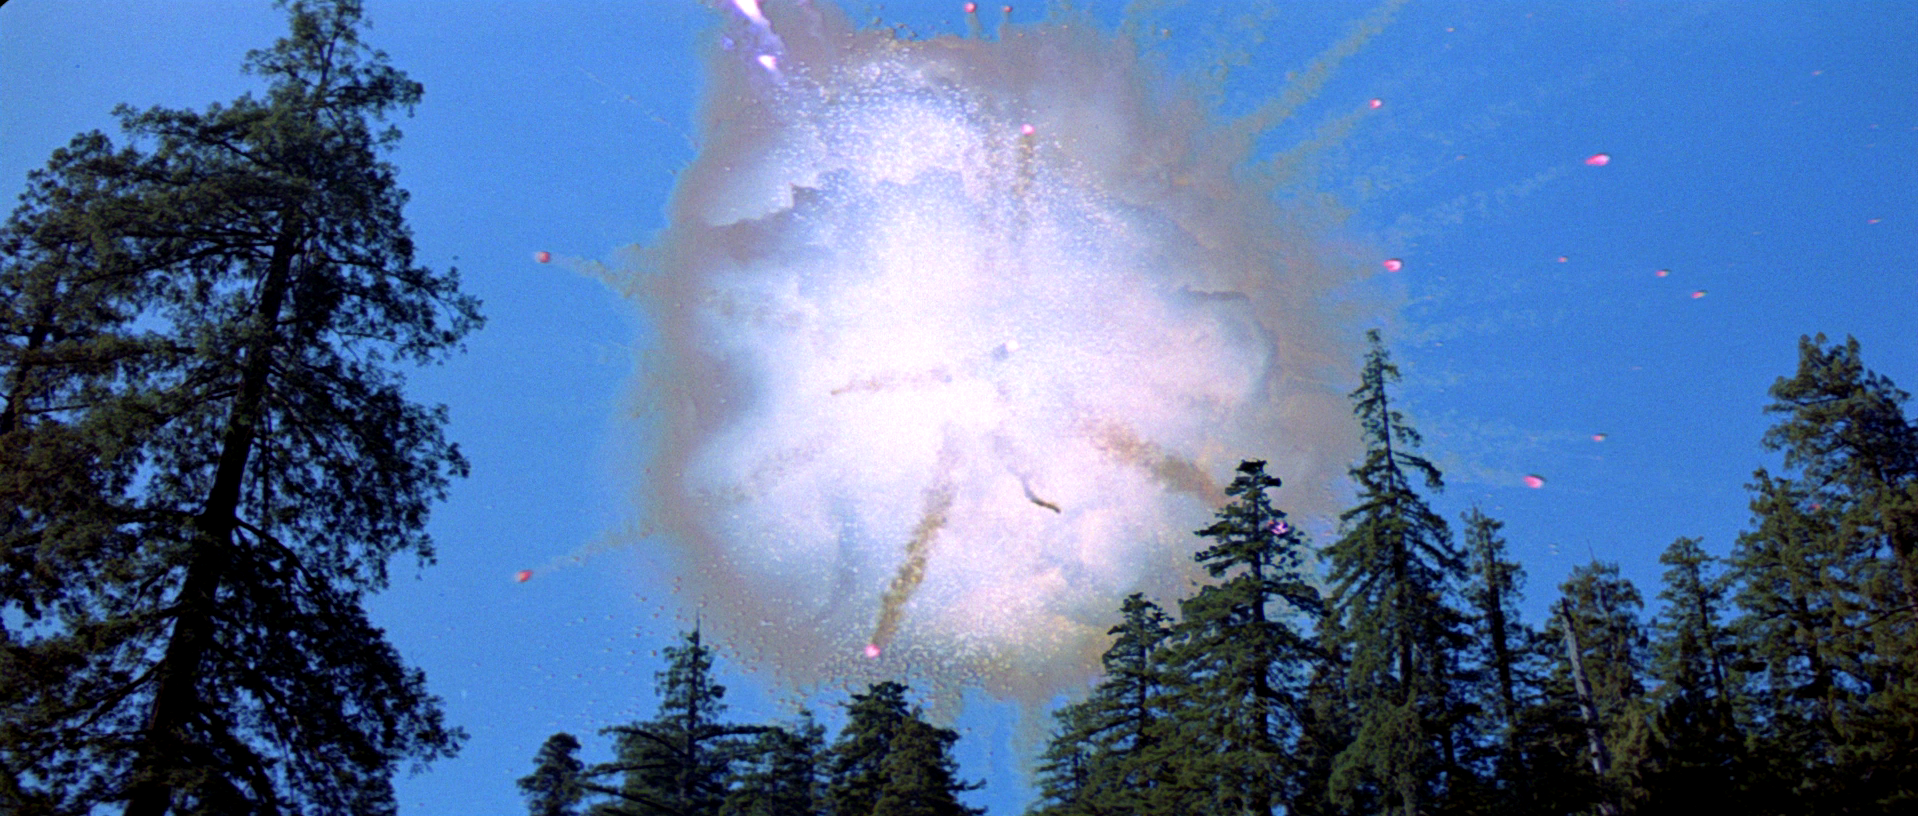
Simultaneously, both the Imperial and Rebel fleets retreated from the Death Star. Wedge's X-wing easily escaped the Death Star unscathed and headed towards the Rebel fleet. The Millennium Falcon outpaced the explosion engulfing the battle station and narrowly escaped as the unfinished superweapon finally detonated, illuminating Endor's early-evening sky. Following her second programmed scenario, Sloane transmitted coordinates to all Imperial ships and ordered them to jump immediately to the Annaj system. However, Garrick remained behind with the Eviscerator to assist in Inferno Squad's evacuation from the ground.
Escape from Endor
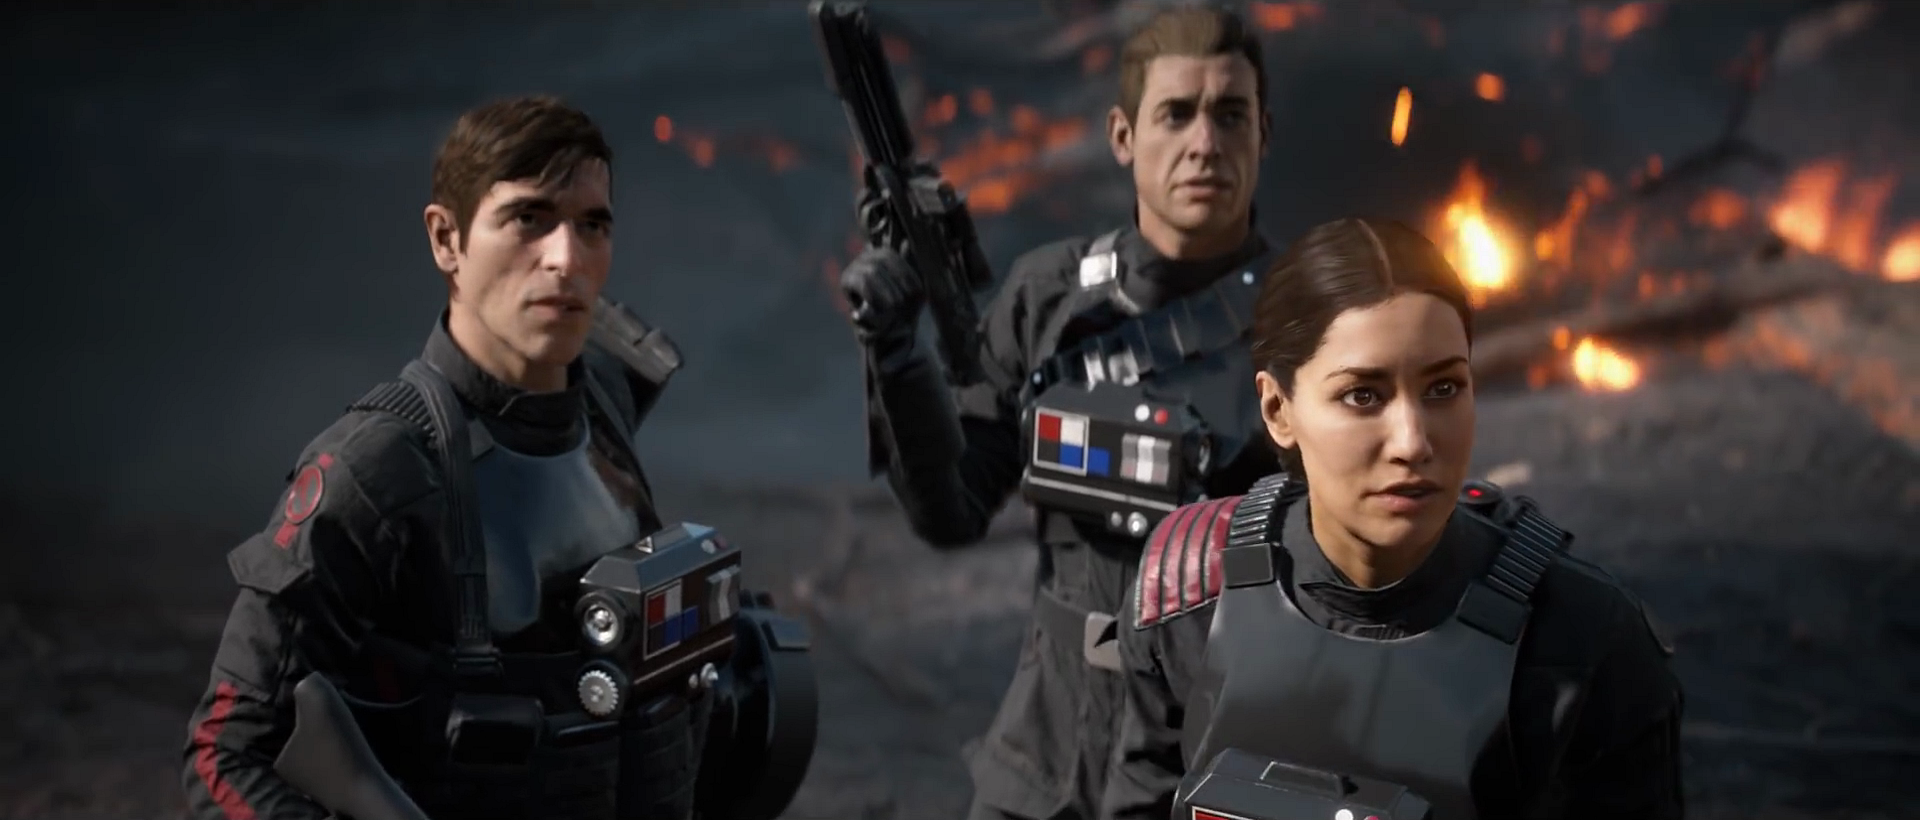
Rebel Commander Lina Graf participated in the ground battle and witnessed the Death Star's destruction from Endor's surface. Upon witnessing the Death Star's destruction, Inferno Squad received orders from Admiral Versio to evacuate back to the Corvus. By this point, the rebel fleet had dispatched U-wings to deploy additional rebel ground forces, and the remaining Imperial forces on Endor were being overwhelmed. Iden and others swiftly assisted a squad of stormtroopers under attack near a crashed Lambda-class shuttle and then fought their way to squad member Del Meeko's location, where he and a squad of stormtroopers were positioned near a downed TIE fighter. Together, the group moved to retake Platform 4 from the rebels. After securing the base of the platform, Inferno Squad stormed the top and evacuated the moon in TIE fighters as more reinforcements arrived on U-wings.
Upon reaching the wreckage of the second Death Star, the squad discovered that the Corvus had been damaged in the explosion and required repairs to restore power and functionality to the engine. Three MC80 Star Cruisers cornered the Corvus, while a fourth engaged the nearby Eviscerator. The cruisers deployed X-wings and Y-wings to attack the corvette, but Inferno Squad swiftly destroyed the fighters. Once the Corvus's repairs were complete, Meeko boarded while Iden was summoned to the Eviscerator, and the two vessels departed for Vardos. Maintenance technician Tern Koyatta, who had been assigned to Endor during the second Death Star operation and worked to establish a secret Imperial weapons cache for the Empire in case the battle station was destroyed, stole an Imperial officer's uniform from a dead officer during the battle, using that uniform and a code cylinder to present himself as a general after his escape from Endor; in his cover story, he had served as the administrator of a hidden weapons depot on Endor and attempted to escape the battle with several subordinates aboard a frigate, only for their vessel to be hit by the Death Star's debris. He continued to allege that he and those who survived the impact were left adrift for a time, with those subordinates eventually jettisoned themselves from the vessel so Koyatta, their ranking officer, could have more air.
Aftermath
In the immediate wake of the combat, Organa revealed to Solo that Skywalker was her twin brother. Together with the Pathfinders, they arranged a meeting at Bright Tree Village. Above them, Rebel pilots docked their starfighters on the fleet's capital ships, tallied the casualties, and transported the wounded to medical frigates. To prevent the battle station's debris from causing widespread destruction on Endor, the Alliance Fleet deployed an array of shields and tractor beams. Despite Madine's concerns about an Imperial counterattack, personnel were transported to the moon, where both the Alliance and the Ewok tribes celebrated their victory throughout the night, with many troopers consuming large quantities of jet juice. In solitude, Skywalker cremated his father's armor on a funeral pyre, before joining the celebration with his twin sister and his friends. During the celebration, Skywalker saw the spirits of Yoda, Obi-Wan and the redeemed Anakin. Luke then reported to the Alliance that both the Emperor and Vader had indeed died during the battle.
In the aftermath of the engagement, the Ewoks attempted to roast several captured stormtroopers. Organa and Solo intervened, persuading them to spare the lives of the Imperial prisoners in exchange for receiving ration sticks through the generosity of General Hera Syndulla. Syndulla agreed to provide the ration sticks in return for Solo stating that her VCX-100 light freighter Ghost was superior to the Millennium Falcon. In private, Organa confided to Solo that no one believed the Ghost was a better ship than the Falcon.
During the rebels celebrations on Endor, ISB Loyalty Officer Sinjir Rath Velus, who had been stationed at the Endor base, took the opportunity to reconsider his life. Velus abandoned his post, killed a Rebel Pathfinder and stole the soldier's clothing and identity. At some point, during a short and to-the-point ceremony held on a flight deck, an admiral spoke of duty, sacrifice and heroism, before awarding a Medal of Bravery to all B-wing pilots who had survived the battle—after which all the ceremony participants headed back to their duty stations; all leave was as of then canceled.
The celebrations spread to other regions of the galaxy as the Alliance disseminated news of the battle's outcome and the Emperor's demise, proclaiming themselves as the new dominant force. On that very day, Organa broadcast a holographic message to locations such as the Anoat sector, conveying the news of the Empire's defeat and urging citizens to rise up against the remaining Imperial forces. Anti-Imperial protests erupted on various worlds, including Bespin, Tatooine, Naboo, and even the Imperial capital of Coruscant. Imperial authorities responded to the protests, triggering riots such as one in Coruscant's Monument Plaza, during which a statue of Darth Sidious was toppled by Coruscanti citizens.
The following morning, Solo spearheaded an assault to eliminate a group of Imperial holdouts on the far side of the Endor moon. After capturing the base, they discovered communication records and plans pertaining to the Imperial post-Endor strategies. Simultaneously, the Imperial Starfleet regrouped to strategize for their next offensive and to designate a successor to Sidious. Coruscant remained in chaos, and Grand Vizier Mas Amedda struggled to maintain the Empire's unity amidst the growing threat of fragmentation: the chain of command had been severed. The Battle of Endor plunged the Empire into disarray, leading to the Emperor's death and the emergence of numerous splinter factions vying for the power vacuum left by their fallen leader. Imperial pilot Rella Sol lamented that, had Palpatine not dissolved the Imperial Senate, senators like her parents might have preserved order after Endor. Despite Vader's passing, his personal castle on the planet Mustafar remained intact, and his servant, Vaneé, driven to madness by the planet's lava fumes, began to believe he was hearing the ghost of Vader. He captured Lina Graf's crew in an attempt to resurrect his master. However, Endor veteran Lina Graf, feigning being the resurrected Vader, freed her allies before trapping Vaneé, forcing the servant of Vader to remained trapped with the hallucinations of his master. Skywalker's true Force spirit, meanwhile, helped Graf and her crew escape his former fortress.
As a result of their triumph on Endor, the Alliance reorganized itself into the New Republic and continued its war against the Empire, striving to liberate the Core Worlds. The Empire, on the other hand, fractured into various factions, some of which the New Republic suspected had retreated to the Outer Rim to prepare a major offensive against their enemies. Despite a counterattack posthumously ordered by the Emperor, and an emergency summit on Akiva, the Empire's ultimate defeat occurred one year and four days after the Battle of Endor, following the Battle of Jakku. Subsequently, the shattered Empire signed the Galactic Concordance, bringing an end to the Galactic Civil War. During this time, shock troopers were deployed to eliminate any Imperial officials who became warlords after the battle, and later became peacekeepers after the New Republic's formation.
Regarding the Death Star II, its remains crashed onto the ocean moon of Kef Bir, where they remained present during the war between the First Order and the Resistance. The hyperspace anomalies of the Moddell sector deposited the battlestation's debris on Kef Bir instead of Endor, which polluted the moon's oceans and displaced native life. Even though the conflict did not end with the Battle of Endor, Finn, a former First Order stormtrooper who joined the Resistance, considered the engagement to be the end of the Galactic Civil War, stating as such before the Resistance's mission to Kef Bir.
Behind the scenes
The battle on Endor
The Battle of Endor served as the culmination of the 1983 film Star Wars: Episode VI Return of the Jedi, the concluding chapter of the Star Wars original trilogy.
George Lucas, the creator of the series, initially envisioned Wookiees as the primitive species that would assist the Rebellion in the ground component of the battle. However, by the time he was developing the third film, the previous movies had already established Chewbacca as technologically adept, prompting him to revise his plans.
Because he desired a primitive race with no prior connection to technology to influence the battle's outcome, and partly to enhance the film's appeal to children, Lucas conceived the Ewoks and had them effectively secure victory in the ground battle. This decision sparked controversy among the actors and some fans. Lucas drew inspiration for having a primitive race triumph over an advanced army from the actions of the Vietcong, and he also utilized the battle as a means to comment on the United States' involvement in the Vietnam War. The inspiration, when it came to light, led to further controversy, as it implied that the Galactic Empire represented the American forces.
Gary Kurtz, who produced both Star Wars: Episode IV A New Hope and Star Wars: Episode V The Empire Strikes Back, disagreed with the inclusion of another Death Star in the battle, deeming it a rehash of A New Hope but with enhanced visual effects.
During pre-production of the film, Lucas engaged in frequent disagreements with screenwriter Lawrence Kasdan regarding story elements and set pieces, debating whether it would be preferable to abandon Endor's presence in favor of staging the climactic battle on Had Abbadon, the Imperial homeworld.
A deleted scene elaborated on the actions within the bunker during the second attempt, specifically depicting Han Solo and his unit encountering a stormtrooper squad inside the control room.
Duel aboard the Death Star II
In the initial draft of Return of the Jedi, the confrontation between Luke and the Sith differed significantly. Instead of occurring aboard the Death Star, the Emperor's throne room was surrounded by lava deep beneath the Imperial Palace on Had Abbadon, as envisioned by Ralph McQuarrie. A significant concept that went unused in the final version involved the physical return of Obi-Wan Kenobi and Yoda from the Netherworld of the Force to the living realm to assist Luke in defeating the Emperor. Similar to the finished film, Darth Vader ultimately sacrificed himself to save Luke, although in this version, he propelled himself and the Emperor into the lava. The duel aboard the Death Star II was intended to be grander than the duel on Cloud City from The Empire Strikes Back, but Lucas altered his decision during filming.
Special Edition changes
In 2004, the re-releases of the original trilogy introduced minor alterations to certain scenes, including those of the Battle of Endor. While most changes were trivial, involving adjustments to color, sound effects, or music, brief scenes of celebrations were added to the end, and Anakin Skywalker's Force spirit was changed from Sebastian Shaw's face to that of Hayden Christensen, who portrayed Anakin in the prequel trilogy and was filming the final prequel film, Star Wars: Episode III Revenge of the Sith, released in 2005. Lucasfilm has stated that the 2004 DVD versions are the canonical depiction of the events in the trilogy.
The Freemaker Adventures
The Battle of Endor serves as the climax of "Return of the Return of the Jedi," the final episode of the second season of Bill Motz and Bob Roth's non-canon animated series LEGO Star Wars: The Freemaker Adventures, which premiered on Disney XD on August 16, 2017. In that episode, the antagonistic M-OC realizes that there is a flaw in the second Death Star. Using a giant Kyber crystal, M-OC forms a shield around the Death Star's reactor core. M-OC is ultimately defeated and destroyed by Rowan Freemaker since he hit the giant crystal with the Kyber Saber, allowing the Rebel Alliance to destroy the reactor core without any obstacles. The Freemakers, the Mon Calamari starship builder Quarrie, and Lieutenant Colvett Valeria later join the other rebels at the victory celebrations in Bright Tree Village.
Battlefront II
The 2017 video game Star Wars Battlefront II features the Battle of Endor and its aftermath in the multiplayer gamemodes, Galactic Assault and Starfighter Assault. One of the Galactic Assault scenarios depicts an Imperial Colonel named Brenna and her brigade stationed on the Death Star II's Command Center North. During the battle, a Rebel CR90 corvette crashes into one of the hangars. The surviving Rebel passengers, led by Rebel Major Shin, skirmish with Brenna's forces in order to escape. Phase One requires the Rebel players to shut down the tractor beam control and generator stations. Phase Two requires the Rebels to disable the sector's turbolaser station and the superlaser control. Phase Three requires the Rebels to activate the shuttle elevator and hangar controls to summon a shuttle and escape. Throughout the game, the Imperial players are tasked with defending the station and stopping the Rebels.
Colonel Brenna, Major Shin, and their respective forces reappear in another Galactic Assault scenario, this time on the Endor Moon, shortly after the battle. The game depicts a Rebel assault on the Imperial Tarkin Initiative facility, Research Station 9, and a nearby outpost. Phase One requires the Rebel players to override the outpost's Walker fueling and computer stations, along with the Walker Controls itself, in order to steal an AT-AT to use in their advance on the Empire's main research station. Phase Two requires the Rebel players to defend the Walker as it marches through the forest to the base. Phase Three requires the Rebels to capture command posts around the base's landing platform. Phase Four tasks the Rebels with capturing one final command post inside the base. Throughout the game, the Imperial players are ordered to stop them.
Colonel Brenna and Major Shin appear one final time at Endor in a Starfighter Assault map. In this scenario, the Imperials advance through the wreckage of the destroyed Death Star II in order to attack an MC80 Star Cruiser. Phase One requires the Imperial players to attack multiple CR90 corvettes flying throughout the debris and destroy them. Phase Two requires the Imperials to attack and detonate Rebel mines placed around the wreckage to allow their Star Destroyer to advance. Phase Three requires the Imperials to attack the MC80, assaulting targets such as the engines and modules throughout the ship. Throughout the game, the Rebel players are tasked with defending the objectives.
In the Singleplayer part of the story, The player will be jumped to in progress during the Battle of Endor with perspective from both Versios in the battle, Garrick is at his star destroyer, while Iden, Del, Dio and Gideon are on the ground. As well as it is a feature in the trailer until the Death Star is destroyed forcing Inferno Squadron to Avenge their Emperor.
Continuity
"Return of the Jedi: The End of the Beginning," an article in Star Wars Insider 217, mistakenly states that the Galactic Empire fell at the Battle of Endor. This is also erroneously stated by Sabine Wren during the episode Part Seven: Dreams and Madness of the television series Ahsoka.