Ellian Zahra
Ellian Zahra was a human female who achieved the rank of Commander within the Galactic Empire. This occurred during the Galactic Civil War, a conflict fought against the Rebel Alliance. Known for both her cunning nature and desire for revenge, Zahra commanded the Star Destroyer called the Tarkin's Will. She advanced in the Empire as a student of Governor Wilhuff Tarkin, developing strong tactical skills under his tutelage. However, after a failed mission, Tarkin dismissed Zahra, though she sought to regain his favor. Before she could, Tarkin perished on the Death Star battle station during the Battle of Yavin, destroyed by the Rebel Alliance. Zahra harbored a personal vendetta against Princess Leia Organa of the Rebellion for Tarkin's demise, planning to kill her as retribution for her mentor.
Following the Battle of Hoth in 3 ABY, Darth Vader, the Sith Lord, assigned Zahra the task of tracking down the scattered divisions of the Alliance Fleet. Her attempt to prevent the rebel Fourth Division from escaping was unsuccessful due to the rebels aboard the freighter Millennium Falcon, including Organa. Zahra continued her pursuit of other divisions, but she was determined to destroy the Fourth Division and Organa. During a battle at Elessia against the Fourth and Seventh Divisions, Zahra personally confronted Organa, injuring the rebel leader with her blade—an action Zahra believed would break Organa's spirit.
Biography
Service to the Empire
Becoming Tarkin's protégé
During the Imperial Era, Ellian Zahra, a human female, lived. While she was young, Zahra's parents and the rest of her family were killed in a terrorist attack by rebels. After surviving on her own for a time, Zahra joined the Imperial Academy to serve the Galactic Empire, seeking to prevent others from experiencing her loss. She achieved top scores on the Empire's entrance exams and was selected by Wilhuff Tarkin, the Governor of the Outer Rim Territories and Grand Moff, due to her potential and lack of family connections. Tarkin provided guidance and support, teaching Zahra extensively. With his guidance, Zahra progressed through the Imperial Academy.
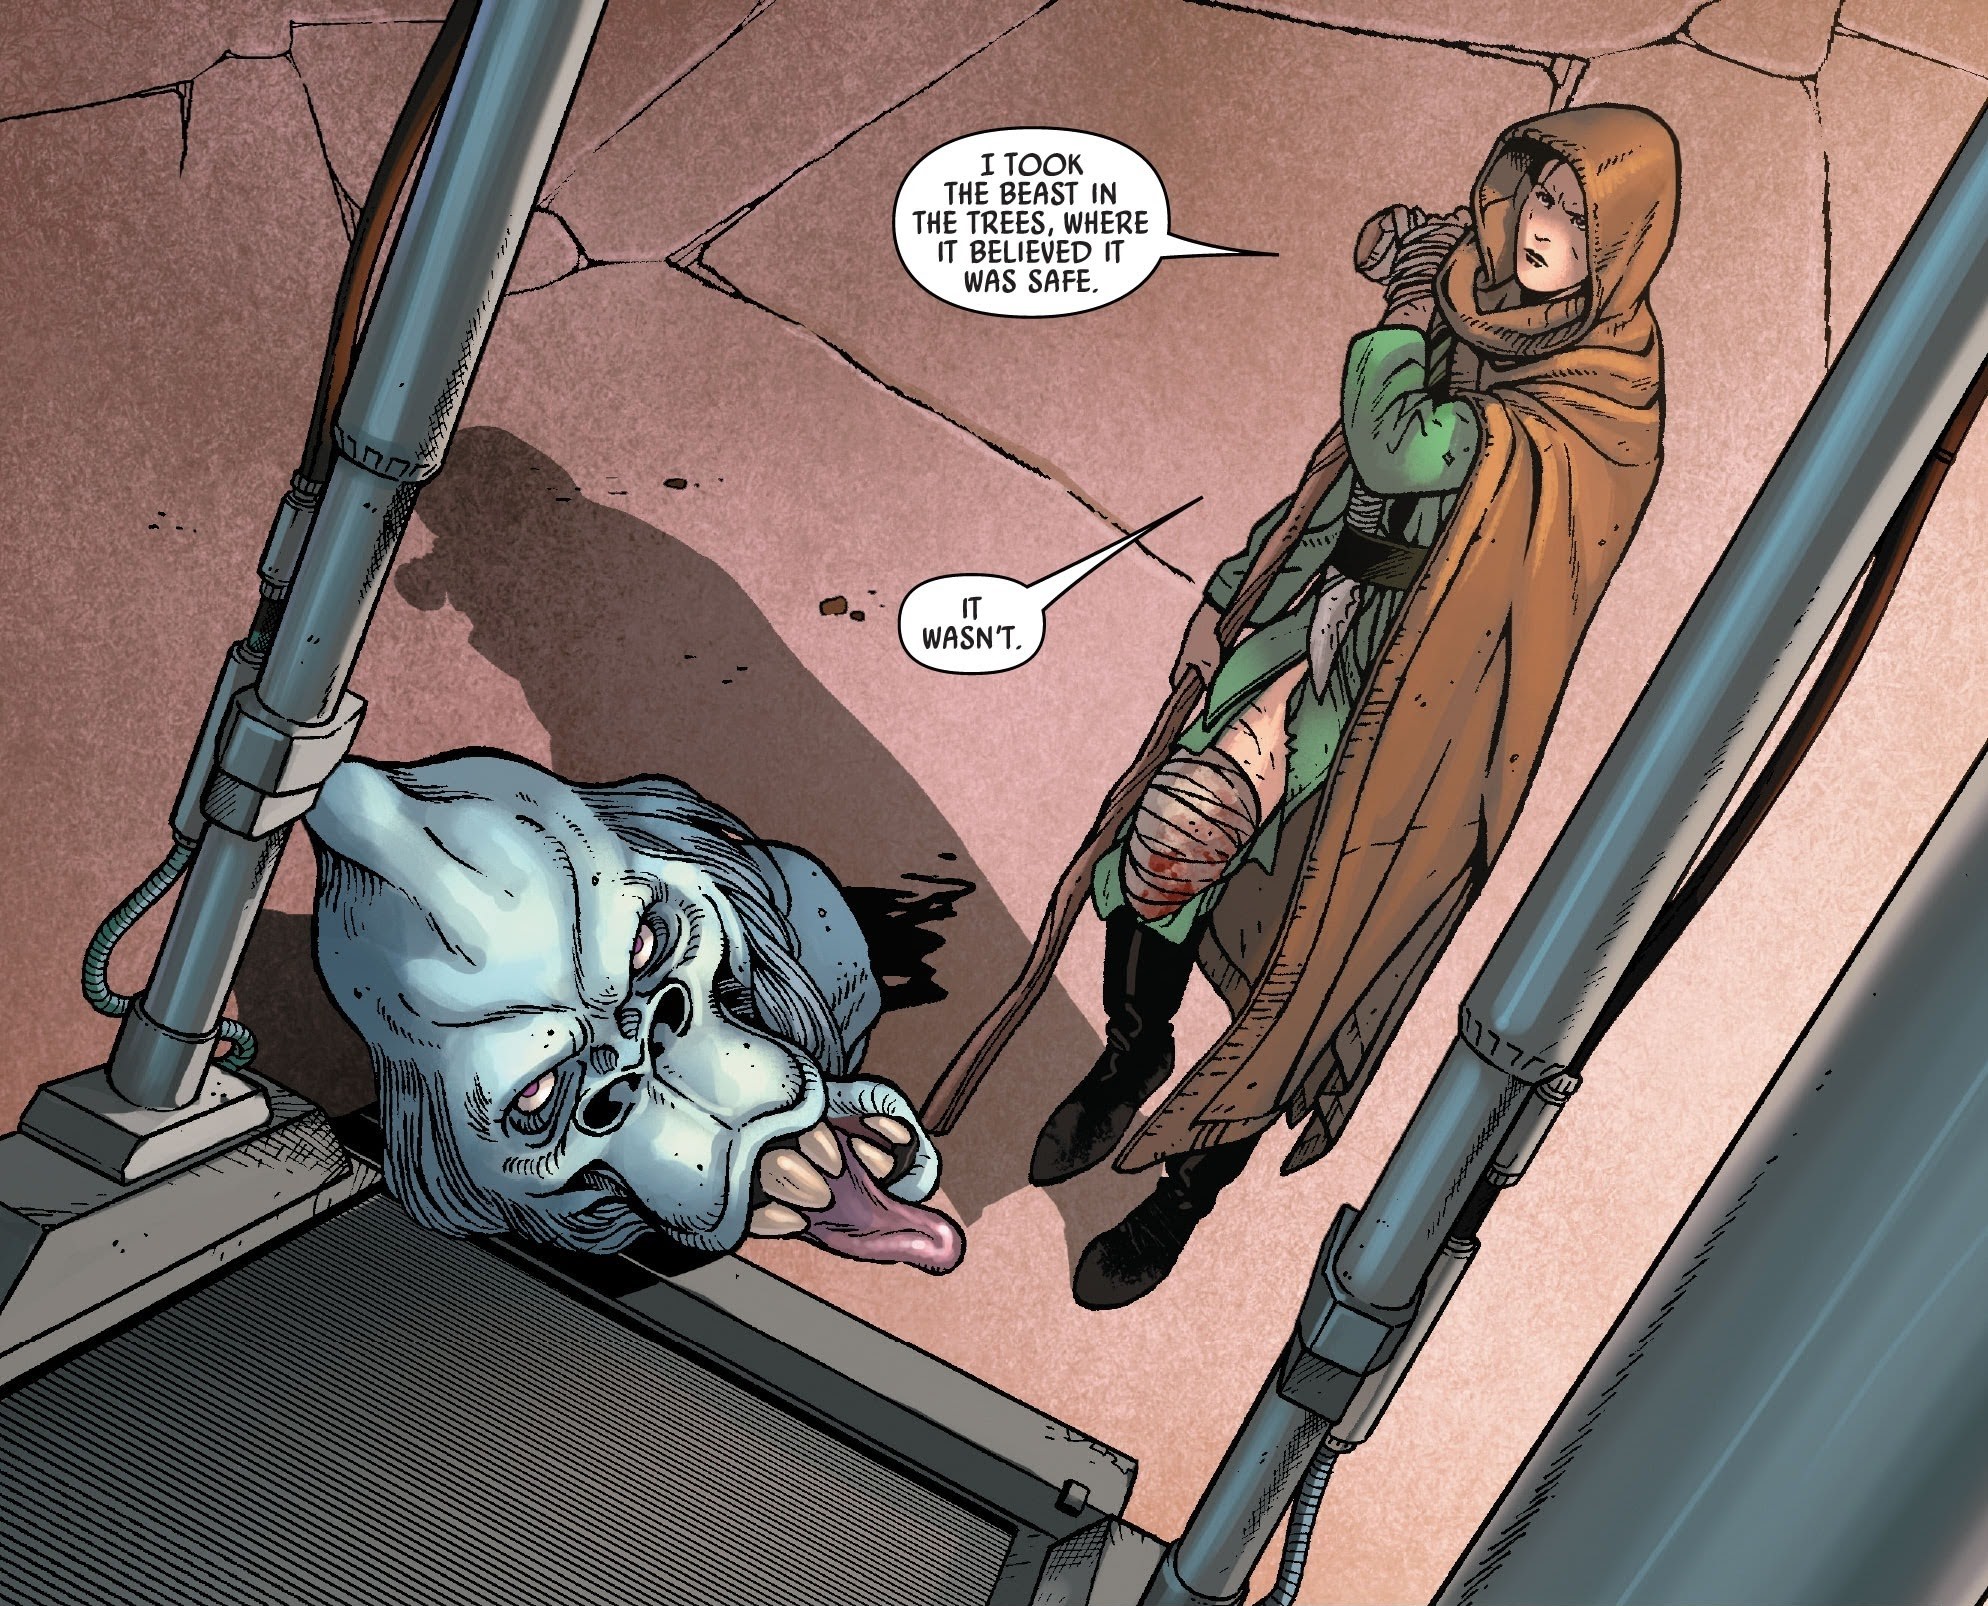
Around 1 BBY, Tarkin took Zahra, along with two other students, Beldin and Hannevik, to Eriadu, his homeworld planet in the Outer Rim. This was a final test to determine who would become his protégé. Tarkin tasked Zahra and her peers with hunting a dangerous albino veermok in the forest of the Carrion Plateau. They had to bring him the creature's head before he departed in his flagship, the Carrion Spike, at dawn in twelve hours. By dawn, Zahra had killed the veermok, trapping it in the trees where it felt secure. She also realized that Tarkin intended for the candidates to compete against each other, and she defeated Beldin and Hannevik. Despite her injuries, Zahra returned to Tarkin with the veermok's head, informing him that her peers were unworthy.
Having succeeded in the test, Zahra became Tarkin's protégé. As an officer in the Imperial Navy, she attended meetings with figures like Director Orson Krennic and oversaw the interrogation of rebels alongside her mentor, eventually reaching the rank of Captain. Tarkin introduced Zahra to Darth Vader, the Sith Lord, recommending her insights during a rebel engagement. She later achieved the rank of Lieutenant Commander, having distinguished herself during her years with Tarkin.
Tarkin's final mission
Zahra eventually met with Tarkin on the Death Star battle station and superweapon, where he assigned her a mission: to eliminate Burnium Ro, a warlord operating on Ikkrukk in the Mid Rim and using imagery from the outdated Nihil criminal group. When Tarkin provided Zahra with a strike force and the Carrion Spike, she questioned the need for such power. Tarkin explained that the Nihil represented chaos, making Ro the opposite of the Empire's order, and she needed to send a strong message. Zahra departed, with Tarkin requesting Ro's head as proof.
On Ikkrukk, Zahra deployed a network of probe droids, creating a mobile surveillance system to locate Ro while she waited on the Carrion Spike. When a Navy Troopers on the vessel's questioned her about the idea, Zahra explained that she considered everything a resource, using the water she was drinking as an example. The probe droids located the warlord in Grail City, and Zahra, unaware that it was a decoy, had the cloaked Carrion Spike follow him. Upon arriving at Ro's stronghold, Zahra deactivated the corvette's cloaking system and attacked the stronghold, destroying the base and killing the decoy "Ro" and his forces.
Upon Zahra's return to the Death Star, Tarkin asked why she didn't bring Ro's head. Zahra insisted she had destroyed Ro and his operation, but Tarkin showed her a shadowfeed broadcast of the warlord, revealing that the man she killed was a decoy. The real Ro was using her failure to elevate himself. Tarkin expressed his disappointment, stating that his faith in her was misplaced before leaving. Although Tarkin ordered Zahra to report for reassignment, she remained determined to find Ro.
The Battle of Yavin
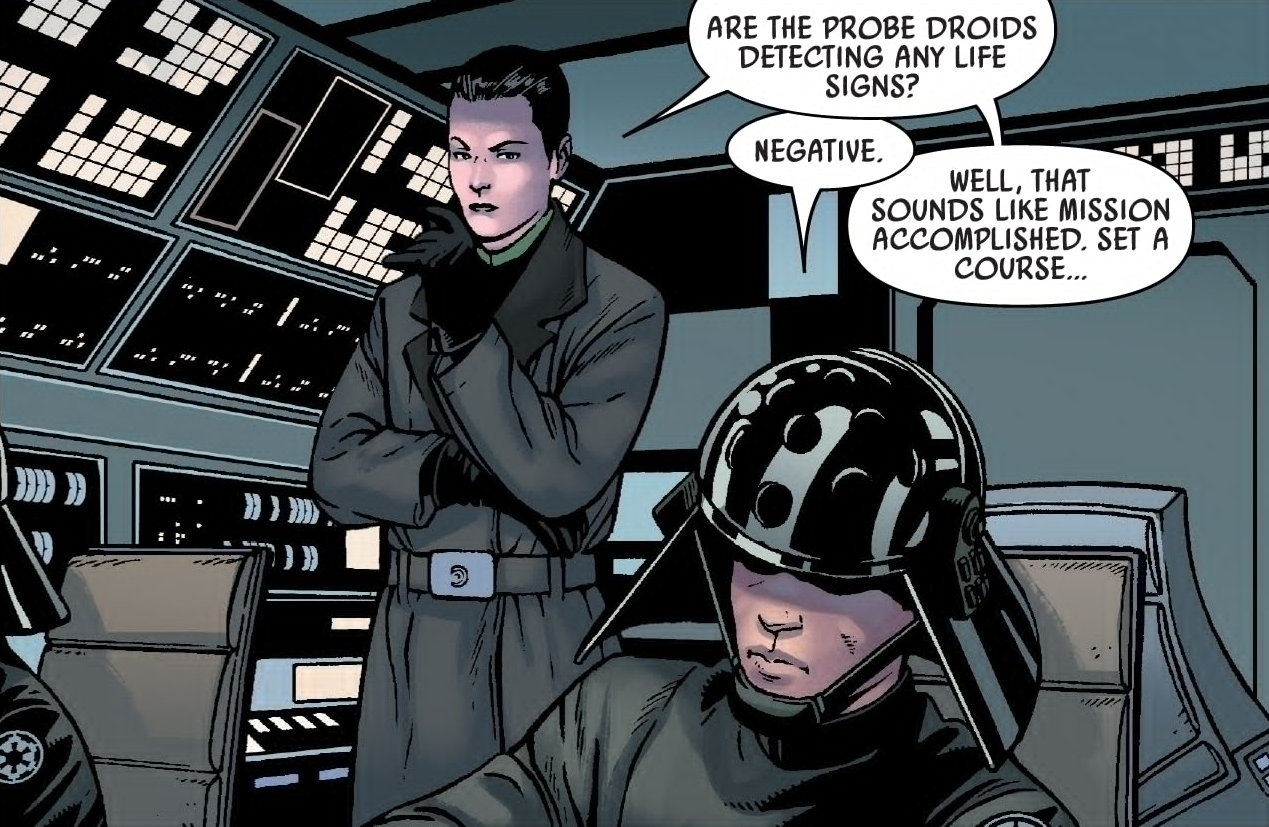
In 0 BBY, a week after her failed mission, Zahra obtained intelligence about Ro's location. She returned to the Death Star, but an officer under Tarkin's orders denied her attempts to meet with him. Zahra instructed the officer to pass her information to Tarkin, but the officer repeated the governor's orders. Relenting, Zahra asked the officer to tell Tarkin that she understood. Intending to kill Ro and regain Tarkin's favor, Zahra headed for a hangar, unaware that the Rebel Alliance was attacking the station during the Battle of Yavin in the Yavin system as the station prepared to destroy the rebel base on the moon Yavin 4.
Zahra attempted to requisition a Lambda-class T-4a shuttle, but the stormtrooper guarding it demanded authorization and informed her about the rebel attack. Although Zahra believed the rebels posed no threat to the Death Star, the stormtrooper remained uncooperative, tasked with holding the vessel for high-ranking officers' evacuation. Zahra knocked the trooper unconscious and commandeered the shuttle.
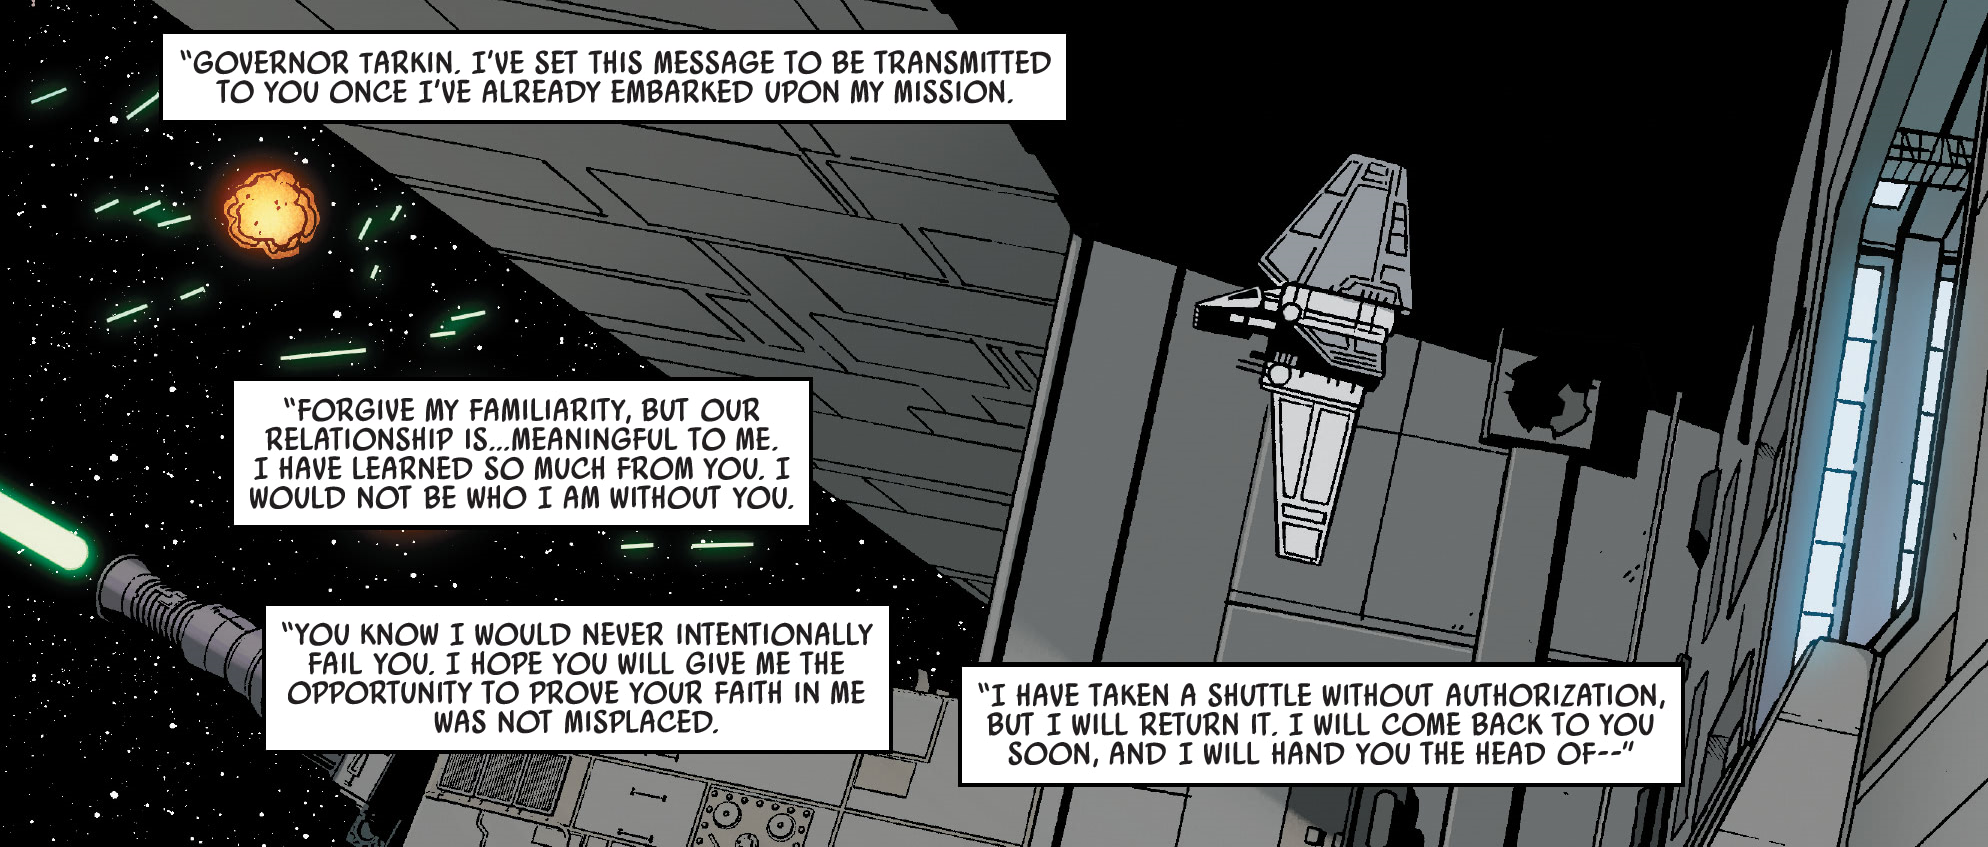
As she flew out of the hangar during the battle, Zahra recorded a message for Tarkin, to be sent once she began her mission. She expressed her hope for an opportunity to prove herself and admitted to stealing a shuttle, but assured Tarkin she would return with Ro's head. However, the rebels destroyed the Death Star, killing Tarkin. Zahra sustained injuries as her starship was damaged by the blast, and she watched the destruction in dismay.
A stalled career
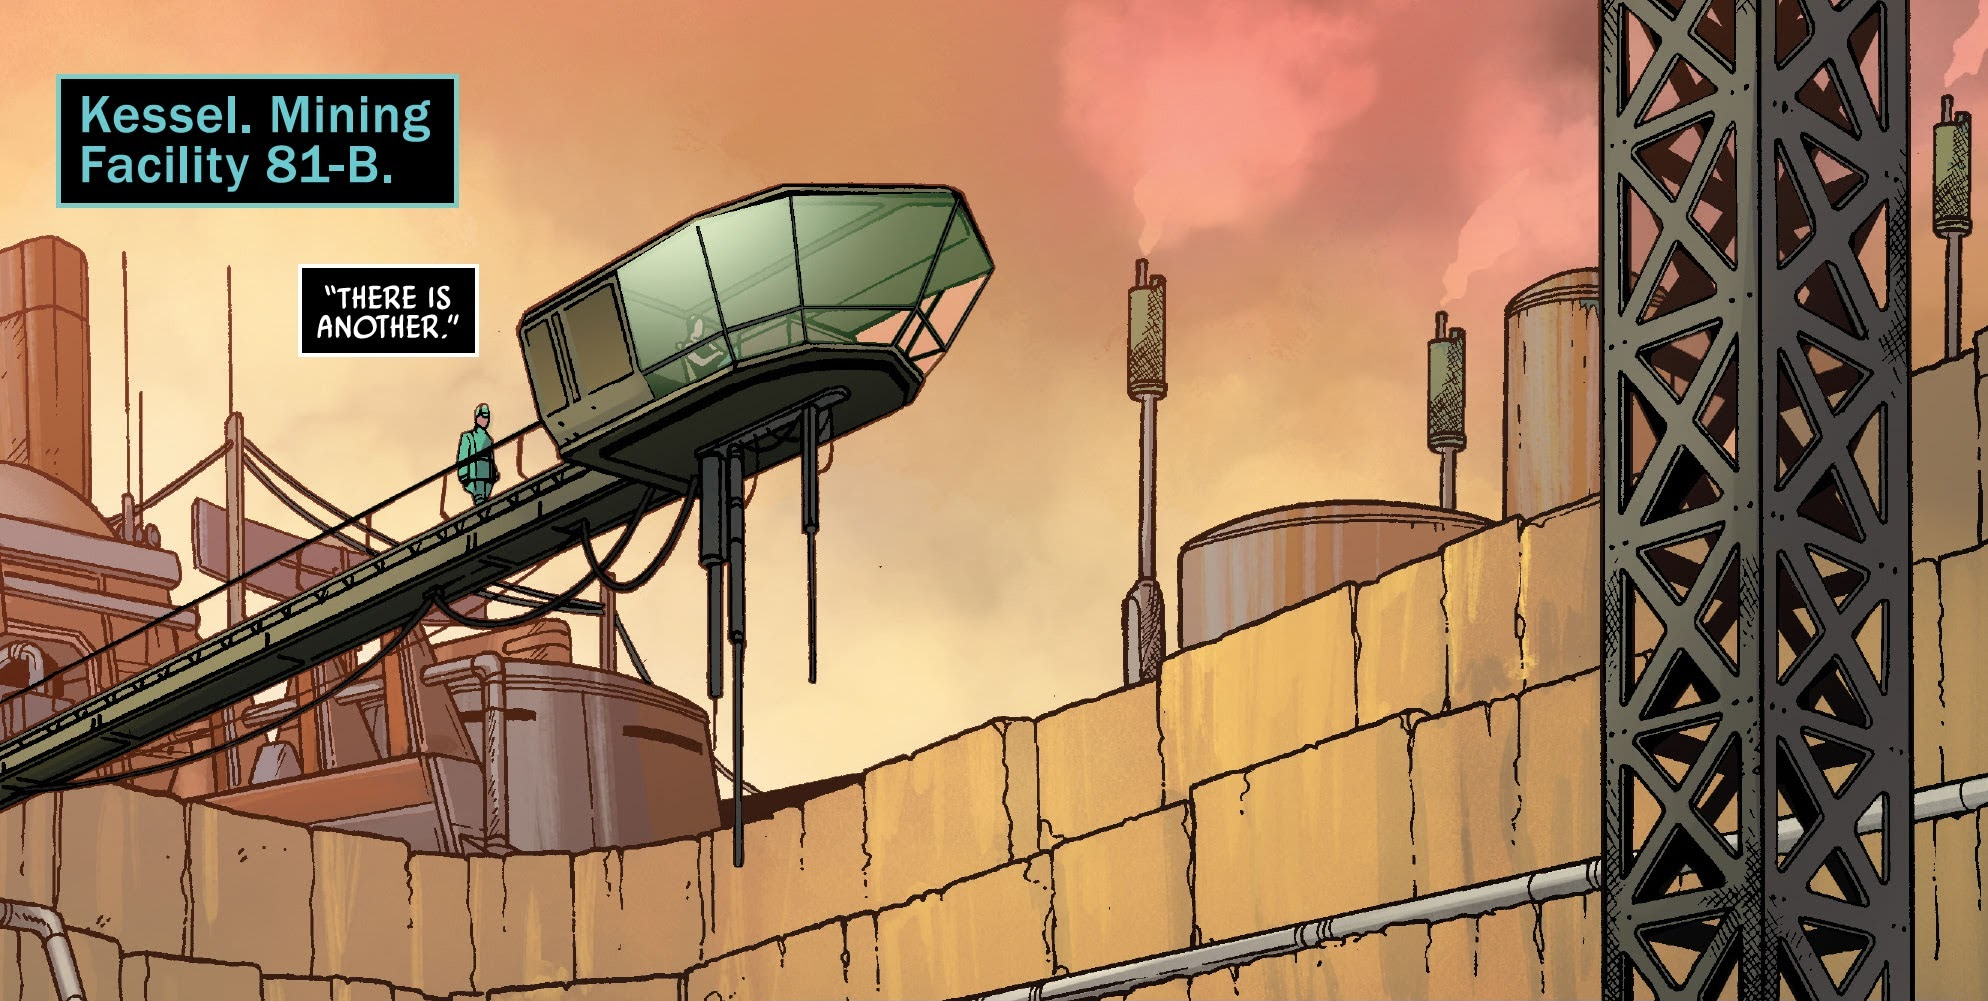
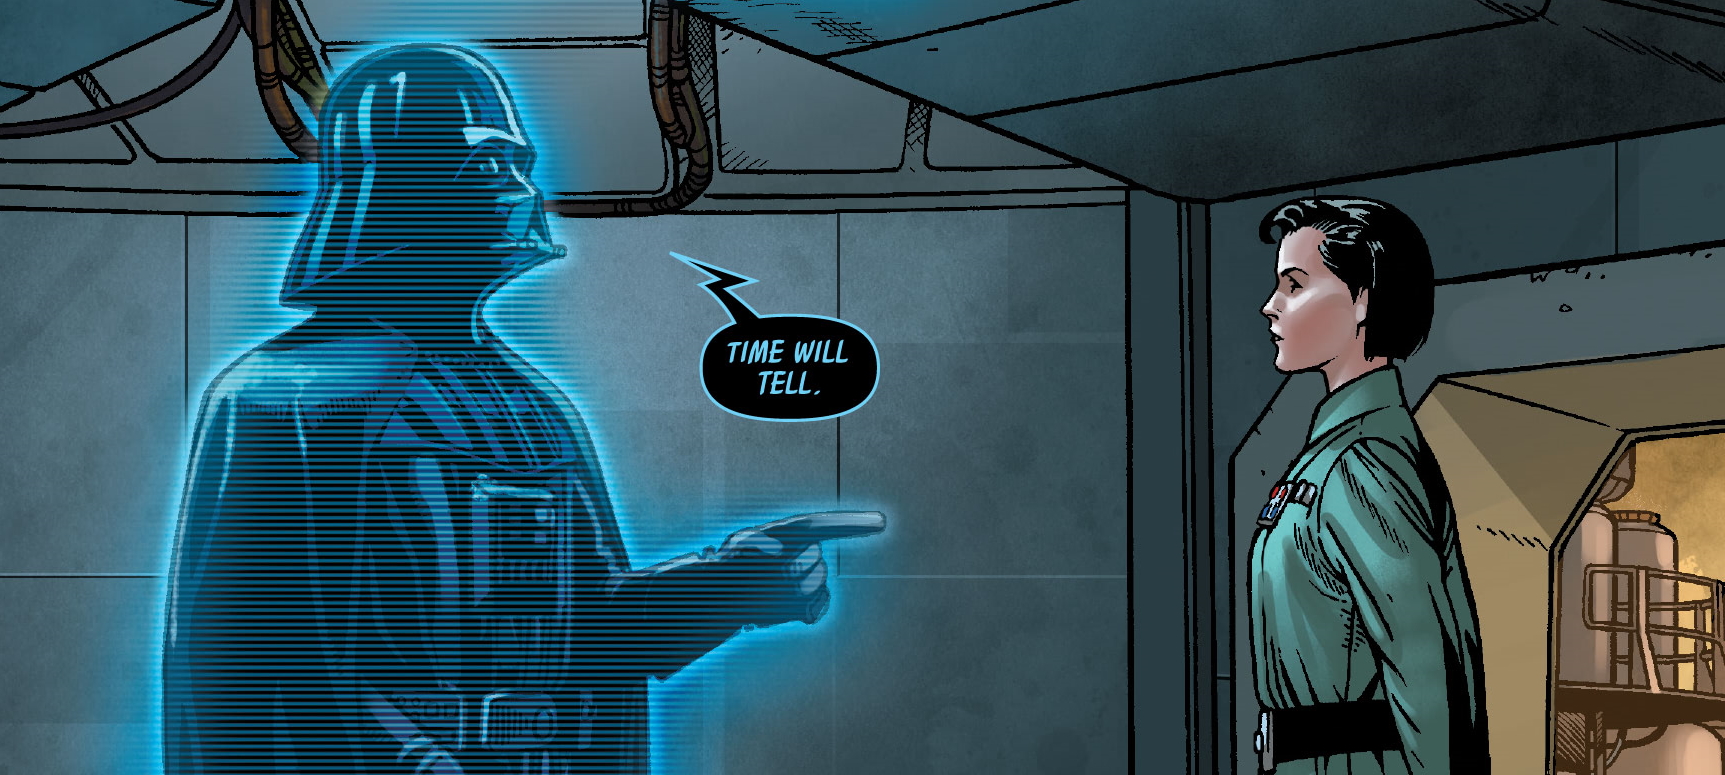
Following Tarkin's final orders and a note in her file recommending indefinite non-essential duties, Zahra, holding the rank of Commander, was assigned to command Mining Facility 81-B on Kessel, a spice mining planet. Zahra believed Tarkin intended this reassignment as a lesson and that she would have had a chance to prove herself if he had lived. Learning that Princess Leia Organa of the Rebel Alliance had been held on the Death Star shortly before its destruction during the rebel attack, she believed Organa's capture led to Tarkin's presence on the station. Zahra blamed Organa for Tarkin's death, vowing to avenge her mentor by killing her.
Reports from the time indicate that Zahra attempted to lobby others in the Imperial Military to revive her career. While some of Tarkin's allies considered her request, others, wanting to distance themselves from Tarkin's perceived failures, did not want to elevate his successor. Grand General Cassio Tagge, recently promoted, kept Zahra at a distance.
Tarkin's records of Zahra's progress were archived in the Imperial Archives under "Commander Ellian Zahra Progress Reports" in the "Grand Moff Wilhuff Tarkin" section. Her failure at Ikkrukk was documented in the "Mission to Ikkrukk" file within "Military Operations." Zahra's reassignment to Kessel was stored in "Personnel Assignment Order #9337118q" in Tarkin's section, and her communications from Kessel were in "Commander Ellian Zahra #7132-7281" under "Kessel Communications."
Hunting the rebel armada
A chance for redemption
By the time of the Battle of Hoth in 3 ABY, Zahra was still stationed on Kessel. The Rebel Alliance was defeated by the Empire, scattering its fleet into divisions to regroup later. Emperor Palpatine ordered Vader to find and destroy the rebel fleet, and Vader sought out Zahra, aware of her record and previous introduction. While Zahra oversaw the mining facility, a lieutenant informed her of an incoming transmission. She sarcastically guessed it was the Emperor, and was surprised to learn it was Vader.
Zahra answered Vader's transmission, confirming that Tarkin had mentored her. Vader noted Tarkin's reassignment order, and Zahra explained that she believed it was a lesson, which Vader agreed was typical of Tarkin. Vader then placed her in command of hunting the rebel fleet remnants, allowing her to use any necessary resources. Zahra was honored and assured Vader she would succeed; the Sith warned her against failure, noting that the Emperor knew her name.
Zahra was put in charge of an assault group called the Hunter Fleet. Vader allowed her to choose any Imperial Navy vessel as her flagship, and Zahra selected the Imperial-class Star Destroyer Fortitude, which had been near the Death Star during the battle and suffered damage from the wreckage. Zahra renamed it the Tarkin's Will and chose Imperials who had lost loved ones in the Death Star's destruction as her crew. She chose not to repair the damage, intending the Star Destroyer to commemorate the loss of the Death Star and its crew; damaged sections were cordoned off, leaving the bodies of the dead. In the days before Zahra's mission, Lieutenant Gorr was assigned to the Tarkin's Will as her second-in-command.
Escape of the Fourth Division
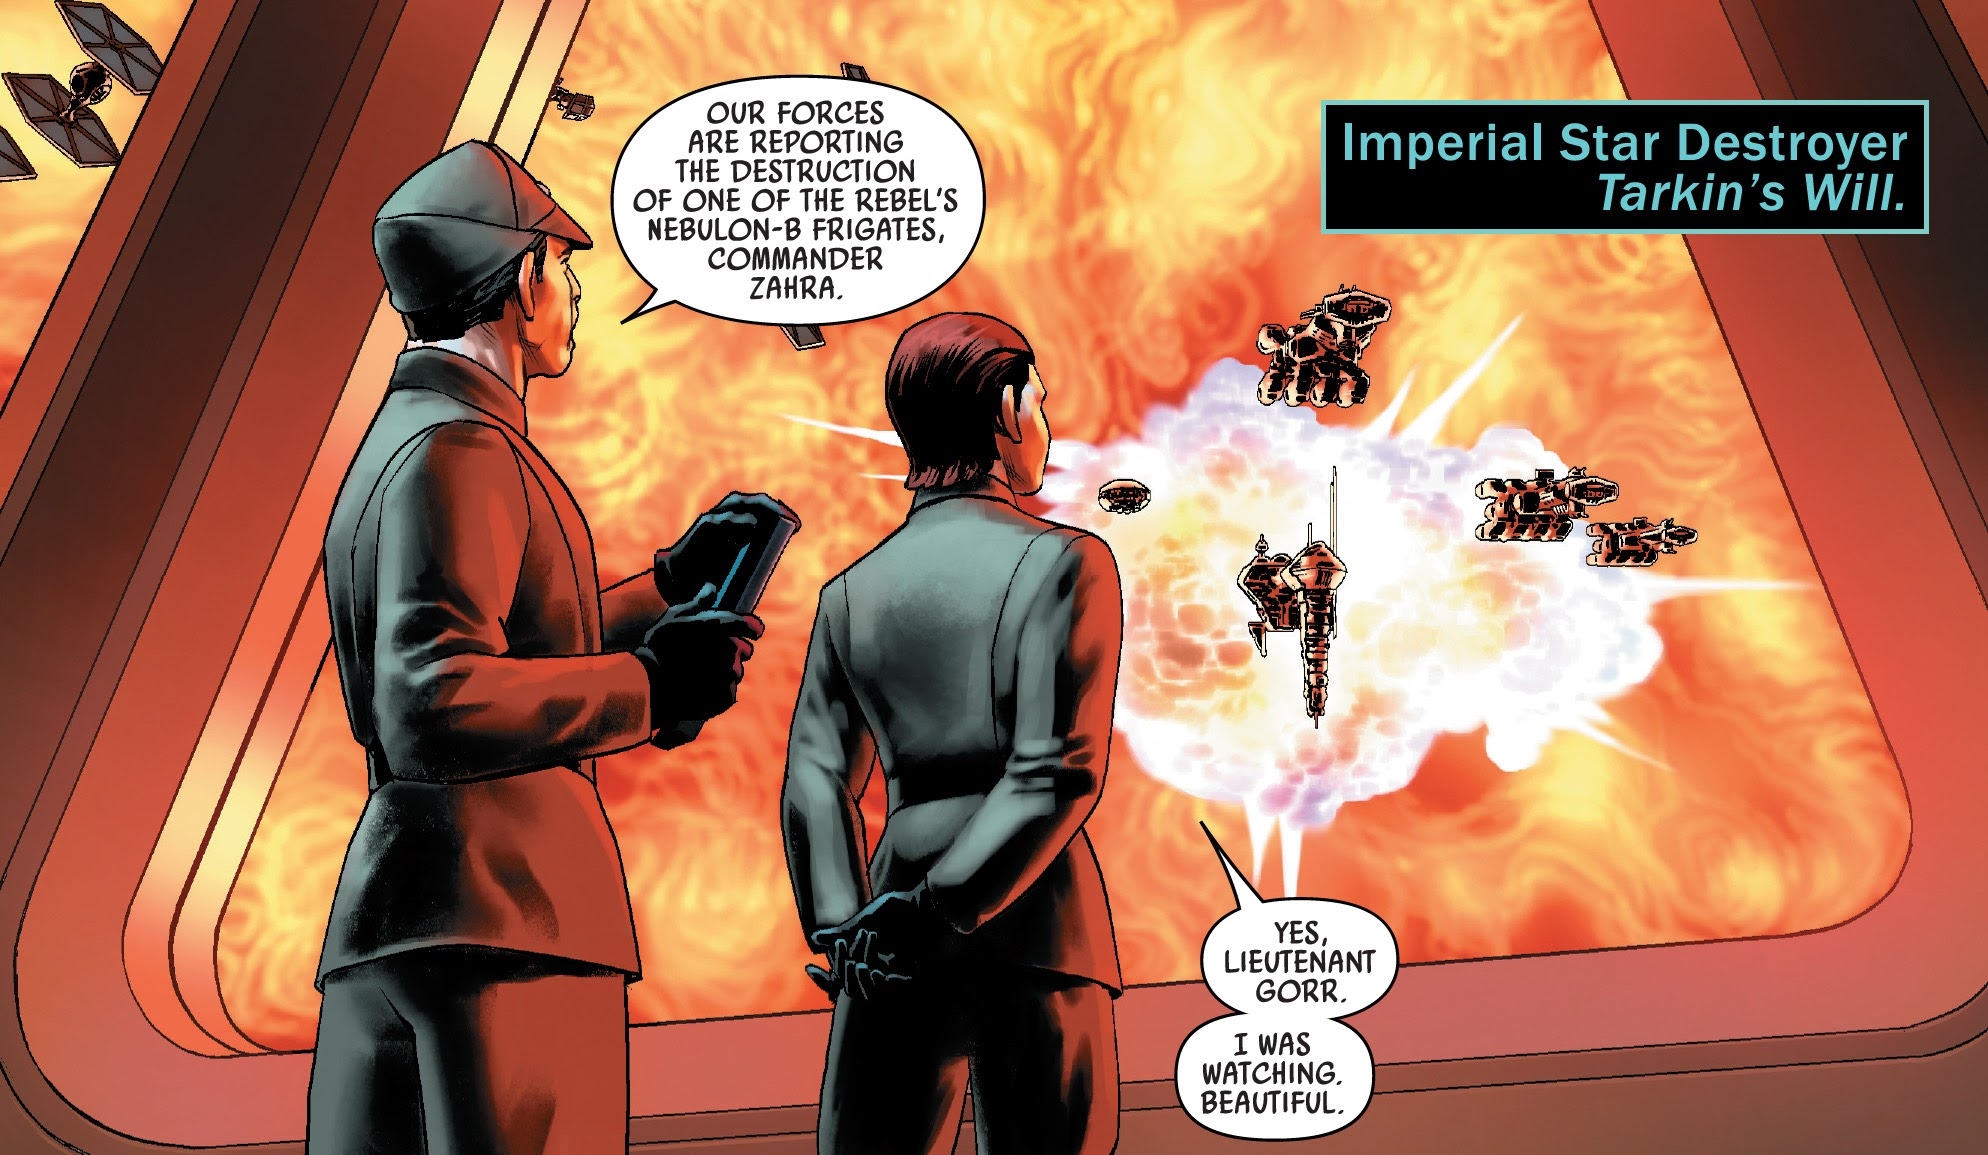
Zahra broke the Rebellion's codes and used her signal analysis protocol to track two divisions communicating—the Fourth and Eighth Divisions. Zahra split her battle group, sending her secondary strike force to attack the Eighth Division near Malastare while she led an attack on the Fourth Division, which was regrouping at Rendezvous Point Delta-Three in the Mid Rim. Zahra used a previously untested tactic, using her fleet's turbolasers to form a cordon and blockade the rebels against a nearby star. Unable to escape, the Fourth Division suffered heavy damage from Zahra's TIE fighters. Zahra admired the destruction and her tactic's success from the Tarkin's Will, discussing the engagements with Gorr.
When a rebel X-wing starfighter escaped the blockade, Zahra ordered a technician to transfer manual control of a turbolaser to her. The technician hesitated but complied at Gorr's insistence, and Zahra destroyed the X-wing, enjoying the rebel's failure. The freighter Millennium Falcon, carrying Organa and other rebels, arrived during the battle. Recognizing Organa, Zahra ordered Gorr to divert a squadron of TIEs and non-essential turbolaser batteries to target the Falcon, seeking to eliminate Organa and the vessel that had eluded the Empire. However, the Falcon's crew destroyed the turbolasers on one of Zahra's light cruisers, allowing the Fourth Division survivors to escape into hyperspace.
Furious, Zahra snapped at Gorr upon hearing the report of the escape, then resignedly ordered the fleet to stand down. Zahra later reported to Vader via hologram, claiming partial success; Vader disagreed and questioned her failure. She mentioned the Falcon's disruption, but Vader reprimanded her for targeting the vessel—unbeknownst to Zahra, the Falcon carried Luke Skywalker, Vader's son and a Jedi, whom the Sith Lord wanted alive. Vader dismissed Zahra, ordering her to destroy the remaining rebel fleet and warning against further failure.
Locating additional cells

After locating the Alliance's Sixth Division in the Mid Rim, Zahra led the Tarkin's Will in an attack on the division. Her forces eliminated all targets in the system, though Gorr noted they had no leads on the locations of other cells. Zahra was confident her plans would succeed, quoting her former mentor. When Gorr, unaware of the Tarkin's Will's history, suggested repairs, Zahra chastised him. She explained that the Tarkin's Will and its damage honored those who died on the Death Star, rallying the crew to remember their losses. Gorr expressed sympathy for Zahra's loss on the station, and she confirmed she had lost someone, declaring her intent to avenge herself on Organa.
Zahra later intercepted transmissions from what she believed was the Alliance Fleet's Seventh Division. Her forces tracked the division's movements, waiting for it to contact another cell and reveal its location. Zahra reported her progress to Vader, who commended her but was soon distracted when Skywalker activated a trap the Sith Lord had set at a Jedi outpost on Tempes. When Vader ordered his pilot to set course for Tempes, Zahra offered to bring the Tarkin's Will to assist, but the Sith Lord insisted on handling it himself.
The rebel trap
The Fourth Division eventually responded to the Seventh Division's transmission, and Gorr reported this to Zahra. Recognizing the Fourth as Organa's group, Zahra intended to eliminate the division herself and send her secondary strike force after the Seventh. Gorr noted that the positions of the Imperial and rebel fleets made the inverse more efficient. Zahra was displeased, but relented, ordering the Tarkin's Will to the Seventh Division's location near Elessia. Jumping to hyperspace, Zahra's fleet arrived at the Seventh Division's location and launched an attack on the rebels.
As the battle progressed, Zahra's forces were poised to overwhelm their enemies due to their superior numbers. However, when she inquired about the Fourth, Gorr informed her that the secondary force found the rebels gone. Zahra was about to reprimand Gorr when the Fourth Division's vessels emerged from hyperspace behind her fleet, intending to trap the Imperials in a pincer maneuver. Zahra remained unconcerned; intending to lead a boarding party, she ordered Gorr to prepare her shuttle. As Zahra, in her armor, prepared to depart, Gorr questioned the wisdom of leading a boarding party during the battle. Determined to face Organa, Zahra insisted it was a necessary risk and that only she could complete the mission. She noted that Gorr had been shadowing her since the start of the hunt, instructing him to follow her methods as she left.
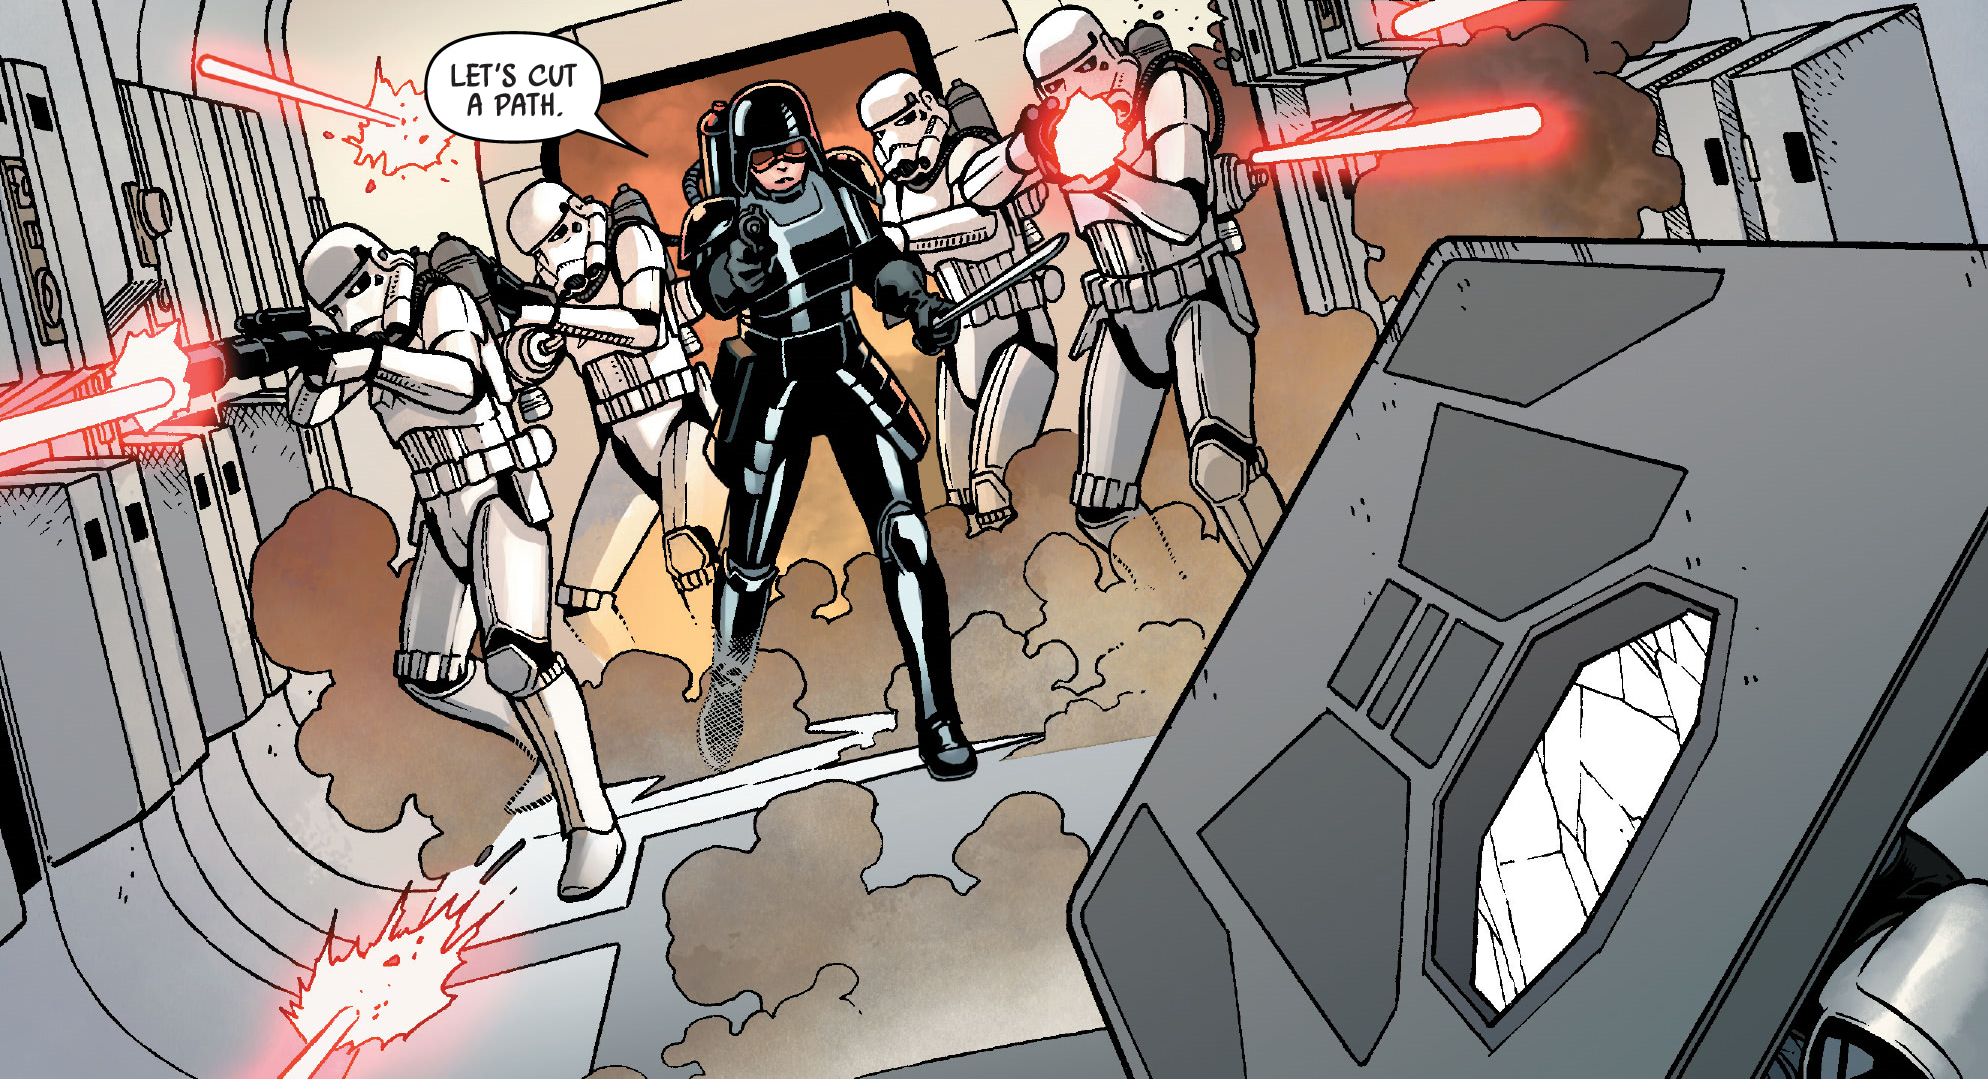
Zahra boarded her Sentinel-class landing craft with a squad of spacetroopers, launching from the Tarkin's Will. Heading for the EF76 Nebulon-B escort frigate that served as the Fourth Division's flagship, Zahra and her stormtroopers boarded the frigate, breaching its airlock. Zahra led the charge, cutting down rebel troopers with her blade and blaster, heading toward the vessel's engine room. Zahra disabled the safety controls on the main reactor, threatening the vessel with explosion within minutes. She contacted the frigate's commanders, stating that the vessel's destruction was not her goal; Zahra promised to reactivate the systems if Organa came alone—armed or not—to the engine room. Commander Grek questioned her intent, and Zahra claimed she only wanted to talk.
Confronting Organa
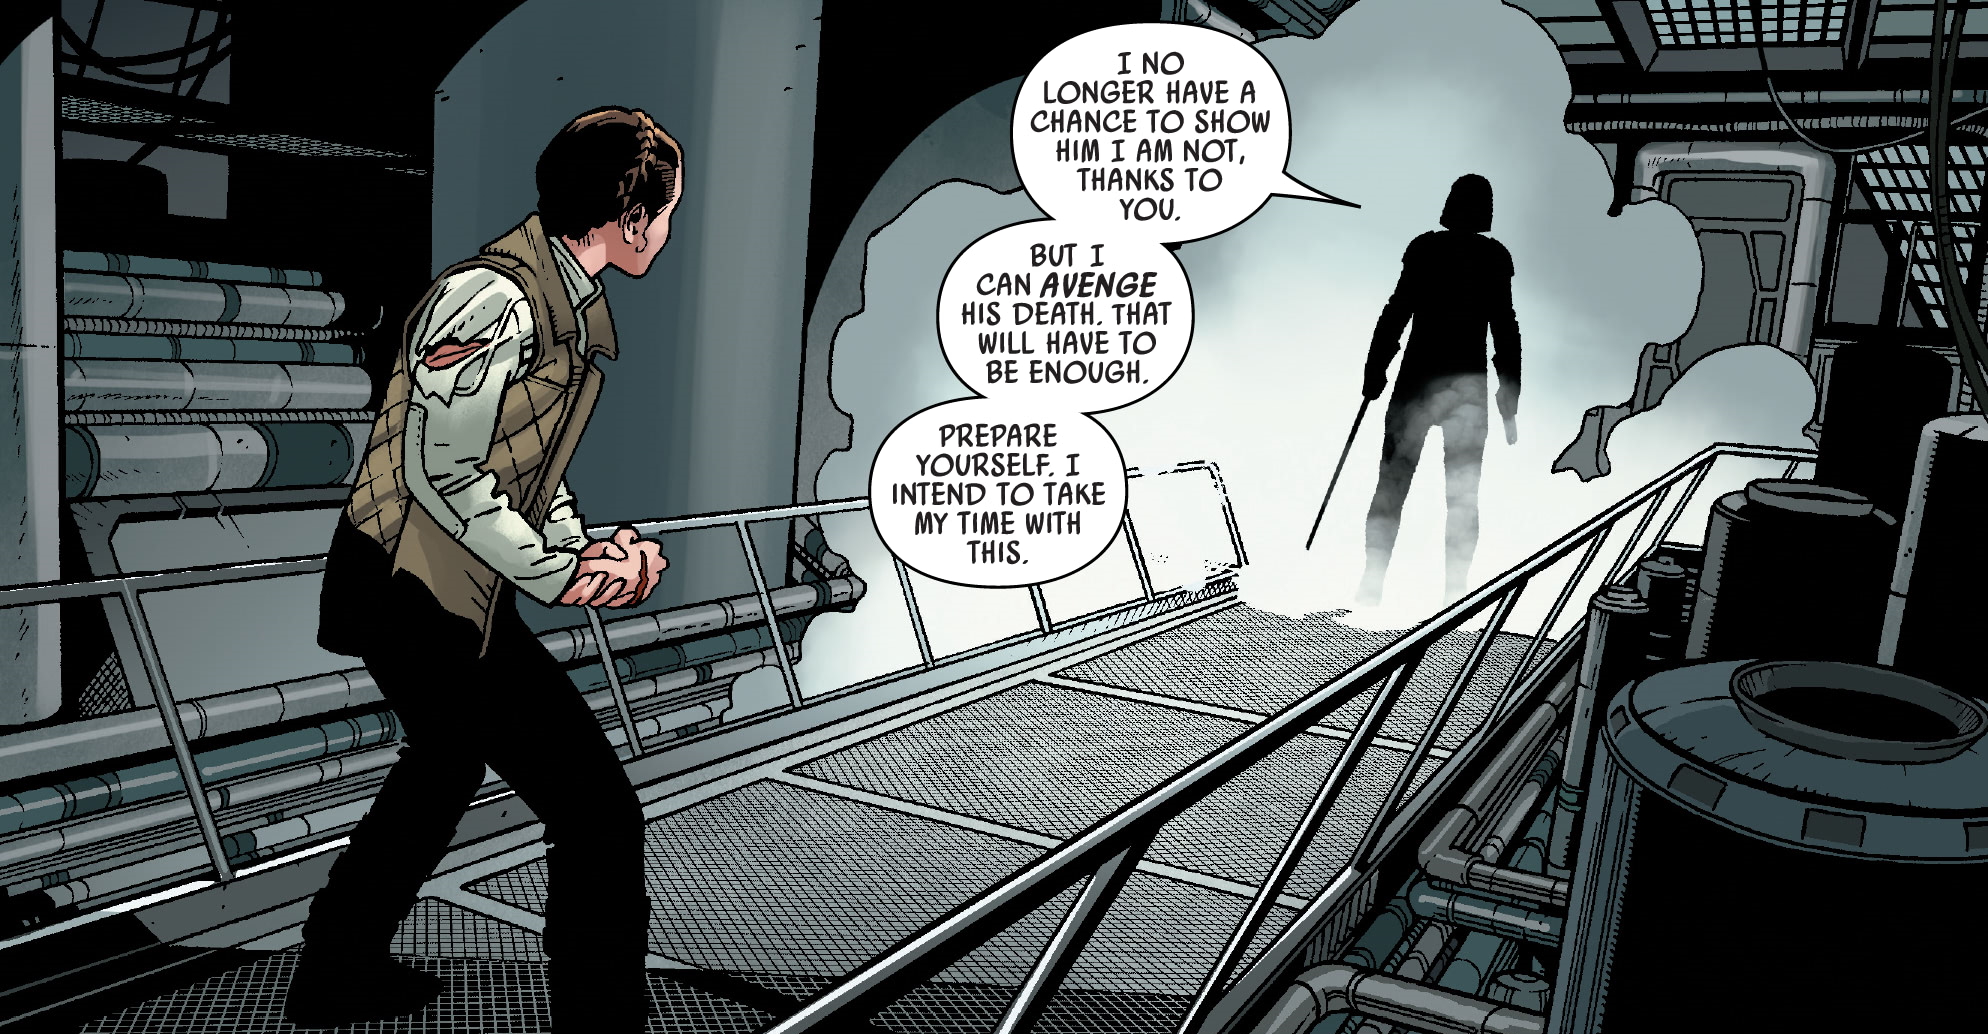
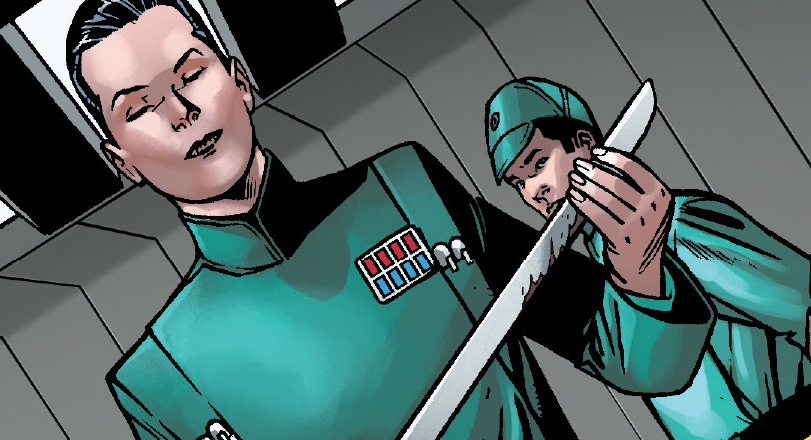
Despite knowing that Organa's compliance was entering a carefully laid trap by Zahra, Organa still proceeded. When the princess stepped into the engine room, Zahra immediately sabotaged the door's control panel with a blaster shot, effectively sealing off her escape route. Staying true to her promise, Zahra reactivated the reactor, then secured her blaster, stating Organa would be freed if she could reach the room's far exit while still alive. Concealed within the engine room's dim corners, Zahra, blade in hand, began to narrate her past to Organa, including the deaths of her family and her rise as Tarkin's apprentice. Organa, in response, attempted to target her unseen adversary. Upon hearing Tarkin's name, Zahra swiftly slashed Organa's arm with her blade. Zahra placed the blame for the Death Star's destruction and Tarkin's death squarely on the princess; as she described how her mentor died believing himself a failure, Zahra inflicted another cut on Organa's hand, causing her to drop her blaster. Despite Organa's near escape, the commander blocked her path, intent on exacting her revenge slowly and deliberately.
However, Gorr's communication interrupted Zahra, informing her that the two rebel divisions were proving too strong for the Imperial forces to handle. Gorr, preparing the Tarkin's Will for a jump to lightspeed, implored her to return to the Star Destroyer. Just then, Skywalker, having defeated Zahra's troopers, appeared behind her, his lightsaber ignited. Zahra told Organa to remember both her and her blade, warning that the princess would encounter them again. She then threatened Skywalker's life; however, due to Vader's plans for the Jedi, she was ordered not to kill him, so Zahra instead threw her blade past his head to distract him before leaping over him and kicking him in the back. Zahra then grabbed her blade and left the room, blasting a viewport with her blaster. Using her jetpack, Zahra escaped the frigate and flew into the hangar bay of the Tarkin's Will just before it departed.
Zahra spoke with Gorr in her office aboard the Star Destroyer. The commander expressed satisfaction with her actions, proudly displaying her blade stained with Organa's blood. Gorr was surprised, as he thought Zahra intended to kill the princess, but Zahra explained that Organa's death had to be carried out in the correct manner. Zahra believed that their confrontation on the frigate had a better outcome, confident that her adversary would never forget her or her blade. By robbing the princess of hope, Zahra was convinced that she had inflicted lasting damage to Organa's standing as a symbol of the Rebel Alliance. As Zahra predicted, Organa did indeed experience a period of hopelessness after her encounter with the Imperial commander.
The Alliance strikes back
Starlight in the darkness
Despite the rebel triumph at Elessia and the reunion of two Alliance Fleet divisions, Zahra and her forces continued their pursuit. The rebels, aiming to establish new encryption codes and reassemble their fleet, sought to create a system based on the extinct Trawak language, utilizing an ancient droid. The Rebellion dispatched its Starlight Squadron to the likely rendezvous points of the other divisions to distribute the new code. In the vastness of space near the Outer Rim planet Felucia, the rebels encountered Imperial probe droids, left by Zahra as a trap amongst the wreckage of the Sixth Division. Zahra, aboard the Tarkin's Will, subsequently ambushed the squadron.

In pursuit of the rebels, Zahra deployed TIE fighters from the Tarkin's Will to encircle them and prevent their escape. When Gorr inquired about ordering the TIEs to destroy the rebels, Zahra refused; recognizing the unique markings of Starlight Squadron, Zahra surmised that the starfighters had a specific mission and instead ordered the activation of the tractor beams, intending to capture the rebels. Starlight Squadron accelerated into the beam, destroying the generators after the Tarkin's Will lowered its shields to pull the fighters in. The rebels entered the Star Destroyer's bay, managing to seize control of the hangar before the Imperials could organize their forces. Upon Gorr informing her of the situation, an enraged Zahra commanded the lieutenant to order the retaking of the hangar.
While the rebels captured an Imperial astromech droid to replace their lost droids and perform the hyperspace calculations for their X-wings, Zahra's forces deployed All Terrain Scout Transports to the hangar. Although the rebels succeeded and escaped, Lieutenant Shara Bey, who had stayed behind to steal Imperial intelligence from the hangar's other astromechs, was trapped aboard the Tarkin's Will when her A-wing was destroyed. Reported as dead in the destruction, Bey managed to evade capture, and, unbeknownst to Zahra, remained hidden aboard the Star Destroyer, gathering Imperial intelligence.
The hunt continues
Shortly after the battle, an unusual transmission from the Tarkin's Will was detected—a message sent by Bey to the Rebellion. Zahra was unaware of the cause of the anomaly, but grew suspicious. After her encounter with Starlight Squadron, Zahra gave a briefing, describing the squadron as a special missions unit. The Imperial forces eventually located the rebels' Eleventh Division at Rendezvous Point Lambda-Four on the Outer Rim planet Ab Dalis. Admiral Kalaxo of the Star Destroyer Ultima II was dispatched to eliminate the division. When Starlight Squadron, accompanied by Skywalker, arrived on Ab Dalis to aid the trapped division, Lieutenant Bonnard suggested contacting Zahra, recognizing the squadron from the commander's briefing.
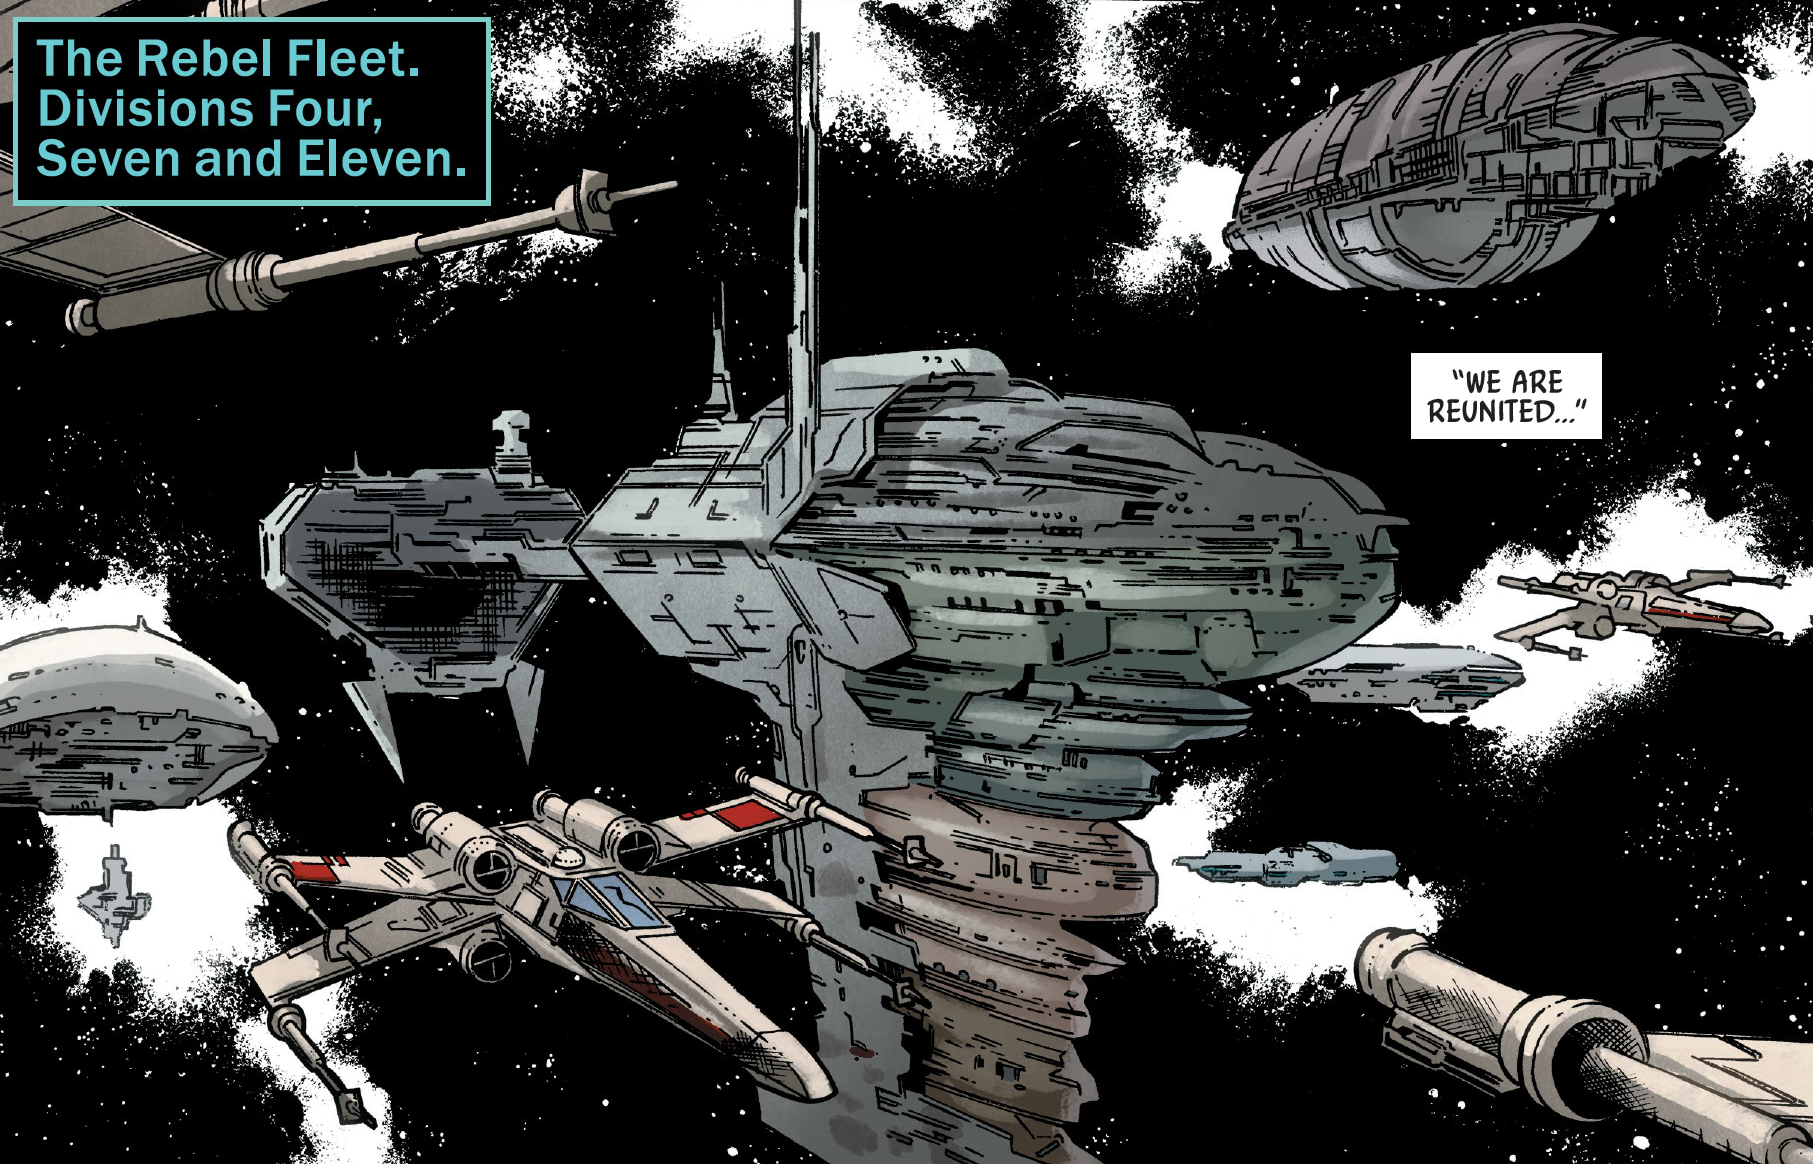
Kalaxo, confident in the Imperial forces' ability to defeat the rebels, intended to contact Zahra only after achieving victory. When the Ultima II breached the shield protecting the rebels' forward ground command post, Kalaxo ordered Bonnard to inform Zahra of their impending victory; however, the rebels destroyed the Ultima II, rescuing the Eleventh Division, including Alliance leader Mon Mothma. Although the rebel fleet reunited three divisions, Zahra continued her hunt for the remaining cells.
Catching a ghost
Unbeknownst to Zahra, Bey remained trapped aboard the Tarkin's Will for some time, sending Imperial intelligence to the rebel fleet. The pilot hid in the damaged sections of the Star Destroyer—where the internal sensors were non-functional—scavenging equipment from fallen bodies and wearing stormtrooper armor as a disguise. As the unauthorized datahub accesses and anomalous transmissions persisted, Zahra's suspicions grew, and she began to doubt Bey's supposed death with her A-wing. The commander tracked the anomalies, receiving reports from Gorr.
When Gorr informed Zahra of a discipline report filed by Warrant Officer Kronauer regarding a substandard stormtrooper whose designation—TK-510—prompted the lieutenant to check their records, Zahra correctly guessed that no trooper of that designation served aboard the Tarkin's Will. Despite Gorr's suggestion that the trooper might have lied, Zahra suspected the identity of their stowaway. Displaying holographic footage from the battle, Zahra explained her suspicions about the pilot's supposed death, deducing that Bey had been stealing Imperial secrets and living in the vessel's damaged sections to avoid detection. Holding up her blade, Zahra ordered Gorr to initiate a search, intending to hunt the pilot.
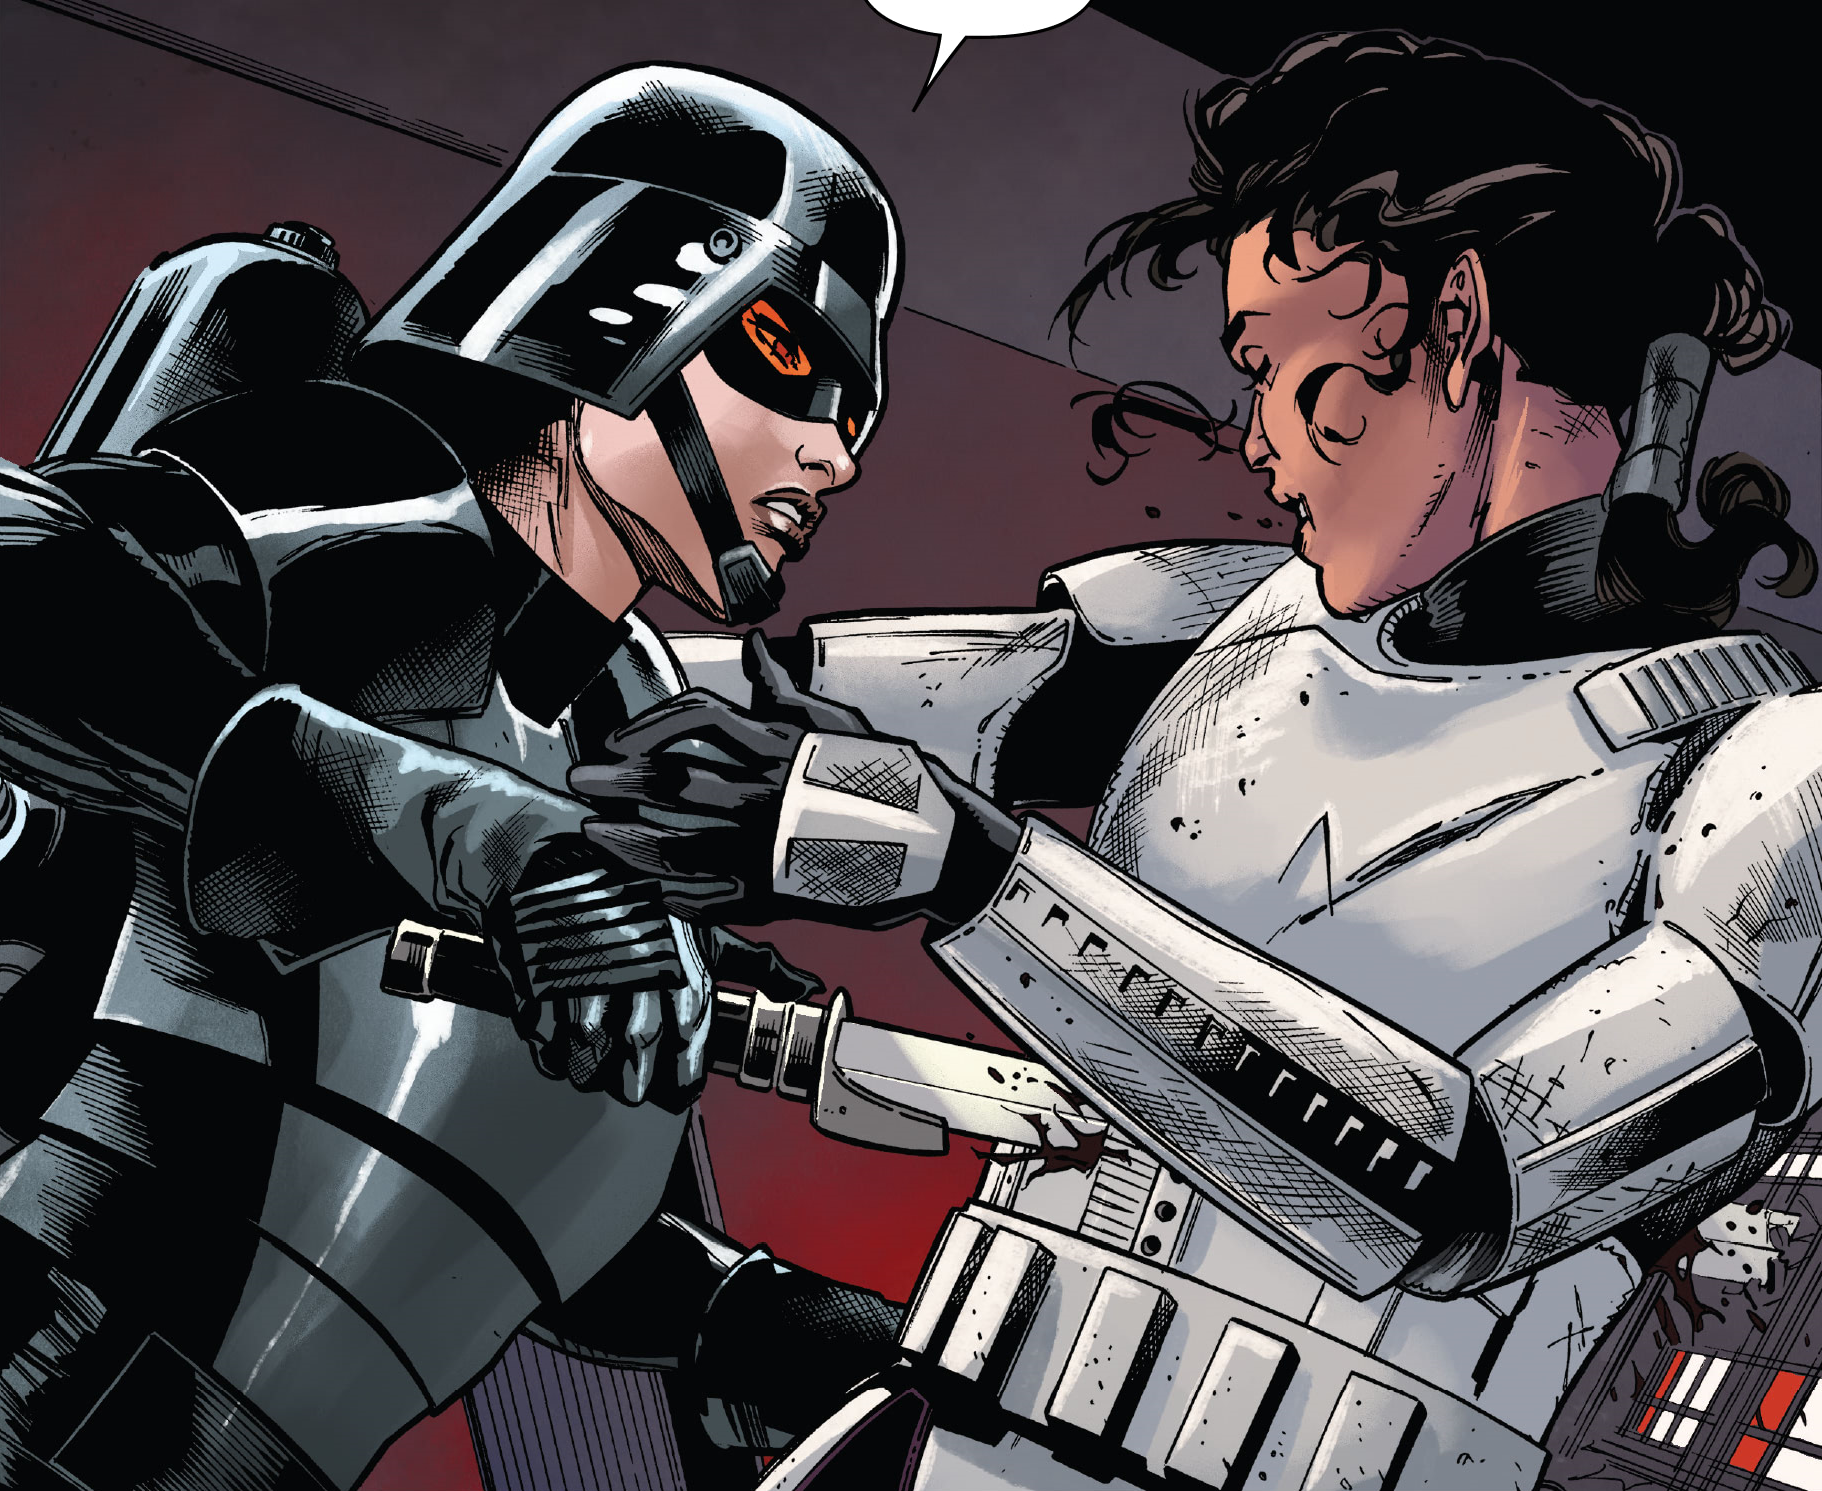
Bey, realizing she would be discovered before the rebels could rescue her, initiated her own escape plan; she sabotaged a Lambda-class shuttle so it would be transferred for maintenance to the auxiliary hangar, making it easier to steal. Zahra, however, noticed the unexpected maintenance schedule for the shuttle, connecting it to the stowaway. Equipped with her armor and blade, she deactivated the shuttle and waited for Bey. When the rebel pilot attempted to steal the vessel, Zahra confronted her. The commander deflected Bey's blaster shots before slicing through the barrel of her weapon, remarking on the pilot's overconfidence but commending her on surviving for so long. Zahra stabbed Bey through the chest with her blade, declaring that the pilot would tell her about her time aboard the Star Destroyer—among many other things.
Failure on Panisia
Zahra's efforts against the rebels culminated in failure during the Battle of Panisia, which resulted in the destruction of the Tarkin's Will. On the planet's surface, Zahra again confronted Organa, who explained the differences between the Empire's and the rebellion's methods of fighting. Zahra was left for dead in a cave. She was left with scars across the right side of her face, neck, and at least a portion of her upper body, and Zahra also lost her right arm and leg, which were replaced with cybernetics. She joined a raider faction and desired revenge against Organa.
Legacy
The historian Beaumont Kin examined various files in the Imperial Archives concerning Zahra and eventually mentioned her in his book The Rise and Fall of the Galactic Empire in 35 ABY. Briefly documenting Zahra's career during her time as Tarkin's protégé and the period after his death, Kin included her as one of the individuals who presented a challenge for Grand General Tagge in the aftermath of the Battle of Yavin. Kin noted Tagge's apparent dedication to keeping her at a distance, suggesting he saw Zahra as a threat to the fragile balance he hoped to maintain within the Imperial forces.
Personality and traits
Servant of the Empire

A cunning and vengeful commander, Zahra was deeply committed to serving the Empire, despite her past setbacks. Having lost her family in a rebel attack and being alone for a time, Zahra had a cynical outlook on life, believing in its inherent unfairness and viewing things realistically rather than with optimism. Zahra joined the Imperial Academy to prevent others from experiencing her suffering. In serving the Empire, Zahra believed that the regime brought order, which in turn created peace. She always considered her resources broadly, exploring all potential uses. Zahra trusted droids—incapable of betrayal—more than organic operatives. During her time on Kessel after her reassignment, Zahra was disillusioned, believing that no one cared about someone like her.
Zahra viewed the Death Star as the Emperor's greatest attempt to maintain peace in a troubled galaxy, considering its destruction a tragic massacre of loyal Imperial subjects. After being chosen to lead the hunt for the rebel fleet, Zahra honored those who died on the Death Star by taking command of the Fortitude, a Star Destroyer damaged in the superweapon's destruction, and assembling a crew comprised solely of those who had lost someone on the station. She intended the Tarkin's Will to be an instrument of vengeance, believing the rebels would come to know and fear it, and criticized Gorr for being ignorant of the Star Destroyer's history and significance.
Zahra was willing to do anything to destroy the Rebel Alliance, which she considered terrorists and traitors. She believed the rebels succeeded in destroying the Death Star due to luck and sabotage. Zahra admired the destruction of the rebel fleet, finding the sight beautiful, and reveled in destroying a fleeing rebel. She considered Luke Skywalker arrogant, but noted that he was surpassed by Shara Bey's futile escape attempt from the Tarkin's Will. However, Zahra was impressed by Bey's survival and was pleased to capture the stowaway herself, believing it a more dignified outcome. When she failed to prevent the survivors of the Fourth Division from escaping, Zahra became angry at Lieutenant Gorr for stating the obvious, but confidently maintained to Vader that the operation was partially successful. She disliked repeating orders to her crew. Zahra had black hair, blue eyes, and light skin.
Tarkin and Organa

As Tarkin's protégé, Zahra was close to her mentor and valued their relationship. She was grateful for his support and guidance, believing she would not be who she was without him. Zahra was determined to never fail her mentor. When Tarkin scorned her after her failed mission on Ikkrukk, Zahra initially struggled to accept the rejection, determined to prove herself, although she understood his disappointment. She assumed Tarkin intended her to learn from his dismissal and would offer her a chance to regain his trust. After losing Tarkin in the Death Star's destruction, Zahra, unable to redeem herself, was angered that her mentor died believing her a failure.
Zahra held Leia Organa solely responsible for the destruction of the Death Star and Tarkin's death, vowing to kill her to avenge her mentor. She had a deep hatred for Organa, wanting the princess to feel the pain she had felt. Wishing to cut Organa's throat in revenge, Zahra became intent on hunting the princess. She extensively studied the Empire's files on Organa to learn about her target. Zahra was reluctant to relinquish an opportunity to hunt Organa and was willing to take risks to exact her revenge. She felt her vengeance on Organa had to be done correctly, wanting to take her time. Although Zahra couldn't kill Organa during their first confrontation at Elessia, she was satisfied with stealing her hope, believing the princess would never forget her desire for revenge.
Skills and abilities

Showing significant potential and achieving impressive results during her time at the Imperial Academy, Zahra became a skilled tactician and commander through Tarkin's instruction, crediting her mentor for teaching her everything. Her crew aboard the Tarkin's Will praised her as an unstoppable hunter. She developed tactics used in battle, such as using a turbolaser cordon to blockade an enemy fleet against a celestial body. Zahra also created a unique method of using probe droids to form a surveillance network. She was willing to disregard the standard procedures of the Imperial tactical manual. When encountering Starlight Squadron, she deduced its importance based on its fighter's insignia. Zahra claimed to know everything occurring aboard the Tarkin's Will and eventually determined Bey's presence on her vessel.
Zahra was a skilled fighter with both her blaster and blade, her preferred weapon. She defeated a deadly veermok and her fellow students of Tarkin during his test on Eriadu. During her confrontation with Organa on the frigate, Zahra struck with her blade from the darkness, unseen by her foe. She manually controlled her Star Destroyer's guns, proving more effective than the automated targeting during the battle against the Fourth Division. Zahra could pilot starships, such as the Lambda-class shuttle.
Equipment
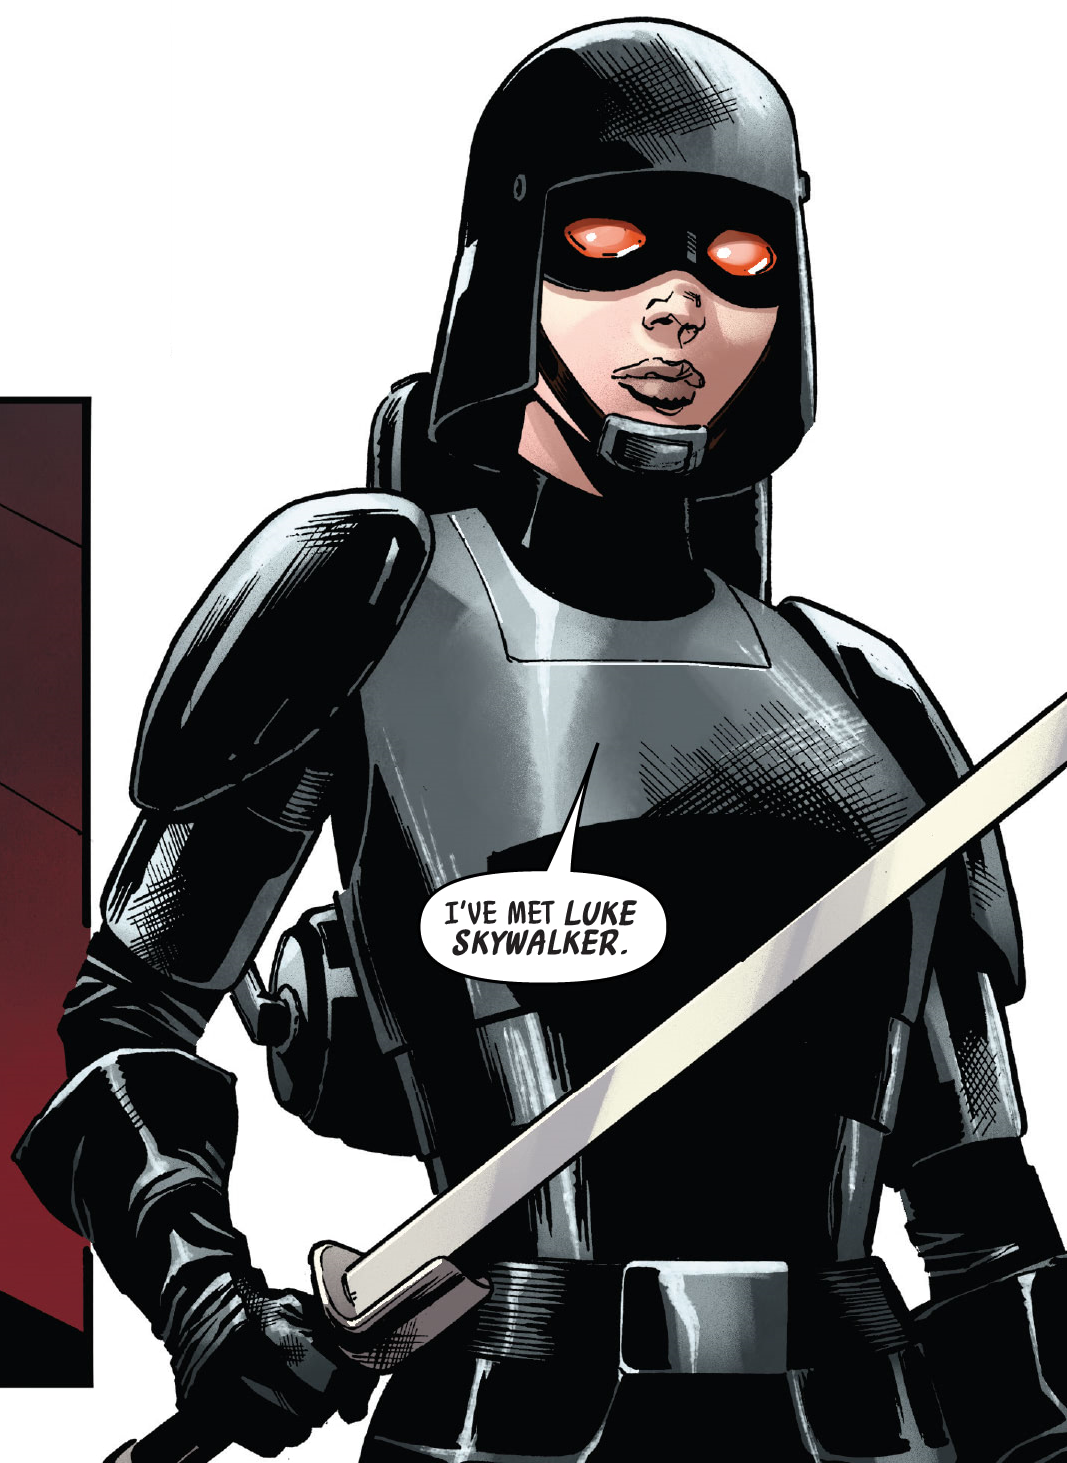
Zahra possessed black-colored armor for battle. The armor—featuring a helmet with goggles, a rebreather, and a jetpack—could deflect blaster bolts. Zahra wielded a blade, which she intended to use to kill Organa. She also carried a blaster.
As an officer of the Galactic Empire, Zahra wore a standard green Imperial military uniform, featuring a rank insignia plaque and code cylinders. During her early time as Tarkin's protégé, Zahra wore a plaque with two red squares above two blue; as a Lieutenant Commander and Commander, her plaque featured four red squares above four blue. She sometimes wore a cap with an officer's disk during her time under Tarkin's tuition, but not as a commander. On Eriadu, Zahra wore a brown cloak over her officer's uniform. During the hunt, she fashioned a stone dagger, as well as a wooden crutch. While on Ikkrukk, Zahra wore a black longcoat.
In her hunt for the rebel fleet, Zahra commanded the Tarkin's Will, an Imperial-class Star Destroyer formerly known as the Fortitude, which had been severely damaged in the destruction of the Death Star. She chose not to repair the damage, keeping it as a memorial. Zahra kept an office aboard the Tarkin's Will, displaying weapons, including her blade and the stone dagger from Eriadu, and trophies, such as mounted creature heads. During her mission to Ikkrukk, Zahra used the Carrion Spike, Tarkin's vessel. She also commandeered a Lambda-class shuttle shortly before the Death Star's destruction. When boarding the rebel frigate at Elessia, Zahra used a Sentinel-class landing craft.
Behind the scenes
Ellian Zahra was introduced in the first issue of the 2020 Star Wars comic series, written by Charles Soule, illustrated by Jesús Saiz, and published by Marvel Comics on January 1 of that year. Her forename was provided in the series' eighth issue, also written by Soule and published on November 4, 2020. Before the comic's release, Zahra was first mentioned in an article on Marvel's website covering the series' announcement on October 2, 2019. In the series' first issue, Commander Zahra's uniform is depicted with a plaque featuring three red and three blue squares, although later issues depict her plaque with four squares of each color.