Operation Starlight
Operation Starlight was a mission undertaken by the Rebel Alliance, aiming to bring the scattered Alliance Fleet back together after the Battle of Hoth had dispersed it. However, each attempt to reunite the fleet exposed the Rebellion to the Empire, as their transmissions were being deciphered, leading to the destruction of rebel units. Consequently, the Alliance sought new, unbroken codes to facilitate the fleet's assembly. Commander Grek of the Fourth Division drew inspiration for the operation's name from the Starlight Beacon, a navigational station established during the High Republic Era.
The Pathfinders of the Fourth Division devised a strategy to steal a vintage Autonomous Translator Module, Mark II droid from the Imperial Museum located on the Imperial capital Coruscant. This particular droid possessed the capability to translate the Trawak language, a code the Imperials had yet to crack. Following their infiltration of the museum, the Pathfinder Needle created a diversion, allowing Kes Dameron and Frell to discreetly enter the curator's gallery and pilfer the translator droid. Despite Needle's death during the operation, the Pathfinders successfully delivered the droid to the Rebellion.
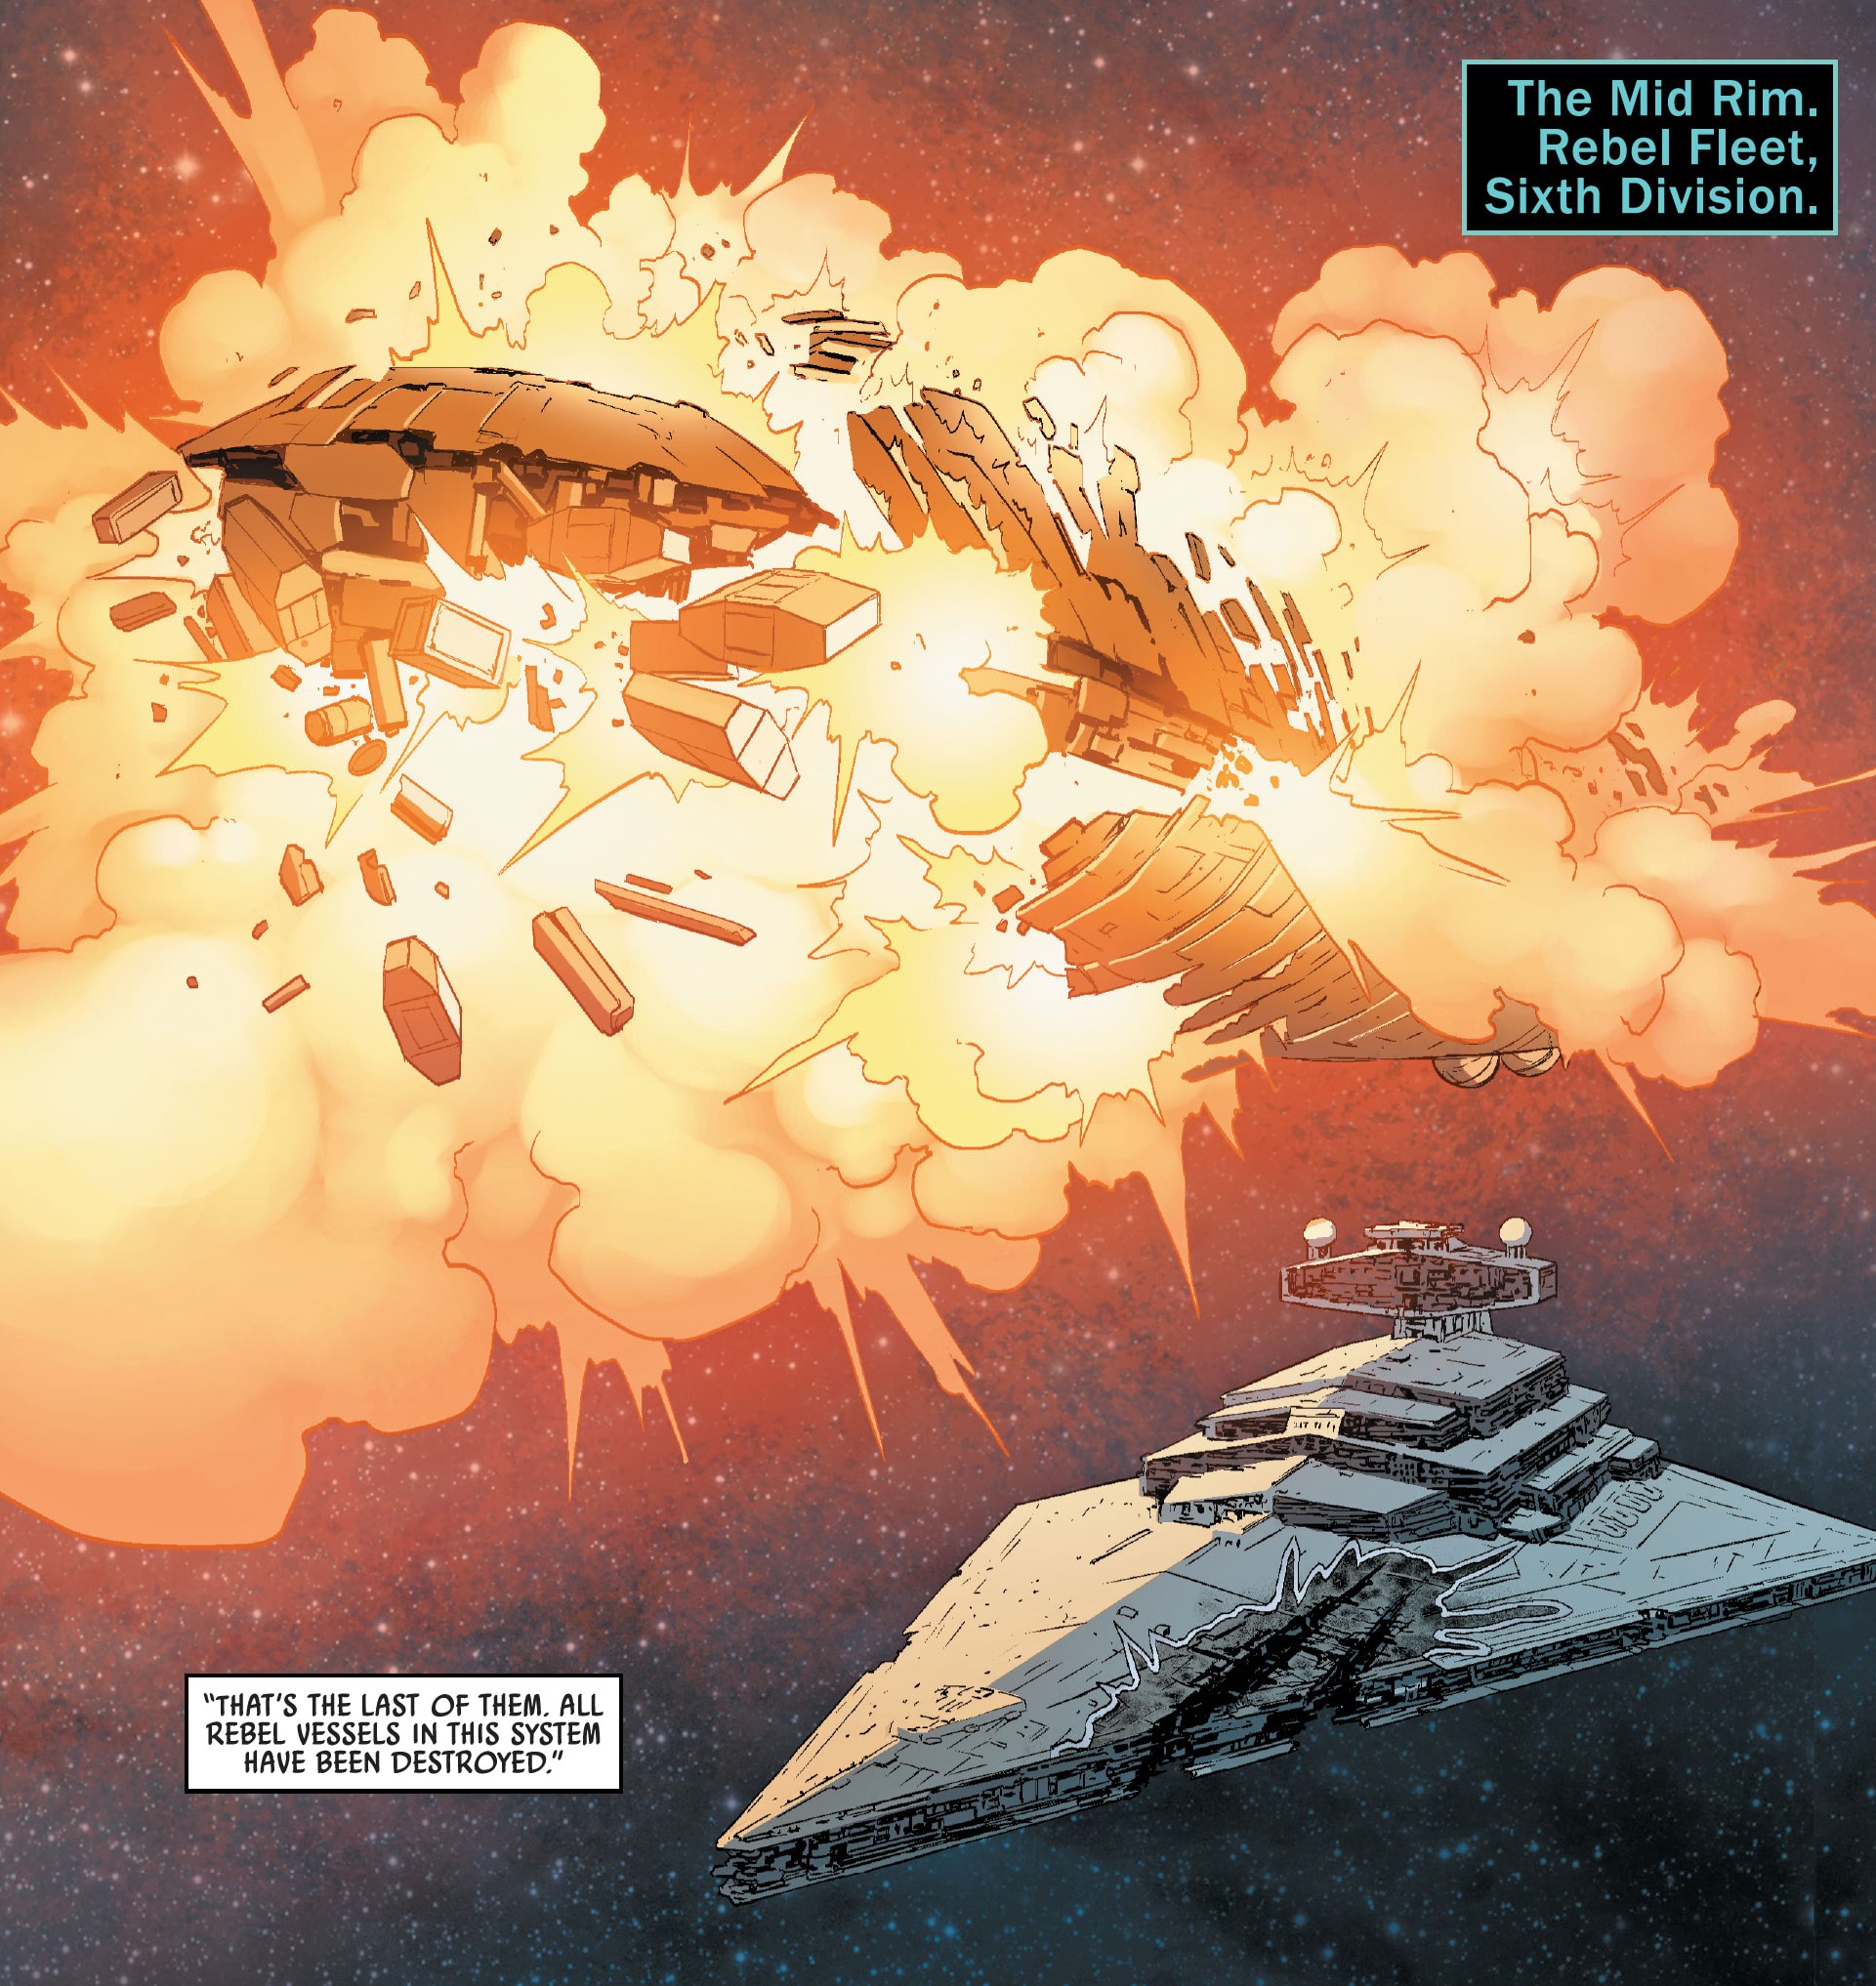
After some difficulty, the rebels managed to get the droid to translate the codes into the Trawak language. These codes were then entrusted to Starlight Squadron, tasked with delivering them to the Sixth Division. However, upon the squadron's arrival near Felucia, they discovered that the Sixth Division had been annihilated. Imperial probe droids attempted to extract the codes stored within the rebel pilot's astromech droids, but the pilots destroyed their astromechs to prevent this. Starlight Squadron was subsequently ambushed by the Tarkin's Will, commanded by Imperial Navy Commander Ellian Zahra. During the ensuing battle, Starlight Squadron destroyed numerous hangar bays on the Star Destroyer, but Starlight Leader Shara Bey was shot down, forcing her to remain behind as the rest of the squadron narrowly escaped.
In dire need of a victory, Skywalker joined Starlight Squadron as they responded to a distress signal originating from the Eleventh Division on the planet Ab Dalis. The Eleventh Division found itself trapped by the Imperial Star Destroyer Ultima II and under siege from ground forces. As Starlight Squadron engaged the TIE fighters, Skywalker received coordinates to target the planet's surface beneath the Ultima II. Although Skywalker's initial shot missed, the remaining members of Starlight Squadron successfully destroyed the target, triggering a volcanic eruption that obliterated the Ultima II. Rebel leader Mon Mothma expressed her gratitude to the squadron for the rescue. The rebel fleet would later converge for the Battle of Panisia.
Prelude
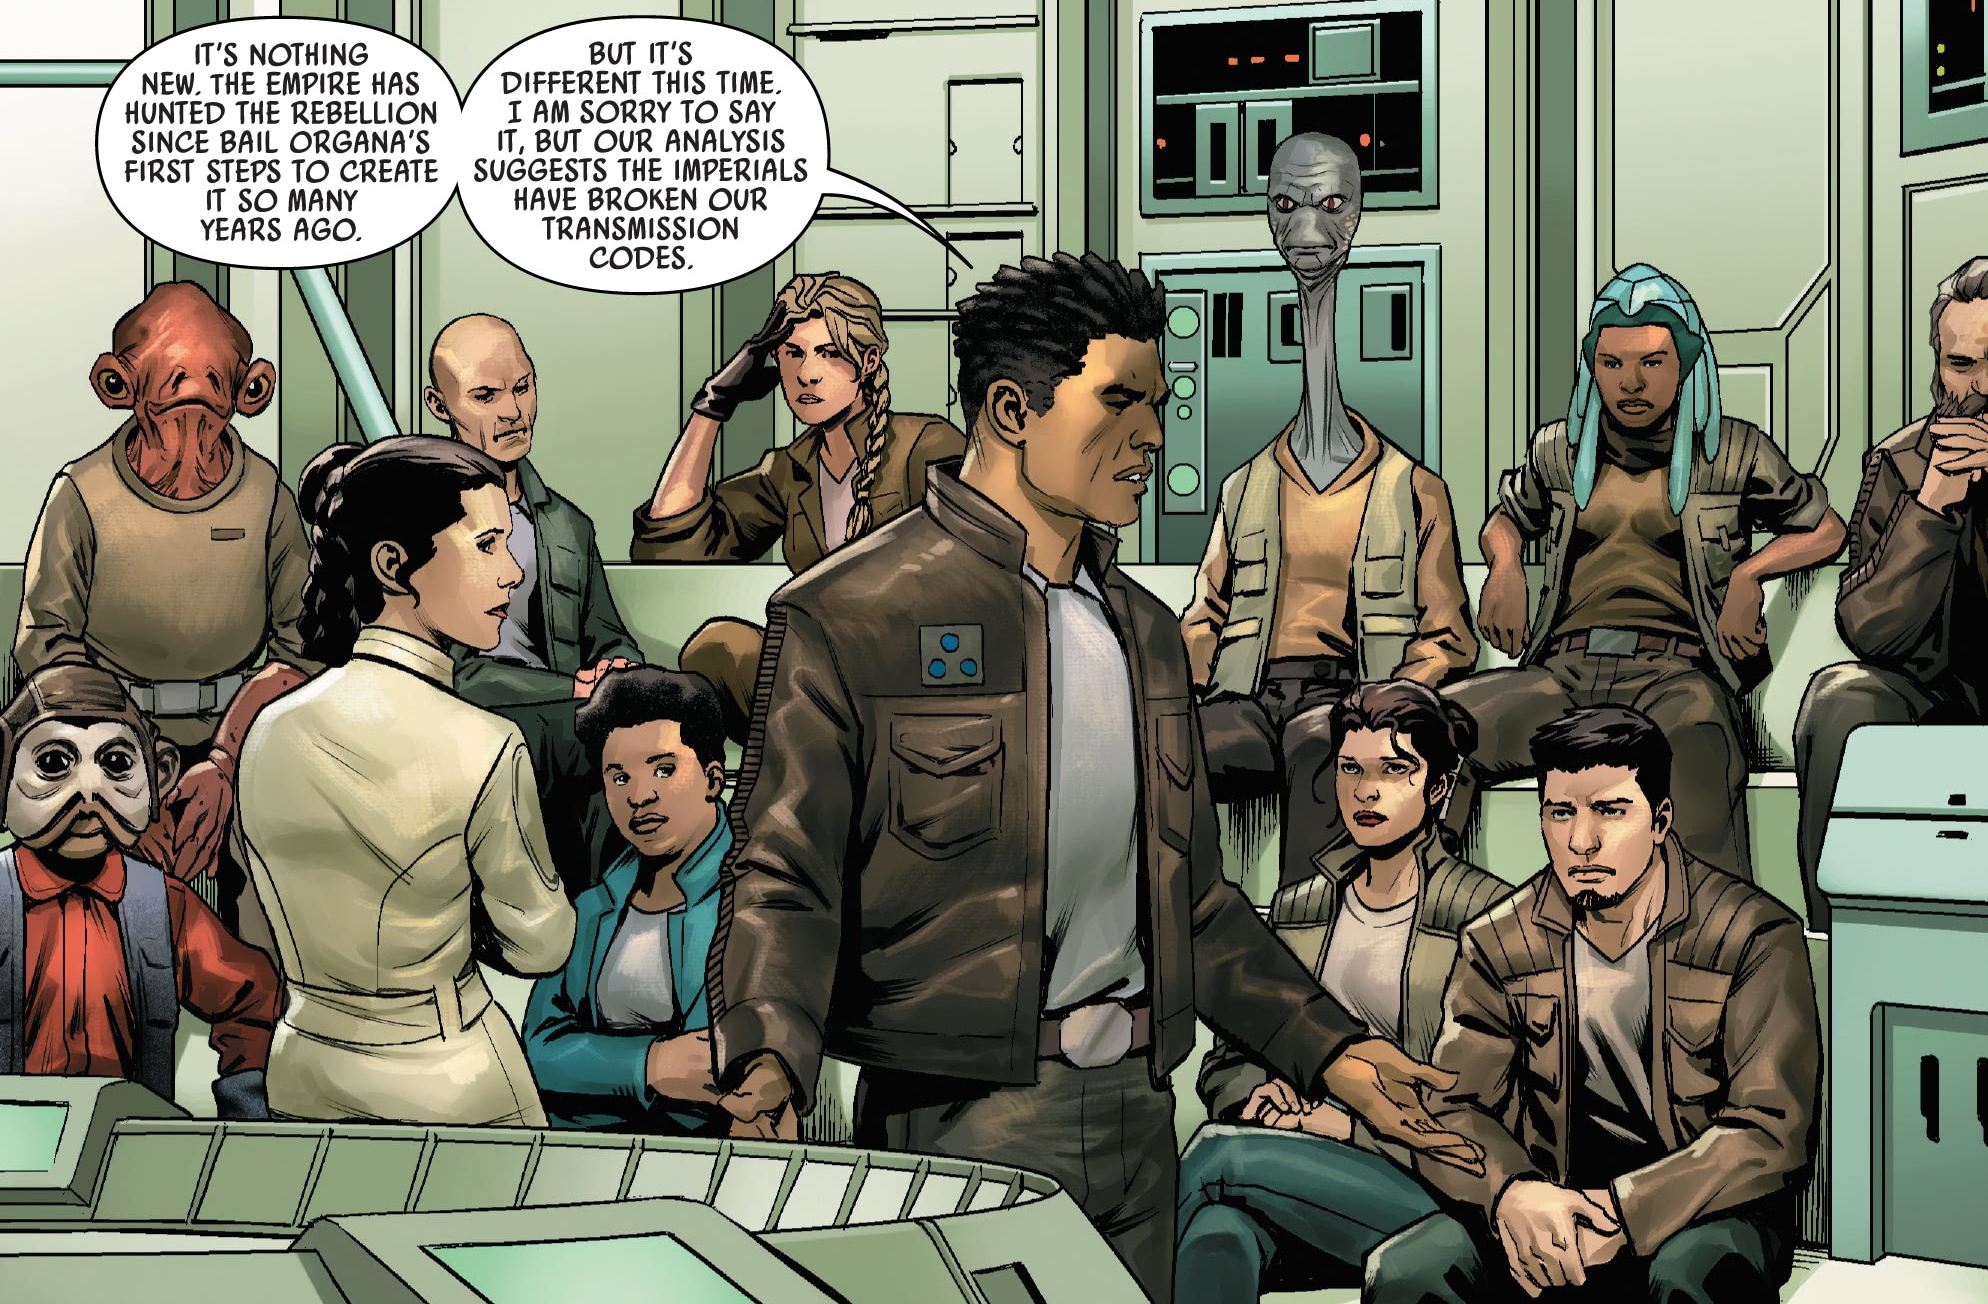
Following the defeat of the Alliance to Restore the Republic at the Battle of Hoth in 3 ABY, the Rebel Alliance Navy dispersed to various pre-arranged locations across the galaxy. This measure was taken to prevent the Galactic Empire from locating the entire fleet. The original strategy involved sending coded messages between divisions to gradually reunite the fleet, but the Empire deciphered these codes using a signal analysis protocol, allowing them to intercept the signals and eliminate the divisions. Princess and General Leia Organa and the Fourth Division faced a dilemma: either await contact from rebel leaders or proactively address the issue themselves. Organa's fellow rebels were determined to rescue the rest of the Rebel Fleet.
Imperial Navy Commander Ellian Zahra was tasked by Sith Lord Darth Vader with hunting down the Rebel Fleet's divisions, utilizing any necessary resources, given her skill comparable to her late mentor, Grand Moff and Governor of the Outer Rim Territories Wilhuff Tarkin. Zahra commanded her Hunter Fleet from the Tarkin's Will, a Star Destroyer initially named the Fortitude that sustained damage during the Battle of Yavin. During an attack on the Fourth Division at Rendezvous Point Delta-Three, Zahra attempted to blockade and annihilate the division, but her plan faltered when the starships managed to escape.
Following the battle, the remaining Rebel Alliance forces convened to discuss their next steps. Commander Grek then presented a new rebel plan. Grek's concept was inspired by the Starlight Beacon space station from the High Republic Era. He shared the history of Starlight Beacon with the rebels and proposed using the space station's inspirational impact on the galaxy as the foundation for the new rebel operation, naming it "Operation Starlight." After being rebuked by Vader for her initial failure, Zahra located and destroyed the Sixth Division of the rebel fleet, although she failed to uncover any new leads on the locations of other divisions, she remained confident due to her various plans in motion.
Zahra intercepted a transmission between the Seventh Division and the Fourth, leading her Imperial forces to Elessia to eliminate the rebels. She led a boarding party onto General Organa's EF76 Nebulon-B escort frigate Redemption and confronted her. However, before she could exact revenge on Organa, whom she blamed for the loss of Governor Tarkin when the Death Star was destroyed, Zahra was intercepted by her mentor's killer and Lord Vader's son, Jedi Commander Luke Skywalker. Zahra managed to escape but sustained injuries. Meanwhile, following the establishment of Operation Starlight, Starlight Squadron was formed and prepared for their first mission the following day.
Operation Starlight
Heist at the Imperial Museum
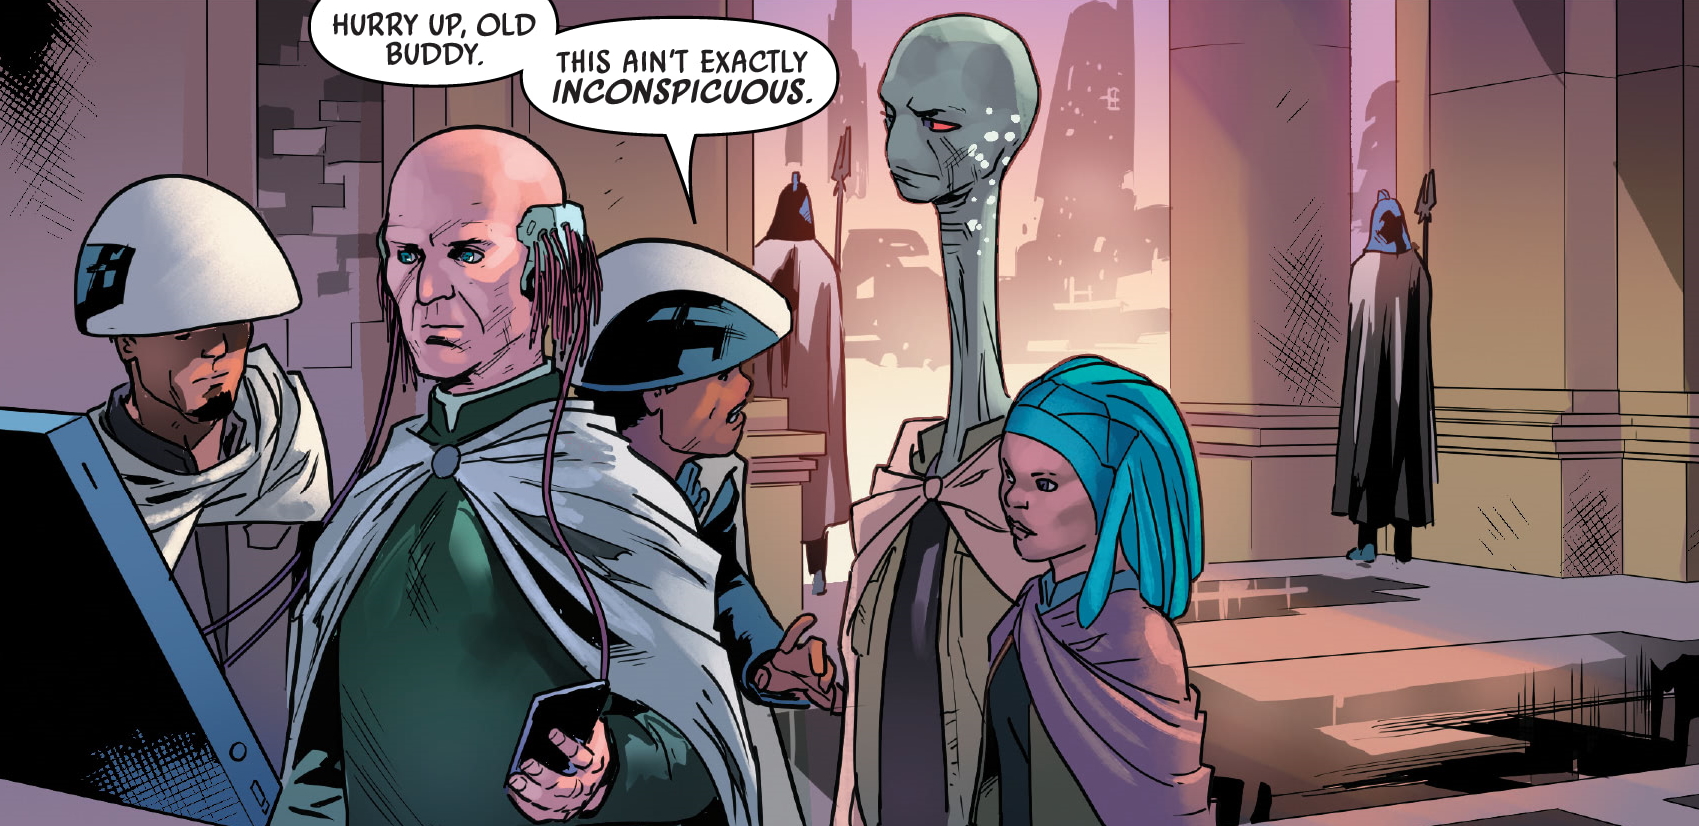
Given the Hunter Fleet's ability to decipher the Rebel Fleet's transmission codes, preventing communication with other Rebel Alliance divisions without alerting Zahra's forces, Organa's protocol droid C-3PO proposed using the extinct Trawak language to create an unbreakable code. This language incorporated ultrasonics, environmental sounds, and air-mouth interactions for communication. The last remaining source of this language was a Autonomous Translator Module, Mark II, which the rebels planned to steal. The only remaining droid of this type was housed in the Imperial Museum on the Imperial capital Coruscant. Although Skywalker desired the mission, Organa assigned it to the Pathfinders, knowing that Vader's Master, the Galactic Emperor and Sith Lord Sheev Palpatine, would sense his presence upon arrival. The Pathfinders, Sergeant Kes Dameron, Frell, and Needle, were joined by Lando Calrissian and Lobot for the operation.
After successfully evading the Imperials aboard Calrissian's old ship, the Millennium Falcon, the group assembled outside the museum. Calrissian preferred to remain on the starship with Lobot, but Dameron informed him that Lobot would participate in the heist. Once inside, Lobot would hack into the museum's databank to locate the droid. Calrissian reluctantly agreed to join the Pathfinders, not wanting to leave Lobot behind. Inside the museum, Lobot connected to the databank and successfully pinpointed the droid's location. Dameron and Frell decided to steal the droid from the curator's private gallery. Calrissian deemed the Pathfinders insane, but Needle agreed to create a diversion while Dameron and Frell infiltrated the curator's gallery.
Shortly after, Needle initiated a commotion over a holy relic that he believed belonged to his people. He attracted the attention of the staff, who summoned the curator to address Needle. The remaining Pathfinders used this time to sprint to the curator's private gallery as he departed to handle Needle. Dameron and Frell confronted the Museum guard, who ordered them to leave immediately.
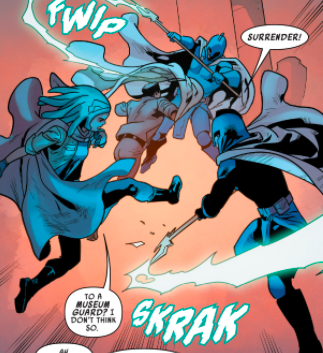
Dameron and Frell then engaged the guards in combat, while Needle continued to distract the curator. The curator attempted to reason with Needle, arguing that the relic was safer in the Imperial Museum under the Empire's superior protection. Needle grew increasingly angry and refused to leave, even if it meant being shot. The curator assured him that he would not have him shot on the spot. Dameron and Frell neutralized the guards, but more time was needed to break in. Dameron requested Needle to buy the Pathfinders more time for Lobot to breach the doors.
Aware of the potential for death, Needle destroyed his comlink and initiated a chase with the curator and his guards to provide the rebels with time. Needle managed to evade the guards but was eventually apprehended, protesting the Empire's ideology. The curator caught up and accused Needle of thieft, a crime punishable by death. Needle was subsequently killed, but he bought the rebels sufficient time to steal the translator droid.
Back at the Fourth Division, C-3PO attempted to activate the droid, but its memory banks had been corrupted, rendering it unable to speak the Trawak language. Dameron and the other rebels were angered and concerned by the situation, as 3PO admitted he had no idea how to fix it.
Imperial ambush near Felucia

Following a struggle to activate the translator droid, it agreed to assist the rebels. After the droid translated the codes into Trawak, the new codes were entrusted to Starlight Squadron, who received a briefing from General Organa regarding a mission to deliver the code to other divisions. The rendezvous points were stored within the pilot's astromech droids, placing the fate of the Rebel Alliance in the pilots' hands.
The squadron soon arrived near the planet Felucia, where the remnants of the Sixth Division lay. The rebel pilots investigated the wreckage, searching for survivors but finding none. As Commander Wedge Antilles detected signals, the starships were attacked by Imperial Viper probe droids, which latched onto the pilots' astromechs. The probe droids then began drilling into the droids to access the codes.
The Fourth Division lost contact with Starlight Squadron, leading General Organa to realize it was a trap. Back near Felucia, the astromechs temporarily resisted the probe droids as the pilots devised a solution. Antilles suggested shooting off the probe droids, but the idea was dismissed. Dameron's wife and Starlight Leader Lieutenant Shara Bey ordered the pilots to self-destruct their droids and eject their astromechs into space, despite the droids holding the coordinates to return to their allies. Bey believed this was preferable to allowing the Empire to obtain the droids' data and learn the locations of the surviving divisions. She planned to have the A-wings share their nav data with the X-wings to facilitate their escape from Felucia as a team. The pilots successfully destroyed their droids but were then ambushed by the Imperial-class Star Destroyer, Tarkin's Will, which had finally tracked down the rebels.
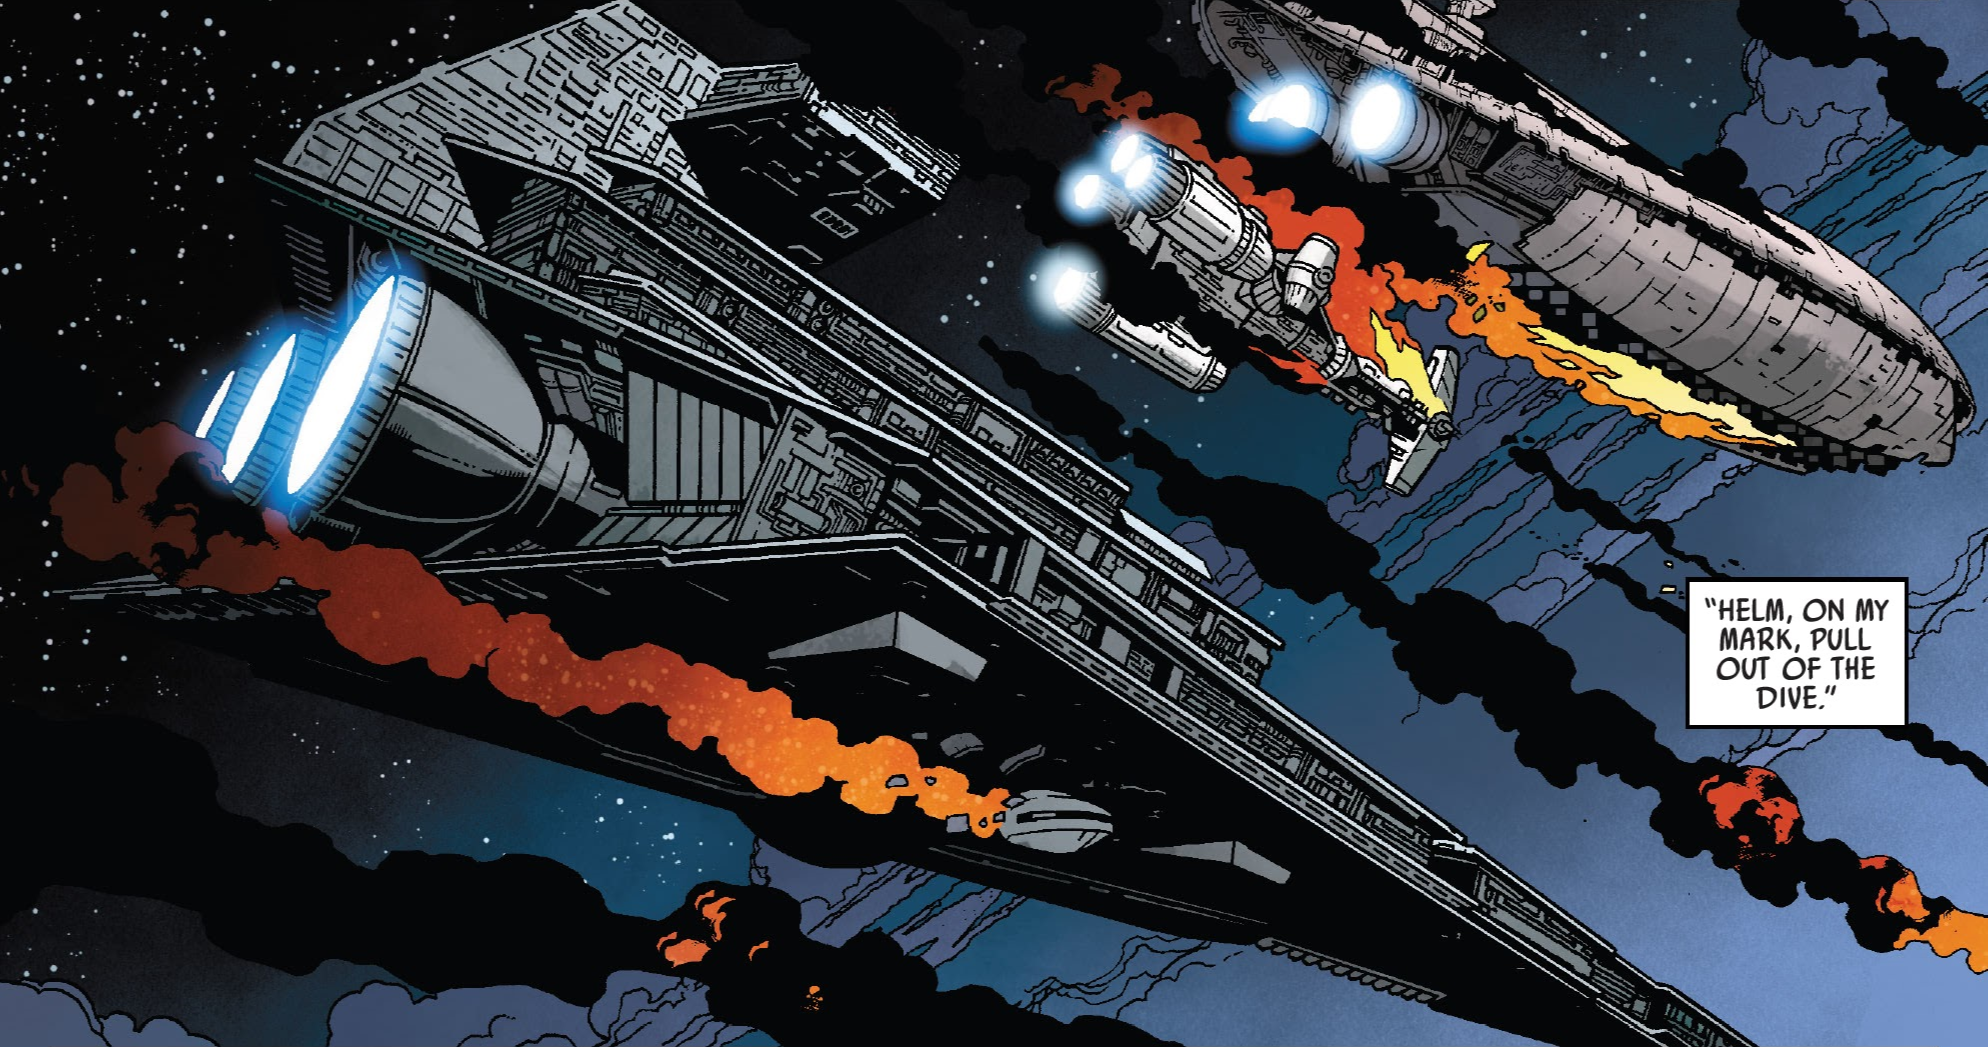
The Tarkin's Will deployed its TIE fighters, initiating a dogfight with Starlight Squadron. During the combat, rebel pilot Captain L'ulo L'ampar realized that the TIE fighters were not attempting to kill them but rather blocking the squadron's escape, as Zahra sought to uncover their mission. Suddenly, the ships began to be pulled into the Star Destroyer by tractor beams. As the starfighters were being beamed aboard, Antilles formulated an escape plan and ordered the ships to engage full throttle. They broke free of the tractor beams, attacked the ship, and destroyed the tractor beams while the shields were down. Starlight Squadron then bombarded the hangar bays to prevent TIE Fighters from launching.
Antilles, Bey, and Freyta Smyth then abandoned their starships and located Imperial astromech droids that would enable them to perform the necessary nav calculations to return home, as the A-wings' computers had been fried during the destruction of the tractor beams. The rebels seized an astromech droid as Bey provided cover for their escape, but her A-wing was destroyed during the battle, forcing her to remain behind as the rest of the squadron departed. Starlight Squadron managed to contact the Fourth Division and report the mission's failure before regrouping and reporting their theft of the astromech, which contained extensive nav data. Leia planned to use this data for Operation Starlight and to track down Commander Zahra's command ship before she could inflict further damage on the Rebel Fleet.
Battle of Ab Dalis
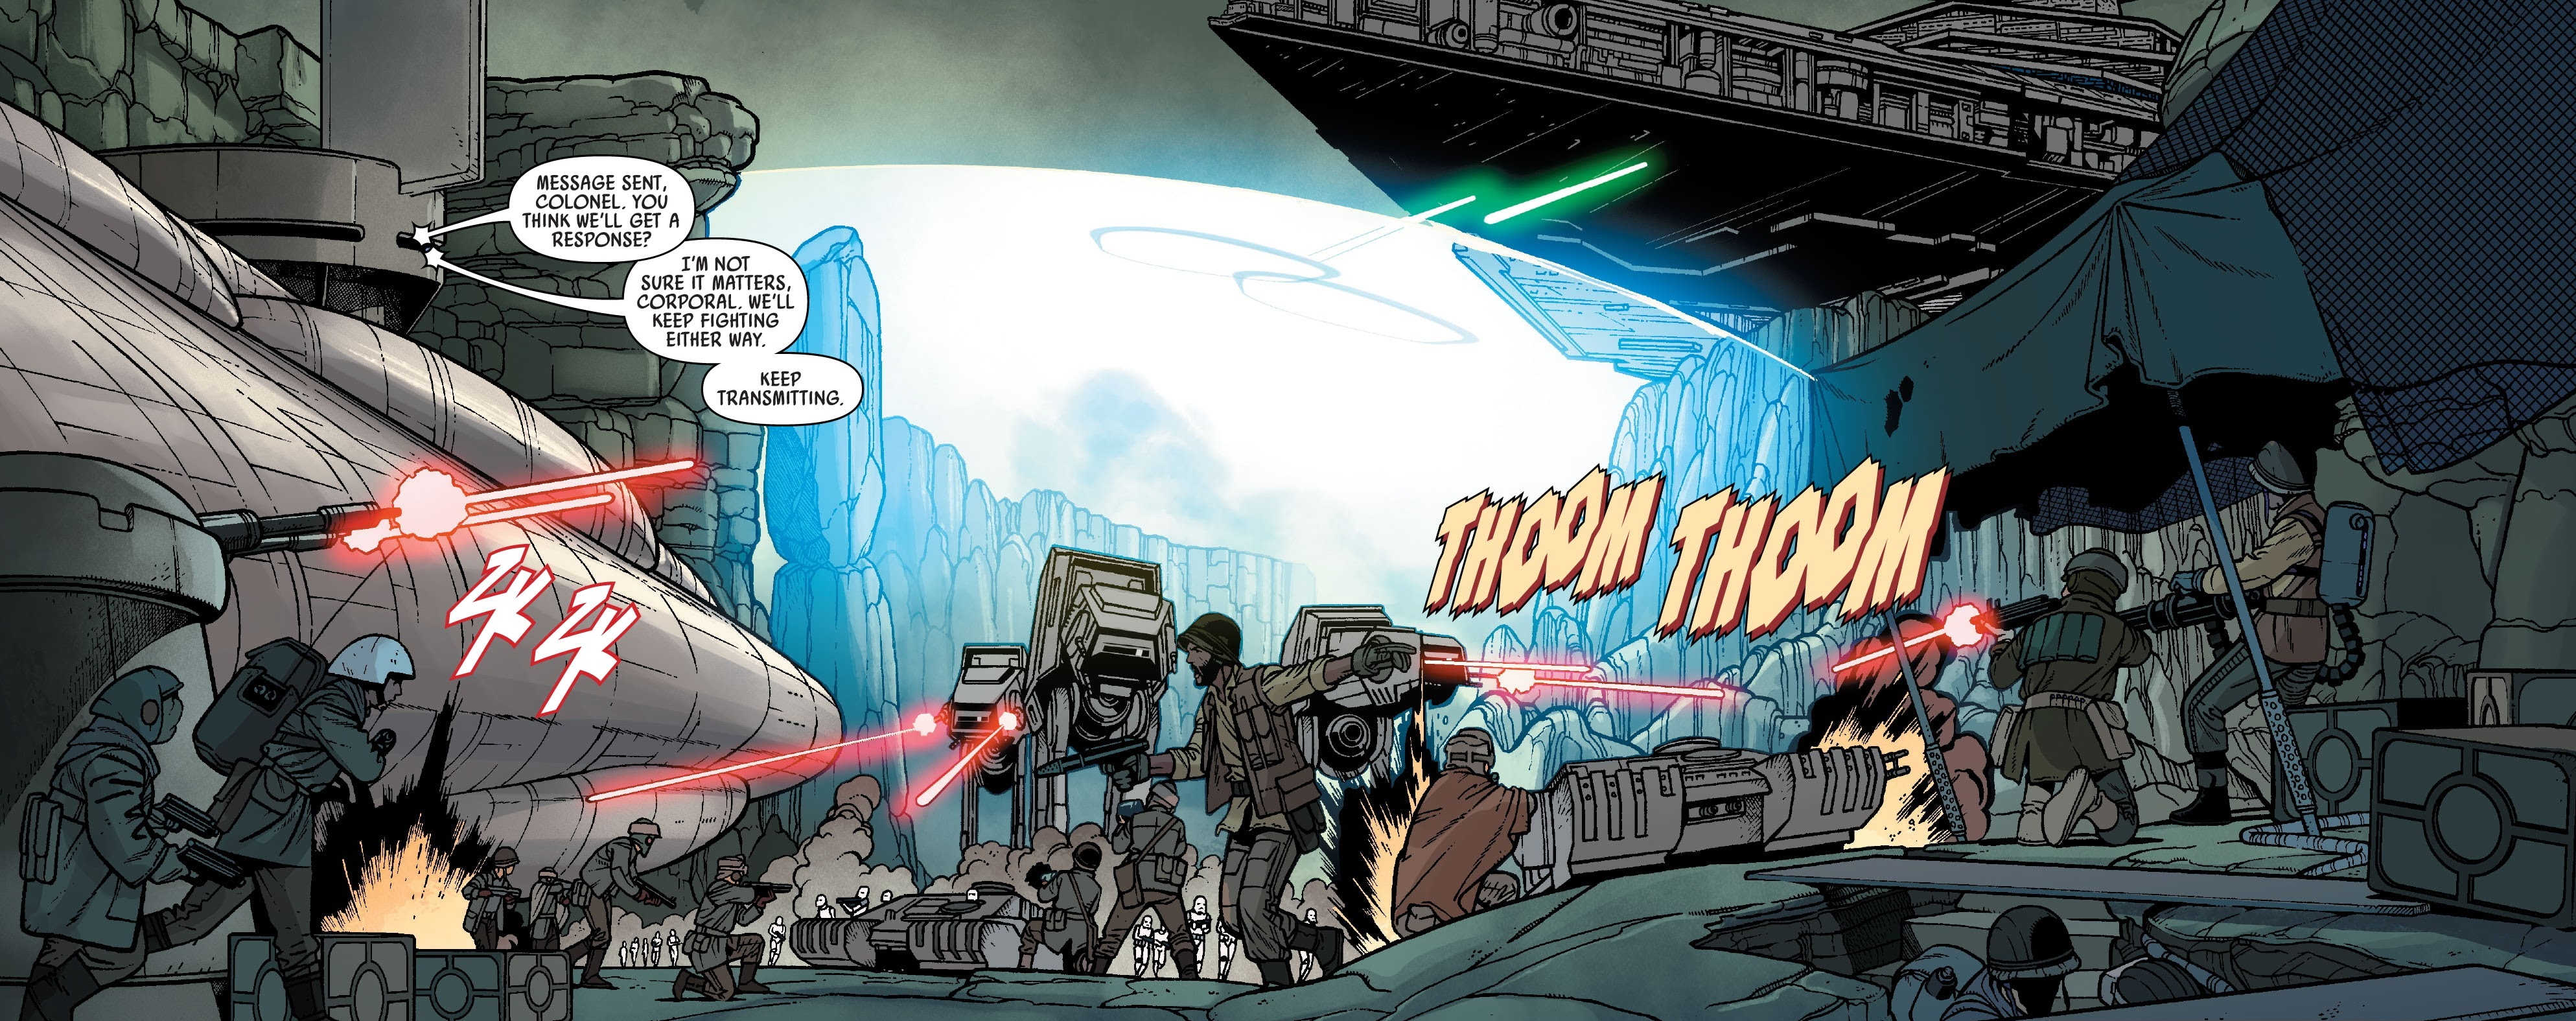
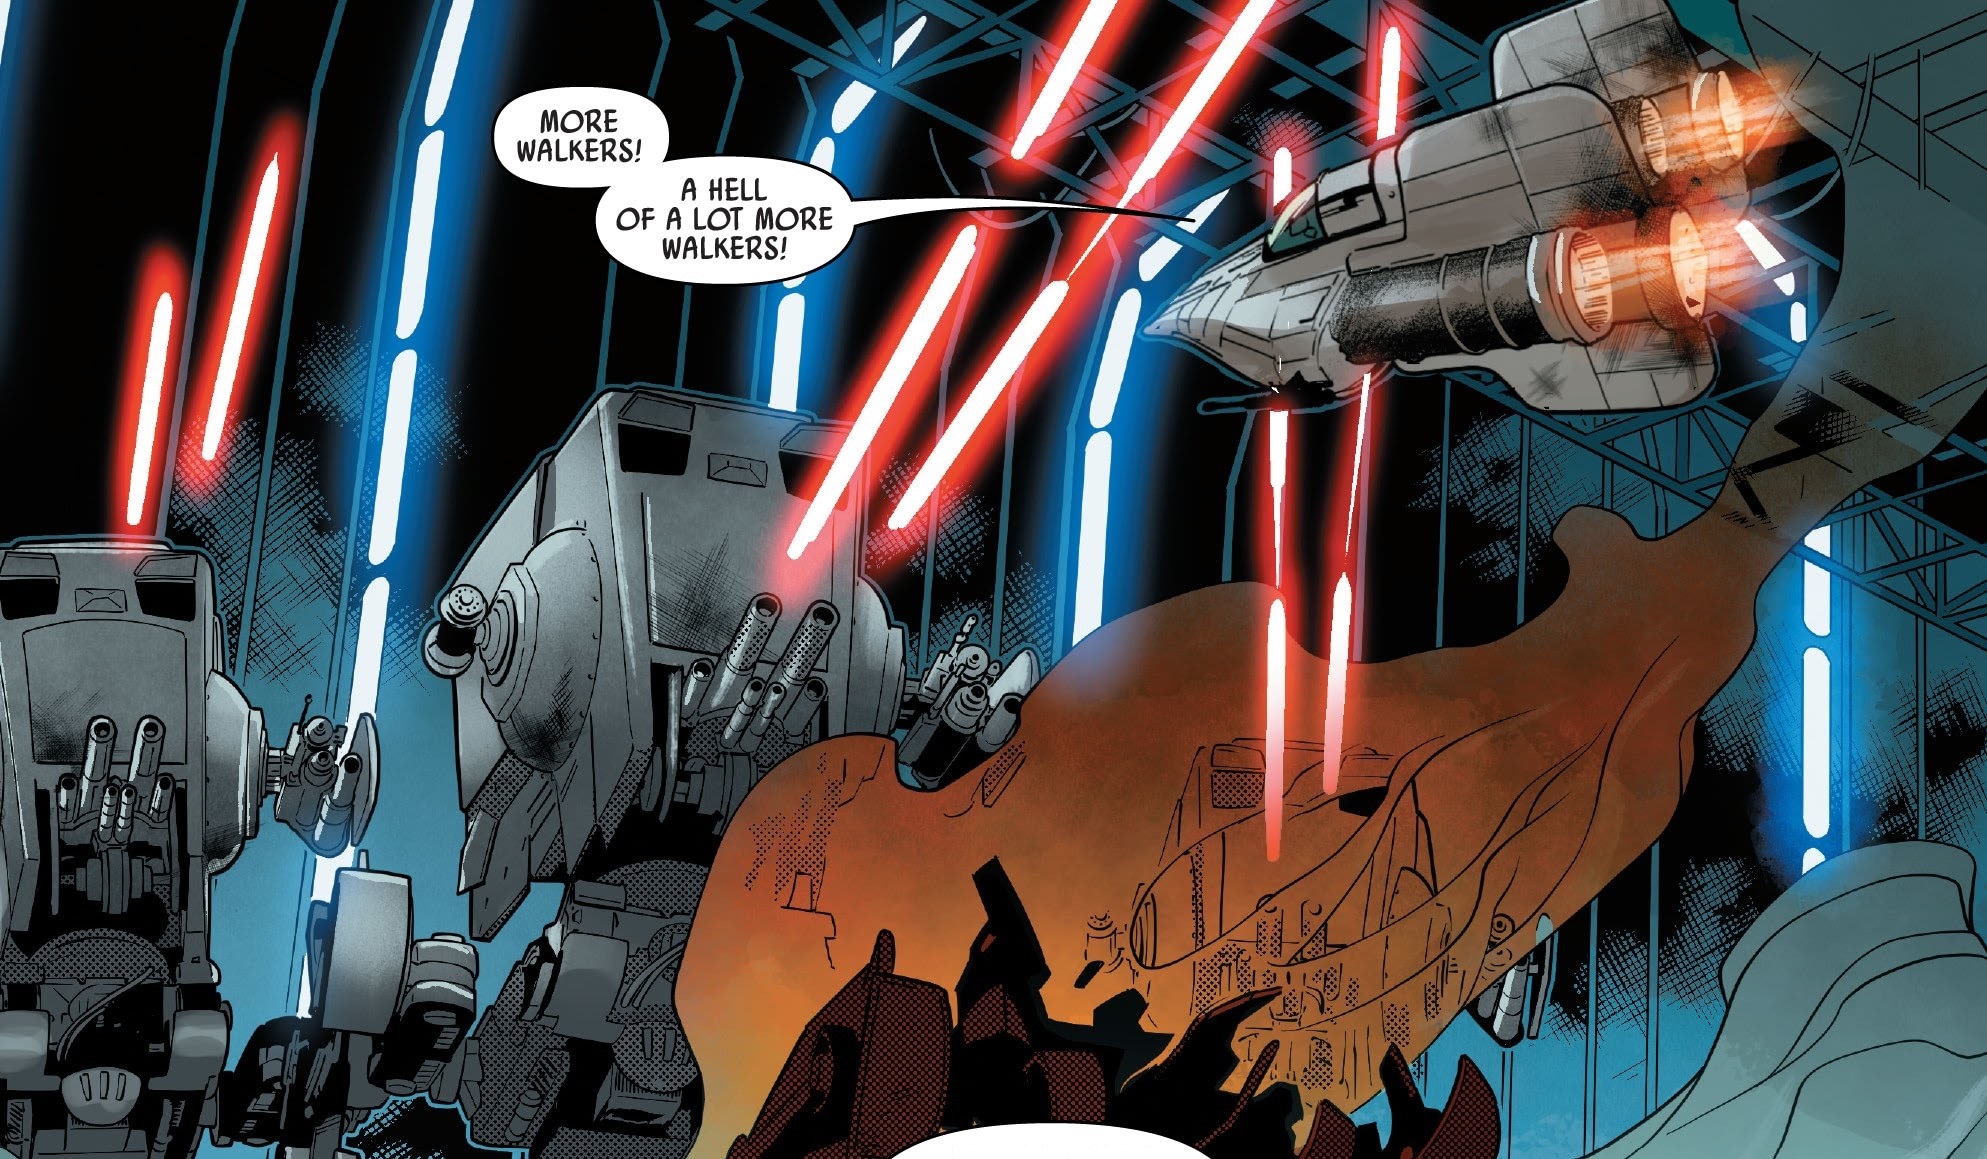
Padawan Skywalker replaced Bey until the Rebellion could find a way to rescue her. The rebels were in need of a victory after numerous losses, and Skywalker agreed to assist Starlight Squadron before departing to Jekara to rescue his friend and Organa's lover, Captain Han Solo. The squadron exited hyperspace above the planet Ab Dalis and received a distress signal from the Eleventh Division of the Rebel Fleet at Rendezvous Point Lambda-Four, which was under siege by the Empire and urgently requesting reinforcements. Starlight Squadron proceeded to the surface, where the Ground Defense Command was taking heavy fire. The foot soldiers of the Alliance Army offered little resistance against the All Terrain Armored Transport walkers that bombarded the rebel's deflector shield.
The Imperial Star Destroyer Ultima II rained fire upon the rebels from above. Commanded by Admiral Kalaxo, he refused to notify Zahra about the incoming craft, intending to contact her only after an Imperial victory. As Starlight Squadron approached the Ultima II, the Star Destroyer deployed its TIE fighters to engage the rebels.
Back at the rebel outpost, a rebel private approached her colonel with a plan to secure victory for the day. The colonel was initially hesitant, but the Ultima II destroyed the forward command post, forcing everyone to take cover. The colonel allowed the private to transmit the plan's coordinates to Skywalker. At first, Starlight Squadron requested more information from the ground forces regarding the data, as the coordinates were directly beneath the Star Destroyer, which would mean certain death for the pilots. The ground forces provided no response, but Skywalker decided to take matters into his own hands and charged towards the coordinates.
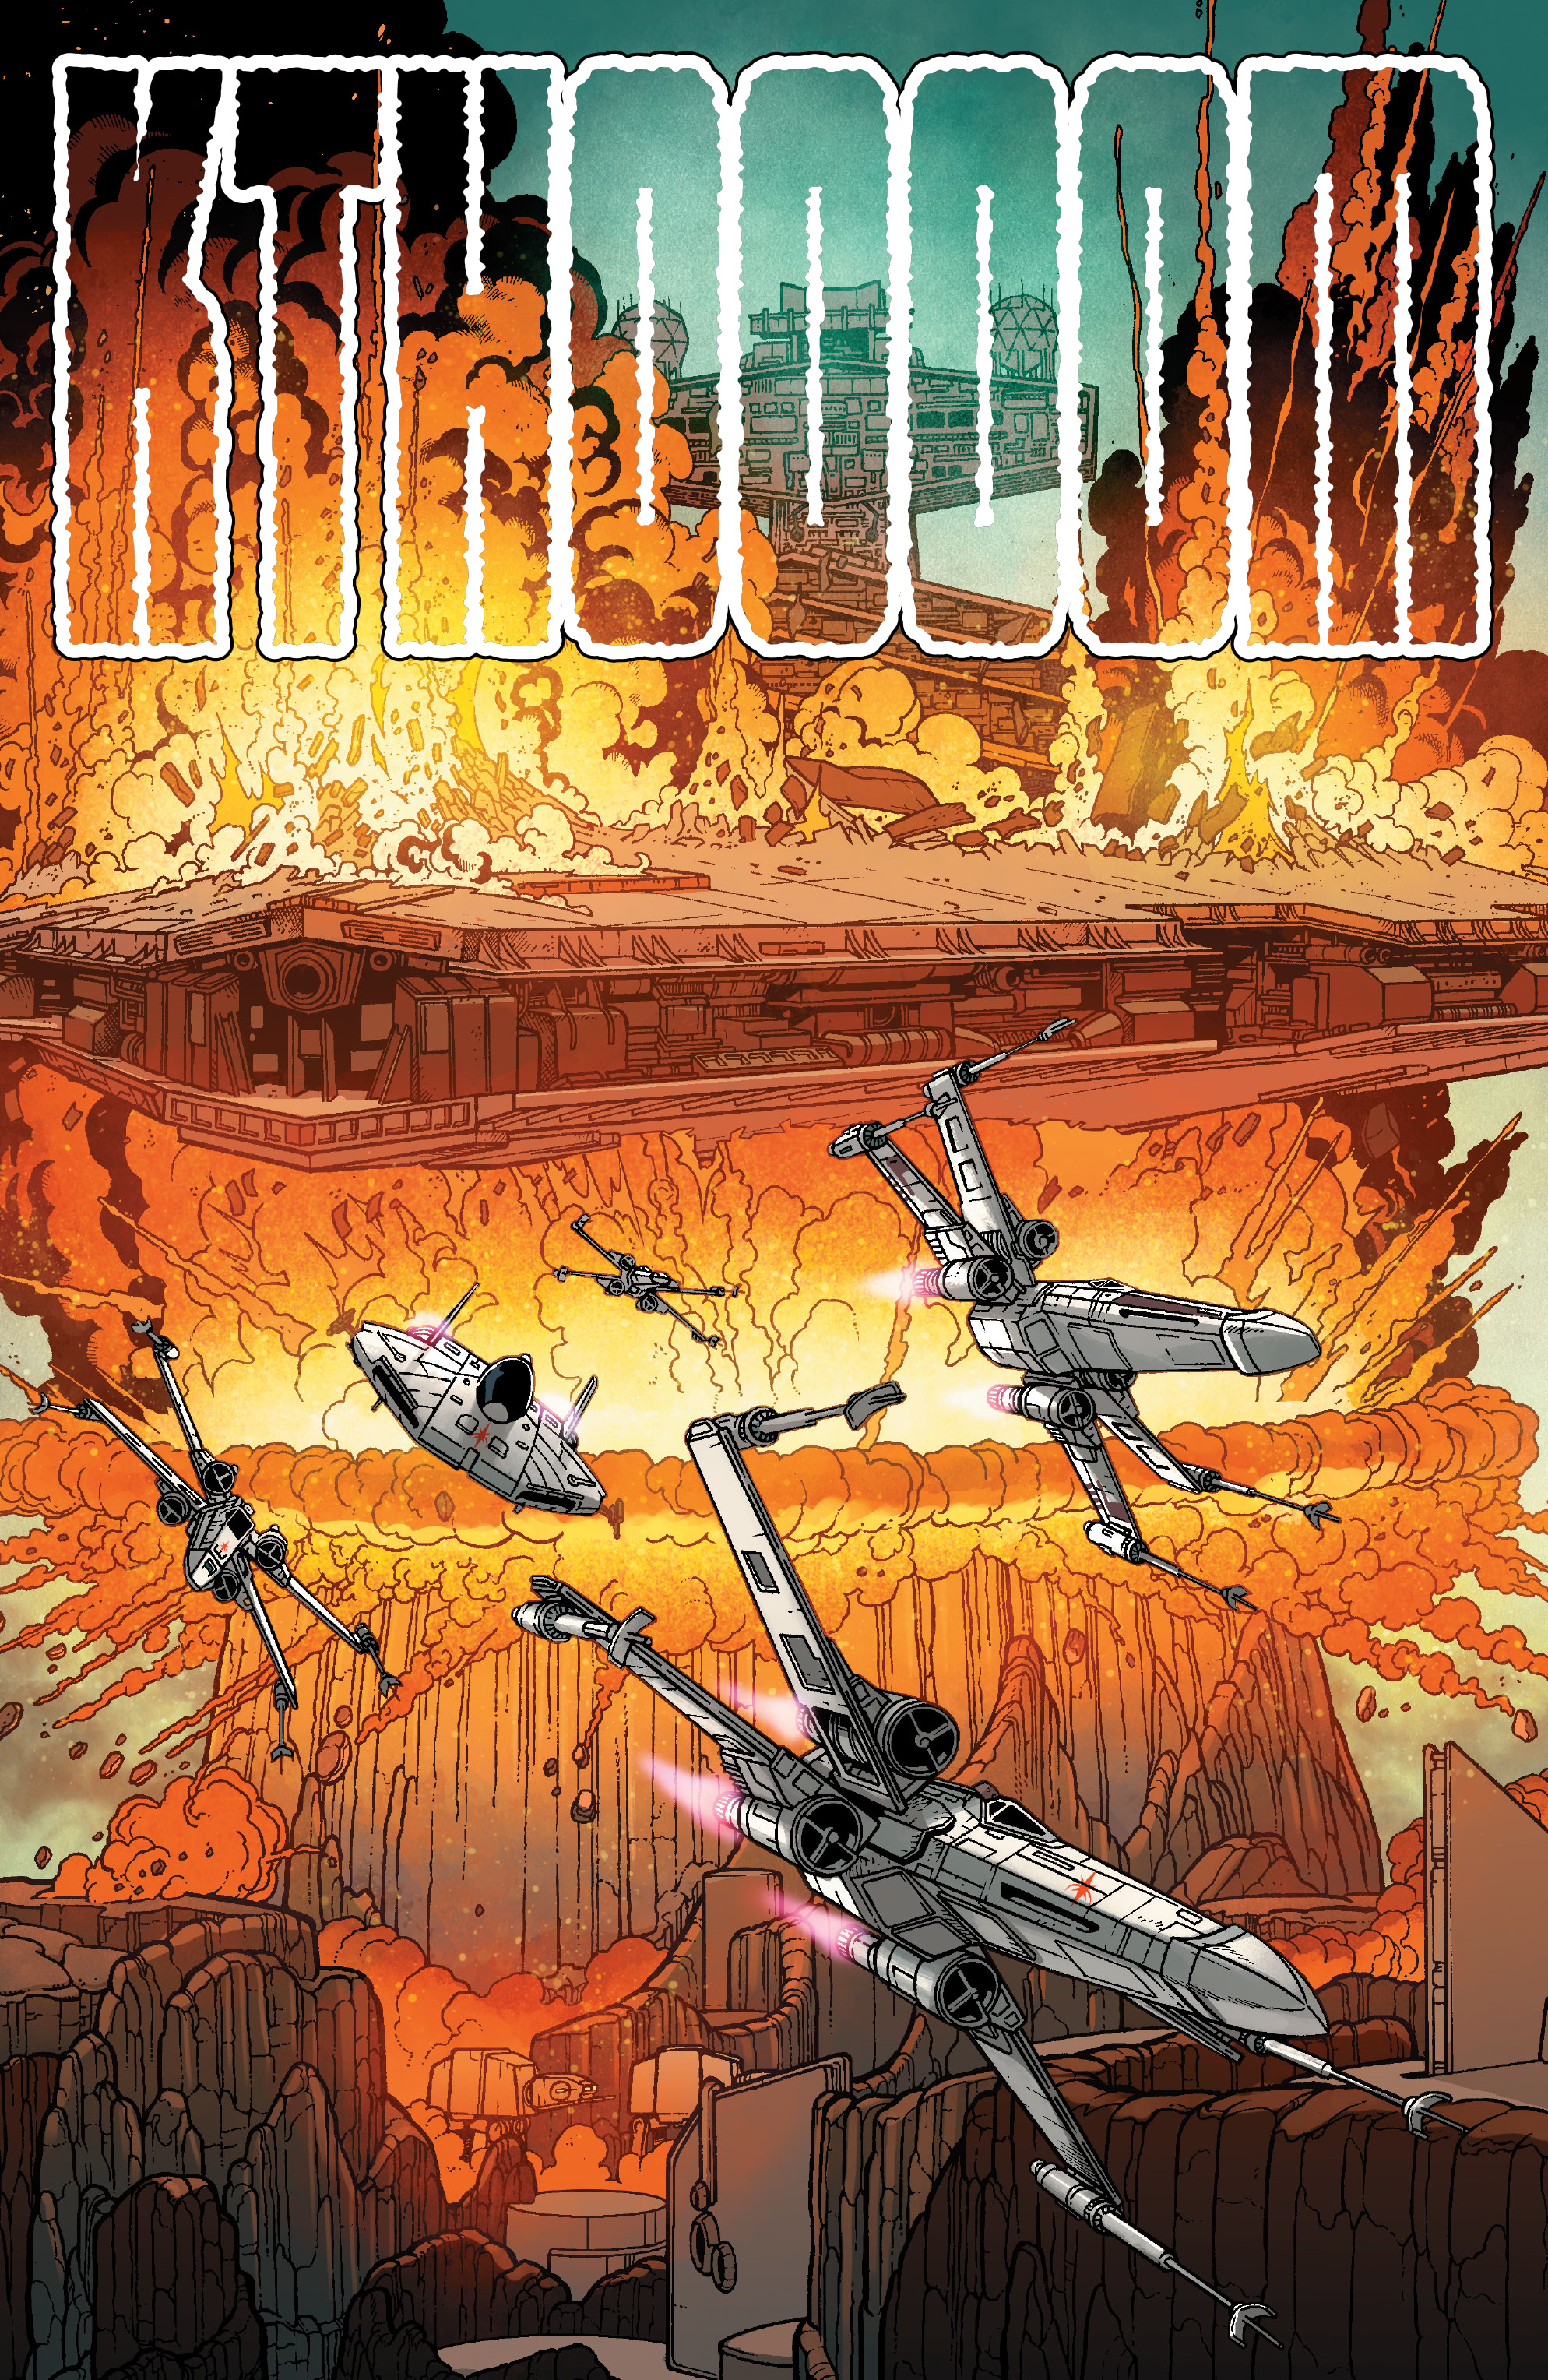
As the squadron protected him from the incoming TIE fighters, Skywalker recalled the similar situation with his destruction of the First Death Star, but he lost focus and fired his torpedoes from his X-wing starfighter onto the surface of Ab Dalis, missing the target. Antilles and the rest of Starlight Squadron followed suit and successfully fired on the target. As the starfighters pulled away, a massive volcanic eruption occurred, piercing through the planet's surface and obliterating the Ultima II and its crew.
The Eleventh Division eliminated the remaining Imperial forces, and Starlight Squadron delivered the Trawak code to them. The addition of the new division increased the Rebel Alliance's fleet size by fifty percent. Starlight Squadron then received a thank you from Rebel leader Mon Mothma, who was saved alongside Mon Calamari Admiral Gial Ackbar.
Defeat of the Tarkin's Will
When Crimson Dawn orchestrated the Syndicate War to sow chaos throughout the underworld and divert attention from its activities against the Empire, Emperor Palpatine's focus was significantly diverted. The Rebel Alliance seized this opportunity to gain more time to regroup its fleet.
The Second Division was stationed at the Temporary rebel cell base on the planet Panisia. The base served as a hiding place for the youngling Cadeliah. Hired by Lady Qi'ra of Crimson Dawn to locate the child, the assassin Deathstick contacted the Imperial Anti-Terrorism Watchline with the base's location. Qi'ra stopped at the Rebel Fleet and delivered the coordinates of the Second Division to the rebels, but Damerson and the Pathfinders along with Starlight Squadron were already enroute to the Tarkin's Will, with a plan to take down the ship and save Dameron's wife. The Pathfinders were on the Star Destroyer when it launched into hyperspace after receiving the location of the Second Division.
Sometime later, Imperial forces, led by the Tarkin's Will, arrived above the base and launched TIE fighters and bombers, initiating an assault on the rebels. Commander Zahra ordered her troops to take no prisoners, but the rebel fleet in its entirety emerged from hyperspace, ambushing the Imperials. After delivering an inspiring speech to her crew, Zahra directed the Tarkin's Will to execute a direct nose dive towards the rebel base on Panisia.
The insurgents pursued the Imperial forces into the planetary gravity wells. There, the Tarkin's Will unleashed its ion cannons against the rebel vessels, rendering them inoperable and causing them to plummet towards the planet's surface. With the Second Division not completely evacuated yet, the rebels faced a difficult decision: either target their own crippled ships, now hurtling towards the rebel base, or attempt to rescue the crews of those ships, risking the base's destruction. Ultimately, the rebels chose to sacrifice the disabled vessels to ensure the Second Division's escape. Just before the Tarkin's Will was about to collide with the base, Zahra commanded the ship to alter its course and engage full engines, obliterating numerous rebel ships still stationed at the base.
As the Tarkin's Will descended back towards the surface, Zahra directed the ship's weapons to focus on the rebel flagship, the Home One. Aboard the Star Destroyer, the Pathfinders successfully destroyed the primary reactor, causing the ship's systems to fail. As the rebel firepower intensified, Zahra gave the order to abandon the Tarkin's Will. The ship crashed onto the planet's surface and exploded upon impact, but Commander Zahra managed to survive. Subsequently, Organa and Zahra engaged in combat on the planet, culminating in Zahra's defeat.
Aftermath
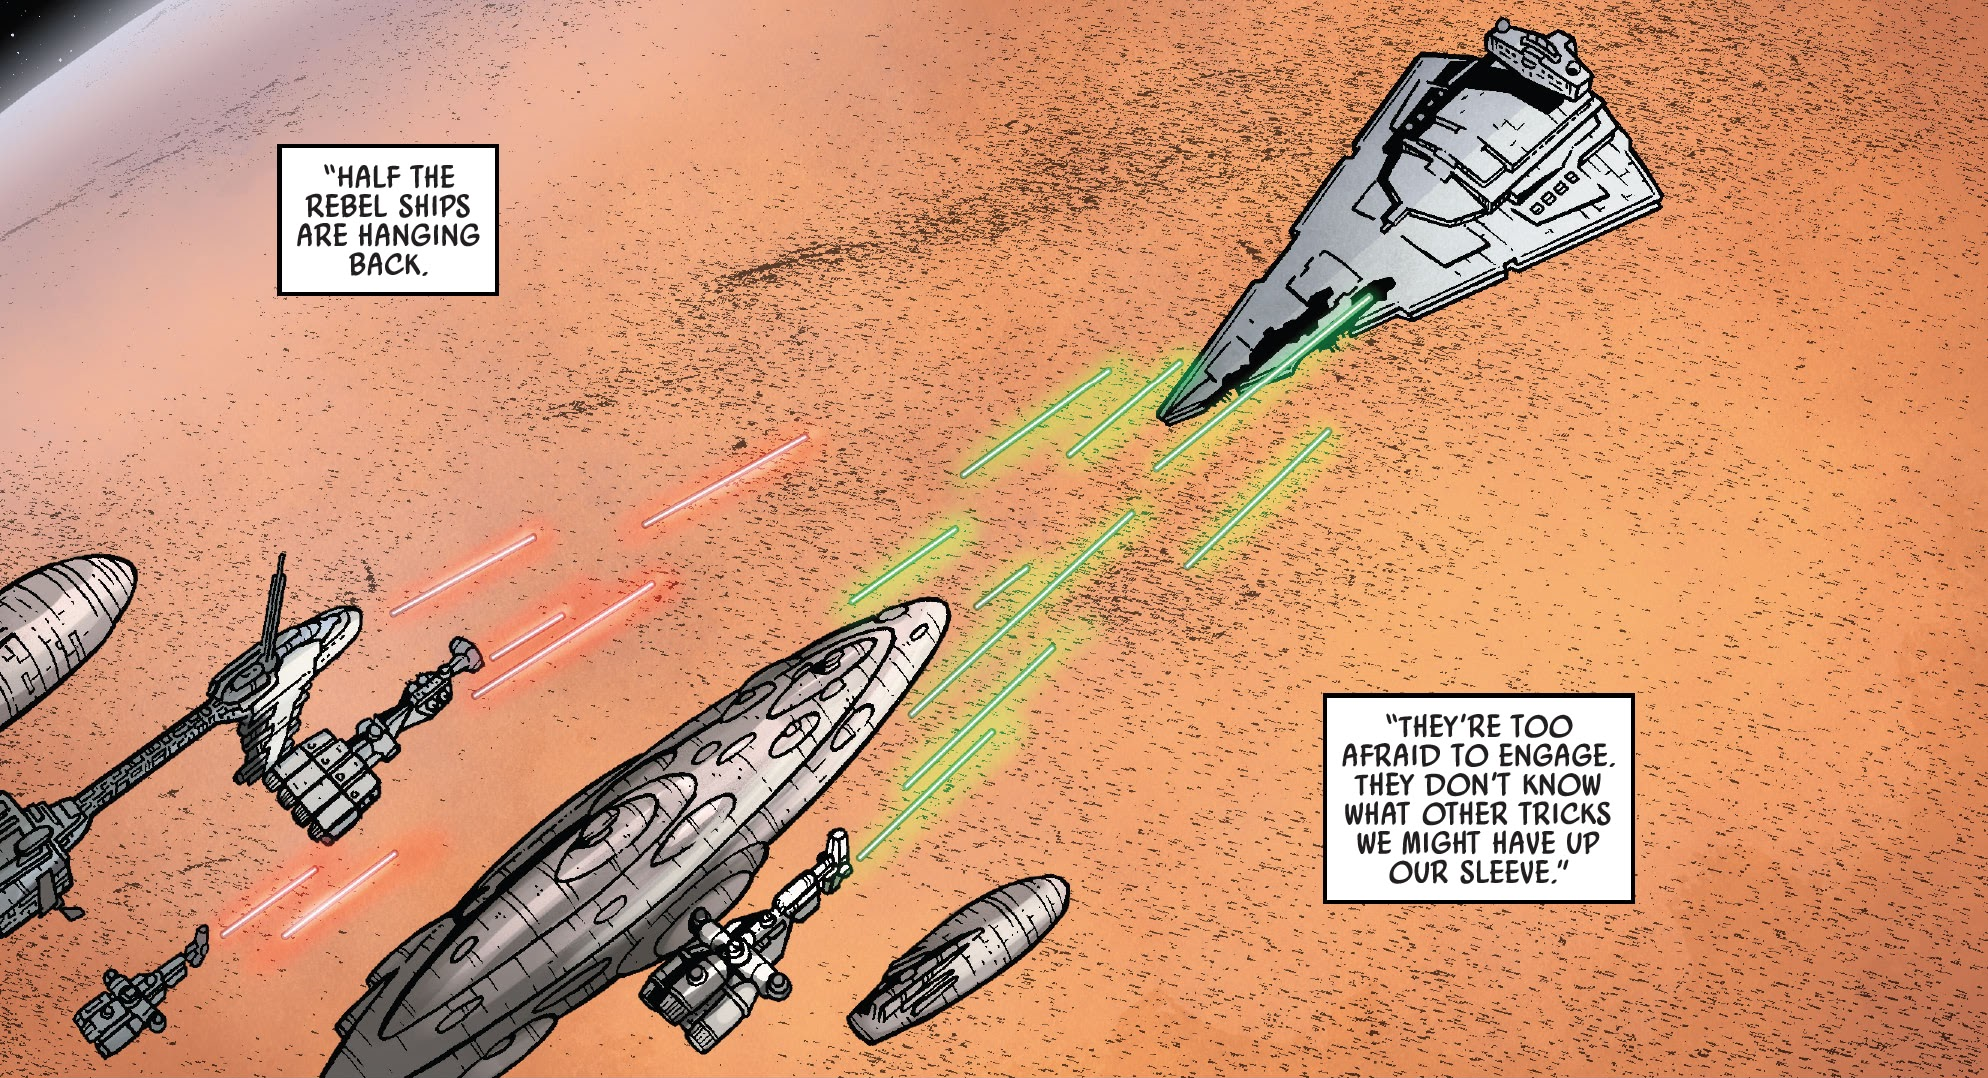
Despite the attempts to reassemble the fleet, Mothma and the other rebel leaders determined that the armada needed to remain divided into smaller task forces. These smaller units could move from one star system to another, preventing the complete annihilation of the fleet in a single engagement. This strategy allowed the Rebel Alliance to endure and prevented the Empire from securing another significant victory for its propagandists, similar to what had occurred during the Battle of Hoth. In time, the Rebel Alliance brought the Rebel Fleet back together at the planet Sullust, which the fleet then utilized as a staging area in preparation for the Battle of Endor. To provide the fleet with an opportunity to regroup there, Organa initiated Operation Yellow Moon as a means to divert the Empire's attention.