Starlight Squadron
Elite pilots from the Rebel Alliance formed Starlight Squadron, a starfighter squadron that served under the Alliance's Fourth Division during the Galactic Civil War.
Description
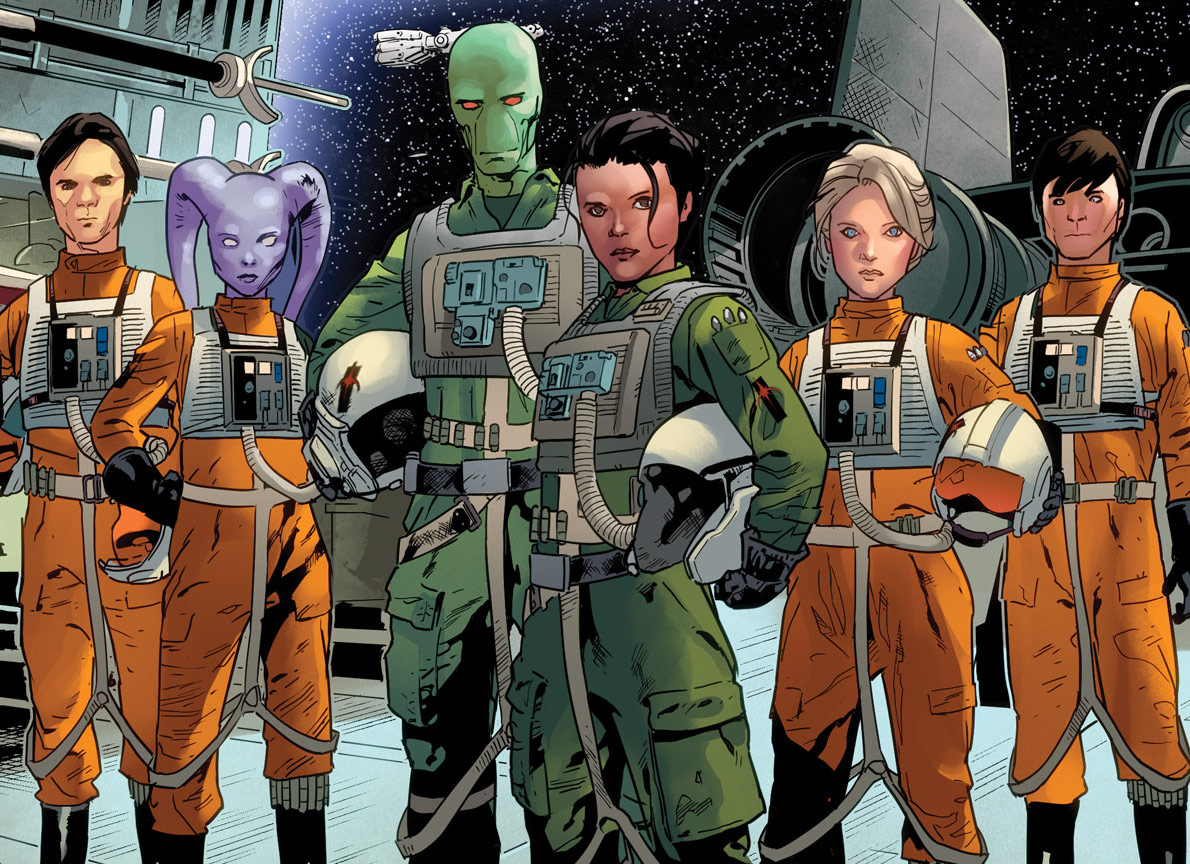
During the Galactic Civil War, Starlight Squadron operated as part of the Rebel Alliance's Fourth Division, utilizing a combination of RZ-1 A-wing interceptors and T-65B X-wing starfighters. These starfighters were piloted by the Rebel Alliance's finest pilots, under the leadership of Lieutenant Shara Bey. Key staff officers included Commander Wedge Antilles, Captain L'ulo L'ampar, and Lieutenant Evaan Verlaine. Other notable members were Captain Mart Mattin and Freyta Smyth. Jedi Commander Luke Skywalker lent his assistance to the Squadron during a mission to Ab Dalis. General Leia Organa, Skywalker's younger twin sister, directly issued orders to the squadron. The squadron's insignia, a red starlight burst often set against a vertical black stripe, was prominently displayed on their starfighters, flight helmets, and flight suits.
History
Formation
Following the evacuation of Hoth in 3 ABY, the Rebel Alliance's fleet dispersed to concealed rendezvous points throughout the galaxy. However, the Galactic Empire managed to decipher Alliance communications due to a signal analysis protocol created by Commander Ellian Zahra, leading to continued attacks on the scattered fleet by her forces. With communication across the galaxy compromised, Commander Grek conceived Operation Starlight, a strategy to reunite the dispersed fleet divisions. Shortly thereafter, Starlight Squadron was established, drawing its members from the most skilled pilots within the Division, as well as some from the Seventh Division. They were assigned to carry out perilous missions in support of Operation Starlight.
Operation Starlight
Search near Felucia

In 3 ABY, Starlight Squadron embarked on its inaugural mission for Operation Starlight, led by Starlight Leader Lieutenant Shara Bey. General Organa tasked them with locating the scattered Rebel Alliance divisions, alerting them to the Empire's breach of Alliance communications, and delivering a new Trawak security code developed by C-3PO and his team. During their search, the squadron stumbled upon the wreckage of the Sixth Division near Felucia. Commander Wedge Antilles detected numerous signals in the vicinity, which were identified as Imperial signatures. Captain L'ampar (Starlight Three) observed Imperial probe droids lying in wait, quickly deducing that they had been setup. The Starlight pilots initiated evasive maneuvers, but the probe droids attached themselves to the astromech droids of the squadron's X-wings, attempting to access their archives by drilling into their conical domes. Fearing the probe droids would obtain the coordinates of other rendezvous points, Antilles suggested destroying them, but Bey questioned the feasibility of such an action. Instead, Bey ordered all pilots to activate their astromech's self-destruct and eject them, resulting in the loss of valuable navigational data and complicating their return to the fleet. Left with no alternative, the droids were ejected and detonated, preventing the Empire from acquiring critical information.
Ambushed by the Tarkin's Will

Almost immediately, the Imperial II-class Star Destroyer Tarkin's Will arrived, ambushing the squadron. The Star Destroyer unleashed a swarm of TIE fighters that outnumbered the Rebel starfighters by a ratio of three to one. Captain Mattin (Starlight Four) proposed that the A-wings retreat while they still had the chance, as coordinating a hyperspace jump during a dogfight without their astromechs was impossible. However, Bey firmly stated her intention to stay and fight. After analyzing the TIE's tactics, L'ampar noticed that the TIEs were not focusing their attacks on individual starfighters, contrary to the Imperial Tactical Manual when outnumbering the enemy, and quickly realized they were being herded. The Tarkin's Will activated its tractor beams, ensnaring the squadron's starfighters to bring them in for interrogation. Evaan Verlaine and Antilles concurred that using brute force to break free would be futile. Antilles then proposed a maneuver that the Rebel pilots had practiced in war games back in Rogue Squadron but had never been tested in actual combat. The maneuver involved accelerating at full throttle and riding the tractor beam toward the Star Destroyer. The Imperials aboard the Tarkin's Will remained unconcerned, interpreting the starfighter tactics as a desperate suicide attack. As soon as the shields were lowered to pull the starfighters in, the squadron targeted the tractor beam projectors and unleashed their concussion missiles and proton torpedoes, destroying them. With the tractor beam disabled and the Star Destroyer's targeting computers unable to lock on due to their speed, the Starlight starfighters surged into the hangar, attacking the TIE fighters and stormtroopers inside. This action prevented more TIEs from launching from the Tarkin's Will.
Escaping the Tarkin's Will
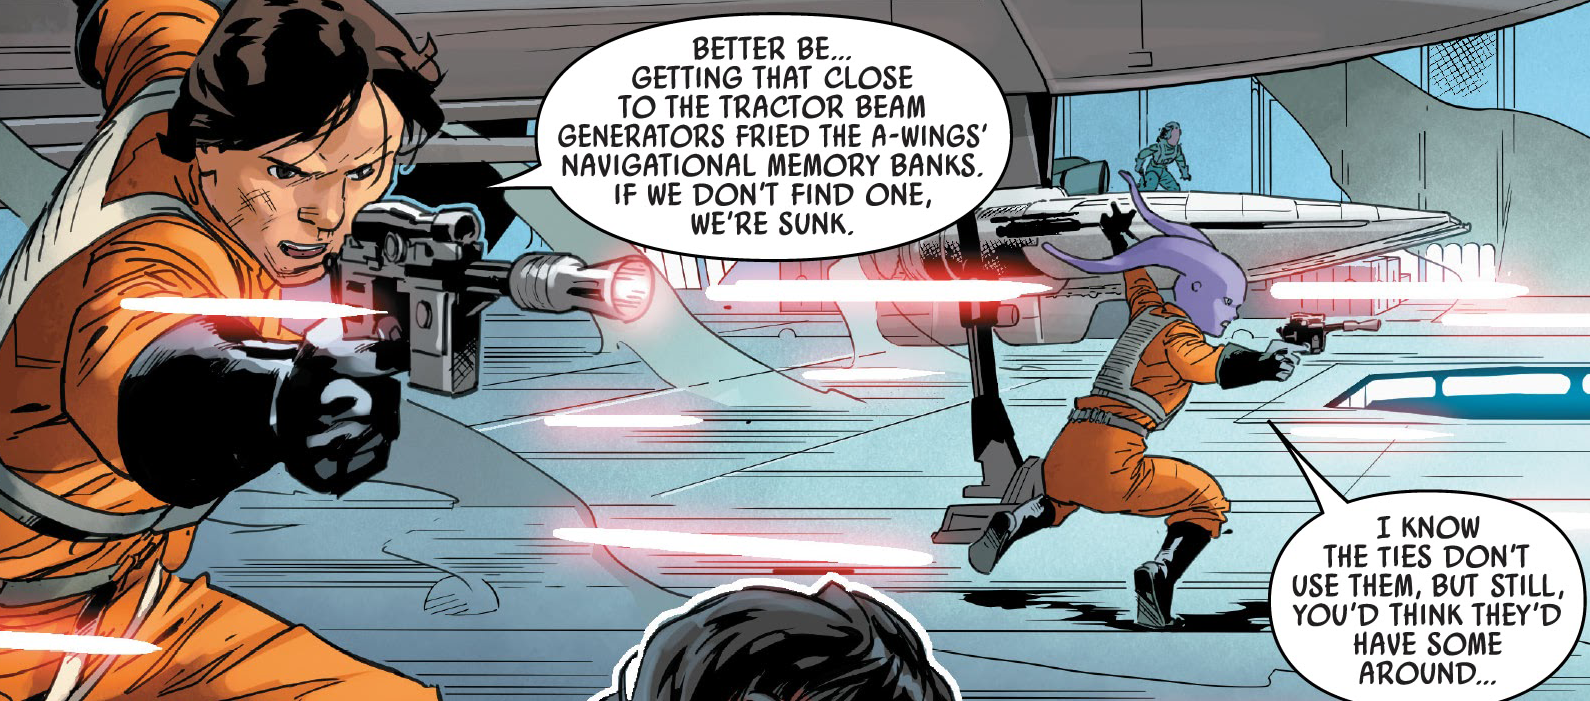
Mattin and Verlaine's X-wings maintained a defensive perimeter to prevent pursuing TIEs from entering the hangar, while L'ampar's A-wing guarded the interior access door against stormtroopers. With the hangar temporarily secured from further Imperial threats, the remaining pilots landed and exited their ships. The proximity to the tractor beam generators had damaged the A-wings' navigational memory banks, so Bey and Freyta Smyth located three Imperial astromech droids nearby, while Antilles provided cover. Smyth accessed one of the astromechs and discovered that it lacked robust encryption. Bey instructed Smyth to return the astromech to an X-wing and begin calculating the hyperspace jump, while she remained behind to accomplish something.
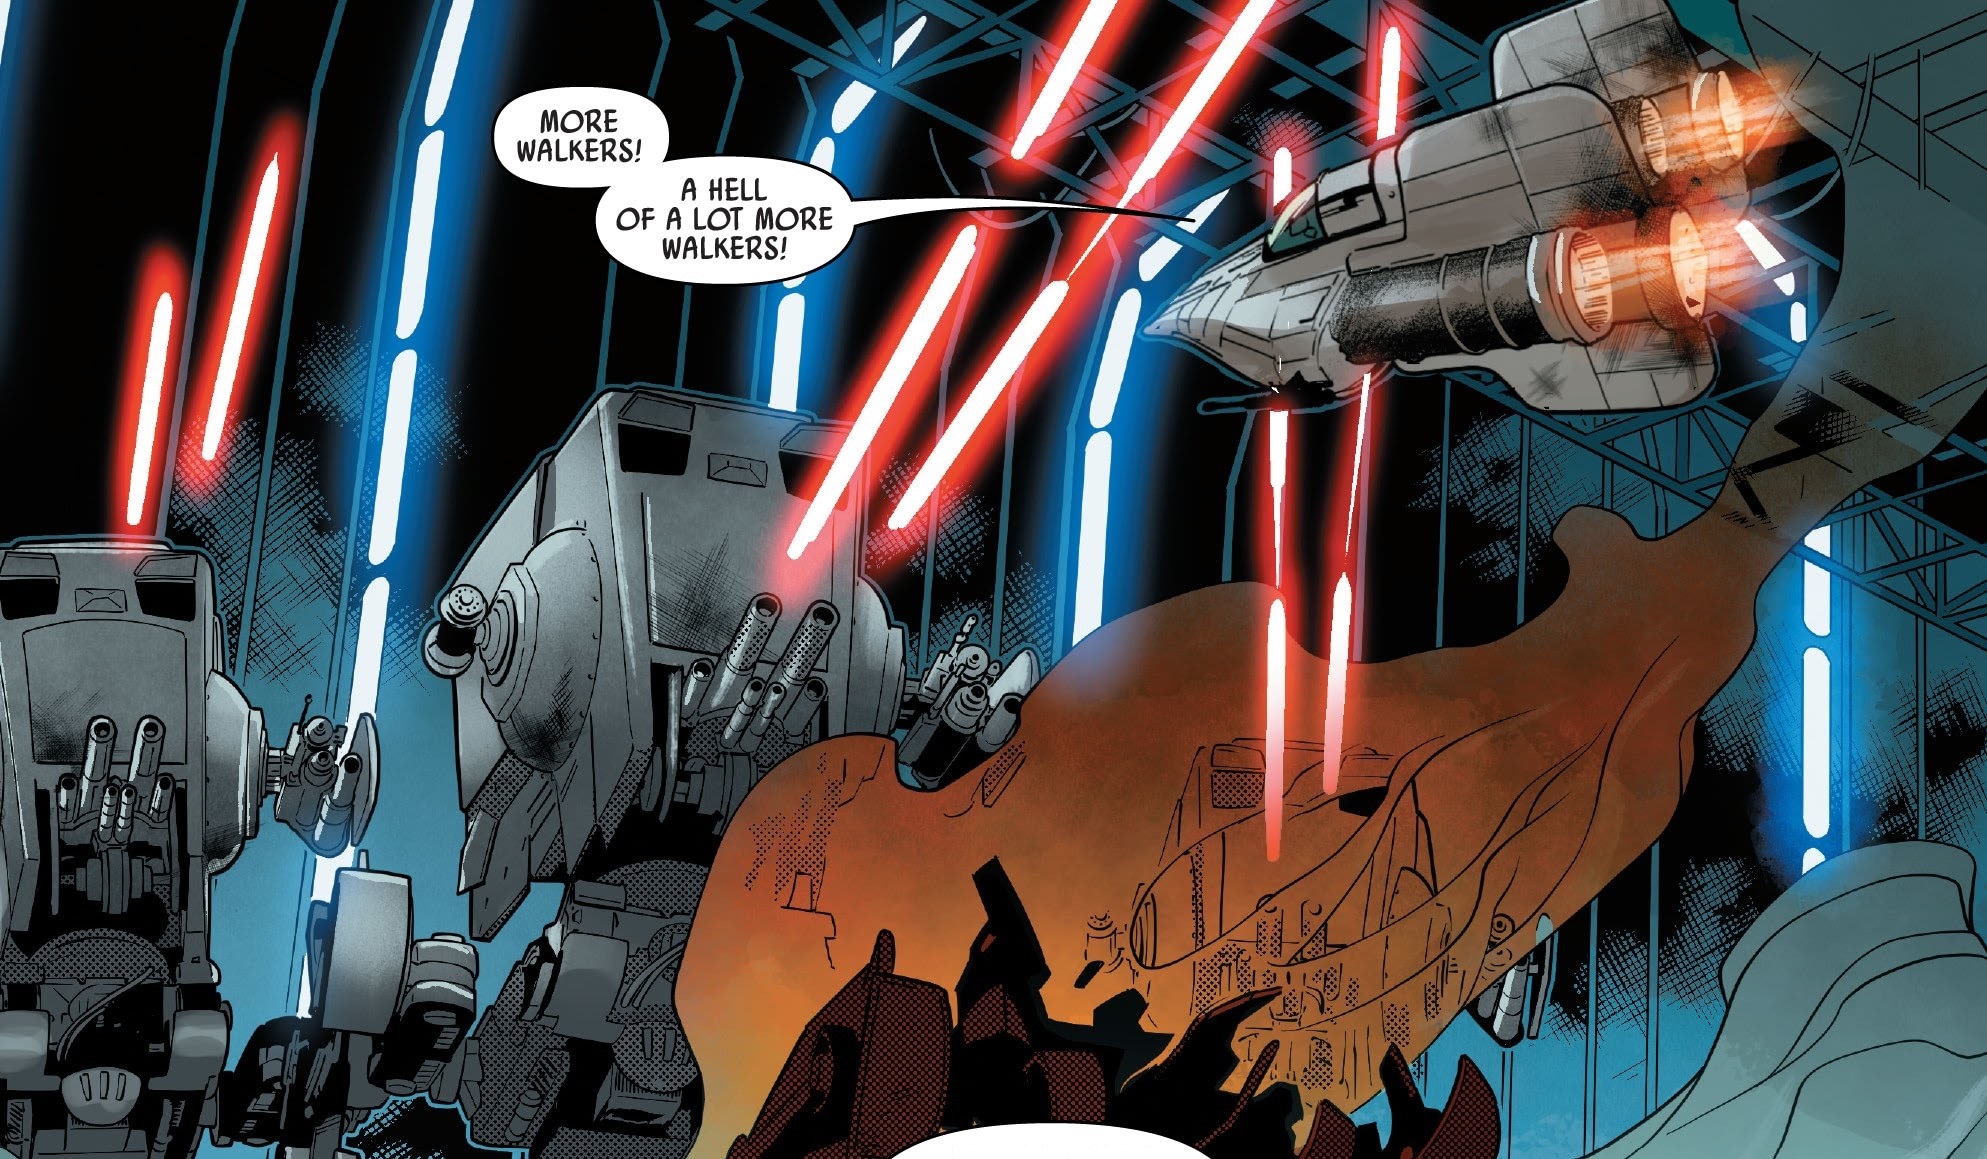
Just as L'ampar destroyed an AT-ST walker, more entered the hangar. Antilles urged Bey to hurry, as the Imperial astromech in his X-wing was nearing completion of the nav calculations and their ships were linked and ready to depart. Bey revealed that she had managed to extract valuable intelligence from the other droids in the hangar, which they could bring back to the fleet. As Bey raced back to her A-wing, it was destroyed by an AT-ST, leaving her stranded. Witnessing this, L'ampar implored Bey not to give up, pledging that Starlight would continue to fight the AT-STs and secure a ship for her. However, Bey recognized the futility of such actions, as staying to help would jeopardize their only chance to return to the fleet. Therefore, she issued a direct order to L'ampar to leave, along with a request for him to inform her husband, Sergeant Kes Dameron, that she loved him and to kiss their son Poe for her. L'ampar reluctantly complied with the order, and the Squadron departed without her.
Returning to the fleet

En route back to the fleet, L'ampar, now Starlight Two, transmitted a message to the Fourth Division, reporting the mission's failure. He recounted discovering the remains of the Sixth Division and the ambush by the same Star Destroyer that had been pursuing them across the galaxy. L'ampar also mentioned the fighting aboard the Star Destroyer that resulted in Starlight Leader being left behind, a revelation that saddened Kes, who was listening in. L'ampar concluded with the only positive news, regarding the capture of the Imperial astromech droid with its memory banks filled with useful navigational data, an idea conceived by Bey. Organa planned to use this data for the Operation and to hunt down Zahra before she could inflict further damage on the Rebel Fleet by locating the Tarkin's Will.
Hiding on Tarkin's Will
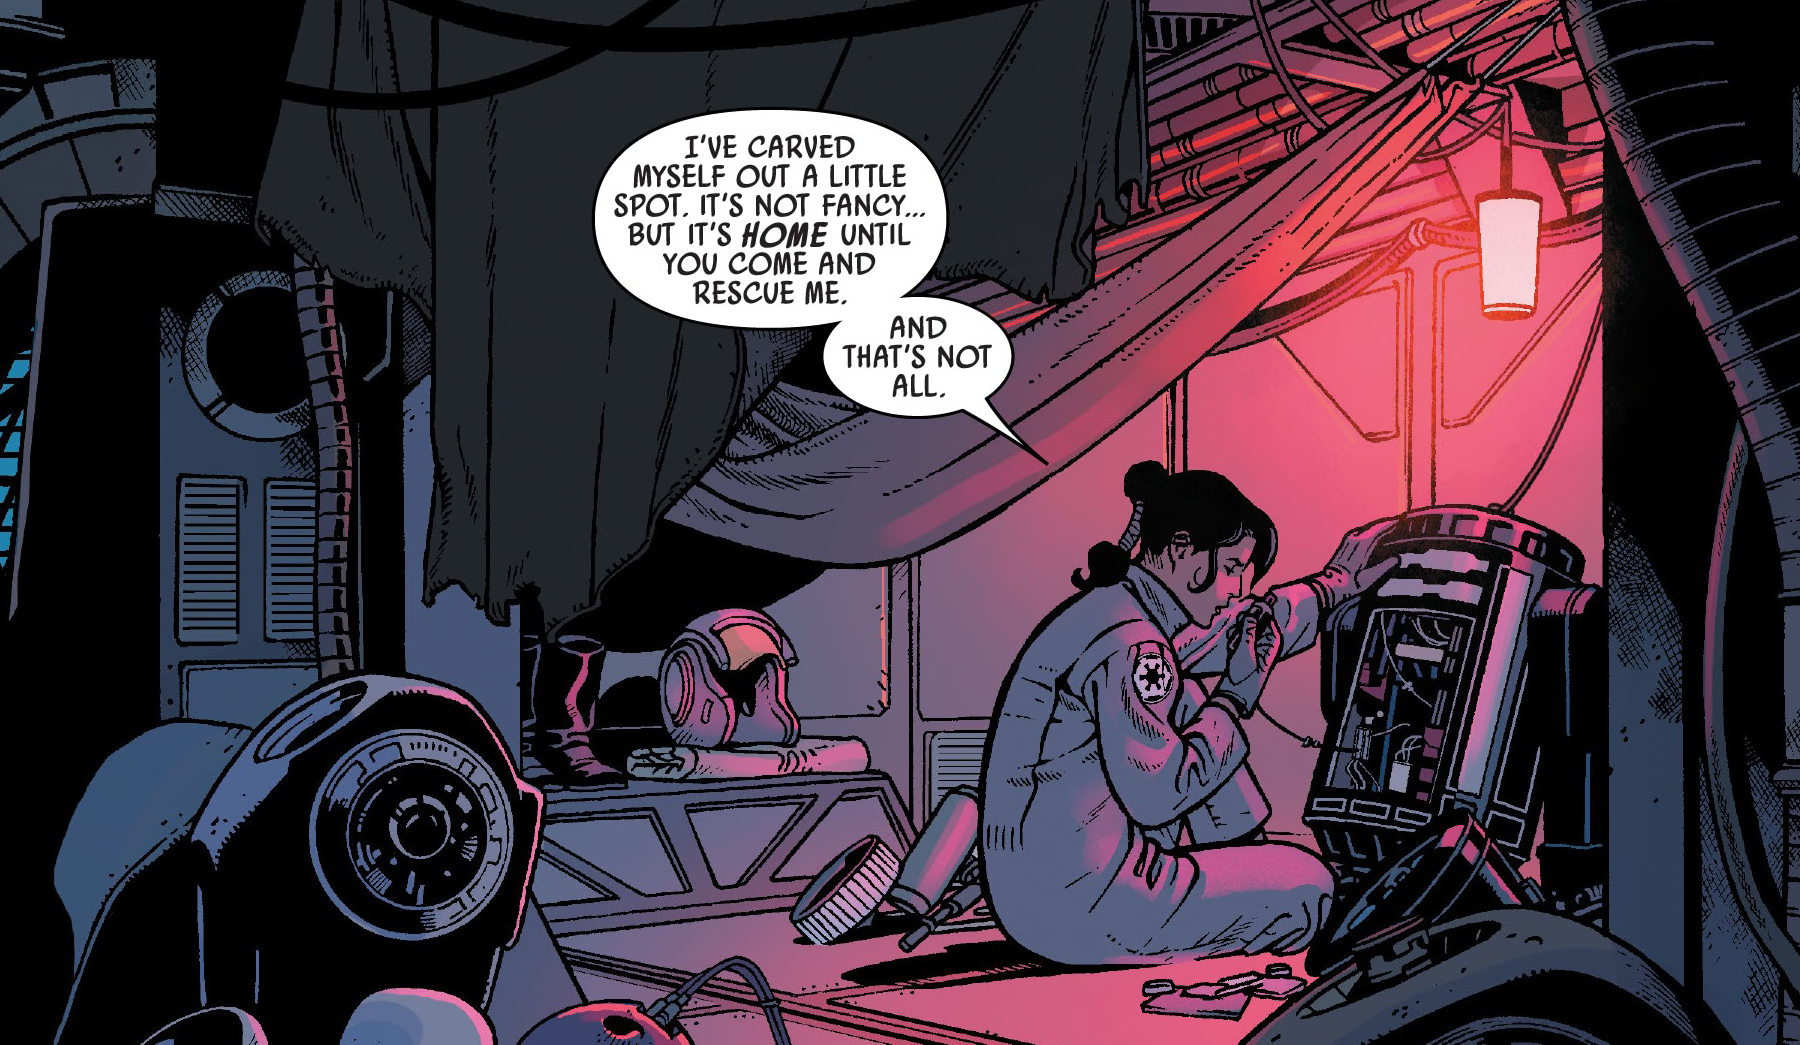
Subsequently, Bey managed to evade capture and slip away from the Star Destroyer's hangar deck. She found a hiding place somewhere on the massive starship and dismantled one of the Imperial astromech droids to establish communication with the Forth Division, where she was able to speak to her husband, much to his relief. Bey informed Dameron that she was working on infiltrating the Imperial systems and would make herself useful by acquiring more valuable information until a rescue team could be sent. Bey then briefed General Organa on the intelligence she had already gathered in the hangar.
Battle of Ab Dalis
Starlight Squadron resumed its search across the unexplored rally points with the assistance of Antilles' close friend and Organa's older twin brother, aspiring Jedi Commander Skywalker, as they were short one member until Lieutenant Bey was rescued from the Tarkin's Will. Their next destination was the planet Ab Dalis. The Eleventh Division was engaged in a battle against Admiral Kalaxo, who commanded the Star Destroyer Ultima II and was a member of Commander Zahra's Hunter Fleet. His ship was positioned beneath a dormant volcano, which the Squadron reactivated using their proton torpedos, resulting in his death in the explosion. Skywalker informed Antilles that he had to depart for Jekara to assist General Organa and Lando Calrissian in rescuing his friend and Organa's lover, Captain Han Solo, from an auction hosted by Crimson Dawn, as he had a vision revealing that Organa's and his father, Sith Lord Darth Vader, was pursuing the owner of the Millennium Falcon. Antilles understood the importance of Solo to the Rebel Alliance and provided the new Trawak security code to the Eleventh Division. Starlight Squadron had increased the Rebel Fleet's strength by fifty percent and facilitated the return of two of its leaders, Chancellor Mon Mothma and Admiral Gial Ackbar.
Rescuing Lieutenant Bey
Some time after the Battle of Ab Dalis, Bey's disguise as a stormtrooper was compromised when Warrant Officer Kronauer noticed that her armor was damaged. This led Commander Zahra to discover that there was a mole on the Tarkin's Will, as her second-in-command, Lieutenant Gorr, pointed out that there was no stormtrooper on her ship with the com number TK-510. They also uncovered Bey's coded transmissions, revealing that she had survived the destruction of her ship and was hiding in the damaged section of the Star Destroyer, where internal scanners could not detect her. When Bey's plan to steal a Lambda-class T-4a shuttle failed and she was apprehended by Zahra, Starlight Squadron and a small group of Pathfinders led by Kes, decided to rescue his wife without permission from Mothma and the rebel leaders.
After recovering the equipment and intelligence she stole and learning her impressive story, Commander Zahra demanded Bey reveal the new transmission code, the Rebel Fleet's targets, and who had survived the Battle of Hoth, or she would target Poe and his maternal grandfather. At that moment, Starlight Squadron and the Pathfinders, aboard a UT-60D U-wing starfighter/support craft, dropped out of hyperspace and engaged the swarm of TIE fighters from the Tarkin's Will once more to prolong the fight. Sergeant Dameron and his team boarded the battle-damaged Star Destroyer, but it jumped into hyperspace when Commander Zahra changed her plan from preventing Starlight Squadron from rescuing Lieutenant Bey to destroying the last division of the Rebel Fleet at the Battle of Panisia after she received intel on it's location from the Imperial Security Bureau. She ordered the TIE swarm to be left behind, as there was no time to retrieve them, and to prevent the Rebel starfighters from escaping as they had at Felucia, considering they were outnumbered. She assured Gorr that they would be picked up upon their return, but if they were defeated, it would be no loss, as the Empire had zero tolerance for weakness in its forces. However, Zahra was lured into a trap, as the Rebel Fleet arrived to protect the last division and finally eliminate the vengeful Commander as part of a plan developed by Lady Qi'ra, who was in charge of the criminal syndicate Crimson Dawn, to cause a distraction so her agent Deathstick could grab the Mourner's Wail Syndicate and the Unbroken Clan's heir Cadeliah and in an attempt to gain General Organa and the Alliance's trust to form a partnership with them for her master plan to kill Vader and Emperor Palpatine so she can bring an end to the Sith and the Empire to make the galaxy an equal playing field for those who want power. After defeating the stranded TIE swarm, Starlight Squadron rendezvoused with the Rebel Fleet, and Lieutenant Bey resumed her leadership role, as Dameron's mission to rescue her had been successful. However, he lost his team, who stayed behind to destroy the main reactor on the Tarkin's Will to damage it and lower the shields so the Alliance could finally destroy it. Bey then led her team again into helping General Organa locate Commander Zahra after she survived the crash of her ship and after a brief fight in the cave she was hiding in, Organa emerged and said they would never have to worry about her again. However Organa was wrong because Zahra survived, although grievously injured, and joined a raider faction during a mission she embarked on with Verlaine and Skywalker to find a fleet of surviving Alderaanians they previously helped after the Battle of Yavin, but with help from the Rebel Fleet, stopped Zahra for good.
Behind the scenes
Star Wars (2020) 6, a comic penned by Charles Soule, with illustrations by Jesús Saiz, and published by Marvel Comics on September 16, 2020, first mentioned Starlight Squadron. The squadron then debuted in Star Wars (2020) 10, a comic also written by Charles Soule, illustrated by Jan Bazaldua, and published by Marvel Comics on January 6, 2021.