Mart Mattin
Mart Mattin, who commanded the Iron Squadron, was the nephew of Commander Jun Sato. Mart assumed control of the squadron after his father's passing. This squadron became the only rebel group on the planet of Mykapo, where they frequently troubled the Imperial forces stationed there.
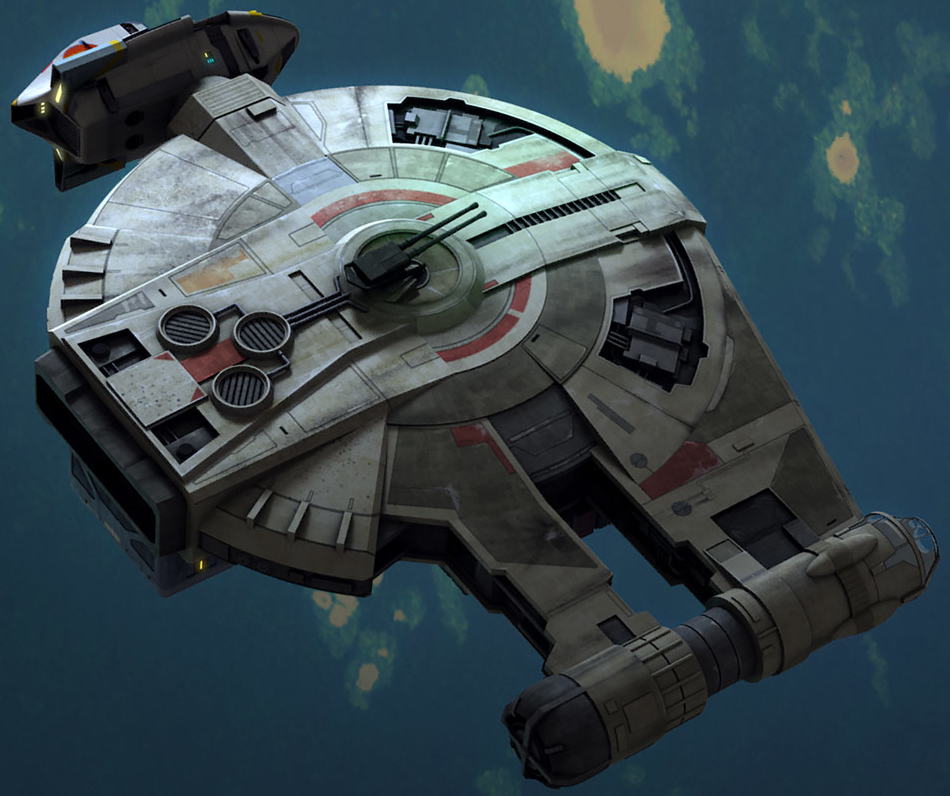
During 2 BBY, the Empire enforced martial law on Mykapo, deploying an initial patrol force. The Sato's Hammer, the YT-2400 light freighter used by the Iron Squadron, was attacked by this Imperial patrol. The Iron Squadron, aided by the Spectres and Phoenix Cell, successfully eliminated the entire patrol. Despite Hera Syndulla's recommendation to evacuate the system, Mart refused.
While his team evacuated with the Spectres, Mart confronted Imperial reinforcements under the command of Admiral Kassius Konstantine. His vessel sustained damage in the engagement, compelling Mart to send a distress signal to the Spectres. With assistance from Commander Jun Sato, his uncle, the Spectres and the rest of the Iron Squadron rescued him. Following this, Mart and his crew became members of the rebellion.
Biography
Background
During the Age of the Empire, Mart Mattin resided on the planet Mykapo together with his father and mother. His father headed the rebel cell known as the Iron Squadron, which included Gooti Terez, a Theelin, Jonner Jin, a human, and R3-A3, an astromech droid. They operated from a YT-2400 light freighter named Sato's Hammer. At some point, Mart's father was killed during a clash with Imperial forces. Mart then took over leadership of the Iron Squadron and did not maintain contact with his uncle Jun Sato, the commander of Phoenix Cell. Considering Mykapo their home, Mart and the Iron Squadron frequently harassed Imperial forces.
Joining the rebellion
In 2 BBY, the Empire resolved to impose martial law on Mykapo. They dispatched an advance patrol, consisting of a Gozanti-class cruiser and several TIE fighters, to secure the system. The Iron Squadron, led by Mart, engaged the Imperial patrol, which damaged their ship's hyperdrive. Shortly after, Hera Syndulla and her Spectres, along with Phoenix Squadron, arrived to evacuate rebel sympathizers on Mykapo. They assisted the Iron Squadron by engaging the Imperial fighters. Hera contacted the Iron Squadron and advised them to evacuate the system. Mart thanked the rebels for their help but declined their offer of assistance. When Hera reiterated her warning, Mart replied that the Iron Squadron did not run. He then flew the Sato's Hammer towards the Gozanti cruiser and dropped several explosive cargo pieces which destroyed the Imperial ship.
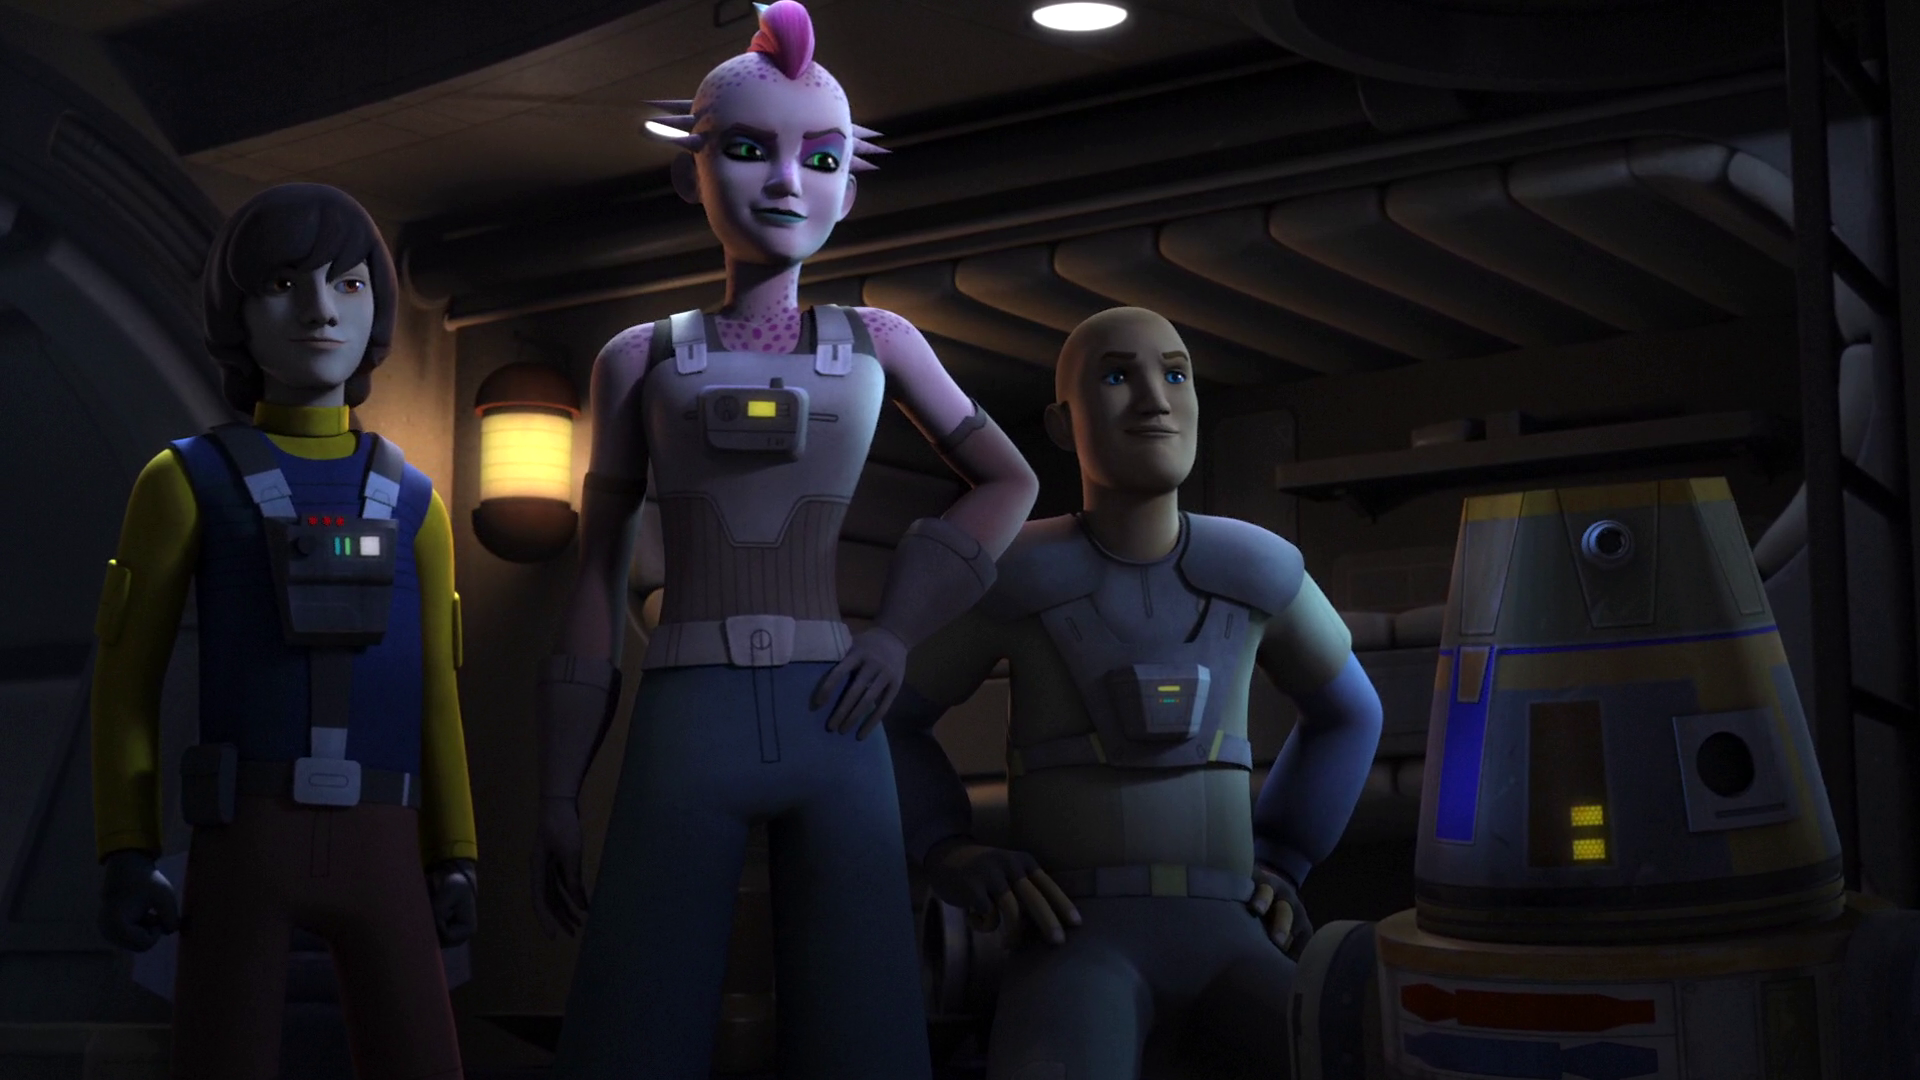
After the skirmish, Mart spoke with Hera via intercom, inviting her and her crew aboard the Sato's Hammer. Hera's ship Ghost docked with the Sato's Hammer, and Mart's crew welcomed Hera and her rebel comrades Ezra Bridger, Sabine Wren, and the astromech droid Chopper. Mart met with the Spectres in his ship's cockpit and acknowledged his relationship as the nephew of Commander Sato. When Mart inquired if his uncle had sent him, Hera explained that she and her fellow rebels had come to evacuate rebel dissidents from Mykapo. Mart dismissed the idea of evacuating Mykapo as cowardice, stating his ability to hold off the Empire. Hera warned them of the Empire's return, but Mart countered that he and his crew had just destroyed a Star Destroyer, mistaking the Gozanti cruiser for one. Ultimately, Mart and his crew refused Hera's offer to leave, reiterating their commitment to defend Mykapo from the Empire.
Despite the unsuccessful meeting, Ezra convinced Hera to allow him, Sabine, and Chopper to stay and repair the Iron Squadron's hyperdrive, determined to win over the squadron. Hera reluctantly agreed but warned them to leave at the first sign of Imperial activity. Mart and his crew permitted Sabine and Chopper to assist R3-A3 with the repairs, though he considered it a waste of time. Sabine and the droids successfully repaired the hyperdrive. However, their efforts were nullified when Mart redirected the power to the armaments and deflector shields. Upon spotting Imperial reinforcements, Mart ordered his crew to their battle stations. This second Imperial force, commanded by Admiral Kassius Konstantine, consisted of an Arquitens-class command cruiser and two additional Gozanti cruisers.
Despite the overwhelming odds, Mart refused to yield and piloted the Sato's Hammer towards Konstantine's forces. Ezra and Sabine disagreed and persuaded Gooti, Jonner, and R3-A3 to join them in their shuttle, Phantom II. When the ship's power failed, Mart saw reason and accompanied the rebels aboard the Phantom II. After everyone else had boarded, Mart remained behind and disengaged the airlock. Changing his mind, Mart launched a frontal assault on Konstantine's light cruiser. However, the Admiral neutralized his explosives by unleashing his frontal batteries. Mart attempted to escape, but the Sato's Hammer's engines were disabled by TIE fighters. Trapped, Mart instructed the Spectres and his crew to flee without him.
Instead of destroying Mart and his ship, Admiral Konstantine ordered one of his TIE bombers to attach a magno-mine to the ship's hull. Panicked, Mart sent a distress signal to Hera and her crew. Konstantine allowed the transmission before cutting it off. While Mart reflected on his mistakes, Hera, her crew, and the rest of Iron Squadron decided to rescue him. Mart was relieved when Hera's ship Ghost exited hyperspace. He informed Hera that the Imperials had attached a magno-mine to his ship. Mart watched as Hera led Konstantine's TIE fighters on a pursuit. This distraction enabled Chopper and R3-A3 to deactivate the magnonmine and its detonator. They then reattached the mine to one of Mart's cargo boxes.
Following a brief dogfight, Hera managed to attach the Ghost to the hull of Sato's Hammer. Shortly after, Mart's uncle Commander Sato arrived on a CR90 corvette and attacked Konstantine's cruiser. Sato reassured his nephew over the com that he was there to get him out. Hera then told Mart to get the bomb ready since she was making a run for Konstantine's cruiser. The rebels flew over the light cruiser and Mart dropped his explosive cargo. The magno-mine damaged the forward section of Konstantine's cruiser and set the ship ablaze. The rebels escaped the system just as Grand Admiral Thrawn arrived on his Star Destroyer Chimaera. Upon seeing the Star Destroyer, Mart and his crew realized that it was difficult for them to take on the Empire by themselves.
Hera flew Mart and his ship to Chopper Base on the planet Atollon. There, Mart embraced his uncle Sato, who thanked Hera and her crew for saving his nephew. Mart then embraced his crew in the presence of the Spectres and Commander Sato. Following the recent events, Mart and his crew decided to join the rebellion.
Assault on Lothal
Under the callsign Phoenix Two, Mart participated in the Rebel assault on Lothal, piloting an X-wing starfighter. However, the attack failed because Thrawn had anticipated their breakthrough of the outer blockade and positioned a large group of TIE fighters to intercept the strike force. Mart crash-landed in Capital City but survived. However, three Imperial stormtroopers surrounded him, and his droid, R3-A3, attempted to defend him before being disintegrated. Hera and Chopper, who also survived their crash-landing, rescued him by hijacking a nearby troop transport and ramming it into the troopers. Mart allowed Hera to take off R3's transmittor, stating that the droid would have helped in any way possible.
Shortly after, they were ambushed by the assassin Rukh, who was tasked with capturing rebel pilots. They temporarily drove him away, and upon finding a sewer entrance, Hera instructed Mart to create a distraction. Mart distracted two stormtroopers, shooting at one, which prompted the other stormtrooper and the AT-DP to chase him. Mart overpowered the other stormtrooper while Hera immobilized the AT-DP. Rukh attacked again, successfully separating Hera from Mart and Chopper. Mart was concerned for Hera's safety, but she told him to escape before the Imperials could capture him. He followed the starbirds and was eventually rescued by Kanan Jarrus, apologizing for not being able to protect Hera.
Kanan's death
Mart, Ryder Azadi, and Jai Kell observed as the Spectres Ezra, Sabine, Zeb, and Chopper constructed three Loth-bat gliders for their mission to rescue Hera Syndulla. Although the rebels succeeded in rescuing Hera, Kanan was killed when Governor Arihnda Pryce bombarded the Lothal City fuel depot. After Kanan's death, Mart, along with Kell and Azadi, listened to a propaganda broadcast by Imperial broadcaster Alton Kastle, who claimed that the Rebellion on Lothal was a lost cause. However, the Spectres later realized that Kanan's sacrifice was not in vain and that the explosion had disrupted the production of TIE Defenders on Lothal.
Trapping Governor Pryce
Mart and other rebels later took part in Ezra and Azadi's plan to liberate Lothal from Imperial rule. The initial step involved using Ryder to lure Governor Arihnda Pryce and her forces into a trap at the Lothal cliff dwelling. Before the assault, Mart and Jai Kell detected movement. Pryce attacked the rebel base with a fleet of patrol transports, stormtroopers, and jumptroopers.
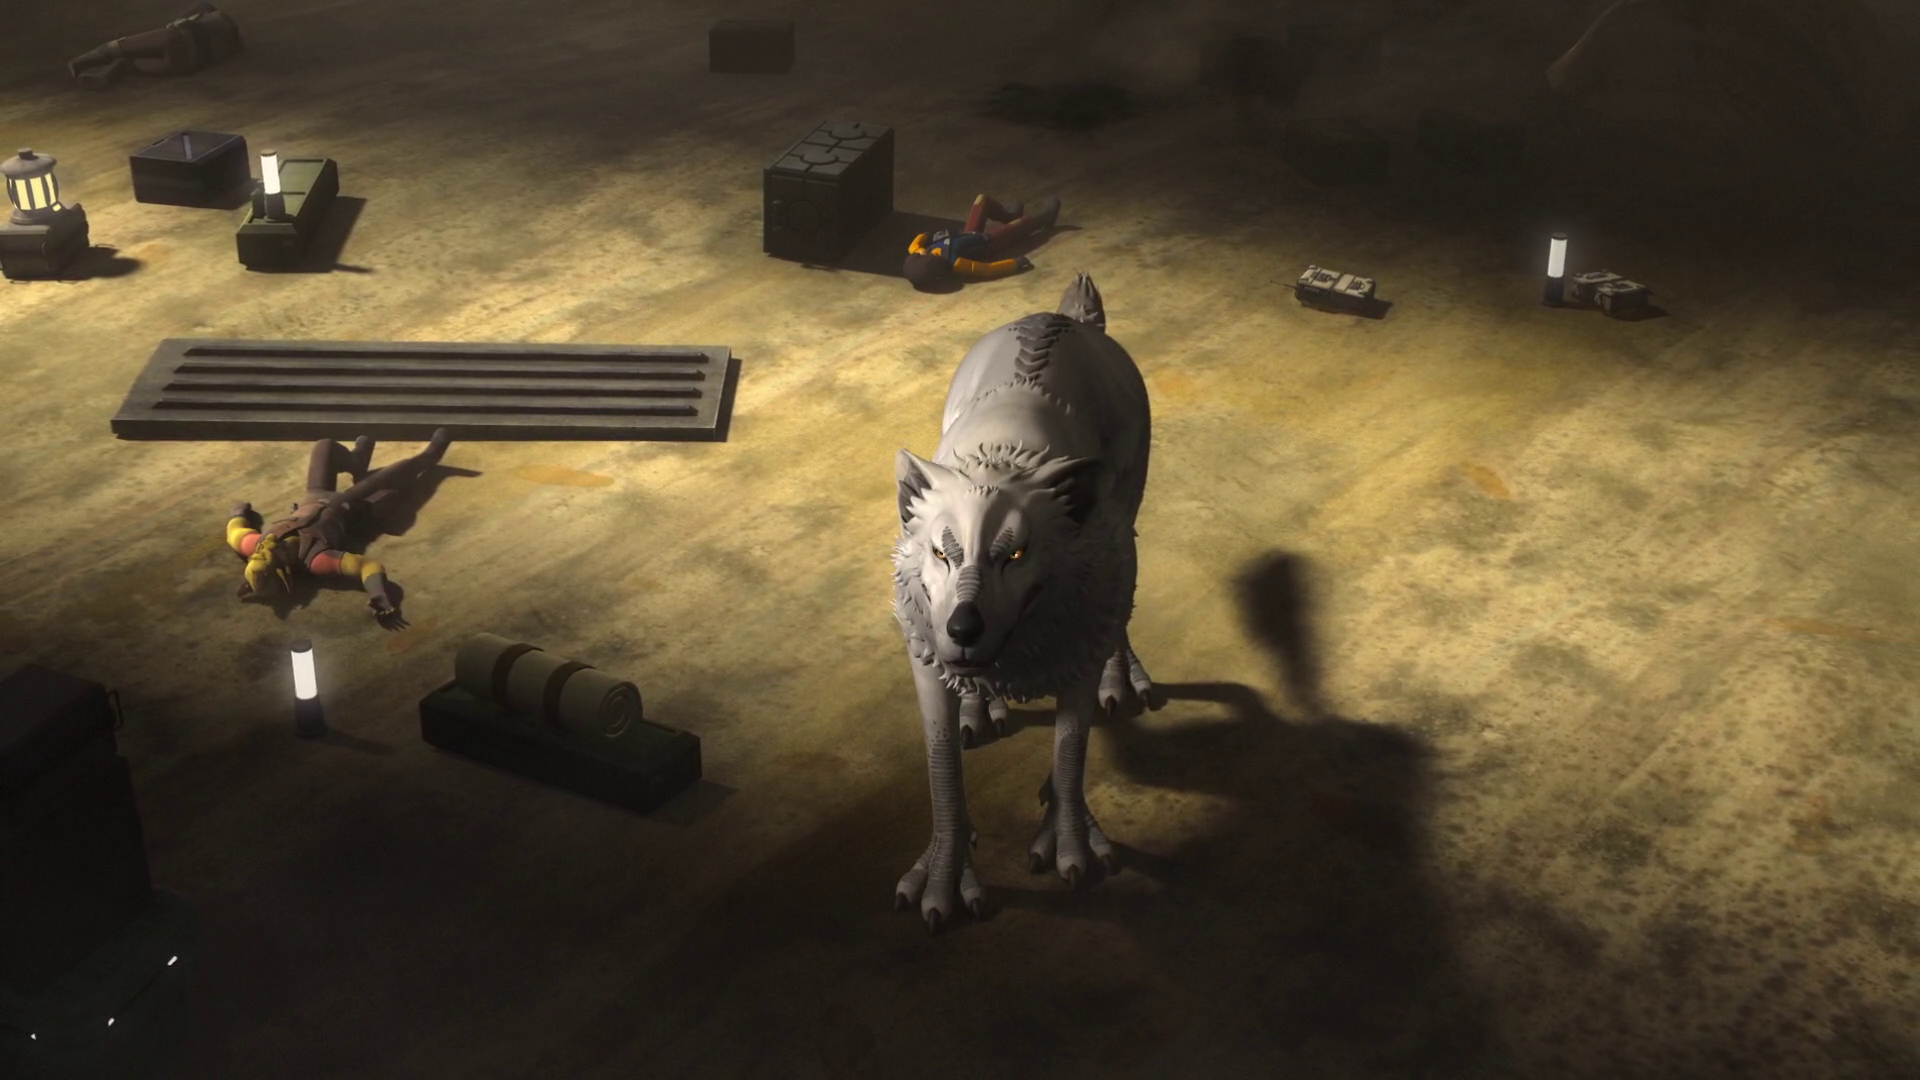
During the fighting, Pryce managed to corner the rebel forces on top of a Mining Guild ore crawler. Although the Imperial forces managed to overwhelm and capture the rebels, they were then ambushed by Hera's reinforcements and a pack of loth-wolves. Pryce, along with several stormtroopers, was taken prisoner, allowing the rebels to proceed with their plan to liberate Lothal.
Liberation of Lothal
During the Liberation of Lothal, Mart, along with Cikatro Vizago and Commander Wolffe, remained at the Lothal cliff dwelling. Their task was to evacuate the other rebels once their mission to launch and infiltrate the Dome had been accomplished. However, they were ambushed and attacked by Grand Admiral Thrawn's Noghri assassin Rukh, who nearly killed Mart with his blaster before being driven off by the White Loth-wolf. Still, Rukh managed to steal their patrol transport.
When Mart awoke, he realized that Rukh might have revealed the rebels' plan to Thrawn. Mart then revealed to Wolffe and Vizago that Ezra had entrusted him with a secret mission in the event that Thrawn returned before they could launch the Dome. The three rebels flew aboard the Spectres' ship Ghost. During the journey, Wolffe inquired about the details of Ezra's plan and remarked that nobody used Frequency Zero anymore. Mart replied that he was unsure if Wolffe would believe Ezra's plan and told him to trust Ezra. Following Ezra's orders, they issued a transmission on Frequency Zero, which summoned a large pod of purrgil, which attacked Thrawn's Seventh Fleet in orbit.
Piloting the Ghost, the rebels guided the purrgil pod towards Thrawn's Imperial Star Destroyer Chimaera. As they approached the Chimaera, Mart asked Wolffe if he would have believed Ezra's plan if he had told him. Wolffe remarked that the plan had Ezra written all over it, while Vizago added that it was going to work. The purrgil carried Thrawn, the Chimaera, and Ezra into the depths of space, which was Ezra's intention. Mart and his fellow rebels then evacuated their comrades aboard the Ghost before Sabine detonated the Dome, eliminating the Imperial garrison and ending Imperial rule on Lothal.
Operation Starlight
Ambush near Felucia
In 3 ABY, Mart joined Starlight Squadron as part of the Fourth Division's Operation Starlight. Mattin, using the callsign Starlight Four, piloted a T-65B X-wing starfighter. In their first mission, led by Starlight Leader Lieutenant Shara Bey, they were tasked by General Leia Organa with locating the scattered divisions of the Alliance Fleet after the Battle of Hoth, informing them that the Empire had cracked Alliance communications, and delivering a new Trawak security code developed by C-3PO and his team. During their search, the squadron discovered wreckage of the Sixth Division near Felucia. Shortly after, they encountered Imperial probe droids waiting nearby. The probe droids latched onto Mattin's astromech droid, and those of his fellow X-wing pilots, and attempted to access the astromechs' archives by drilling into their conical domes. Fearing the Empire might learn the coordinates of the other rendezvous points, Commander Wedge Antilles suggested shooting them off, however Bey questioned his ability to actually pull it off. Instead, Bey ordered all pilots to set their astromech's self-destruct and eject them. However, doing this would mean losing their nav data that would make it difficult getting back to the fleet. With no other choice, the astromechs ejected and detonated, saving their valuable data from the Empire.

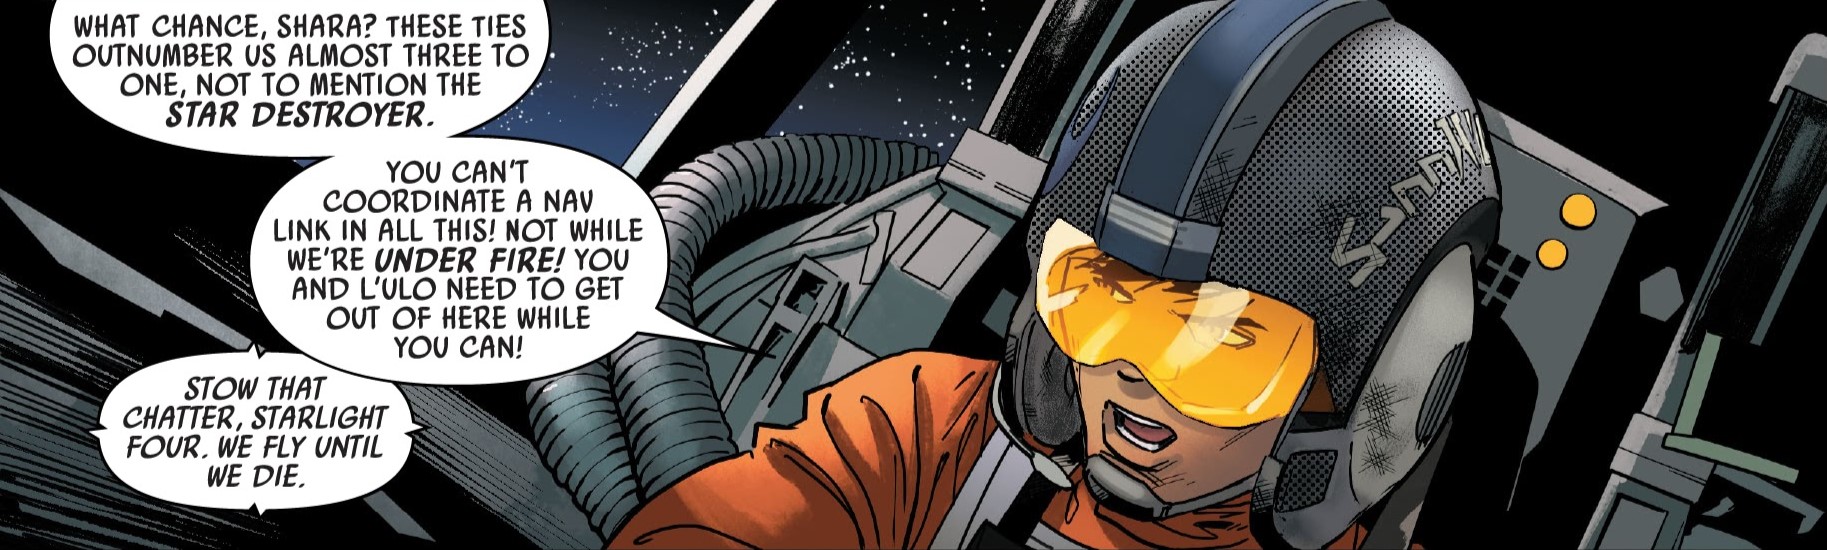
Almost immediately, the Imperial II-class Star Destroyer Tarkin's Will arrived and ambushed the squadron. The Star Destroyer launched TIE fighters, which outnumbered the Rebel starfighters three to one. Mattin suggested the A-wings leave while they still had a chance, as there was no way they could coordinate a hyperspace jump during a dogfight without their astromechs. However, Bey made it clear that she was staying to fight. After studying the TIE's tactics, Captain L'ulo L'ampar (Starlight Three) noticed the TIEs were not ganging up on individual starfighters, per the Imperial Tactical Manual when outnumbering the enemy, and quickly realized they were being herded. The Tarkin's Will engaged its tractor beams, catching the squadron's starfighters to bring them in for interrogation. Evaan Verlaine and Antilles agreed that using brute force to try to escape would not work.
Antilles then suggested a maneuver that the Rebel pilots war-gamed back in Rogue Squadron but was untested. The maneuver involved accelerating full throttle and riding the tractor beam toward the Star Destroyer. As they did this, the Imperials aboard the Tarkin's Will remained unphased, as the starfighter tactics gave the impression the Rebels were planning to ram the Star Destroyer in a last-ditch suicide mission. As soon as the shields dropped to pull the starfighters in, the squadron targeted the tractor beam projectors and fired their concussion missiles and proton torpedoes, destroying it. With the tractor beam offline, and the Star Destroyer's targeting computers unable to lock on due to their speed, the Starlight starfighters raced into the hangar, and fired upon the TIE fighters and stormtroopers within. This prevented anymore TIEs from scrambling from the Tarkin's Will.
Escaping from the Tarkin's Will
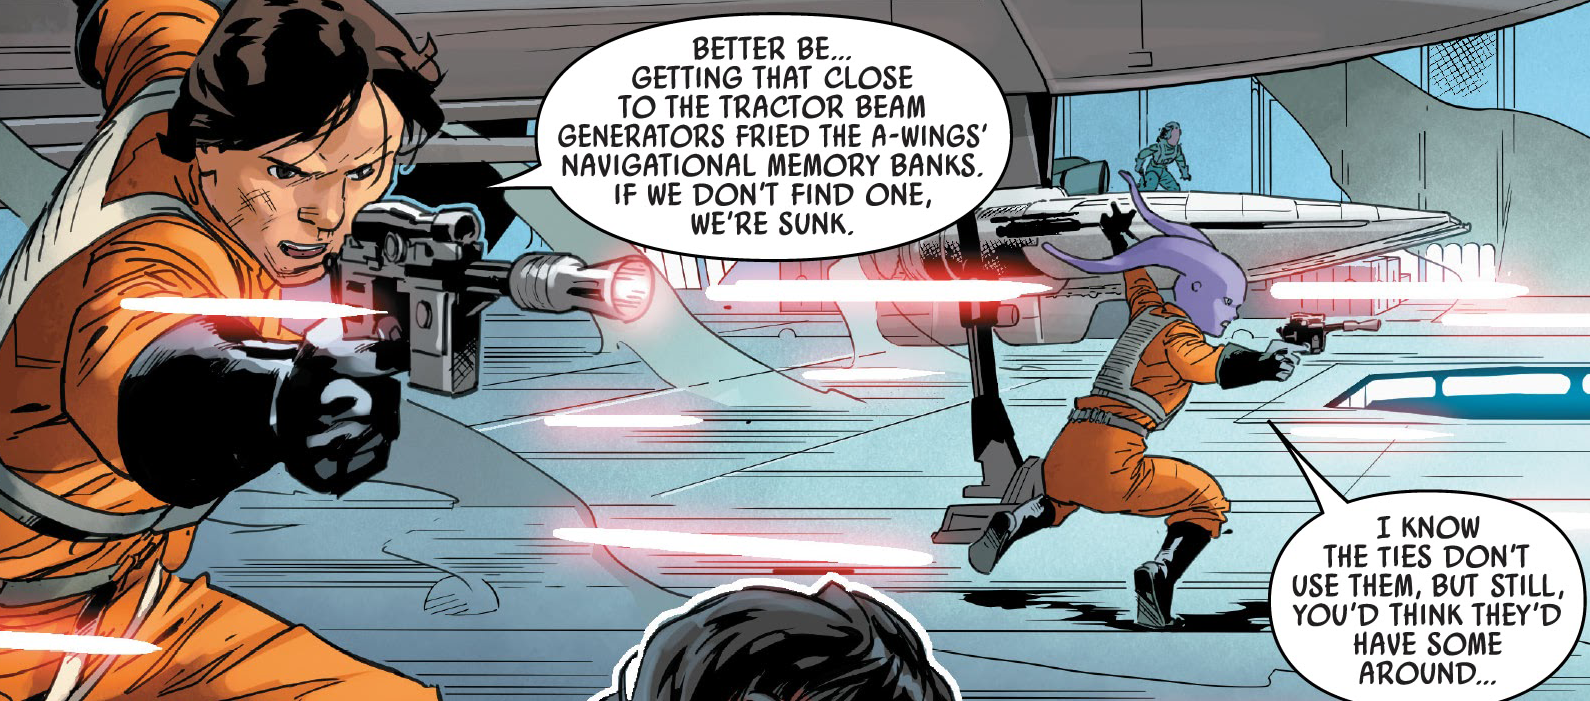
Mattin and Verlaine's X-wings guarded the hangar entrance to prevent TIE fighters from entering, while L'ampar's A-wing protected the interior access door from stormtroopers. With the hangar temporarily secured, the pilots landed and disembarked. The A-wings' navigational memory banks had been fried by the tractor beam generators, so Bey and Freyta Smyth hurried towards a group of Imperial astromech droids nearby, while Antilles provided cover fire. Smyth hacked into one of the astromechs and was surprised by the weak encryption. Bey instructed Smyth to return the astromech to an X-wing and begin hyperspace calculations, while she remained behind to do something. Just as L'ampar destroyed an AT-ST walker, more entered the hangar. Antilles urged Bey to hurry, as the Imperial astromech in his X-wing had almost completed the nav calculations and all their ships were linked and ready to go. Bey explained that she had gathered valuable intelligence from the other Imperial droids in the hangar, which they could take back to the fleet.
Abandoning Starlight Leader

As Bey raced back to her A-wing, it was destroyed by an AT-ST, leaving her stranded. Witnessing this, L'ampar told Bey not to give up, as Starlight would continue fighting the AT-STs and secure her a ship. However, Bey recognized the futility of this, as staying to help would cost them their only chance to return to the fleet. She issued a direct order to L'ampar to leave, along with a request to tell her husband, Kes Dameron, that she loved him and to kiss their son, Poe, for her. L'ampar reluctantly acknowledged the order, and the squadron departed without her. On the way back to the fleet, L'ampar, now Starlight Two, transmitted to the division that the mission was unsuccessful. He reported finding the remains of the Sixth Division, the ambush by the same Star Destroyer that had been hunting them across the galaxy, and the battle on it that resulted in leaving Starlight Leader behind. He ended with the one piece of good news: the capture of an Imperial astromech droid with memory banks full of useful navigational data, which was Bey's idea, and one Organa planned to use for Operation Starlight and in finding the Tarkin's Will so they can hunt down Commander Zahra. Later, Mattin's squadron leader Bey, who everyone thought had been caught, had managed to evade capture, and escape from the Star Destroyer's hangar deck. Bey had found a hiding place somewhere on the big, city-sized starship and managed to dismantle an Imperial astromech droid and slice into the Imperial systems to obtain valuable information. Bey raised comms with the Fourth Division and talked to her husband and then debriefed General Organa on the intelligence she had gathered while in hiding.
Personality and traits
Mart Mattin, a young human male characterized by his long, dark hair and brown eyes, possessed a creative yet somewhat impetuous rebellious spirit. A born leader, Mart commanded his rebel group, known as the Iron Squadron.
Prior to the Skirmish over Mykapo in 2 BBY, it became clear that neither Mart nor any member of Iron Squadron had ever actually encountered a Star Destroyer, despite being aware of their existence. This lack of firsthand experience caused them to misidentify Gozanti-class cruisers and Arquitens-class command cruisers as Star Destroyers, fostering an overconfident belief in their ability to independently challenge the Galactic Empire. However, the sudden appearance of the Chimaera emerging from hyperspace left Mart utterly amazed by the true scale and imposing presence of Star Destroyers.
Later, Mart contributed his piloting expertise to the Rebel Alliance, piloting a T-65B X-wing during the Attack on Lothal. Despite his skill, Mart and his entire squadron were shot down by Imperial forces. Mart experienced great distress when Imperial stormtroopers destroyed his droid, R3-A3. In remembrance of the droid's sacrifice, he arranged for Chopper to inherit its transmitter. Mattin was also proficient with a blaster. He held Hera Syndulla in high regard and was unwilling to abandon his commanding officer. Nevertheless, he reluctantly obeyed Hera's orders to retreat while she remained behind to delay their Imperial pursuers.
Ezra, recognizing Mart's piloting abilities and his tendency for recklessness, entrusted him with the delicate task of guiding a pod of purrgil to assault the Imperial fleet during the Liberation of Lothal.
Equipment
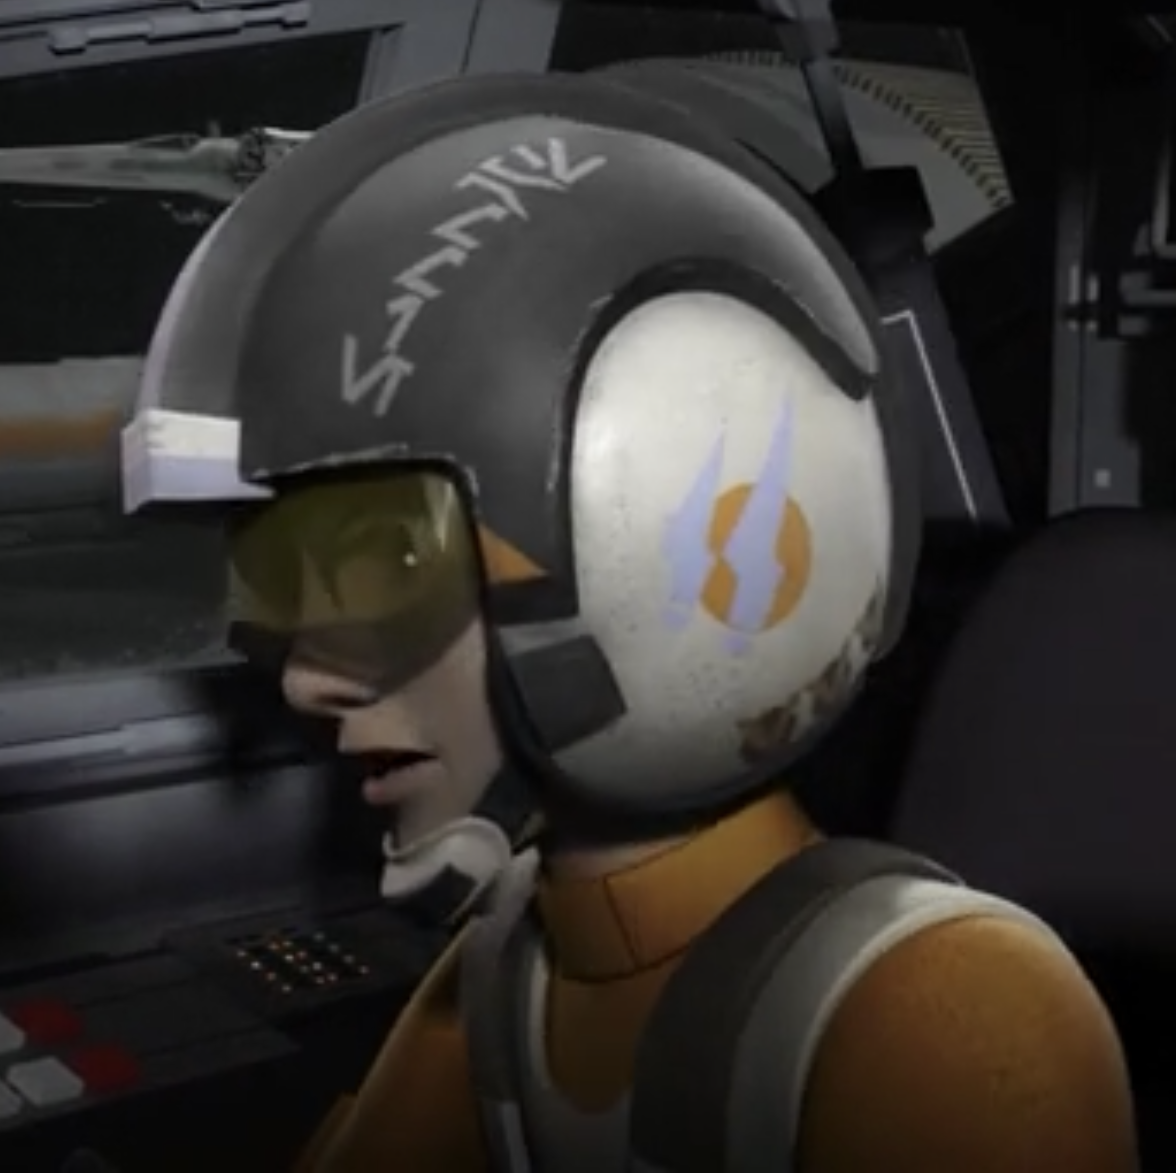
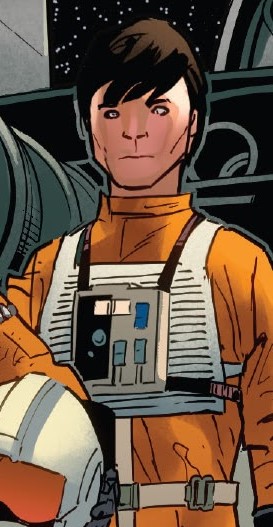
While piloting an X-wing, Mart Mattin wore an orange flight suit in conjunction with a gray and white flight helmet. The helmet featured Aurebesh inscriptions across the top, which translated to "Sammie."
Behind the scenes
Zachary Gordon provided the voice for Mart in "Iron Squadron," the eighth installment of the third season of Star Wars Rebels. His character was named as a tribute to Matt Martin, a member of the Lucasfilm Story Group.