Attack on Lothal
The Assault on Lothal, also known as the Battle of Lothal, unfolded during the Galactic Civil War in the year 1 BBY. In this conflict, the Alliance to Restore the Republic launched an offensive against the planet of Lothal, aiming to obliterate the Imperial Armory Complex. The Galactic Empire was utilizing this complex for the planned production of TIE/d "Defender" Multi-Role Starfighters. Prior to this, the Rebels had made an earlier attempt, involving forces from the Phoenix Cell and the [Massassi Group](/article/massassi_group]. However, Grand Admiral Thrawn, the Imperial commander, foresaw the attack and ambushed the Rebels at their base located on Atollon. Following this setback, Alliance High Command hesitated to authorize another strike. Their reluctance changed when they discovered the Empire's plans to manufacture the even more sophisticated TIE/D Defender Elite at the same factories, and the implementation of Protocol 13 on Lothal, which involved the evacuation of all Imperial personnel.
Consequently, Hera Syndulla successfully convinced the Rebel leadership to sanction a fighter assault on Lothal. Promoted to the rank of General, she was entrusted with commanding a force comprising 24 fighters and bombers. This force was a combination of T-65B X-wing starfighters and BTL-A4 Y-wing assault starfighter/bombers, with the primary objective of targeting the Lothal City fuel depot. Simultaneously, on the ground, the remaining members of Hera's team, known as the Spectres, along with members of the Lothal resistance group, worked to dismantle the anti-air defenses safeguarding the factories. During the aerial engagement, the Rebel forces suffered some losses inflicted by the Imperial ace Commander Vult Skerris. However, Hera managed to lure him into a carefully laid trap and shot him down, setting off a sequence of events that resulted in the destruction of a Star Destroyer. This created the opening needed for Hera's forces to proceed towards their designated targets.
Nevertheless, Thrawn had anticipated this move and had a second wave of TIE fighters prepared. The entire strike force was decimated, with several fighters crashing into Lothal City. Among the few survivors were Hera, her astromech droid Chopper, and Mart Mattin. Hera rescued Mart from stormtroopers attempting to apprehend him, but the three were soon pursued by Rukh, Thrawn's assassin, who had been dispatched to capture the surviving Rebel pilots, especially "Captain" Syndulla, alive. The Rebel trio managed to reach a sewer hatch, but while diverting the Imperial forces guarding it, Rukh caught up, and Hera was captured as Mart and Chopper fled on her orders. Upon reaching an exit outside the city, Mart and Chopper encountered Kanan Jarrus, who informed them that while they could do nothing more to rescue Hera, he could take action.
Prelude
Planned attack

Lothal, a remote planet situated in the Outer Rim, gained significance for the Galactic Empire due to its mineral resources. Phoenix Cell, the rebel group operating from the Lothal sector on the isolated world of Atollon, initiated preparations to strike the Imperial Armory Complex, a facility producing weapons and vehicles for the Empire's military. Another rebel cell, General Jan Dodonna's Massassi Group, one of the largest in the galaxy, was invited to participate in the operation. Over several months, members of Phoenix Squadron, including the Spectres, began their preparations. Ezra Bridger, a Spectre, was from Lothal and eager to liberate his homeworld. Since the Siege of Lothal years prior, Imperial security had tightened on the planet. Former Lothalite governor Ryder Azadi had formed a resistance group after escaping from prison. Azadi's cell supported Phoenix Squadron's planned attack and assisted with intelligence gathering.
Around 2 BBY, coinciding with the Spectres breaking out the pirate Hondo Ohnaka from an Imperial prison on Naraka, Lothalian Governor Arihnda Pryce sought to decisively address the sector's insurgency, having long neglected her responsibilities. She summoned Grand Admiral Thrawn and his Seventh Fleet for assistance. Pryce believed Thrawn, with his broader perspective, would be more effective than the Imperial Navy's senior officer in the sector, Admiral Kassius Konstantine. Thrawn deduced that the rebels, having freed Ohnaka, intended to steal old Y-wings from the Imperial scrapyard Reklam Station on Yarma. Pryce intercepted the rebels as they fled with the starfighters, witnessing the arrival of Phoenix Squadron's forces to rescue them. However, Thrawn instructed her to allow their escape, realizing this was not the entire rebel fleet. He intended to wait for the entire fleet before launching an attack.
Through numerous missions, Phoenix Squadron and the Spectres gathered intelligence and weapons for the impending assault. The Y-wings acquired from Reklam Station were allocated to the Massassi Group. After learning from a rebel agent that the Empire was constructing a new weapon in the Lothal factories, Kanan Jarrus, Bridger, and Chopper infiltrated the complex to identify it. They successfully stole the plans for the TIE/d "Defender" Multi-Role Starfighter, a sophisticated TIE model equipped with deflector shields. Shortly before the two rebel units were set to strike, rebel cells across the galaxy united to form the Rebel Alliance.
Piece by piece

As the rebels prepared their assault on Lothal, Thrawn gathered information to thwart them. The Armory Complex infiltration provided the Grand Admiral with his most significant clue to locate the rebels' base: the revelation that the infiltrators had received assistance from someone within the Imperial ranks. Thrawn intended to use the spy, once caught, to lead him to the rebels. This spy, a Fulcrum agent, was ISB Agent Alexsandr Kallus, a former adversary of the Spectres who had experienced a change of heart after an encounter with Spectres member Garazeb Orrelios on the Geonosian moon Bahryn. Kallus later alerted Phoenix Squadron to Thrawn's use of E-XD-series infiltrator droids to search for rebel bases, enabling Orrelios, Chopper, and AP-5 to prevent EXD-9 from revealing Chopper Base's location to the Empire. However, this incident helped Thrawn narrow down the number of planets he needed to search.
Later, the Empire intercepted one of Kallus' Fulcrum transmissions, leading Thrawn to discover the spy's codename and that they were an Imperial officer. The Grand Admiral summoned ISB Colonel Wullf Yularen to assist in locating the spy. The rebels, realizing the transmission had been monitored, dispatched Bridger, with Chopper and AP-5 assisting, to rescue Kallus. Shortly after Ezra boarded the Arquitens-class cruiser where Kallus and Lieutenant Yogar Lyste were stationed, posing as a shuttle thief, Thrawn's flagship, the Chimaera, arrived. Kallus and Lyste were summoned onboard. Lyste, eager to impress the Grand Admiral, brought along the captured Bridger, and the droids managed to accompany them when AP-5 claimed they had a recording of the shuttle theft. In a meeting, Thrawn informed Kallus, Lyste, and Admiral Konstantine about the spy and his proximity to locating the rebel base. Thrawn had also interviewed other Imperial officers, intending to trap the spy when they attempted to warn the rebels. Meanwhile, Kallus convinced Lyste that Pryce was the spy, leading him to follow her. Using a code cylinder stolen from the Lieutenant, Kallus freed Ezra from the Chimaera's brig and they infiltrated Thrawn's office, sending the Star Destroyer's clearance codes to Jarrus and Rex, the retrieval team, and erasing Atollon from Thrawn's holomap. Ultimately, Kallus implicated Lyste as Fulcrum, and the rebels escaped. The deception fooled Pryce and Konstantine, but Thrawn and Yularen remained privately suspicious. One forgotten piece of evidence, the helmet Bridger wore as part of his disguise, helped Thrawn deduce that the ISB agent was the real spy. However, he kept this information secret for his own purposes.
Battle of Atollon
On the eve of the planned attack on Lothal, Thrawn arrived at Lothal City's Imperial Complex to warn Governor Pryce and Admiral Konstantine. Grand Moff Wilhuff Tarkin also attended the meeting via hologram. Kallus, not invited, used a mouse droid to spy on the meeting from the vents. Thrawn informed Pryce, Konstantine, and Tarkin of the impending attack and that General Dodonna's fleet would be assisting Phoenix Squadron. Overhearing everything, Kallus traveled to an old communications tower outside the city to transmit a warning to the rebels. There, Thrawn ambushed him, using the trajectories of Kallus' transmission and the Massassi fleet to discover the rebel base's location. Kallus managed to send a brief message but was arrested by the Grand Admiral and his death troopers. On Atollon, Phoenix Squadron and the recently arrived Massassi Group received the warning in time to alert their forces. The arrival of the Imperial fleet forced the Rebels to abandon their planned attack on Lothal.
Two Interdictor cruisers prevented the Rebel ships from escaping. Hera Syndulla devised a plan to create an opening for one ship, Bridger's Gauntlet, to escape the Imperial blockade and obtain reinforcements. She assigned Jarrus and Chopper to accompany him; however, Jarrus decided to seek assistance from the mysterious Force wielder Bendu. During the ensuing space battle, many Rebel ships were destroyed. Bridger's opening occurred when Commander Jun Sato sacrificed himself and his ship, the Phoenix Nest, by ramming Admiral Konstantine's Interdictor. Shortly after Bridger escaped, Syndulla was forced to order a retreat. In hyperspace, Bridger requested reinforcements from Alliance leader Mon Mothma, but she regretfully declined. Bridger decided to seek help from fellow Spectre, the Mandalorian Sabine Wren, and her family. Wren had left Phoenix Squadron earlier after reuniting with her family. She had acquired the Darksaber, an ancient Mandalorian weapon, and remained to give it to the rightful leader of Mandalore. Ezra arrived on Krownest to learn from Countess Ursa Wren that they were engaged in a civil war and had limited resources to spare. Wren persuaded her mother to hear Bridger out, and Ursa allowed Wren to take some ships and willing warriors to assist the Rebels. She planned to strike the remaining Interdictor.
Back on Atollon, Jarrus failed to convince the Bendu to help the Rebels, as he refused to take sides. However, Jarrus enraged the Force wielder by calling him a coward. The Rebels took shelter under Chopper Base's shield from Thrawn's orbital bombardment. After the bombardment, Thrawn led a ground assault to eliminate the Rebels, under orders from Tarkin to capture the commanders. Pryce was left in charge of the fleet. During the ground assault, the Bendu arrived in the form of a thunderstorm and attacked the Imperials and Rebels with lightning. The remaining Rebel ships took off. Thrawn had his troops concentrate their fire, bringing down the Bendu, only for the Force wielder to vanish. Meanwhile, Bridger, Wren, and their strike team arrived. As Fenn Rau and his Fang fighters kept the TIE fighters occupied, Ezra, Sabine, and the Wren warriors attacked one of the Interdictor's gravity well projectors. Eventually, the projector was breached, causing the warship to explode. Onboard the Chimaera, a captive Kallus took advantage of Pryce's rage at the Interdictor's destruction to arrange his escape, and was picked up by the Ghost in an escape pod. The remaining Rebel ships fled.
Prioritizing
Following the battle, the surviving Rebels went to the Rebel Alliance's headquarters on Yavin 4. However, Jarrus, Bridger, and Chopper accompanied Wren back to Mandalore to help her rescue her father from the Empire. There, Wren gave the Darksaber to Bo-Katan Kryze. The four Spectres did not arrive on the moon until after the mission was completed. Once Bridger reached Yavin 4, he was frustrated that the Rebellion did not seem to consider trying to help the people of Lothal again. Mothma explained that the Alliance could not allocate significant resources to assist only a few planets and had to focus on the broader picture.
Weeks later, a message from Azadi arrived, warning that the Empire had developed a new TIE Defender on Lothal. The Spectres volunteered for the mission, which Mothma approved, having witnessed the Defender's threat firsthand. She cautioned that the Alliance could not send additional forces. They smuggled themselves onto Lothal aboard the Broken Horn and met with the Lothal resistance in the occupied town of Jhothal, escaping through its sewers with the help of resistance member Jai Kell. After meeting with Azadi, the Rebels split up to reconnoiter the Imperial facilities. Syndulla and Jarrus, observing Lothal City from a distance, discovered preparations indicating the Empire intended to mass-produce the Defender Elite. Azadi took Bridger, Wren, and Orrelios to a remote Imperial airfield, identified by his spies as the location for a planned test flight of the prototype. During the recon mission, Ezra and Wren ended up stealing the prototype when Thrawn and Pryce arrived at the airfield while the two were attempting to steal the fighter's flight data recorder.
After fleeing in the fighter and shooting down pursuing TIE interceptors, Bridger and Wren survived the crash after the prototype Elite's kill switch was activated. They fled into the wilderness with the flight recorder, hiding the Elite's hyperdrive near the site for later recovery, to be installed on Ryder's UT-60D U-wing starfighter/support craft, which lacked a working one. Ezra and Sabine reached the Rebel camp with the help of a Loth-wolf. Later, Bridger, Orrellios, and Jai were sent to retrieve the hyperdrive, a mission complicated by the arrival of Thrawn's personal assassin, Rukh. He pursued the two young men, while Zeb escaped with the hyperdrive in a stolen Imperial Troop Transport. Ezra and Jai evaded Rukh, but not a homing beacon he covertly planted on their speeder bike. Imperial forces arrived at the Rebel camp just after Sabine finished installing the hyperdrive on the U-wing, and Hera and Chopper escaped in the ship, reaching Yavin 4 with the flight recorder. Jai fled on a landspeeder, and the other rebels escaped the Imperials with the help of several Loth-wolves, who brought them to a location on the other side of Lothal. The white wolf revealed it knew Kanan's birth name, Caleb Dume, before departing.
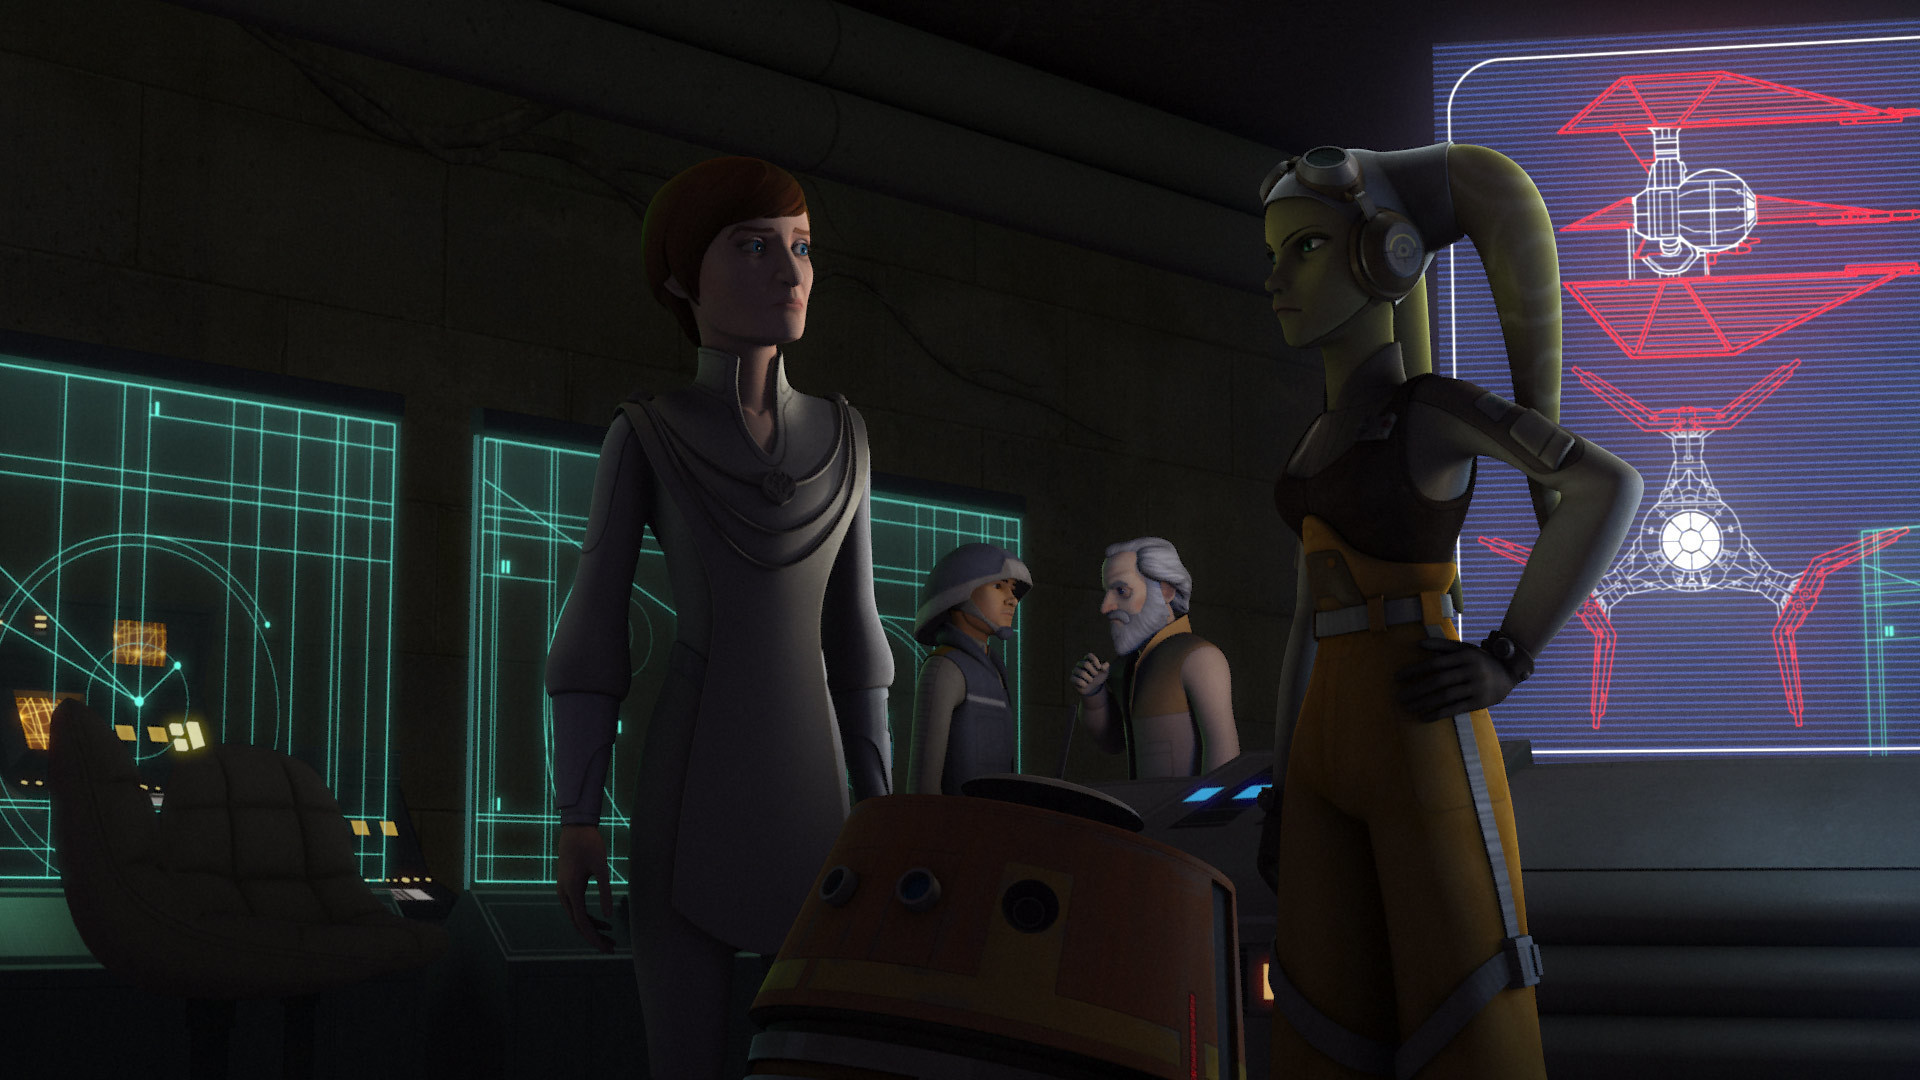
At Yavin 4, analysis of the flight recorder revealed no weaknesses in the TIE Defender Elite. It also outperformed any starfighters the Alliance fielded, leading Hera to argue for an attack on Lothal to prevent the fighter's production. Mothma asked Syndulla and Chopper to leave the briefing room while the Alliance leaders discussed the proposal. Eventually, Mothma informed Syndulla that, although no decision had been made, they had discovered the Empire had enacted Protocol 13, the evacuation of all Imperial personnel, on Lothal. This prompted Syndulla to reenter the briefing and inform the Rebel leaders, Bail Organa and General Dodonna, that they had no time to waste. She argued that an attack would demonstrate the Rebellion's resolve and that she had a team on Lothal ready to assist. This argument persuaded the Alliance leaders, and Mothma authorized Syndulla to plan the attack, promoting her to general. When Hera regained contact with the Spectres, who had hijacked a Mining Guild ore crawler to access a long-range transmitter, she informed them of the impending attack. Bridger was particularly thrilled that the long-planned attack on Lothal was finally going to happen.
Attack

Initial strike
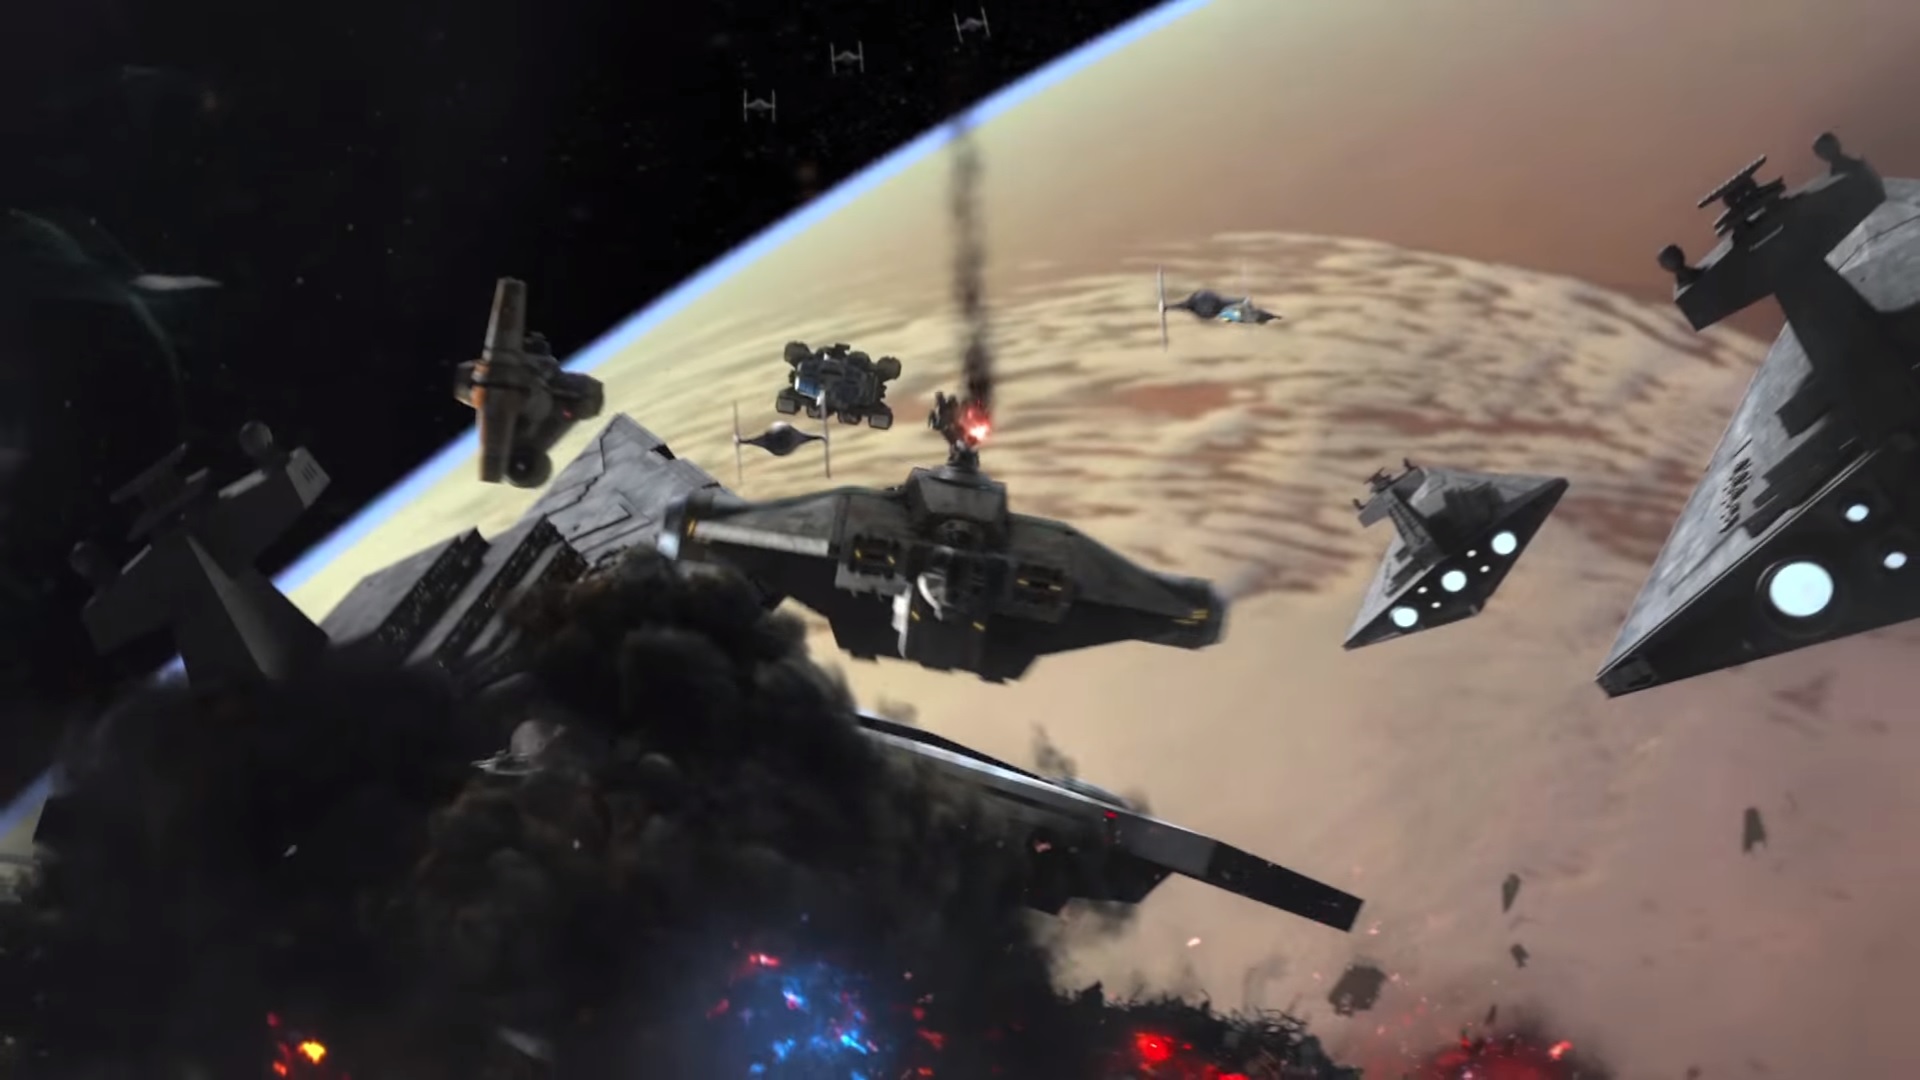
On the planet's surface, the remaining Spectres, along with Ryder and Jai, approached the air defenses protecting the factories and planted explosives. They went undetected by the Imperials and destroyed the turrets without issue. Hera, commanding a squadron of T-65B X-wing starfighters and BTL-A4 Y-wing assault starfighter/bombers, totaling twenty-four ships, arrived at Lothal to attack the Lothal City fuel depot. The Imperial blockade detected their arrival. Thrawn ordered his fighters launched, sending his best pilot, Commander Vult Skerris, in a Defender Elite. When Pryce contacted him about the destruction of the air defenses, he assured her that no Rebel ships would breach the blockade.
Hera instructed her X-wing pilots, including Mart Mattin, Cleat, and Duke, to ensure the slower Y-wings could penetrate the blockade. During the attack, Skerris shot down Cleat and Duke, prompting Hera to engage him. He pursued her, and his Defender Elite gave him an advantage. However, Hera outmaneuvered him, luring him into the sights of the Chimaera's gunners. Thrawn, realizing Hera's trap, ordered Skerris to disengage, but he refused as he almost had her in his sights. The Grand Admiral ordered his gunners to open fire, and the shots deactivated Hera and Skerris' shields. Hera flew over the Star Destroyer's bridge and fired on its scanning array, damaging it and creating a cloud of smoke, which she flew into. She closed her fighter's S-foils and flew through the narrow gap. Skerris lost sight of her in the smoke, and his fighter's larger profile forced him to go around the structure. Hera waited and fired at him, damaging the unshielded Defender Elite, ripping off two wings and sending Skerris spiraling out of control. He crashed into an Arquitens-class command cruiser, damaging its magazine. The cruiser exploded and crashed into a Star Destroyer, shearing off its bridge superstructure. Hera and ten other surviving rebel pilots (eight X-wings and three Y-wings) seized the opportunity and headed for Lothal.
Shot down
Thrawn had positioned a secondary squadron of fighters within the cloud cover of Lothal, and they initiated an attack run. From outside Lothal City, the Spectres could only watch in dismay as the Rebel fighters were shot down. However, at least three managed emergency landings within the city limits, including Hera's craft. Chopper successfully roused Hera and extracted her from the wreckage, but the crash had damaged his communications array, preventing contact with the remaining Rebels. A local citizen urged them to seek refuge, warning of approaching Imperial forces and suggesting the eastern gate as an escape route. Hera and Chopper evaded a searching patrol transport before retreating further into the urban environment. The other Rebels, situated outside the city, ultimately retreated, realizing the attack was over and that remaining in the open plains would expose them to Imperial detection. Kanan, however, hesitated, driven by his belief that he could rescue Hera. Eventually, he parted ways with the others, heading back towards the capital, while the rest made their way to their hidden base.
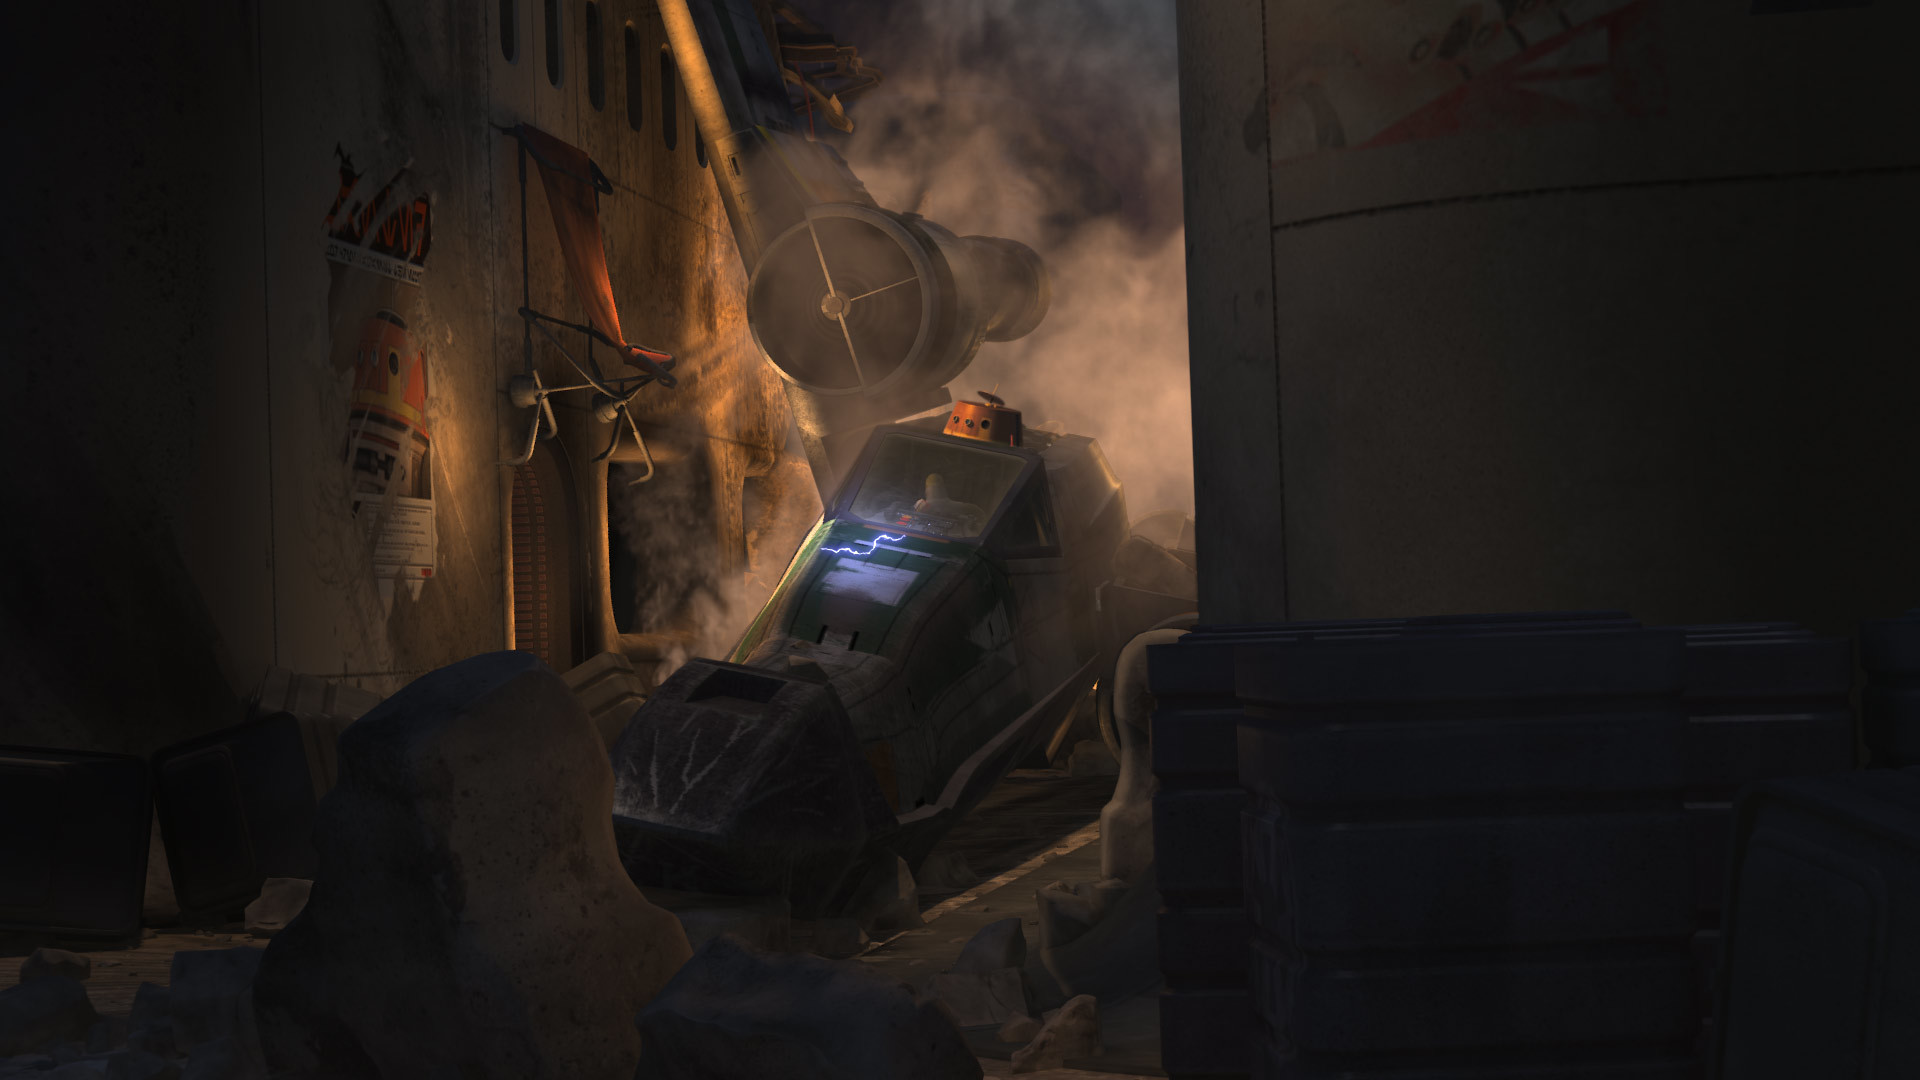
Upon receiving reports of downed Rebel fighters within the city, Thrawn dispatched Rukh to apprehend the surviving pilots, prioritizing their capture alive, especially Captain Syndulla. Rukh, aided by Pryce's forces, conducted a sweep of the city and successfully captured at least one pilot, Secon Daree. When Pryce learned that the Rebel Flight Leader's starfighter had been located in the eastern district, but the pilot and her astromech were missing, she ordered a complete lockdown of the area, with a methodical search of every building until Hera was found. Meanwhile, Hera and Chopper were devising a plan to slip past an Imperial blockade when Chopper intercepted a distress signal from a Rebel astromech droid. Upon investigation, they discovered the wreckage of Mart's fighter. Mart was pinned down by stormtroopers, and his droid, R3-A3, was valiantly defending him despite Mart's injuries. The stormtroopers aimed to seize R3, recognizing the potential value of his memory banks, and ultimately destroyed him to disable him. Witnessing this, Hera instructed Chopper to remain hidden and commandeered a troop transport. Using the transport, she rescued Mart, who obtained a blaster from a fallen trooper, and together, the three Rebels eliminated the remaining stormtroopers. Mart authorized Hera to use R3's transmitter as a replacement for Chopper's damaged one. After the installation, Chopper attempted to contact the other Rebels, but Imperial jamming thwarted his efforts.
City Escape
Shortly after, the three Rebels found themselves under attack by Rukh, who had tracked their scent. Hera returned fire, and the trio fled into the labyrinthine streets. Rukh pursued them across the rooftops. While evading capture, Mart spotted Rukh above and fired upon him, causing the assassin to descend to street level and engage them directly. He swiftly incapacitated Mart, but Hera disarmed him. However, Rukh managed to knock her to the ground and reclaim his weapon. Before he could strike Hera, Chopper stunned him, and Mart, regaining consciousness, fired at Rukh, forcing him to retreat back to the rooftops. After Mart inquired about their destination, Hera instructed Chopper to locate the nearest sewer access point. Upon identifying it, Chopper guided them onward. The Rebels pressed forward.
Reaching the sewer hatch, Hera, Mart, and Chopper discovered that it was guarded by two stormtroopers and an All Terrain Defense Pod. The AT-DP was positioned directly over the hatch. Spotting an unattended landspeeder nearby, Hera formulated a plan to divert the walker. Mart drew the Imperials' attention by stepping out into the open and claiming to be a Rebel pilot they were searching for. The stormtroopers opened fire, and Mart returned fire, hitting one, before fleeing down a side street, prompting the remaining trooper and the walker to give chase. Chopper, positioned on a nearby rooftop, received orders from Hera to open the hatch, and he descended to the controls, interfaced, and initiated the opening sequence. Hera seized control of the landspeeder. Mart concealed himself behind crates to evade the pursuing Imperials, ambushing the remaining stormtrooper. As the walker began to turn around, Mart fired upon it, and Hera rammed it with the stolen landspeeder, causing it to topple over.
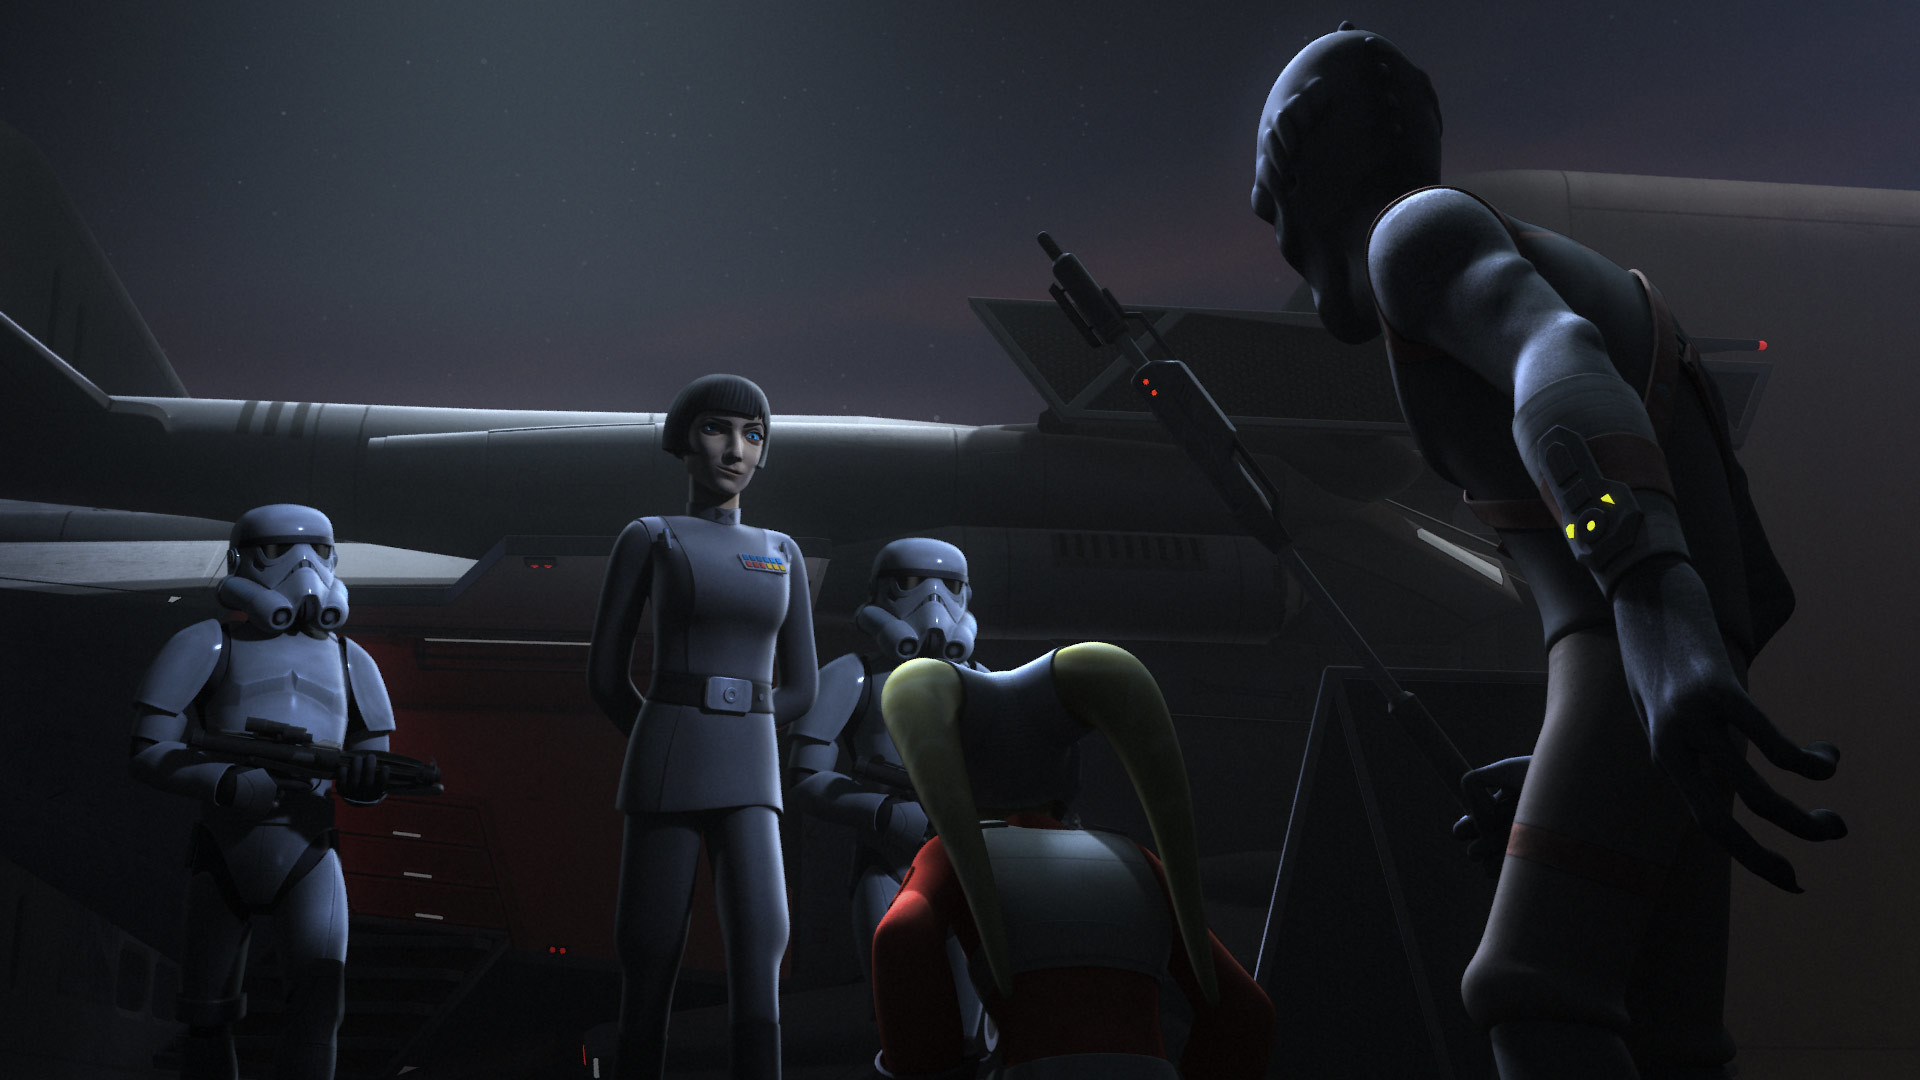
Mart sprinted towards the hatch upon Hera's signal, as she stunned the AT-DP's pilot. He descended into the sewer and waited at the top of the ladder. As Hera ran for the hatch, Rukh intercepted her from the rooftops. He leaped down into the street and approached Hera from behind, prompting Mart to shout a warning. Rukh tackled Hera, and she kicked him off. The two engaged in combat, and Rukh eventually knocked Hera down. Mart prepared to intervene, but two TX-225 GAVr "Occupier" combat assault tanks arrived, cutting off Hera's access to the hatch. An Imperial gunship also arrived, and Hera ordered Mart and Chopper to escape. Mart swiftly descended into the sewer, but Chopper hesitated, hovering on his rocket booster in the opening. Hera retrieved her blaster and fired upon the hatch controls, forcing Chopper to descend before the hatch door closed. Rukh disarmed Hera and forced her to her knees, holding his weapon to her back. The gunship landed, and Governor Pryce disembarked. Hera remarked that she had always wanted to meet Pryce, who responded with a dismissive comment about Hera's "small victory" before stunning her.
After the Battle

En route back to Lothal City, Kanan was stopped by the three Loth-wolves he had previously encountered. Initially frustrated by the delay, he felt pressed for time. After the white wolf, their leader, uttered "Dume," Kanan inquired about his purpose, and the wolves conveyed a message to him.
Following a trail of painted starbirds left by the Lothal Rebels, Mart and Chopper reached a hatch outside the city, where Kanan awaited them. By this point, it was past dawn. The two escapees expressed their regret at being unable to rescue Hera, and Kanan reassured Mart that he had done all that he could. However, Kanan believed he could still take action. The three Rebels departed on Kanan's speeder bike.
At the Imperial Complex, Governor Pryce interrogated Hera, seeking information about the location of the Alliance Fleet, but Hera remained defiant. Refusing to abandon their leader, the remaining Spectres launched a mission to rescue General Syndulla. Ezra devised a plan to infiltrate the Imperial Complex using Loth-bat gliders. Despite successfully rescuing Hera, Kanan Jarrus perished when Governor Pryce ordered her AT-AT walkers to destroy the fuel depot in an attempt to eliminate the Spectres.
The destruction of the fuel depot dealt a significant setback to Thrawn's TIE Defender initiative, as it destroyed the Empire's fuel supply and also damaged portions of the TIE Defender factory. Thrawn, who was on Coruscant advocating for the continuation of his project to the Emperor, reprimanded Governor Pryce for her incompetence and vowed to deal with her upon his return to Lothal. To conceal the extent of the disaster, Pryce organized a parade to celebrate the death of Kanan Jarrus, a survivor of the Great Jedi Purge. The Spectres soon discovered the damage inflicted upon Imperial war production on Lothal, which reinvigorated their spirits.
Behind the Production
The attack on Lothal was initially referenced in Steps Into Shadow, the opening episode of _Star Wars Rebels' third season. Planning for the intended attack served as a central plot thread throughout the season, culminating in the season finale, "Zero Hour," where the Rebels were ambushed before they could execute their plan. The attack was ultimately depicted in the fourth season episode "Rebel Assault."