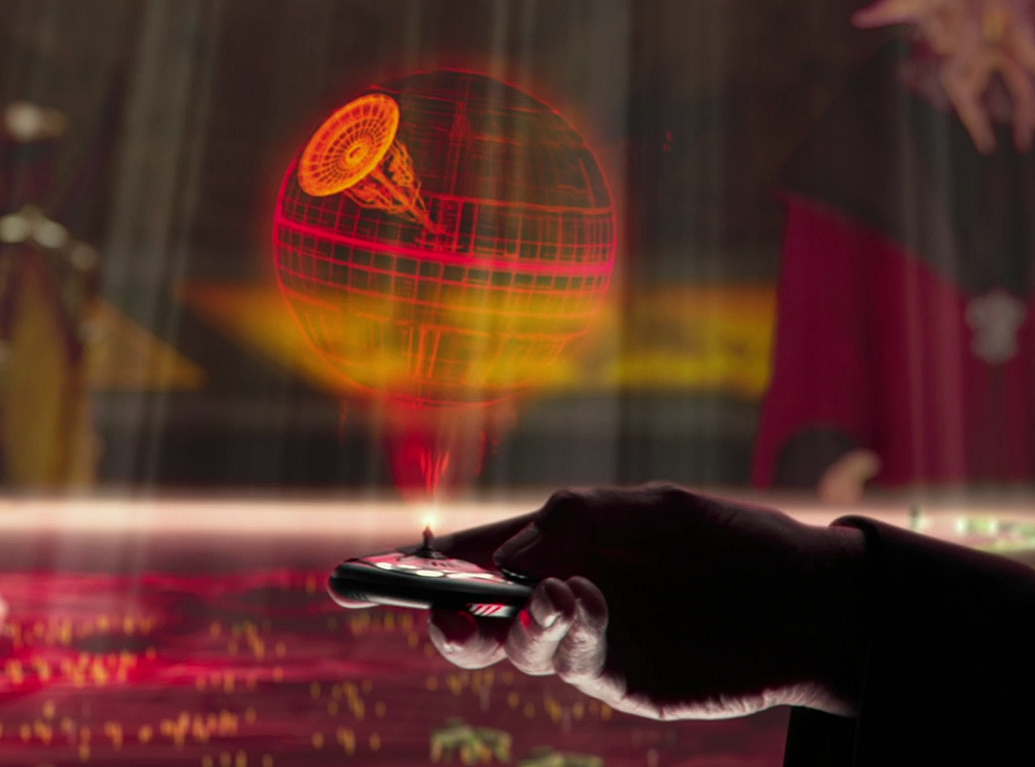
The DS-1 Orbital Battle Station, also known as the mk. 1 deep-space mobile battlestation but more commonly referred to as the Death Star or Death Star I, and disguised from the public as the Imperial Planetary Ore Extractor, was an enormous Imperial battle station and superweapon measuring 160 kilometers in diameter, intended to maintain order throughout the Empire by threatening planetary annihilation. Initially, it was the Separatist Ultimate Weapon, before evolving into the Expeditionary Battle Planetoid Development Initiative, or Project Death Star, after transitioning from a Separatist endeavor to an Imperial one in 19 BBY.
The design's genesis can be traced back to Raith Sienar's Expeditionary Battle Planetoid. Despite growing skeptical of the project's feasibility, Sienar shared the design with Wilhuff Tarkin in 29 BBY. Tarkin, taking credit for the design, presented Sienar's concepts to Supreme Chancellor Palpatine. Palpatine then tasked Bevel Lemelisk and Tol Sivron with collaborating with Poggle the Lesser's Geonosian hives on refining the design. During the First Battle of Geonosis, Palpatine's secret apprentice, Dooku, delivered the improved design to Palpatine.
Around 19 BBY, towards the conclusion of the Clone Wars, the construction of the initial Death Star commenced on occupied Geonosis, continuing even after the Galactic Empire's rise. Under Imperial rule, the project's headquarters shifted locations multiple times, moving from Geonosis to Seswenna and subsequently to the Patriim system. By 3 BBY, the project was relocated to its final site, the Horuz system.

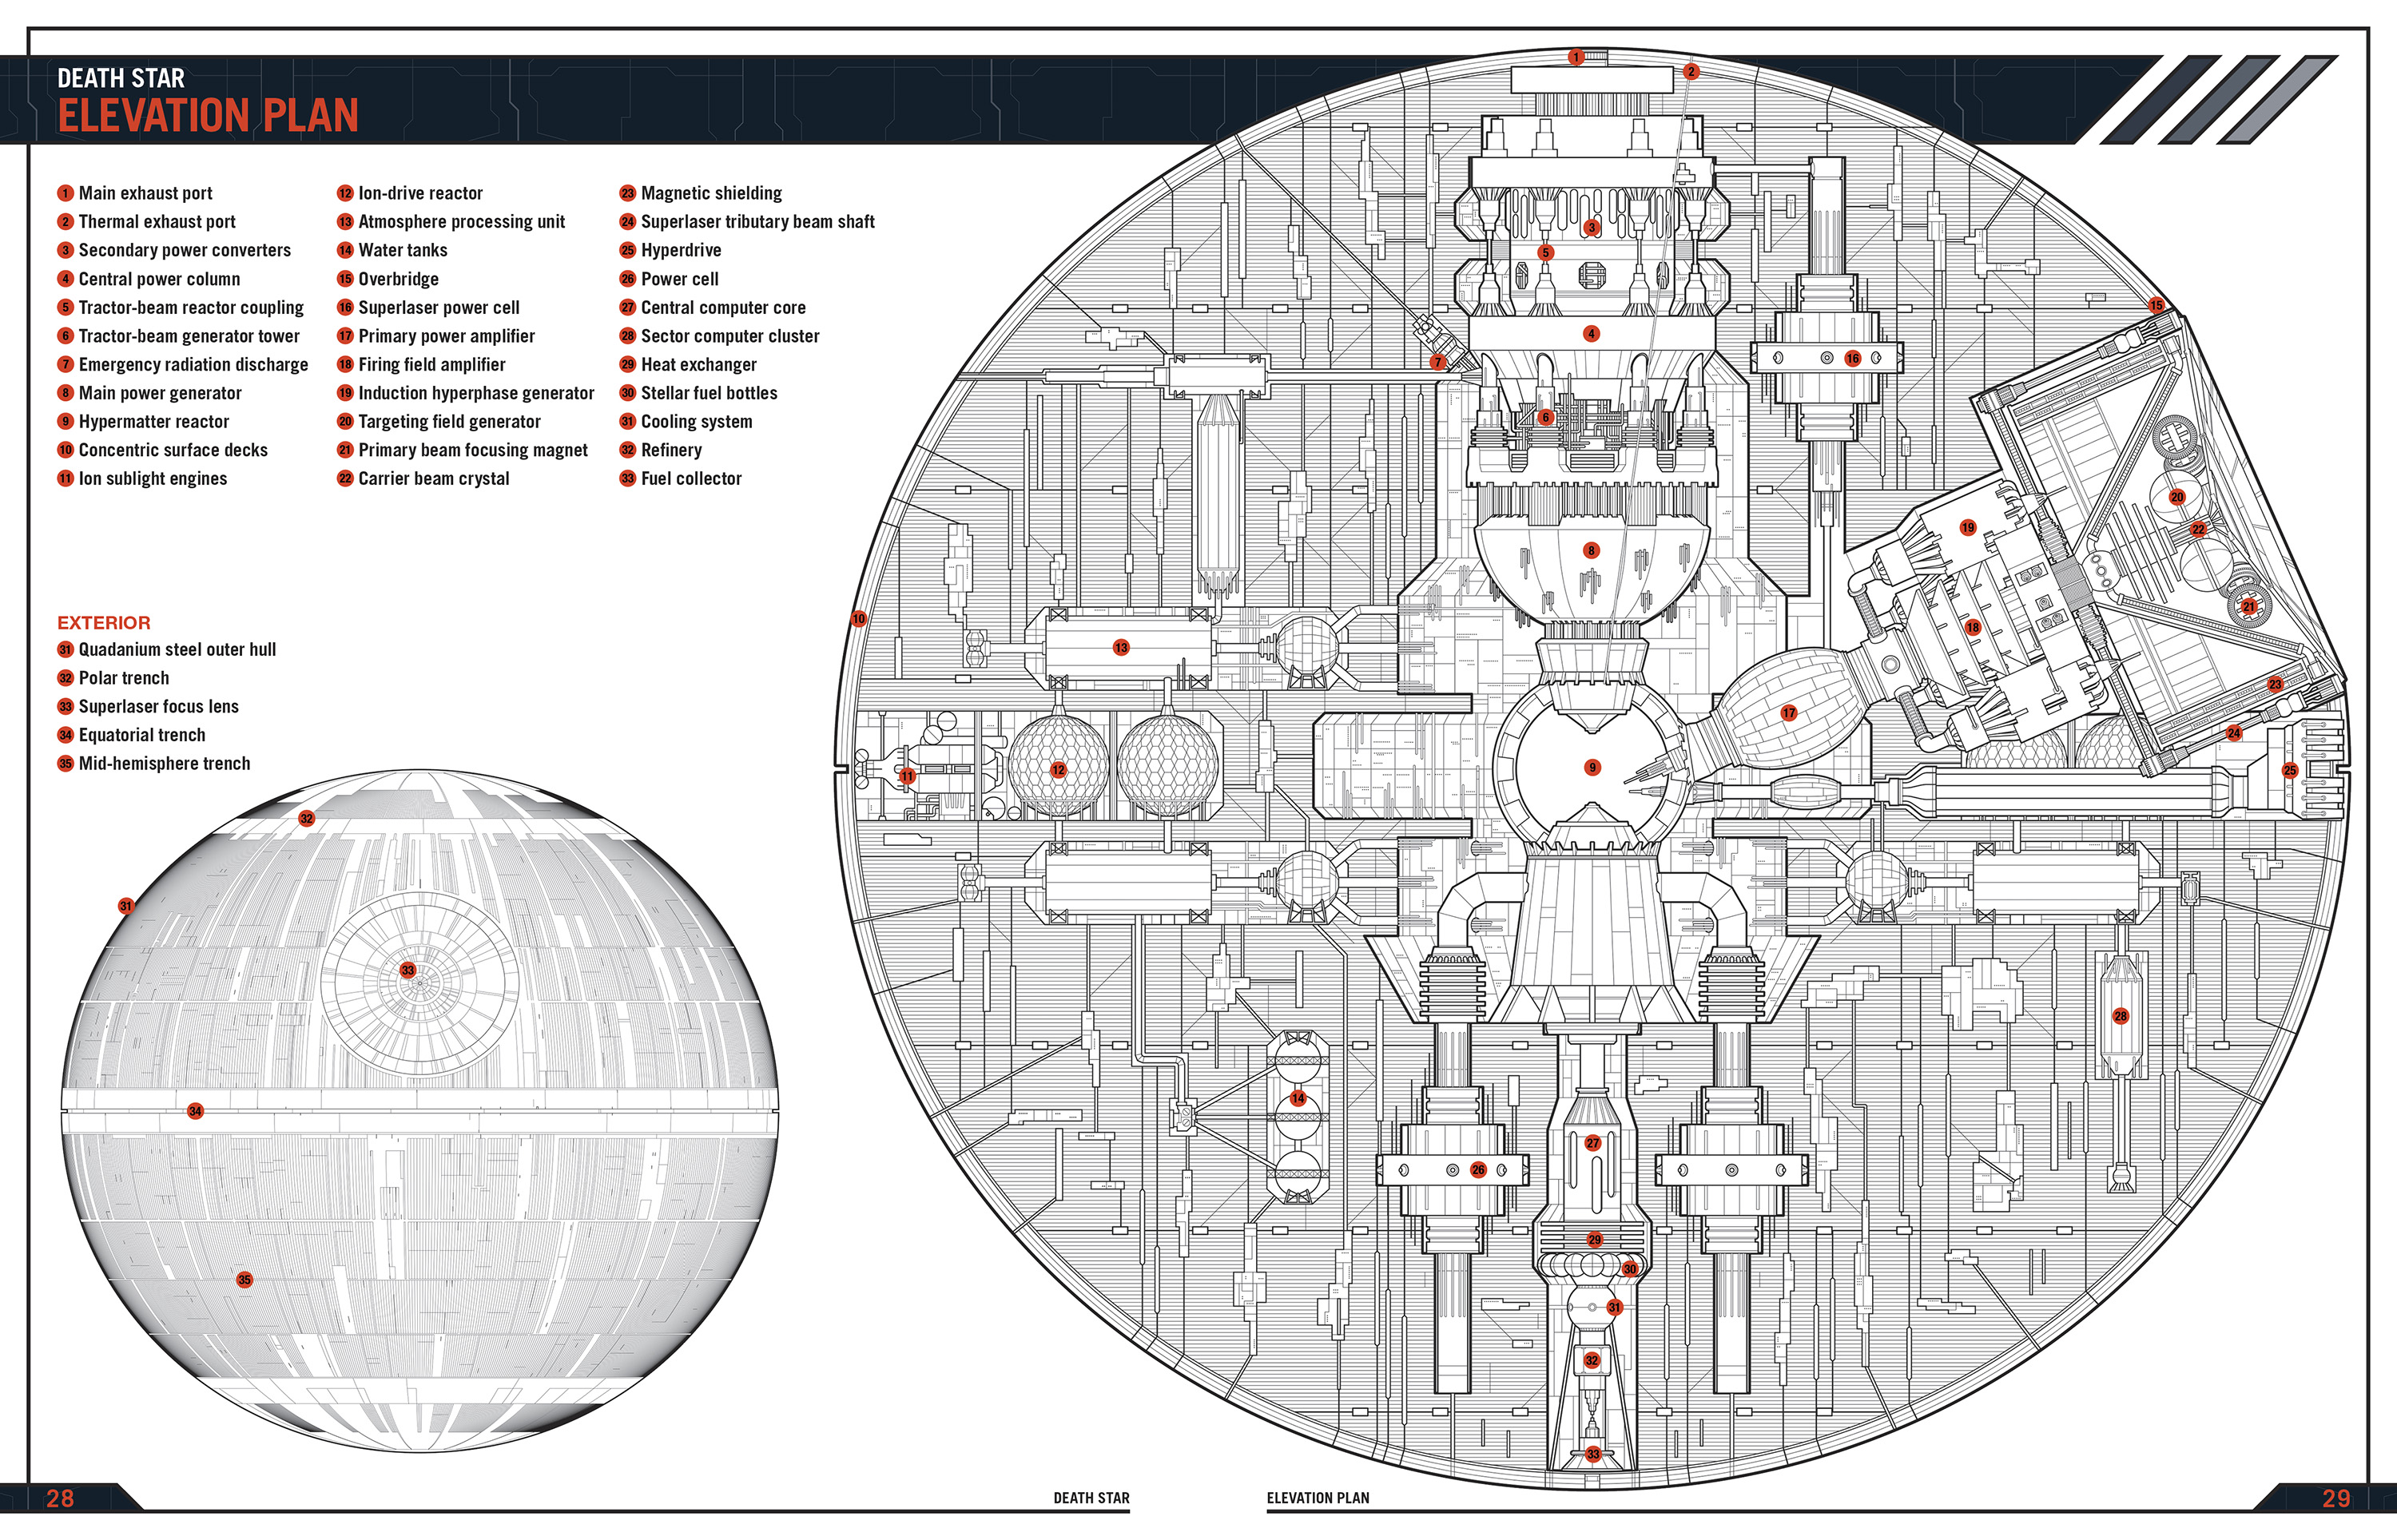
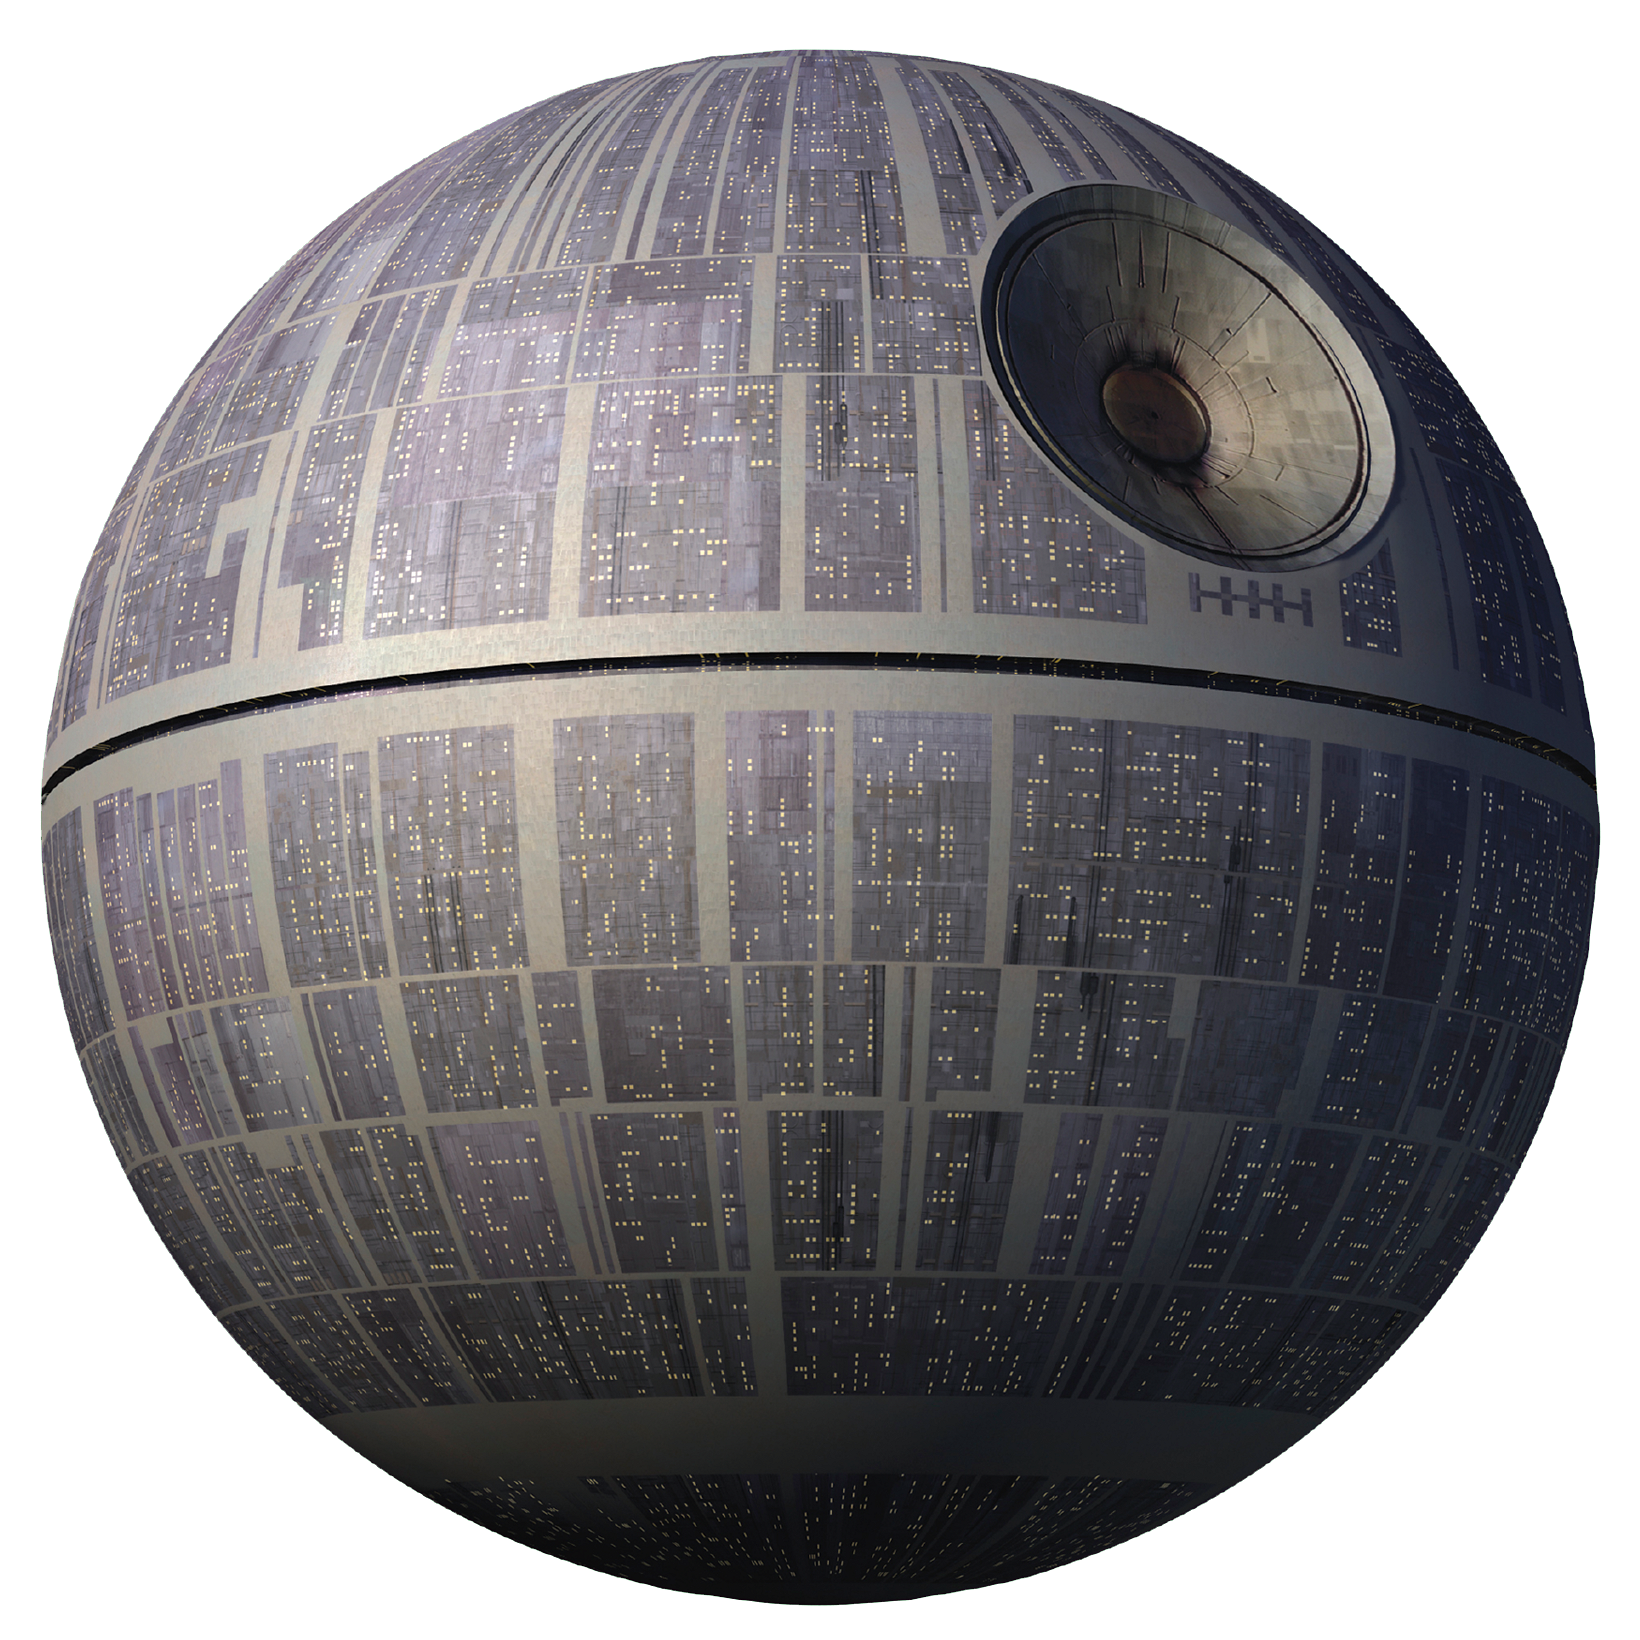
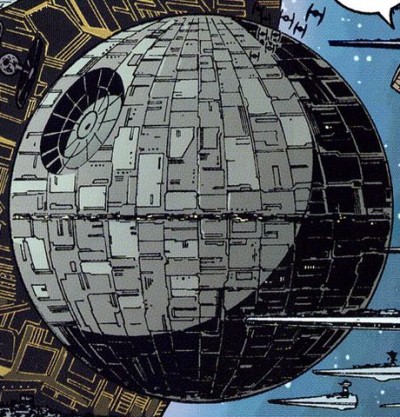
The Death Star, officially designated DS-1 Orbital Battle Station or mk. 1 deep-space mobile battlestation, was a massive battle station purpose-built for destroying planets, though publicly known as the Imperial Planetary Ore Extractor. Its fundamental structure was a sphere, comparable in size to a Class-IV moon, featuring a kilometer-wide trench encircling its equator, which housed docking bays. It embodied the principles of the Tarkin Doctrine. Due to its immense size and spherical form, it was occasionally mistaken for a small moon.
Similar to its successor, the original Death Star was divided into two hemispheres, each further segmented into 12 bridge-controlled zones, totaling twenty-four zones, also referred to as sprawls or sectors. Each sprawl contained food replicators, hangar bays, hydroponics facilities, detention blocks, medical centers, armories, command hubs, and all other necessary amenities to support any mission. In case of emergencies, auxiliary command centers within each sprawl provided complete control over weapons and maneuverability, offering a redundancy depth of two dozen. Every zone had its own bridge, which then reported to the Death Star's overbridge, positioned just above the superlaser. The Death Star comprised eighty-four distinct internal levels, with a total height of 1,148 meters (4,685 feet). Each level consisted of 357 sublevels, each 4 meters (13.1 feet) high. A specific number of sublevels were stacked around the surface of the sphere, encompassing the inner stacked levels. Some of the Death Star's docking bays were designated as executive docking bays for high-ranking personnel, offering larger facilities and enhanced defenses.
The battle station was equipped with two enormous sublight engines located in its midsection and a powerful hyperdrive system. Powered by 123 individual generators linked to a single navigational matrix, the Class 4 hyperdrive enabled the Death Star to traverse thousands of light-years from Alderaan to Yavin IV in mere hours. Engineers working close to the highly radioactive engines wore radiation suits to minimize exposure. Grand Moff Wilhuff Tarkin once compared walking inside the Death Star to exploring the Caves of Corips, but with illuminated tubing and plastisteel replacing the natural environment.
The station's amenities included parks, shops, and other facilities catering to the Human crew, along with essential infrastructure such as trash compactors. The outer hull of the planetoid was constructed from quadanium steel.
Near the northern pole stood a hundred-meter tower, heavily shielded, serving as the Emperor's personal quarters when aboard. Operational command of the space station was directed from the overbridge, which included the conference room. A dedicated high-speed shuttle system allowed officers to quickly navigate the station.
A critical vulnerability existed in the Death Star's design: an exposed thermal exhaust port. This port had been identified as unnecessary during construction. However, when the architect in charge of the area requested its removal from the plans to the Wookiee foreman overseeing construction, the Wookiee insisted on a written amendment. Before the architect could submit the amendment, the Wookiee fell ill and was hospitalized, and his replacement built the port according to the original specifications. The port, measuring two meters in width (approximately the size of a womp rat), was located at the end of a large trench on the battle station's hull and was ray shielded against energy weapons like laser cannons.
The Death Star's armament and defensive systems were as impressive as its overall design. Its primary weapon was the Concave Dish Composite Beam Superlaser, incorporated into the final design by Bevel Lemelisk. Initially, Tarkin envisioned the weapon as capable of merely "rocking a [targeted] world to its very core," but the final superlaser could shatter planets, leaving only asteroid fields. Alternative plans included a composite beam superlaser due to the challenges of constructing a single-beam superlaser, which required a mechanical arm for positioning. However, these plans were abandoned once the technical difficulties of the planet-shattering superlaser were overcome.
The Death Star's spherical structure, including most of its internal volume, was dedicated to supporting and maintaining the superlaser. The superlaser cannon well had a diameter of approximately 35 kilometers. Energy for the weapon originated deep within the battle station and was channeled into an array of eight initiator laser cannons. These cannons, through tributary beams, converged at a central nexus point above the cannon well to form a single, powerful beam. The superlaser also required eight superlaser firing stations: four primary and four backup, in case of failure. The superlaser posed a danger to the Death Star itself, necessitating safeguards to prevent the battle station from being destroyed by its own power, some of which were addressed through Project Hammertong. One such safeguard was the tributary beam shafts, with eight lining the superlaser's circumference, originally intended for Hammertong and constructed at Desolation Station. Focusing coils lined the shafts to maintain beam integrity. The tributary beams required perfect calibration; otherwise, the central beam would misfocus and dissipate, causing backscatter that could severely damage or destroy the superlaser housing. The firing process generated magnetic fields and gravitational flux, which needed dissipation to prevent misalignment of the amplification crystals and the battle station's disintegration.
The station's main armament, a fearsome superlaser, was housed in the northern hemisphere. This weapon appeared externally as a bowl several kilometers wide. When activated, eight separate beams were each activated by a crystal through the particle accelerator tubes, amplified through rings, and combined to form eight beams that converged outside the dish, focusing into a single, incredibly powerful superlaser beam. The superlaser's power settings were adjustable, allowing for the destruction of both naval vessels and planets. Blasts capable of destroying naval vessels could be fired approximately once per minute, while planet-destroying blasts required a full day to recharge. This superlaser was potent enough to destroy even shielded planets with a single shot.
At full power, the superlaser needed 24 hours to recharge, while use against spaceborne vessels only required a minute.
The Death Star's superlaser came at a cost: it had limited shielding capabilities. However, its surface-to-air defenses compensated for this deficiency. It featured 5,000 Taim & Bak XX-9 heavy turbolasers, 2,500 Borstel Galactic Defense MS-1 ion cannons, 2,500 Borstel Galactic Defense SB-920 laser cannons, and 5,000 Taim & Bak D6 turbolaser batteries serving as surface-to-air defenses. The SB-920 batteries, primarily located around the Death Star's trenches, could destroy starfighters with a single shot and used an advanced Target Acquisition and Targeting (TAT) system similar to Imperial surface-to-air defense systems. The XX-9 heavy turbolasers were larger variants with four sections. A safety mechanism automatically locked the turrets when any part of the Death Star was within their sights to prevent friendly fire and deter hijackers, making them less effective against starfighters. In addition to defense, the turbolaser batteries served as directional markers for TIE fighter pilots.
Shield-projection towers on the Death Star's surface emitted energy fields that protected the station's city sprawls from space debris and provided limited defense against energy weapons, as most of the Death Star's energy reserves were allocated to the superlaser. At least three shield-projection towers were necessary for a city sprawl, with their power cells, machinery, and shield-operator stations situated at the towers' bases. They were heavily concentrated around the tower housing the Emperor's throne room. Battle Station Operations oversaw shield operation, with officers, operators, and technicians manning the shield-projection towers' stations to ensure full functionality. During battle, shields from neighboring sprawls could overlap to create a continuous energy blanket over the surface.
The battle station also had field generators, including a jamming field that affected enemy ship sensors (except sight) and could create distortion potent enough to reduce starfighter maneuverability to less than point three, particularly along the meridian trench housing the thermal exhaust port.
The Death Star's hull plating consisted of military-grade Quadanium steel, primarily sourced and processed from asteroidal metal. Due to the difficulty of creating and installing sufficient material, sections of the Death Star were pressurized during hull installation for efficiency, serving as storage for supplies and temporary habitats for laborers. The Death Star's hull appeared relatively smooth from a distance.
The Death Star had 768 modified Phylon Q7 tractor beam projectors, with 24 assigned to each zone. The projectors in each zone could focus one or all of their tractor beams on a single target from a considerable distance, ensnaring enemy ships in a virtually unbreakable energy bubble long before their sensors could identify the object as a battle station rather than a small moon. Each projector required a crew of ten and was coupled to the main reactor to prevent accidents caused by generator malfunctions. Seven power coupling terminals, located atop a 35-kilometer-tall generator tower, provided energy for over 700 tractor beams. Disabling even one coupling site from the main reactor would render the tractor beam inoperative.
Besides the outer defenses and armaments, the station's interior also featured significant security measures, including metallic spikes (inspired by stalagmite-filled pits on Tatooine), BlasTech Class VI automated laser projectors linked by security cameras, and IT-O interrogator droids, which sometimes served as defensive systems against intruders.
The Death Star had a complement of 11,000 combat vehicles, 7,000 TIE fighters, four strike cruisers, and over 20,000 other military and transport vehicles.
In summary, the Death Star possessed more destructive firepower than half of the Imperial Navy and was considered the most powerful force in the galaxy.
Reflecting the rigid structure of Imperial organizations, the Death Star's command structure, known as command sectors, was equally rigid.
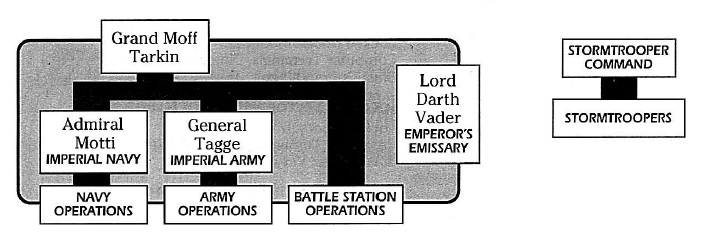
Grand Moff Wilhuff Tarkin directly commanded the battle station. Below him was a triumvirate consisting of Army Command, Naval Command, and Battle Station Command, represented by High General Cassio Tagge, Admiral Conan Antonio Motti, and General Hurst Romodi, respectively. However, the Galactic Emperor's authority superseded theirs during his visits. Below them were the Operations Chiefs for the Army, Navy, and Battle Station Operations, all held by officers with the rank of colonel. Each Operations Chief had eight majors representing specific departments within their branch, along with four majors responsible for general, service, technical, security, and military sectors (including Army troopers, Death Star troopers [a subset of the Imperial Navy troopers], gunners, and TIE pilots). Lieutenants supervised the command sectors and were the lowest-ranking officers assigned to Command sector duty posts.
The Stormtrooper Corps and the Emperor's emissary, Lord Darth Vader, were exceptions to this structure, with Vader answering only to Grand Moff Tarkin. Members of the Army and Navy could request the stormtroopers' services, but they remained under the Emperor's sole command.
The Death Star's conceptual origin lies in its precursor, the "Expeditionary Battle Planetoid." Raith Sienar conceived the idea around 29 BBY, during the time of the Second Battle of Zonama Sekot. Sienar designed the Battle Planetoid as an immense space station with a 100 km diameter main sphere and two smaller spheres. The design required significant advancements in hypermatter technology, with Sienar envisioning ice asteroids powering the station.
Raith presented the designs to Wilhuff Tarkin, commander of the Republic Outland Regions Security Force. Tarkin found the concept appealing because it allowed for the abandonment of the "stateless strategy" of warfare. However, by the time Sienar showed the design to Tarkin, Sienar had already lost interest in the design, thinking it impractical due to the technological advances required for its completion. However, Tarkin, who esteemed the design more than Sienar, showed the design to Supreme Chancellor Palpatine, claiming it as his own as part of the Tarkin Doctrine.,
Palpatine subsequently directed Bevel Lemelisk and Tol Sivron to collaborate with Poggle the Lesser and his Geonosian hives to advance hypermatter technology and address structural challenges. When Geonosis seceded from the Republic, Lemelisk expressed concerns about the project. However, Palpatine remained unconcerned, assuring Lemelisk that the Separatists would not put the weapon into production.
In 22 BBY, Poggle the Lesser, leader of the Geonosians, returned the top-secret design to Count Dooku to prevent it from falling into the hands of the Jedi during the Battle of Geonosis. Dooku transported the designs back to Coruscant and gave them to Darth Sidious, his dark master. These plans were later integrated with Wilhuff Tarkin and Raith Sienar's vision of an Expeditionary Battle Planetoid.
Towards the end of the Clone Wars, Sidious ordered Geonosian builders to start constructing the station above their occupied homeworld. Hundreds of thousands of workers toiled on the station throughout the war. Approximately five months after the Battle of Geonosis, Dooku briefly considered halting production of the Weapon in favor of the Planet Killer, but changed his mind after the demonstration failed due to sabotage by Mace Windu. Seventeen months after the war began, Geonosian technicians on Zaadja were observed working on the Weapon's design.
In 19 BBY, Supreme Chancellor Palpatine dispatched the 501st Legion on a mission to Mygeeto to retrieve an energy sample for the superlaser of the soon-to-be formed Galactic Empire. During the final weeks of the war, the Separatist Council debated ways to prolong the conflict, allowing their secret weapon time to be completed.
Following the deaths of all Separatist Council members and the end of the Clone Wars in 19 BBY, the newly established Galactic Empire acquired most Separatist holdings, including the unfinished battle station. Wilhuff Tarkin was appointed to oversee the secret development project, using his creative vision to realize the Death Star as the Empire's ultimate weapon.
To expedite construction and gain the Emperor's favor, Tarkin had Darth Vader lead an Imperial invasion of Kashyyyk, enslaving Wookiees for labor. These Wookiees were transported to the Death Star's construction site. Much of the project's funding came from funds appropriated from the Department of System Exploration and the Department of Public Works.
However, the project nearly failed despite these early gains. Building the Death Star proved more challenging than anticipated, with labor union disputes, supply issues, and design problems slowing construction. Repeated, though often unsuccessful, sabotage efforts further hindered progress. Additionally, Darth Vader Force-choked Lemelisk, requiring a temporary replacement to oversee development while Lemelisk underwent Bacta treatment. The actual effective work on the station took less than two years, requiring resources from all corners of the Empire.
The technology for the massive superlaser, the weapon's core, was of particular concern. Tarkin assembled some of the galaxy's most brilliant minds, including Tol Sivron, Qwi Xux, and Bevel Lemelisk, to build a proof-of-concept model at the Maw Installation. This model became known as the Death Star prototype.
Besides the concave dish model of the battle station's superlaser, other proposed superweapon systems included a Resonance Torpedo Launcher, an Interplanetary Ion Cannon, and a regular Composite Beam Superlaser.
It remains unclear when exactly the designation "Death Star" began to be used in reference to the project. The earliest documented instance of the name Death Star as a codename for the project appears in a memo from approximately 5 BBY. This document, penned by Imperial advisor Ars Dangor, formally placed Wilhuff Tarkin in complete control of the project. The name became permanent once the Imperial Ministry of Propaganda adopted the Death Star moniker.
Even before the Death Star achieved full operational status, its detention facilities started accumulating prisoners. Individuals deemed political agitators, Rebel insurgents (who were in the early stages of organization), perilous pirate groups, and even some surviving members of the Royal Naboo Security Forces who had bravely attempted to thwart their Queen's assassination, along with countless other adversaries of the Empire, were quietly made to vanish from public view within the massive prisons of the still-incomplete battle station.
During 2 BBY, four individuals who would later rise to prominence as leaders within the Rebel Alliance found themselves transferred to the Death Star: Senators Bail Organa, Garm Bel Iblis, and Mon Mothma, in conjunction with a former Jedi General by the name of Rahm Kota. Following their capture on Corellia, Palpatine orchestrated the transfer of these four to the battle station with the intention of subjecting them to interrogation and torture, ultimately culminating in a public execution. However, this scheme was disrupted by Galen Marek, the former apprentice of Darth Vader. Galen intervened, attempting to liberate the rebels, and ultimately seemingly sacrificed himself to ensure the escape of the four leaders. Furthermore, the Bothan Spynet managed to intercept limited intelligence pertaining to the Death Star's progression, which was subsequently transmitted to the Rebel Alliance through low-security channels, a contingency that Lemelisk had foreseen.
Sometime thereafter, the reconstruction of the Death Star was reassigned to Geonosis. During this period, it was also under heavy Imperial guard. A StarSpeeder 1000, having escaped an Imperial raid at the Star Tours space station and en route to deliver a Rebel agent to the Rebel Fleet, was intercepted by Darth Vader's fighter squadrons as well as the Mandalorian bounty hunter Boba Fett. This encounter eventually resulted in a skirmish within the internal mechanisms of the Death Star, causing minor damage. Additionally, the completion of the Death Star's superlaser was delayed due to a Rebel attack on the Imperial facility known as Desolation Station, which led to the theft of the Tributary beam component and the total annihilation of Desolation Station.
The stormtroopers belonging to the 501st Legion were among the personnel assigned to safeguard the interior of the Death Star. They were compelled to suppress a prison break that had inexplicably erupted within the station, spearheaded by a Jedi Padawan inmate. A number of prisoners successfully acquired a partial technical blueprint of the battle station, which was transmitted to a Rebel cell stationed on Polis Massa. In the aftermath of this embarrassing failure, the 501st were reassigned and relocated away from the station.
Due to the controversial nature inherent in its weaponry, Imperial officers were mandated by their field manual to refer to the Death Star concept in general or the DS-1 as the official title of Imperial Planetary Ore Extractor to any non-Imperial news outlets. Additionally, they were required to report the questioner to the Imperial Security Bureau for a thorough follow-up as a precaution.
In the year 0 BBY, the station was attacked by a rebel force composed of the Lucrehulk-class battleship Fortressa and 500 X-wings. This engagement concluded with the destruction of the rebel fleet, and the Fortressa being struck by the Death Star's superlaser.
The narrative surrounding the Rebel Alliance's acquisition of the plans is intricate and complex. Although three distinct sets of schematics were pilfered, only when combined could they furnish a comprehensive analysis of the space station's vulnerabilities.
In 0 BBY, Princess Leia Organa of Alderaan, possibly during an investigation by Alliance Intelligence into the existence of a superweapon, received information about it from a soldier she rescued on Ralltiir. Intelligence on AX-235 validated the existence of the weapon. Rianna Saren's report concerning the Destruction of Despayre served as confirmation of the battle station's superlaser's destructive capabilities.
Furthermore, Rahm Kota initiated a reconnaissance mission directed at the station to amass intelligence on its primary systems, specifically its superlaser weapon. X2 volunteered for the mission, motivated by a sense of obligation to rectify his unwitting contribution to the Empire's creation. At this juncture, the tributary beam had just been delivered to the Death Star, a fact X2 discovered through a transmission from X1 intended for the Death Star's commander. Subsequently, under Kota's command, X2 conducted an impromptu superlaser test on an Imperial-class Star Destroyer that the Rebels had hijacked and scuttled earlier, leading them to comprehend the weapon's unimaginable destructive potential.
Concurrently, Rebel leader Garm Bel Iblis, aided by the professional thief Moranda Savich, procured a collection of heavily encrypted datacards from an Imperial defector stationed on Darkknell. It was only after these datacards were transmitted to the Alliance that the resistance uncovered the true objective of Governor Tarkin's "pet project": to instill fear through the annihilation of entire worlds.
In the aftermath of the Death Star Uprising, the aforementioned set of partial schematics was transmitted to the Rebel base located on Polis Massa. Despite the Fighting 501st's swift raid on the compound, Bothan spies successfully transmitted this initial set off-base, presumably to their other asteroid base, AX-235. With one piece of the puzzle secured, the Alliance intensified its efforts to acquire additional sets of plans that would complete the overall picture.

Around this time, rumors circulated regarding an Alliance cell on Kalakar Six having obtained the plans, prompting Palpatine and Vader to personally investigate the matter. Ultimately, the endeavor was deemed a fruitless bantha chase, as the planet was devoid of any Rebel sympathizers; in reality, the mission was likely a deception orchestrated by the Emperor to assess his pupil's capabilities.
Meanwhile, genuine efforts to secure the Death Star plans were actively underway. Rebel agent Kyle Katarn, a former Imperial Academy graduate, employed his combined skills of stealth and force to seize a supplemental set of plans from the Empire during the Battle of Danuta. With two smaller portions of the schematics in hand, the Rebels focused on acquiring the final, most comprehensive set of plans.
Through the actions of operative Bria Tharen and Red Hand Squadron, the Alliance engaged the enemy on the planet Toprawa. Operation Skyhook, as it was known, culminated in one of the most significant victories to date for the Rebels: the final set of plans would at last be under their control.
On Toprawa, operative Havet Storm transmitted the plans, along with the schematics for the superlaser, to Tantive IV, a consular ship positioned in orbit. Carrying these two additional components, the starship fled the system and intercepted the readouts from Katarn and AX-235, with Princess Leia herself leading the entire operation. By leveraging her diplomatic immunity, Leia hoped to locate her father's friend, Obi-Wan Kenobi, and subsequently formulate a strategy to analyze the schematics in search of a weakness in the superweapon's defenses.
However, fate would dictate a different course of events.

When Darth Vader and the 501st initiated a raid aboard Tantive IV, the plans were nowhere to be found. In the nick of time, Leia, recognizing the paramount importance of the plans' survival, concealed them within astromech droid R2-D2 who, accompanied by C-3PO, descended to the surface of Tatooine with the objective of delivering the plans to Obi-Wan for safekeeping. After being captured by scavenging Jawas and subsequently sold to moisture farmer Owen Lars, the astro-droid sensed that he was nearing his destination of finding Kenobi. Joined by Owen's step-nephew, Luke Skywalker, R2 located the individual he was seeking.
Following her capture by Lord Vader, Princess Leia was accused of espionage and treason and transported to the Death Star for interrogation, Vader's primary objective being his obsessive pursuit of the Rebellion's concealed base of operations. When she demonstrated considerable resistance to Vader's torture methods, Governor Tarkin ordered her to be escorted to his command center. Tarkin threatened Leia with the destruction of her homeworld, Alderaan, and Leia deliberately provided misleading information, claiming that the Rebel base was situated on the remote planet of Dantooine. However, Tarkin, desiring a higher-profile target for his demonstration, ordered the Destruction of Alderaan while Leia watched helplessly. Billions perished; the overarching objective of the operation was to disseminate the message of fear that the Empire required to maintain control over all planetary systems.
Luke, Obi-Wan, Han Solo, Chewbacca, C-3PO, and R2-D2, aboard the Millennium Falcon, were ensnared in a tractor beam after emerging from hyperspace near the remnants of Alderaan and drawn onto the Death Star. They concealed themselves within various secret compartments within the ship while stormtroopers conducted a search, and subsequently proceeded to the control room. Obi-Wan conceived a plan to liberate the ship by deactivating a tractor beam projector.
Upon learning that the Princess was aboard, Luke, Chewie, and Han made their way to her cell block. They successfully liberated her despite being attacked by stormtroopers. They made their escape by leaping into a garbage chute, and despite nearly being crushed as the walls compacted, they escaped after R2 deactivated them. Returning to the Falcon, they encountered a company of stormtroopers. The troopers were diverted by the confrontation between Obi-Wan and Darth Vader, enabling them to reach the ship and take off, bound for Yavin IV.
Upon arrival, R2-D2 uploaded the data tapes, and Alliance tactician Jan Dodonna identified a vulnerability within the station: an unshielded thermal exhaust port that, if targeted with a proton torpedo, would trigger a chain reaction and obliterate the battle station.
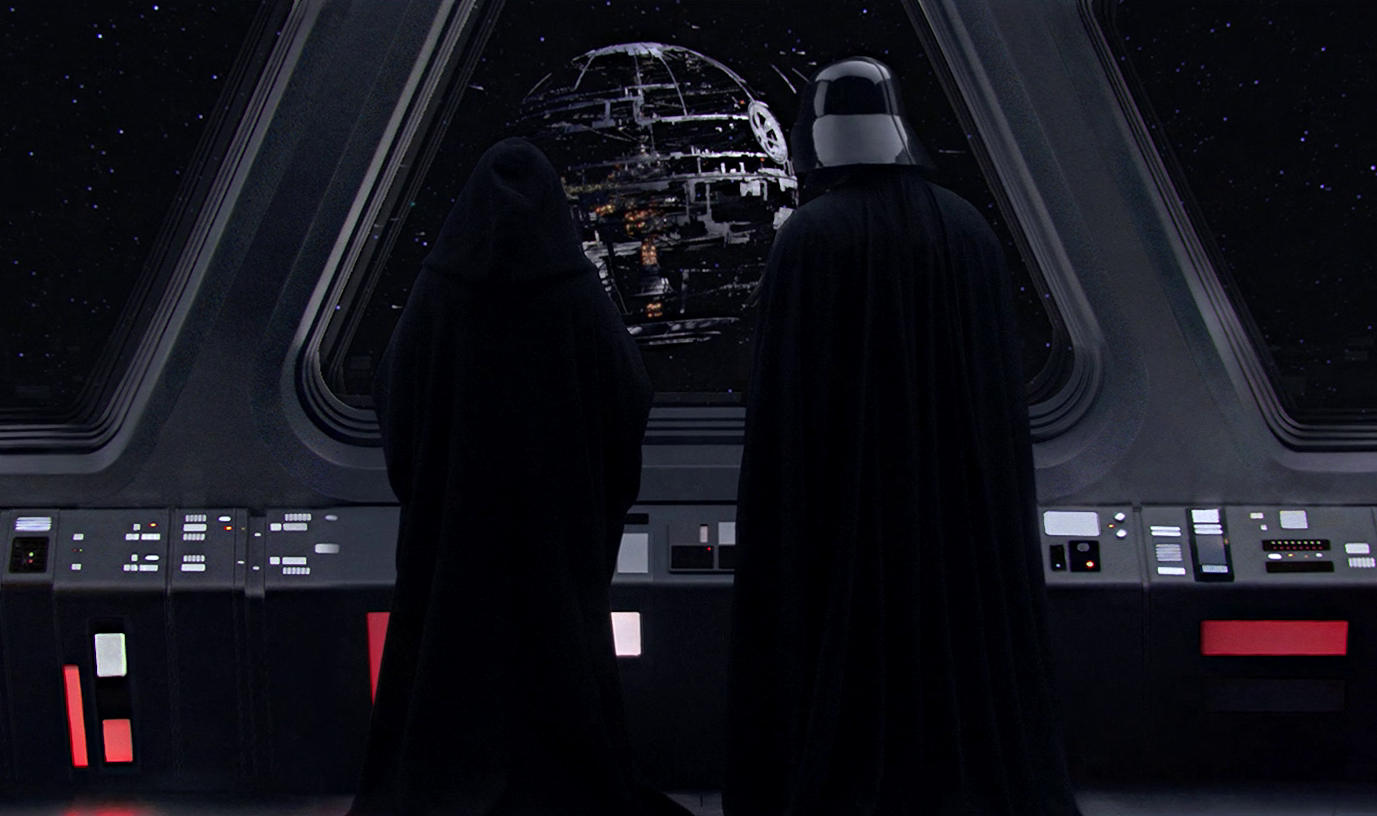
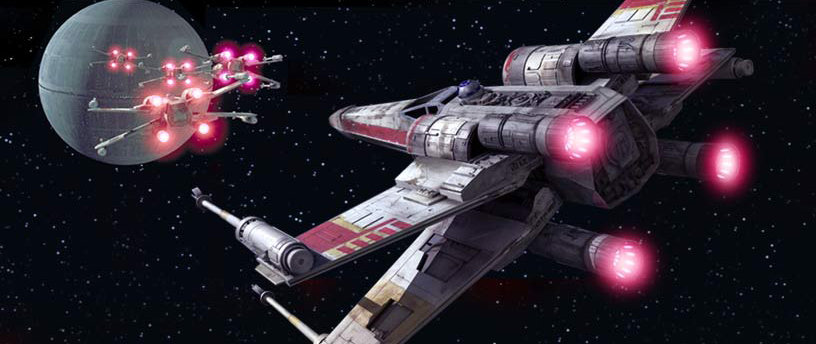
The ensuing Battle of Yavin resulted in the destruction of the Death Star, just as it was poised to annihilate the newly discovered Rebel Base on Yavin's fourth moon. Luke Skywalker destroyed the Death Star during the trench run, who, with the aid of the Force, successfully launched two proton torpedoes into the exhaust shaft that directly accessed the Death Star's primary reactor. Yavin 4 would have been destroyed by the Death Star seconds earlier had it not been for the hesitations of Master Chief Gunnery Officer Tenn Graneet, who delayed the firing due to his remorse over the destruction of Alderaan, despite his loyalty to the Empire. He instructed his crew to "Stand by," inadvertently granting the Rebel Alliance the time required to successfully destroy the battle station. Ironically, shortly before Luke Skywalker launched the proton torpedoes into the thermal exhaust port, Palpatine had authorized the construction of a second Death Star.
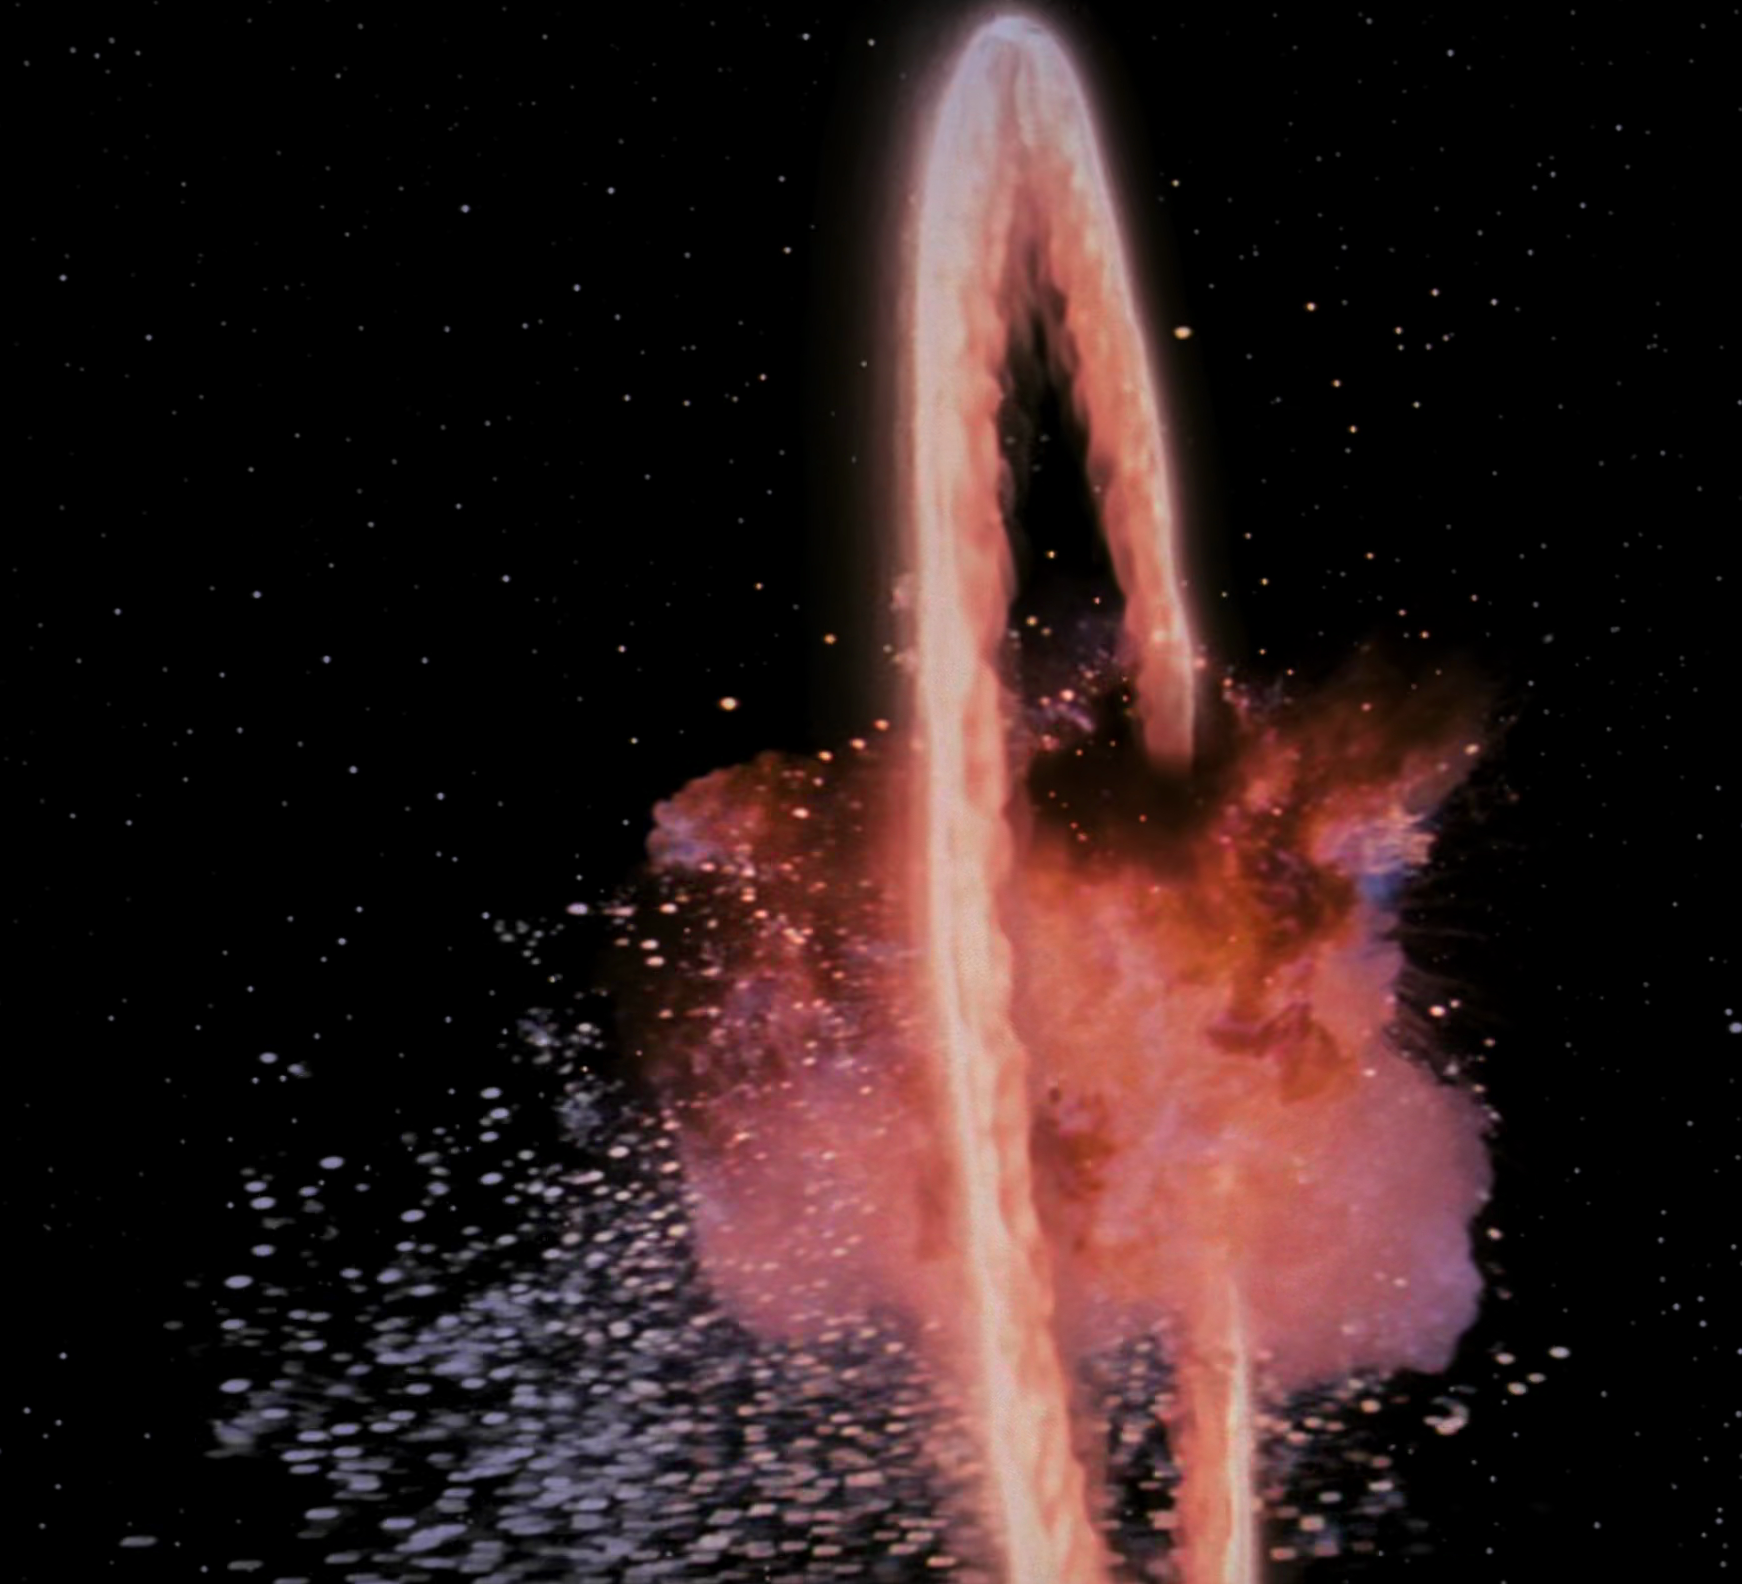
The reactor detonated, obliterating the battle station and killing all those still aboard, including Grand Moff Tarkin. This event would prove to be a pivotal moment for the Rebellion, and secured young Skywalker his initial place in galactic history. Despite the Empire's continued status as the dominant military force in the galaxy, this significant Alliance victory garnered credibility and support for their movement. In the months following the battle, thousands of star systems aligned themselves with the Alliance, leading to the escalation of the Galactic Civil War.
Although the destruction of the Death Star was primarily an Alliance triumph, it also served as a blessing in disguise for the Empire, particularly the Imperial Navy. The Death Star's development had diverted vast amounts of resources and talent away from the Navy, causing delays in other development projects, including those directly related to the creation of a new class of Star Dreadnoughts intended to serve as the new pinnacle of capital-ship power. The Death Star's destruction elevated the importance of the project in question within the Empire.
Furthermore, extensive data, encompassing numerous transmissions, images, and footage of events leading up to the final moments of the Death Star's existence, including the rescue of Organa and other related events, had been transmitted to a communications complex on Galvoni III. Voren Na'al, a historian aligned with the Rebel Alliance, infiltrated the complex and absconded with much of this data, narrowly escaping and subsequently publishing a report on the superweapon.

In the immediate aftermath of the giant battle station's destruction, salvaging companies and other organizations such as the Ugors and the Ni'lyahin Smugglers arrived at Yavin IV and hauled away substantial portions of debris. It wasn't long before the Empire intervened and halted all further unauthorized theft.
The Empire established an Imperial Salvage Station in orbit around Yavin IV to gather the floating remnants of the destroyed Death Star. Major Reskik of the Imperial Security Bureau oversaw the salvage team stationed aboard the station. The salvage teams consisted of civilian engineers dispatched by the major defense contractors who had provided the primary system designs for the Death Star project. The Empire provided additional zero-G work crews.
Innumerable pieces of debris rained down upon the jungle moon. Many left scorched craters and ignited fires within the jungles. Some pieces remained largely intact. Following the Alliance's departure from Yavin 4, numerous salvage teams scoured the jungles to recover pieces of Death Star technology. Many independent salvagers, such as Nagem Dr'Lar, sold the debris to the Empire. However, other organizations with an interest in the Empire's technology also dispatched their own teams to the remote moon. The Hutt Expeditionary Force led by Osae Meilea attempted to recover debris for the Hutt crimelords. Even the Black Sun crime cartel attempted to acquire pieces of the destroyed station.
A year after the Death Star's destruction, some spacers possessed a piece of wreckage from the battle station.
Tyber Zann, Crime Lord of the Zann Consortium, was interested in some of the Death Star's debris because it contained information about the Aggressor-class Star Destroyer and the Eclipse-class Super Star Destroyer.
The command structure within the Death Star, like all organizations within the Galactic Empire, adhered to a strict hierarchy. Command sectors were distributed throughout the Death Star and were supervised by Imperial officers holding the rank of lieutenant or higher.
Excluding visits from the Emperor, the battle station operated under the direct command of a triumvirate consisting of Grand Moff Tarkin, Admiral Conan Antonio Motti of the Imperial Navy, and High General Cassio Tagge of the Imperial Army. Officers with the rank of Colonel, or, in the case of Trech Molock, High General, held the positions of Chiefs of Navy, Army, and Battle Station Operations. Beneath each Operations Chief were eight majors who served as chiefs of specific departments within their branch of operations. Four majors were also responsible for the general, service, technical, security, and military sectors, the last of which encompassed Army troopers, gunners, pilots, and specialized versions of the Navy Troopers known as the Death Star Troopers. Members of the Imperial Security Bureau (ISB) were also stationed on board.
Two significant elements of the Death Star's complement did not fall under the conventional command structure yet warranted attention. The first was the Emperor's emissary, Darth Vader, who reported to Tarkin but was otherwise exempt from any other authority aboard the battle station. The second was the Stormtrooper Corps. While the Stormtroopers could collaborate with Army and Navy troopers as well as ISB personnel when their services were required, they were not subject to their jurisdiction and were thus hardly subservient to either branch, as their primary allegiance was to Emperor Palpatine alone. They also ensured that all officers adhered to the policies of the Emperor's New Order.
At any given time, approximately 1.7 million Imperial personnel (excluding droids) were stationed aboard the battle station.
The security sector was the division of the Death Star tasked with patrolling and safeguarding critical or restricted areas within the Death Star. The members of the security sector were the Imperial security officers, commonly referred to as wardens throughout the Empire. Their responsibilities encompassed patrols, guarding critical or restricted areas, maintaining detention cell blocks, policing corridors, and protecting visiting officials. The wardens were also among the few Imperial officers aboard the battle station who were permitted to carry personal weapons at all times. The wardens were assigned to various security divisions, including enforcement, protection, surveillance, and detention, with the latter three working in concert to provide comprehensive security coverage throughout the battle station. The surveillance stations maintained a state of alert throughout all duty shifts, utilizing a network of hidden cameras, sensors, mobile remotes, and droids. However, the wardens themselves were subject to constant surveillance and observation, as each standard security sector was required to provide office space and reasonable assistance to the ISB. The ISB and the security forces maintained a strained relationship, largely due to the ISB's reputation for placing undercover agents among military and technical-support personnel, as well as their policing and surveillance techniques being even more stringent than regular Imperial security standards. They also maintained their own armory within each sector.
Members of the security sectors were also responsible for quelling disturbances (such as heated arguments between crew members) and restoring order, as Tarkin, a former commander of the Republic Outland Regions Security Force, likened the Death Star to a community.
The Service and Technical Sectors were responsible for maintaining the Death Star. Technicians were assigned to these two sectors. The Service Sector was tasked with inspecting, maintaining, repairing, and replacing machinery. The jobs ranged from highly skilled technicians trained to fabricate components from scratch, to droids programmed to clean corridors. Furthermore, members of the Service Sector were required, as their most critical duty, to maintain the station's protective and emergency equipment. They were also required to maintain a variety of gear, from TIE Fighter pilot gear to Viper Probe Droids. RA-7 protocol droids were deployed throughout the station, including in the maintenance sections, earning them the moniker "Death Star Droids," despite being outnumbered by the MSE-6 droids. When not engaged in performing repairs or routine maintenance of the machinery aboard the station, members of the Service Sector were stationed at monitoring posts to monitor temperature and performance readings or awaited system-failure alarms triggered by diagnostics systems integrated into the Death Star's machinery. They were also assigned to clean carbon buildup, replace components, and overhaul engines at shops. Technical Sector technicians—those not selected for the Service Sector—worked in the science stations, medical bays, research laboratories, programming facilities, and engineering stations, with the potential of developing a weapon even more destructive than the superlaser. However, members of this sector were constantly reminded that while their service to the Empire, specifically to the Death Star, was important, it was not more important than the military sector. The staff assigned to the medical stations of this sector possessed varying ranks and abilities, although their droids specialized in various medical techniques, including surgery, anesthesia, and prosthetics.
The role-playing game by West End Games posited a diameter of 120 kilometers for the original Death Star.
Star Wars: Incredible Cross-Sections, a fact book, along with meticulous scaling of the battle station as depicted in the film, implied a larger diameter of 160 kilometers. Conversely, Grant McCune, the Chief Model Maker for the movie, stated that a scale of 1:180,000 was employed for the Death Star in the film. Given that the Death Star model measured 120 centimeters in diameter, this suggests an intended diameter of 216 kilometers. The Death Star Owner's Technical Manual, another fact book, later revised the diameter to 120 km. Nevertheless, more contemporary sources like The Essential Guide to Warfare and The Complete Star Wars Encyclopedia specify a length of 160 km, which this article adopts as the accurate measurement.
The argument that the plans depict an earlier iteration of the Death Star is rendered untenable because the initial plan in Attack of the Clones showcases the "later" configuration. Although Attack of the Clones portrays the plans in the "northern" hemisphere, The Essential Guide to Warfare indicates that the superlaser was initially positioned on the equator before its relocation to the northern hemisphere.
In the DVD commentary for Revenge of the Sith, George Lucas remarked that the Death Star visible at the film's conclusion was, in fact, the first Death Star, attributing this to "union disputes and supply problems." (Interestingly, the main characters in Kevin Smith's film Clerks engage in considerable speculation regarding the unionization or subcontracting status of Imperial workers, which may or may not be an inside joke on Lucas's part.) However, earlier Expanded Universe materials, including Jedi Search and Champions of the Force, suggested that the structure seen in Revenge of the Sith was a prototype preceding the Death Star featured in A New Hope. This notion was later retconned in The New Essential Chronology, which asserts that the latter served as a testbed prototype for the superlaser intended for the former, and that the Death Star appearing at the end of Revenge of the Sith is indeed the first Death Star.
A eponymous full-length novel, authored by Michael Reaves and Steve Perry, was published in October 2007, providing a comprehensive account of the events transpiring within and around the Death Star during its construction, deployment, and ultimate destruction. Death Star claims that a zone represented one twenty-fourth of a hemisphere, while other sources indicate a total of twenty-four zones. This article operates under the assumption that Death Star contains an error on this particular point.
In numerous video games, notably the Rogue Squadron trilogy, players are required to navigate various obstacles and execute multiple turns while traversing the Death Star's trench run. The schematics and layout of the Death Star lack any evidence of such obstacles or turns within the trench, leading to the conclusion that the trench's depiction in video games is non-canonical. In the first game, Star Wars: Rogue Squadron, released in 1998, the Battle of Yavin is available as a bonus mission, unlocked by earning all gold medals in the campaign or through the use of cheat codes. Conversely, the Battle of Yavin in the sequel, Star Wars: Rogue Squadron II: Rogue Leader, serves as the game's inaugural campaign mission and is therefore considered part of the game's canon storyline. Furthermore, the Death Star functions as a setting for several Versus Modes in Star Wars: Rogue Squadron III: Rebel Strike.
Star Wars: Rebel Assault, released in 1993, casts players as Rookie One, who takes on the role of destroying the Death Star, effectively replacing Luke Skywalker. This article adheres to the sequence of events as presented in Star Wars: Episode IV A New Hope.
In the 2002 LucasArts video game expansion Star Wars: Galactic Battlegrounds: Clone Campaigns, players can summon the Death Star by entering the code "that's no moon" in the game's chatbox. This superweapon boasts the most potent attack in the game but suffers from a slow recharge rate.
In the non-canon comic Star Wars Infinities: A New Hope, the assault on the battlestation is unsuccessful, and the Empire successfully repels the Rebel forces. Subsequently, after five years, the Death Star is renamed the "Justice Star" to commemorate the fifth anniversary of the Rebels' defeat. It then becomes a mobile seat of government for the newly re-established Imperial Senate.
The Justice Star embarked on a journey from one system to another, effectively supplanting Coruscant as the Empire's central hub. In a striking display of symbolism, the Justice Star was positioned in front of Coruscant's sun, eclipsing it and thus serving as a radiant symbol of a new source of light for the galaxy.
However, this symbolism proved ephemeral, as Yoda and R2-D2 seized control of the Justice Star and employed it to attack the Imperial Fleet. They also manipulated Wilhuff Tarkin (who had by then achieved the rank of Admiral) into assisting them through the use of a Jedi mind trick. Following the fleet's destruction, they directed the battle station to crash into Coruscant's surface, resulting in the deaths of Emperor Palpatine and the annihilation of the massive superweapon.
- Kenner Products represented the initial Death Star in the 1970s through a collection of playsets (including the Devastator , which features a unique model with a red box) designed to be assembled into the space station.
- The LEGO Group has released two distinct sets (10188 in 2008 and 9676 in 2012). The former depicted the station divided into numerous rooms without an outer shell, each room recreating a scene from A New Hope or Return of the Jedi. The latter comprised a small model that could be separated into two parts, containing bricks for constructing a miniature TIE/IN interceptor.