Star Wars: Episode V The Empire Strikes Back, also known as The Empire Strikes Back, is a motion picture from 1980 with Irvin Kershner as director and Leigh Brackett alongside Lawrence Kasdan as writers, using a story conceived by George Lucas. It serves as the second installment within the Star Wars original trilogy.
The movie follows the ongoing conflict between the Rebel Alliance and the Galactic Empire. The storyline depicts Han Solo, Chewbacca, and Princess Leia Organa being relentlessly pursued through the cosmos by Darth Vader and his formidable forces. Simultaneously, Luke Skywalker embarks on his crucial Jedi training under the guidance of Yoda, acting upon instructions from the spirit of Obi-Wan Kenobi. During an intense and almost deadly confrontation with Vader, Luke is confronted with a shocking truth and must come to terms with his fate.
Despite initial mixed reactions, the film has become the most beloved in the franchise among both audiences and critics. It is now celebrated as one of the finest sequels ever made, and also one of the greatest cinematic achievements of all time. It was re-released with changes during 1997, and subsequently on DVD in 2004. The Blu-ray version of the film was released in September of 2011. A radio adaptation was aired on National Public Radio in the United States back in 1983. In 2010, the film gained recognition when it was chosen for preservation by the Library of Congress as part of the National Film Registry.
The story takes place three years after the events of A New Hope. The Rebel Alliance has been compelled to evacuate their base located on Yavin 4 and establish a new one on the icy planet known as Hoth.
An Imperial Star Destroyer, sent by the Sith Lord Darth Vader in his continued search for Luke Skywalker, deploys numerous probe droids throughout the galaxy. One of these droids lands on Hoth and starts its survey of the area. Luke Skywalker, while patrolling on his tauntaun, comes across the probe, mistaking it for a meteorite. After informing his comrade Han Solo about investigating the site, Luke is attacked and knocked unconscious by a ferocious wampa.
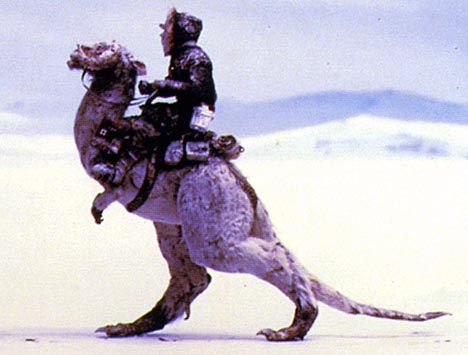
When Luke doesn't return to Echo Base, Han Solo rides out on his tauntaun to find him amidst an approaching storm. Upon waking up, Luke finds himself suspended upside down inside a cave, where he sees a wampa devouring his tauntaun. Using the power of the Force, Luke manages to summon his lightsaber from the snow. After activating it, he frees himself and severs the wampa's arm, escaping the cave into the frigid night of Hoth.
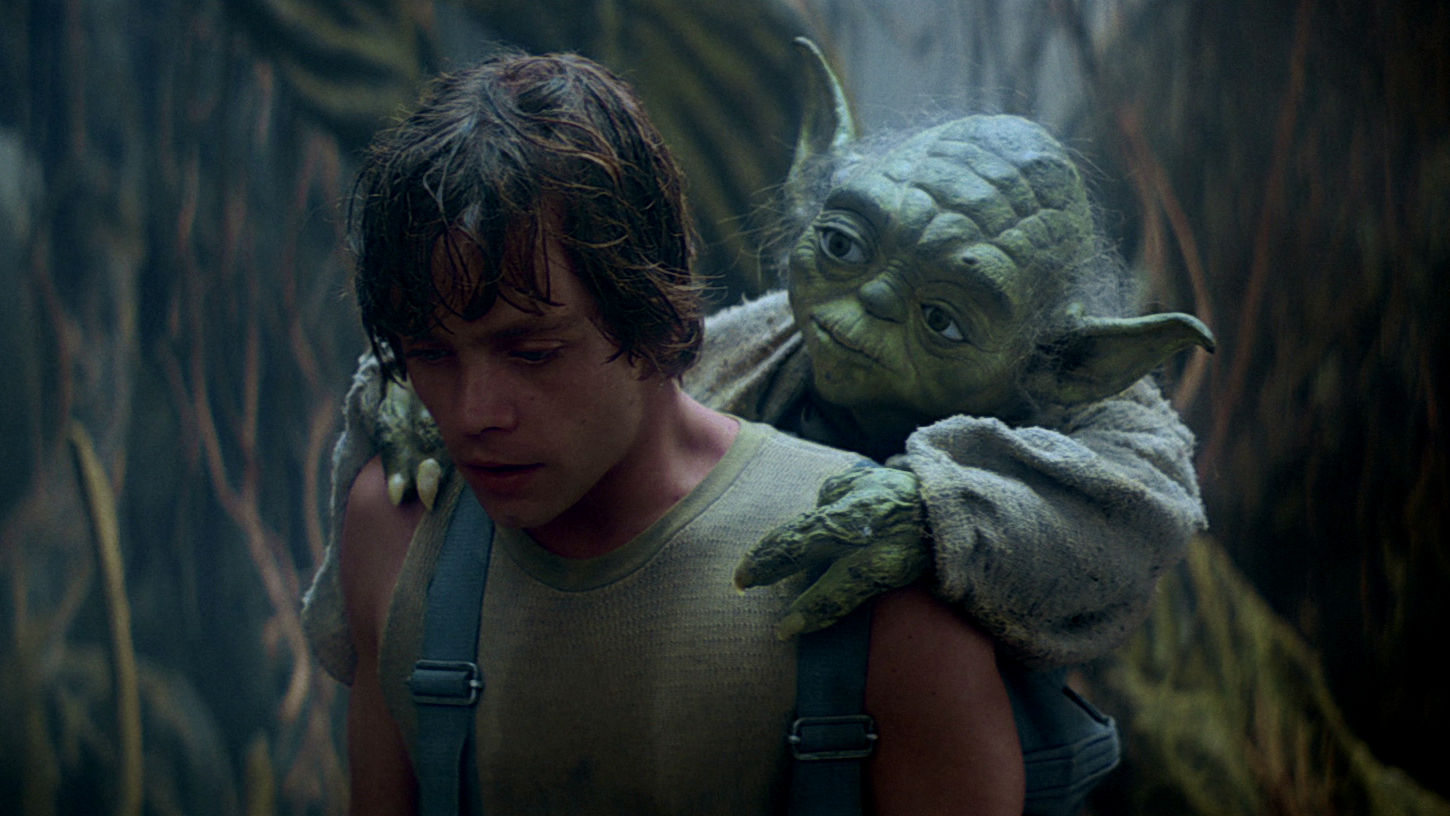
Luke attempts to return to Echo Base on foot, but becomes lost in the blizzard and collapses in the snow. Suddenly, the Force spirit of Obi-Wan Kenobi appears before him. Kenobi's spirit instructs Luke to journey to Dagobah for training under Yoda, a Jedi Grand Master. After the spirit vanishes, Han arrives and finds Luke nearly unconscious, mumbling about Obi-Wan, Yoda, and Dagobah. Han then watches his tauntaun collapse from the extreme cold. To prevent Luke from freezing, Han uses Luke's lightsaber to cut open the dead tauntaun and places Luke inside. Han proceeds to build a shelter for both of them. They are forced to spend the night outside because the aircraft (snowspeeders) used by the Rebels for atmospheric flight have not been adapted for the planet's extremely low temperatures, preventing a rescue mission.
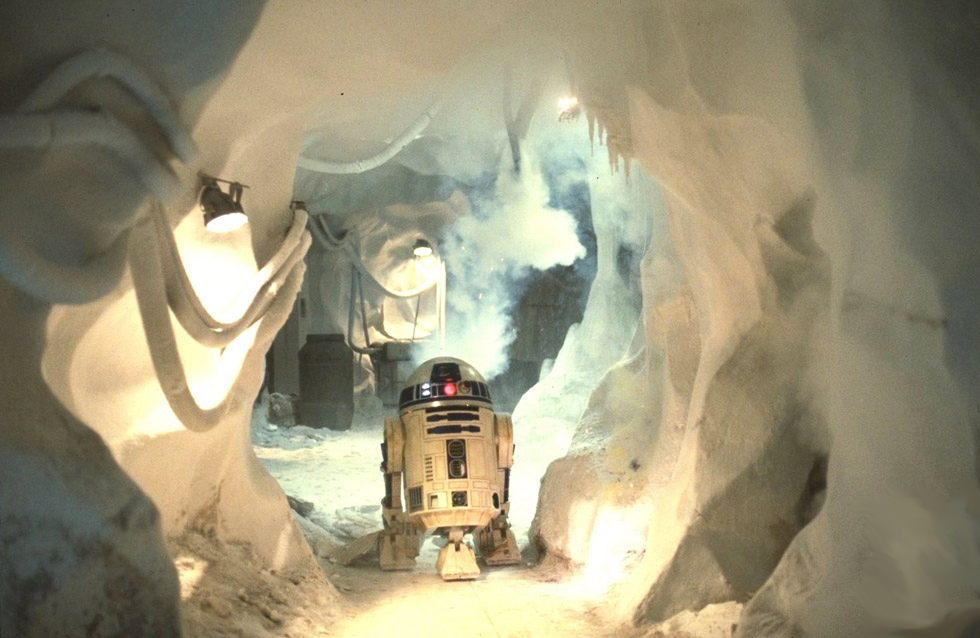
The following morning, Rebel Pilots in snowspeeders leave Echo Base to search for the missing duo. Zev Senesca, a pilot in Rogue Group, contacts Han over comlink, and the pair are rescued. Upon their return to base, Luke is placed in a bacta tank for treatment under the care of the medical droid, 2-1B.
Princess Leia Organa urges Han to remain with the Rebels. When Han assumes it is because she has feelings for him, Leia becomes angry and calls him a "stuck-up, half-witted, scruffy-looking nerf herder."
Meanwhile, the probe droid spots indications of occupancy on Hoth and transmits a signal to the Imperial fleet before being shot at by Han Solo and Chewbacca, triggering its self-destruct. Aboard the Executor, Admiral Kendal Ozzel dismisses the information as mere smuggler activity. However, Darth Vader suspects otherwise and orders the fleet to Hoth. Han warns General Rieekan that the Empire is likely aware of their location, prompting Rieekan to order the evacuation of Echo Base.
Darth Vader and the Imperial forces head towards the Hoth system to initiate the attack. The rebels load essential equipment onto transports and plan a rear-guard action to ensure their escape. Luke, now recovered from the Wampa attack, bids farewell to Chewbacca and Solo, who intend to leave the Alliance to settle their debt with Jabba the Hutt. As the Imperial forces enter the Hoth system, General Rieekan orders full power to the energy shield protecting the base from orbital bombardment.
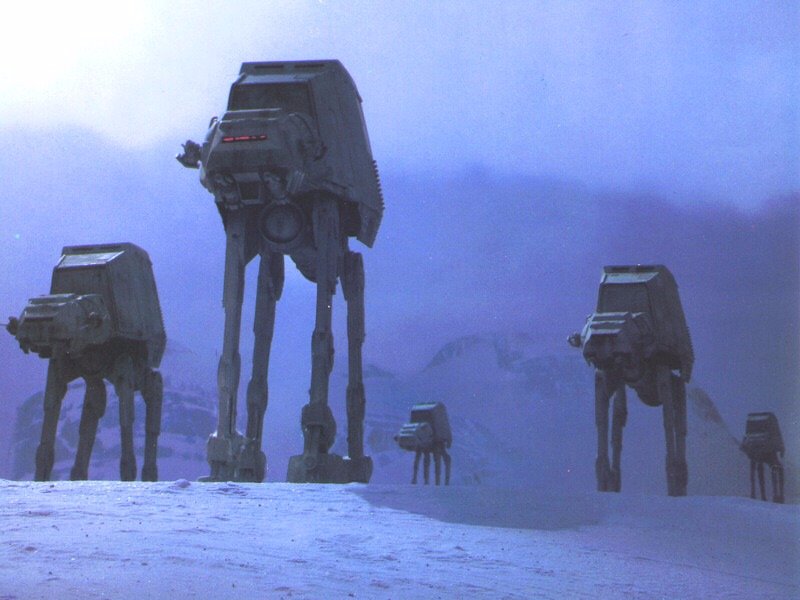
Aboard the Executor, General Maximilian Veers informs Vader that Admiral Ozzel emerged from lightspeed too close to Hoth. Ozzel's plan was to surprise the Rebels before they could establish defenses. However, Vader realizes the Rebels have been alerted to the fleet's arrival. Via video communication, Vader uses the Force choke to kill Ozzel for his incompetence, promoting Captain Firmus Piett to Admiral in his place. As Vader had previously ordered, the Imperial ground forces, led by General Veers, land outside the Rebels' shield and advance overland to destroy the power generator.
Princess Leia instructs the Rebel fighters to evacuate Hoth two to three ships at a time, passing the energy shield to a rendezvous point beyond the outer rim. Rieekan lowers the shields to allow the Ion cannon to fire at an Imperial Star Destroyer, enabling the first transports to escape. Rebel pilots depart the Hoth base for the approaching battle against the heavily armed Imperial forces, equipped with agile AT-STs (All Terrain Scout Transports) and massive AT-AT (All Terrain Armored Transport) walkers, under the command of General Veers.
The Rogue Squadron snowspeeder group, led by Luke, begins their attack. Luke quickly determines that the AT-AT's armor is too strong for blasters and decides to use harpoons and tow cables to entangle the walker's legs. Luke's gunner Dak Ralter is hit and killed during the initial approach. Wedge Antilles and his gunner Wes Janson make the first pass, successfully toppling one of the AT-ATs, which is then destroyed by Rebel troops. The main AT-AT, commanded by General Veers, prepares to target the Rebel base's main power generator. Luke's speeder is shot down by the Imperials and crash-lands in the snow. Luke escapes before an AT-AT can crush his ship.
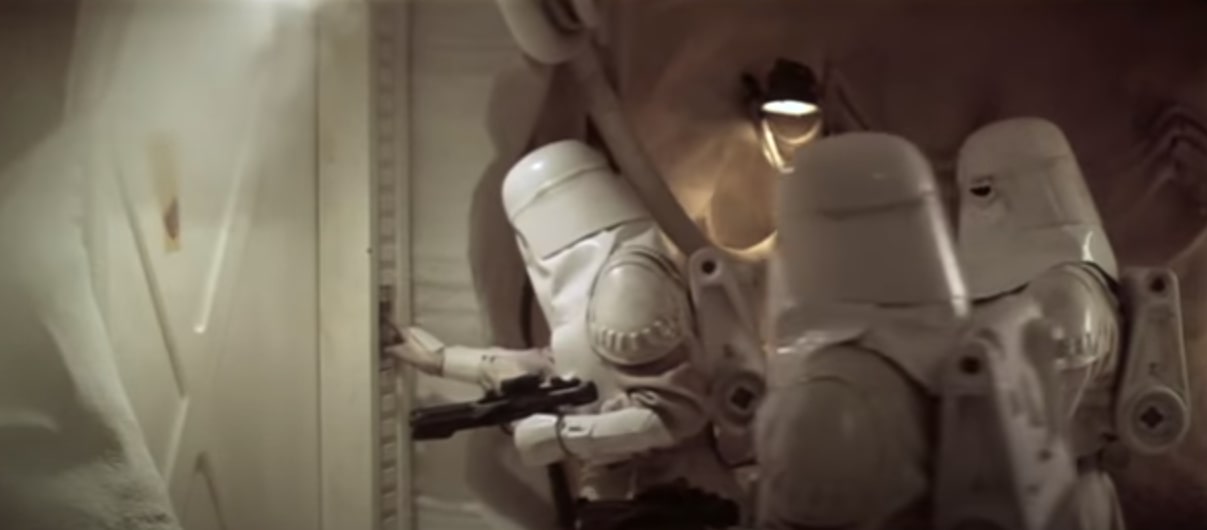
The Rebel base is now under direct attack, and Imperial snowtroopers have entered the base, forcing Han, Leia, Chewbacca, and C-3PO to flee. Leia orders the evacuation of the base as they depart.
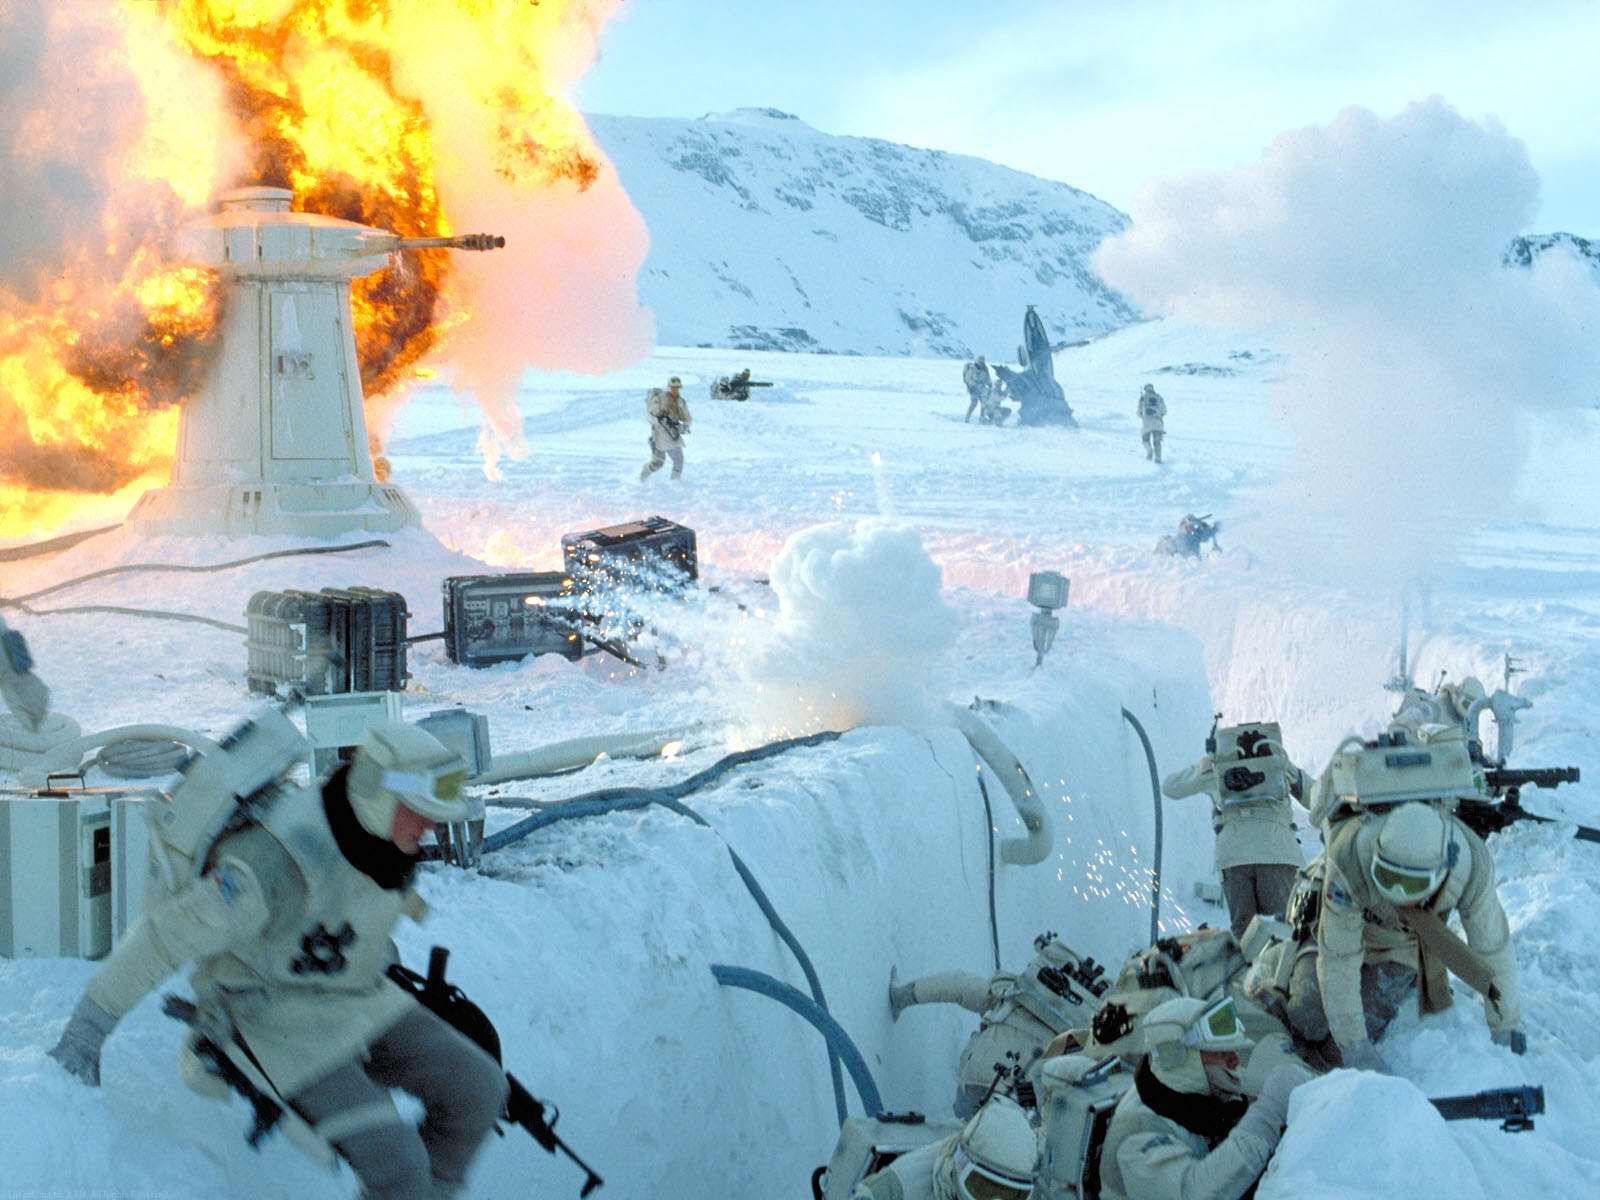
Luke manages to destroy another AT-AT by using his hoist cable and lightsaber to enter the transport's belly, dropping in a thermal detonator, and detaching himself as explosions neutralize the AT-AT. The Rebels suffer significant casualties during the battle. The main AT-AT, driven by General Veers, reaches firing range of the power generator and successfully destroys it.
Han, Leia, and company, realizing they are being pursued by Vader (who has arrived on Hoth), make their way to the Millennium Falcon and escape. As the Falcon takes off, Luke reaches R2-D2 and his X-wing starfighter, departing Hoth. Changing course from the rendezvous point, he sets coordinates for Dagobah.
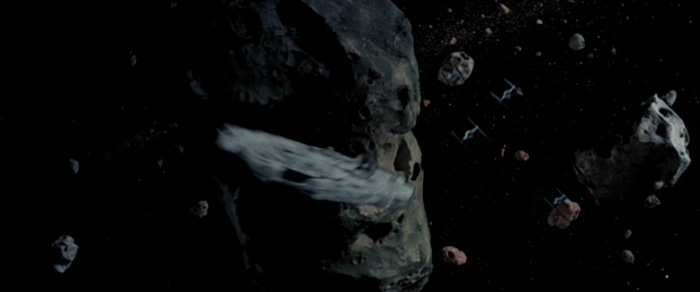
Han and company are chased by Imperial TIE fighters. Attempting to jump to lightspeed, Han realizes (with help from 3PO) that the hyperdrive is damaged. While trying to repair the hyperdrive system, Han enters an asteroid field to evade pursuit. He lands his ship inside a cavern on a large asteroid to rest and find a way to fix the ship.
Luke lands on the swampy planet Dagobah, sinking his X-wing in the process, and R2 is almost eaten by a Dragonsnake, which spits him out. He discovers a small and peculiar figure tinkering with his gear. After Luke says he is looking for a Jedi Master, the being offers to take him to Yoda.
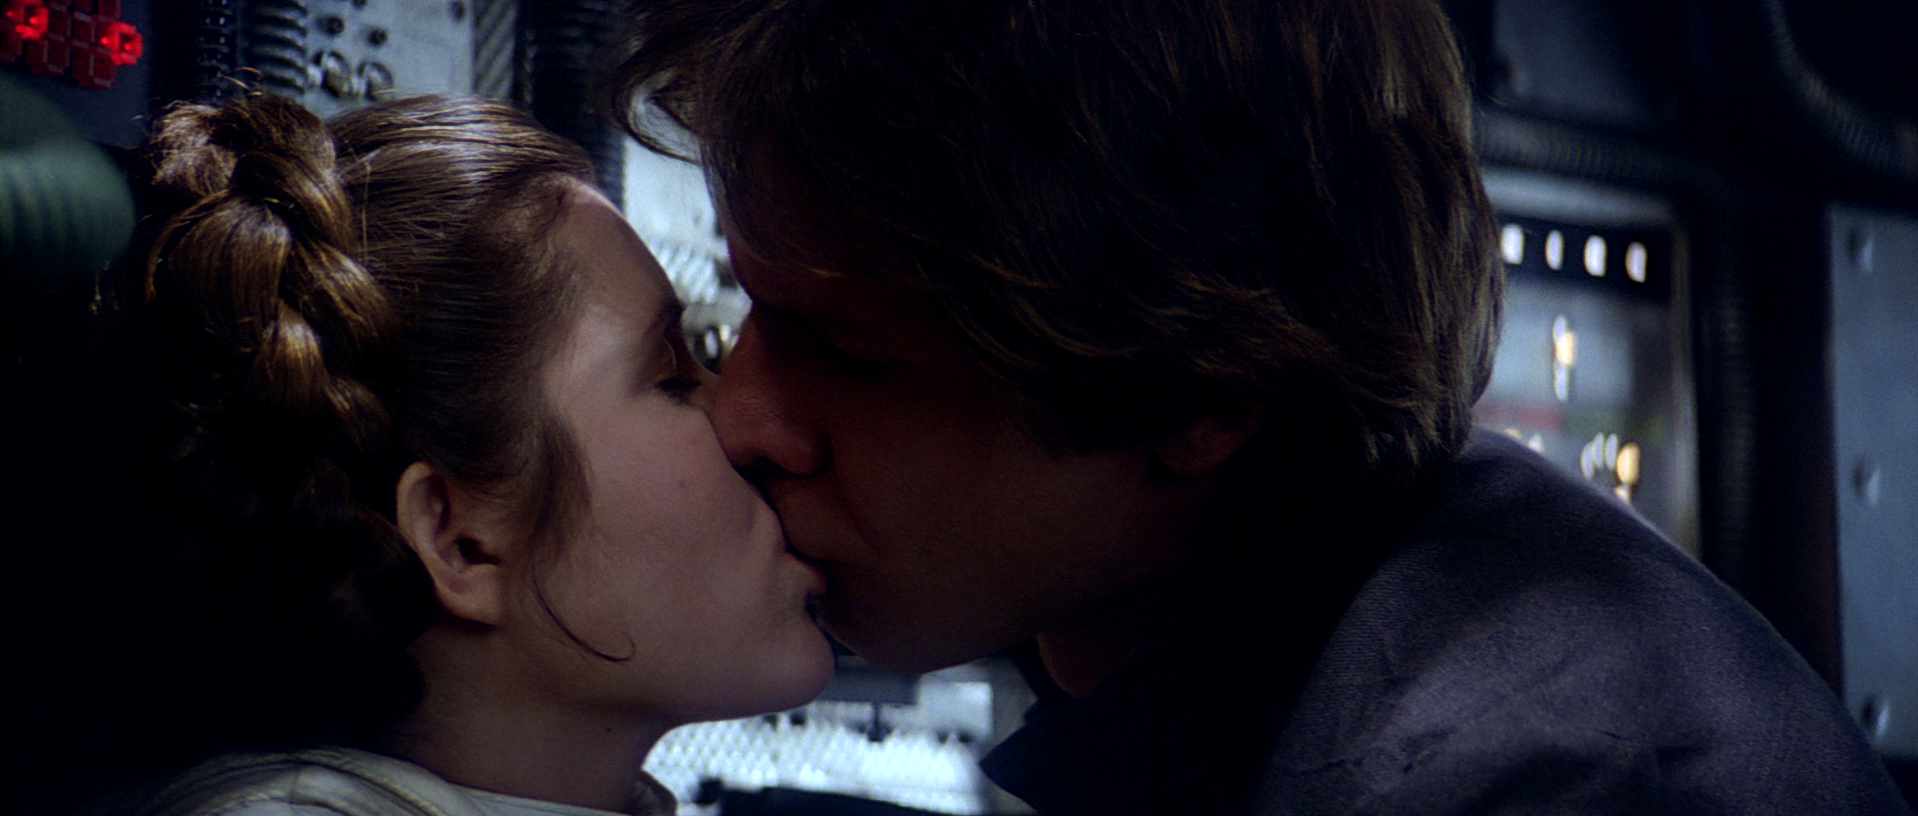
Back on the Falcon, while Leia tries to make repairs, Han attempts to woo the Princess, leading to a passionate kiss. When Threepio arrives, Leia withdraws.
Vader orders Death Squadron to sweep the asteroid field to find the Millennium Falcon. As the search continues, the dangers of the field take their toll: an asteroid destroys the bridge tower of a Star Destroyer, killing everyone aboard. On the Executor, Vader communicates with the captains of the other ships. Captain Lorth Needa suggests they assess the damage. Vader insists they continue the search. Admiral Piett informs Vader that Emperor Sheev Palpatine demands immediate contact. Vader moves his ship out of the asteroid field for a clear transmission.
In his quarters, Vader receives a holographic message from Palpatine, who alerts him to a "new enemy who could destroy" the Empire - Luke Skywalker. Vader suggests turning Luke into a "powerful ally". Lord Sidious agrees, calling Luke a "great asset" and asks if it can be done. Vader declares Luke will join the Empire "or die".
Instead of taking Luke directly to Yoda, the creature leads him to his hut. Luke insists on finding Yoda immediately, but the creature responds with "Not far. Yoda not far." The figure says Luke lacks patience, but Kenobi's voice says the boy will learn if he is trained. Luke realizes the small green figure is Yoda. Yoda asks Kenobi if he will finish the training he begins, then suspects Luke will succumb to fear.
The next day, while cleaning Mynocks off the Falcon, Solo and his companions escape what turns out to be the inside of a titanic space slug. Meanwhile, Luke begins rigorous training from Yoda, including moral lessons about the dangers of the dark side of the Force. He is told to enter a cave strong with the Dark Side's power, ignoring Yoda's warning to leave his weapons. Inside, he envisions confronting and beheading Darth Vader. The severed head's mask breaks apart, revealing Luke's face, a warning that uncontrolled emotions will turn Luke into Vader.
Back on the Star Destroyer, Vader enlists bounty hunters, Boba Fett, Dengar, IG-88, Bossk, 4-LOM, and Zuckuss to find the Millennium Falcon for a "substantial reward". An Imperial commander spots the Falcon, leading to a pursuit. The Falcon eludes the Empire by attacking the lead Star Destroyer and attaching itself to the rear of the cruiser's command tower, making it appear to vanish.
Days later, while training, Luke is distracted when his X-wing fighter almost completely submerges into the swamp. Luke says he cannot lift the ship, seeing it as too big. Yoda says it is "no different, only different in your mind." Luke says he'll "try" to lift the ship, but Yoda says "No, try not! Do or do not, there is no try." Luke tries to use the Force, but fails. Yoda reminds him that "size matters not" and shares wisdom about the Force. Yoda uses the Force to lift the ship, leaving Luke dumbfounded.
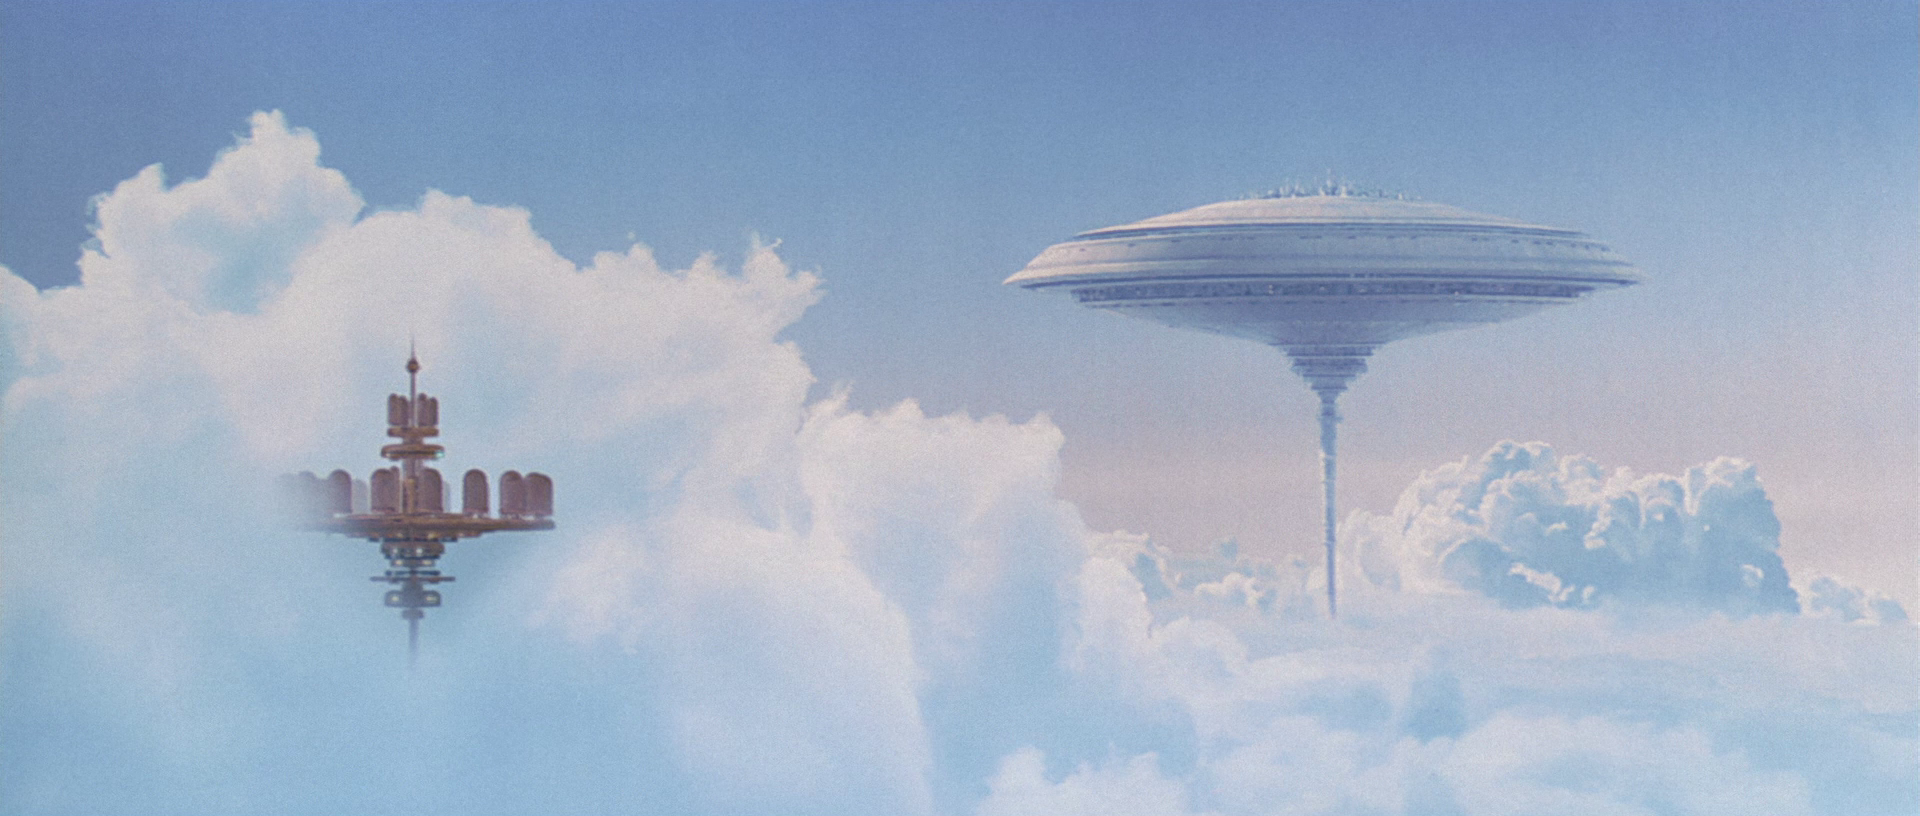
When the fleet disperses, the Rebels wait for the ship's refuse dump before detaching and floating away with it. The Falcon's hyperdrive needs repairs, so Han decides to go to Cloud City, a gas-mining colony run by his "old friend" Lando Calrissian. Boba Fett deduces the Falcon's escape method and follows them.
The next day, Yoda reminds Luke of the things the young Jedi will see in his mind, the future, the past, and of friends he recognizes. Luke has a vision of his friends in danger and wants to rescue them, but Yoda reminds him that if he leaves now, everything his friends fought for will be destroyed.
Upon arriving at Cloud City, Han's party is welcomed by Lando Calrissian. However, the Rebels are suspicious, especially after finding C-3PO deactivated and dismembered.
That evening, Luke and R2-D2 prepare to leave Dagobah, warned by Yoda and Kenobi not to end training for a fight he is not ready for. Ben says that if Luke faces Vader, he must face him alone. Luke promises to return and complete his training, and his ship takes off. Yoda is disappointed, declaring Luke reckless. Ben says "That boy is our last hope", however, Yoda replies, "No... there is another..."
A day later, Han and company are betrayed by Calrissian, who was threatened by the Empire unless he cooperated. They become captives of Darth Vader, who tortures Han and Leia to create a disturbance in the Force for Luke to detect.
Meanwhile, Chewbacca tries to rebuild C-3PO, accidentally putting his head on backwards. After being tortured, the rebels are informed by Lando that Leia, Chewbacca, and C-3PO will be confined to Cloud City and Han will be given to Boba Fett. Leia believes Vader wants them all dead, but Lando says he is after someone called "Skywalker." The rebels realize Vader wants Luke and has set a trap. After Lando announces that Luke is on his way, Han attacks him, only to be restrained.
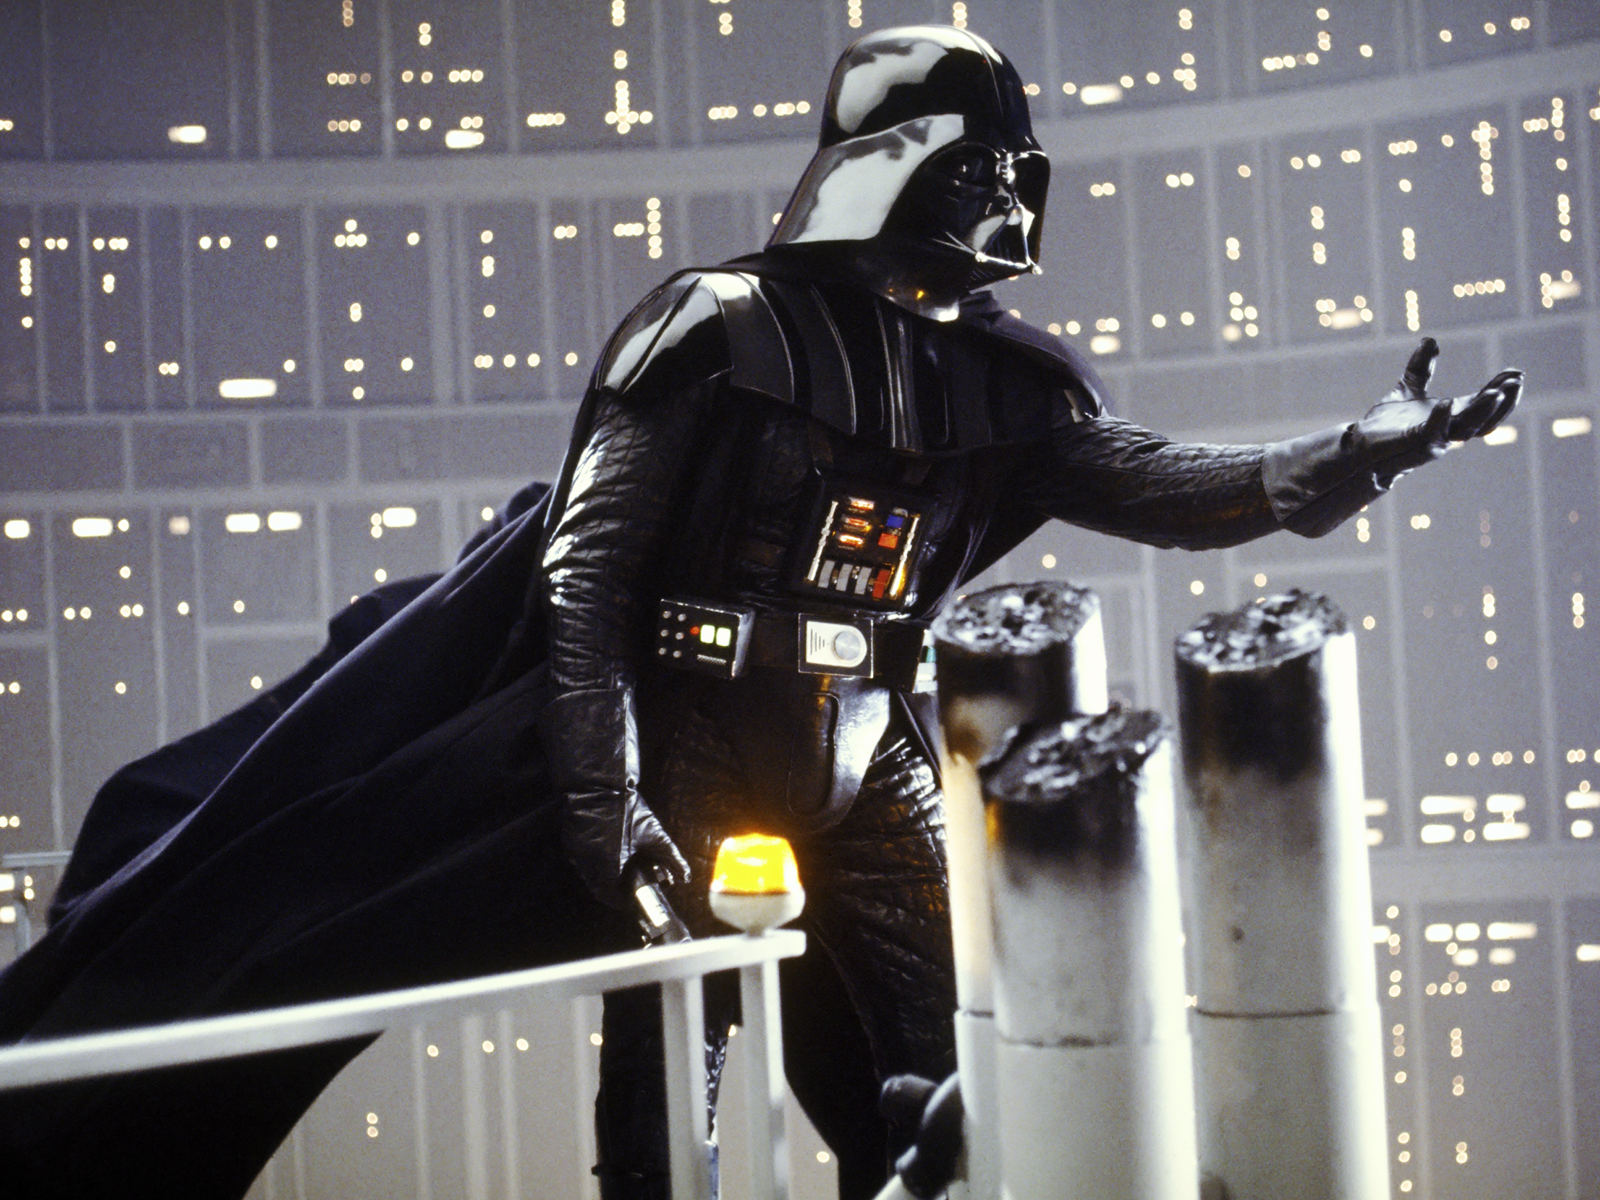
That afternoon, Vader enters a carbon-freezing chamber intending to freeze Luke Skywalker. He uses the opportunity for Boba Fett to deliver Solo to Jabba the Hutt by testing the device on Solo himself. Han and company enter the chamber. Chewbacca resists, but Han restrains him. Han says goodbye to Leia with a kiss before being frozen in carbonite. Vader hands over Han to Boba Fett for transportation to Tatooine to receive a bounty from Jabba. An Imperial commander informs Vader that Luke's starfighter has arrived on Bespin. The Dark Lord orders Lando to take Leia, Chewbacca, and C-3PO to his Star Destroyer, breaking his deal with Calrissian. However, the Cloud City administrator has other plans.
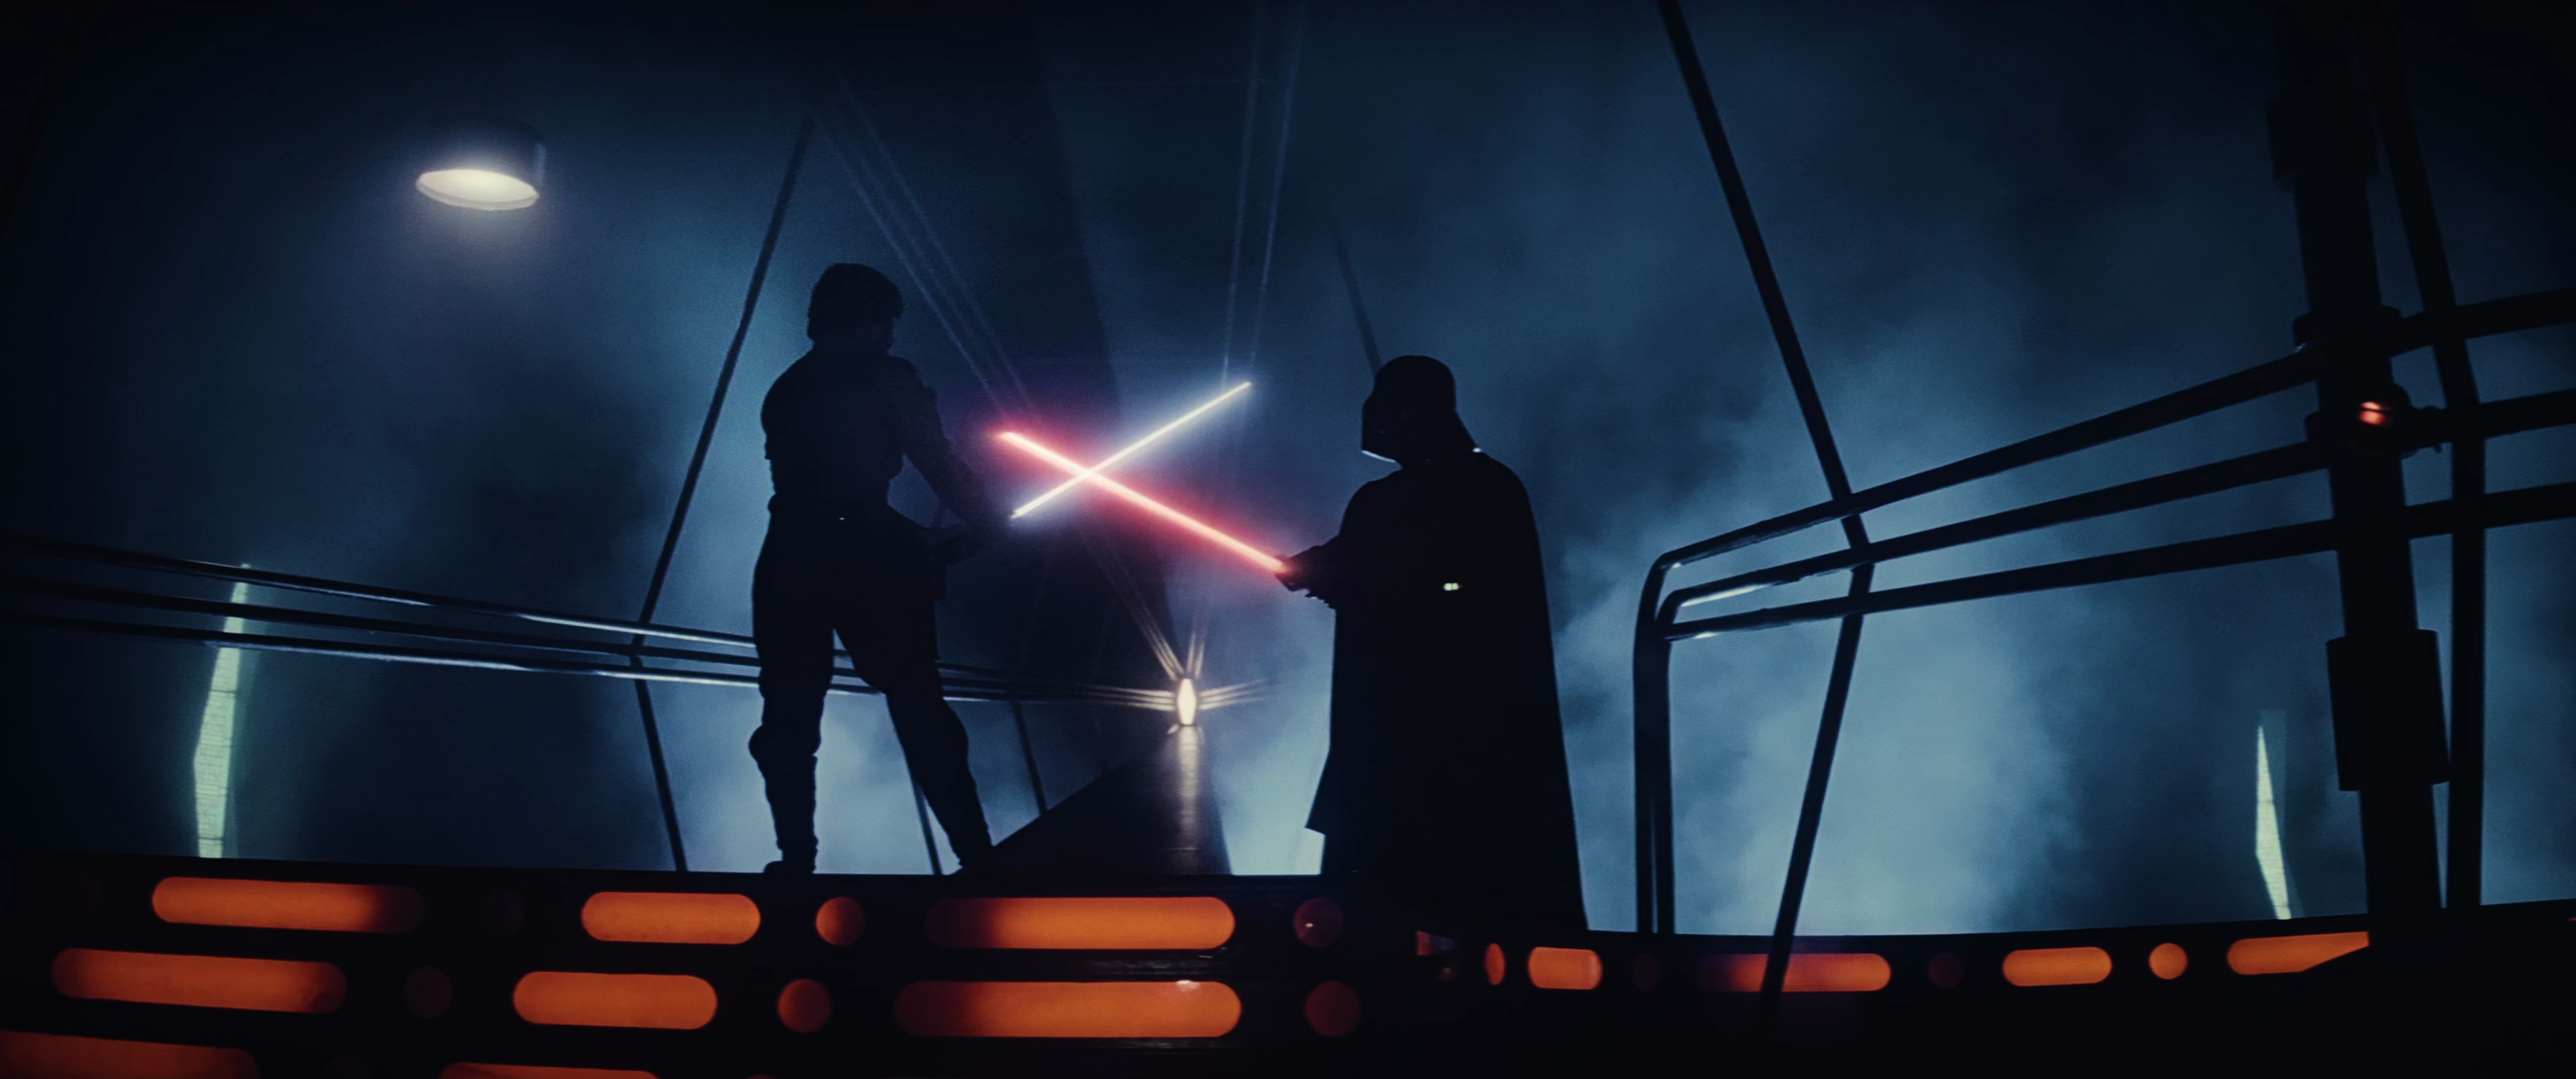
Luke arrives at Bespin. He walks through Cloud City, spotting Boba Fett taking the frozen Solo back to his ship. He tries to follow but is thwarted when the bounty hunter notices and opens fire. He meets Leia, Chewie, and Lando, who have been captured by stormtroopers. Luke tries to ambush the Imperials, but is unsuccessful. Leia yells that "it's a trap!" Luke runs after his friends, but wanders into the carbon-freezing chamber. There, he meets Vader and they fight in an epic lightsaber duel, where Luke's skills are no match for Vader's experience.
The Imperials are overpowered by Cloud City security, freeing Lando and company. Chewbacca turns against Lando for betraying Han and chokes him, but he manages to say there's still a chance to rescue Han at the East Platform. C-3PO is reunited with R2-D2. Lando and company arrive too late as Fett's ship takes off, then engage in a battle with stormtroopers.
Luke and Vader continue the duel in the darkened rooms. Luke nearly falls into the freezing chamber but leaps out with the Force before Vader activates it. The fight continues. Vader uses the Dark Side of the Force, hurling everything at Luke. One item breaks the window, creating a vacuum. Luke is pulled out and the fight moves to the emergency platform.
As the gunfight continues, Lando orders an evacuation of Cloud City before the arrival of the main forces of the Empire, then the rebel company manages to find their last hope of escape... the Millennium Falcon.
On the emergency platform, Luke and Vader continue the duel. Vader knocks Luke off his feet and invites him to surrender so that he won't be killed, like Obi-Wan. The young man continues to fight. During the duel, Luke strikes Vader in his right shoulder, damaging his armor. Vader severs Luke's right hand, which is holding his lightsaber, and reveals the truth about his father:
Luke does not believe what he heard and accuses Vader of lying, but he advises the young man to listen to his own heart, and thus understand that this is pure truth. Shocked and frightened, Luke falls into despair. Vader invites the young man to reunite with him in order to destroy the Emperor together and rule the galaxy as a father and son. However, Luke chooses suicide and allows himself to fall down the deep shaft.
Luke is sucked into an air vent, exits the underbelly of the city and catches an antenna beneath Cloud City. He attempts to climb back to the open hatch, but it closes. Facing death, Luke calls out to Ben Kenobi in vain, then calls out to Leia.
Leia senses Luke's telepathic distress call. Chewie turns the Falcon around at Leia's insistence and returns to Cloud City. Lando catches Luke once the wounded Jedi drops himself to the Falcon, and the ship flees as TIE Fighters race toward them. The Falcon is about to escape into hyperspace when the hyperdrive system fails (due to imperial specialists). Vader asks for confirmation that the Millennium Falcon's hyperdrive system was deactivated to prevent their escape, then orders weapons be set to stun.
As the Imperial forces relentlessly pursue the Falcon, the wounded Luke experiences a telepathic connection with Vader, who is calling out to him. Responding to the call, Luke whispers, "Father...", while Vader's telepathic voice echoes, "Son, join me". Recognizing Vader's presence, Luke laments, "Ben, why was I not informed?".
Following his dismemberment in Cloud City, C-3PO urgently requests R2-D2 to complete his reconstruction. Demonstrating remarkable resourcefulness, R2-D2 swiftly restores functionality to the Falcon's hyperdrive, enabling the ship's timely escape into hyperspace. Disappointed by this turn of events and disregarding Piett's failure, Vader retreats to his private chambers within his Star Destroyer.
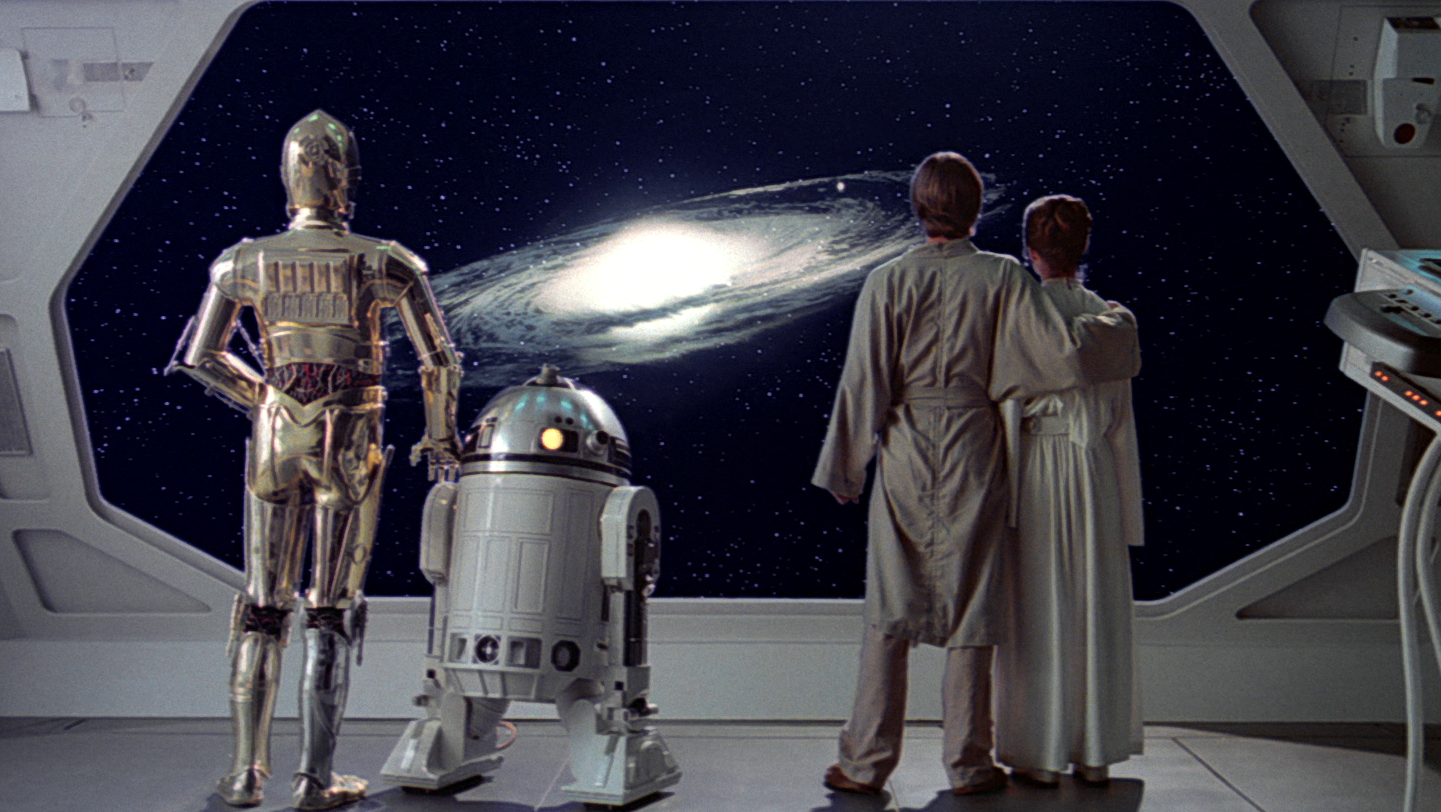
Aboard an EF76 Nebulon-B escort frigate at the Rebel fleet's designated meeting point, Luke is once again under the medical supervision of 2-1B, which involves the installation of a prosthetic hand. Meanwhile, Lando and Chewbacca embark on their perilous undertaking...the rescue of Han. Lando assures Leia that they will return the man she loves to her. The film concludes with Luke, Leia, and the droids observing the Falcon's departure into the unknown, thus preparing the audience for Return of the Jedi.

Lucas enlisted the talents of screenwriter Leigh Brackett to craft a screenplay based on his provided story outline. Brackett successfully completed the initial draft on February 23, 1978, but tragically passed away shortly thereafter. Lucas expressed his dissatisfaction with the direction Brackett's screenplay had taken. Lacking a writer to revise the work, he personally undertook the task of writing the second draft throughout March. This draft introduced significant alterations to the plot compared to the first draft, establishing the storyline that ultimately appears in the film. A particularly noteworthy change was the revelation that Vader is Luke's father. After Lawrence Kasdan completed the screenplay for Raiders of the Lost Ark, he was subsequently hired to rewrite and enhance Lucas's draft. He produced several more drafts before a script conference took place in November, involving George Lucas, Lawrence Kasdan, Irvin Kershner, and Gary Kurtz. Following further contributions and refinements, the final shooting script was established. Kershner and the actors made minor adjustments to the dialogues during filming, which were generally approved by Lucas.
The majority of the concept art and designs for the film were created by Ralph McQuarrie, Joe Johnston, and Nilo Rodis-Jamero, drawing inspiration from Lucas's concepts. The Yoda puppet was conceived by British make-up artist Stuart Freeborn. Freeborn stated that he modeled Yoda's face after his own and incorporated certain facial characteristics of Albert Einstein.
Principal photography spanned from March 5 to September 24, 1979. Certain scenes depicting Hoth were filmed in Norway, specifically in the area between the Finse railway station and the Hardangerjøkelen glacier. The scenes set on Dagobah, Cloud City, and within the Hoth Echo Base were filmed at Elstree Studios, located in England.
The film's production encountered significant budgetary and scheduling overruns. When the budget exceeded its initial allocation by $10 million, the bank threatened to withdraw its loan. To secure the necessary funds to complete the film, Lucas was compelled to approach 20th Century Fox and negotiate a revised agreement. The studio received a larger share of the film's profits in exchange for guaranteeing the loan. Despite these challenges, Lucas successfully retained the rights to the sequel and merchandising.
Following the immense success of the first film (and its acclaimed soundtrack), John Williams was once again selected to compose the score. Unlike the first film, the exact pieces used for the temp track are unknown, but Kershner intended to use pieces from "Stravinsky and Shostakovich, Hindemith and Copland, Prokofiev [his scores for Sergei Eisenstein's films] and Bliss". The spotting sessions for Empire were held on an unknown date in early November, 1979. Also present at the sessions were producer George Lucas, producer Gary Kurtz, director Irvin Kershner, editor Paul Hirsch, music supervisor Lionel Newman, and music editor Ken Wannberg. Footage of the carbon freeze scene being spotted can be seen in the documentary Star Wars: Music by John Williams, and also in the Enhanced Edition of J.W. Rinzler's The Making of The Empire Strikes Back.
After the spotting sessions, Williams commenced work on composing his score. For this film, he chose to both reuse themes from the first (Luke's theme, Ben's theme - now known as The Force Theme, and Princess Leia's Theme) while also creating entirely new themes (Darth Vader's Theme, Yoda's Theme, the Cloud City Theme, the Han/Leia love theme). The amount of time he would've spent writing the music for this film is unknown, but we know that he had at most 8 weeks, assuming the spotting sessions were in the first week of November. This is because recording started December 27th, 1979.
Once again, the film's score was orchestrated by Herbert Spencer, this time assisted by Angela Morley, Al Woodbury, and Fred Steiner.
The exact recording schedule for Empire is unknown, but we know it was recorded on December 27th, 28th, 29th of 1979, and January 7th, 8th, 9th, 10th, 17th, and 18th of 1980. The score was recorded with the London Symphony Orchestra at Anvil Scoring Stage by engineer Eric Tomlinson, and his assistant Alan Snelling. This time, the score was recorded with an upgraded Neve mixing console supporting 24 channels, that was hooked up to a 24-track 2" MCI recorder using Dolby A. Instead of recording the live mix to the multi-track masters like he had with Star Wars, Tomlinson recorded his live mix for Empire to an 8-track Struder A80 machine also using Dolby A. The first 6 tracks were used for his live surround mix, and the 8th channel had a film synchronization tone. The 7th channel was left empty to prevent cross-talk. No 35mm magnetic film master was created for the Empire sessions, unlike for the original Star Wars.
Similar to its predecessor, the score of Empire has been made available in various formats throughout the years. While many of these releases are simply reissues of previously available material, there are currently four releases with unique programs that were independently mastered from the original session tapes:
Leading up to the premiere of The Empire Strikes Back, several cast members engaged in in-character promotional appearances on television, including Mark Hamill and Peter Mayhew on Jim'll Fix It, Anthony Daniels on Sesame Street, and Daniels, Hamill, and Mayhew on The Muppet Show.
The world premiere of The Empire Strikes Back took place on May 17, 1980, at the Kennedy Center in Washington, D.C., as a special Children's World Premiere event. A Royal Charity Premiere was subsequently held in London at the Odeon Cinema in Leicester Square on May 20th. This event was playfully named "Empire Day," a nod to the British Commonwealth Day holiday (previously known as Empire Day before 1958), and featured a large number of stormtroopers throughout the city. Additional charity benefit premieres were conducted in various locations on May 19 and 20. The film was then officially released to the general public in North America and the U.K. on May 21, 1980. The initial release included 127 prints of the film in 70 mm format, followed by a wider release in June 1980, primarily in 35 mm format. A television documentary titled Star Wars: Music by John Williams was released concurrently with the film. Similarly, in September 1980, CBS broadcasted the official making-of documentary, SPFX: The Empire Strikes Back.
In cinemas across Australia, the United Kingdom, and Scandinavia, the short film Black Angel was presented before the theatrical screenings of The Empire Strikes Back. Black Angel marked the directorial debut of Roger Christian, who had served as the art director for A New Hope. The film was filmed in Scotland during the autumn of 1979, with a budget of £25,000, which was gifted to Christian by George Lucas in recognition of his contributions to Star Wars.
A novelization of the film was penned by Donald F. Glut and released on April 12, 1980. Marvel Comics also adapted the film into comic book format as part of their ongoing Star Wars series. This adaptation, comprising six parts (issues 39 to 44), was scripted by Archie Goodwin and illustrated by Al Williamson. (Decades later, a manga adaptation illustrated by Toshiki Kudo was published in Japan in 1998 and in the United States in 1999.) Kenner introduced a toyline inspired by the film. A radio drama adaptation was written by Brian Daley and produced for broadcast on National Public Radio in 1983.
George Lucas released a Special Edition of The Empire Strikes Back in 1997, alongside the other two films of the original trilogy. This edition included several modifications and additions, such as the replacement of a musical piece in the closing scene.
On September 21, 2004, the three original films were finally made available on DVD. This release incorporated a few further minor alterations to the film, including adjustments to sound effects and enhancements to the film's visual quality. One notable improvement in visual quality involved the removal of an unusual pink tint from the Cloud City entrance scene, where the Cloud Car had been replaced with a Tibanna refinery in the 1997 theatrical version.
Moreover, the scene featuring Darth Vader communicating with the Emperor was modified for the DVD release. Originally, Palpatine was portrayed by a woman wearing a mask with chimpanzee eyes superimposed over her own, with an elderly male's voice dubbed in later. Both Clive Revill, who provided Palpatine's voice, and Marjorie Eaton, who physically portrayed Palpatine, were replaced by Ian McDiarmid, who was later cast in the same role in Return of the Jedi and all three prequel films. However, Revill's name remained in the movie's credits as the voice actor for Palpatine. McDiarmid re-recorded the dialogue with James Earl Jones, and they both added additional lines to this scene.
Another addition was Temuera Morrison providing the voice for Boba Fett, further emphasizing that Boba is indeed a clone of Jango Fett.
The trilogy was re-released on separate two-disc Limited Edition DVD sets from September 12, 2006 to December 31, 2006; the original versions of the films were included as bonus material. This release was met with controversy because the unaltered versions were sourced from the 1993 non-anamorphic Laserdisc masters and had not been retransferred using modern video standards. The Empire Strikes Back was re-released in Blu-ray format in September of 2011.
On April 7, 2015, Walt Disney Studios, 20th Century Fox, and Lucasfilm jointly announced the digital releases of the six released Star Wars films. As Lucasfilm had retained digital distribution rights to Episodes I through VI, Walt Disney Studios Home Entertainment made The Empire Strikes Back available for digital download on April 10, 2015.
Despite the Walt Disney Company's 2012 acquisition of Lucasfilm Ltd. and the release rights to all future Star Wars films, Fox was to retain original distribution rights to Star Wars: Episode IV A New Hope, which they co-produced and co-financed, in perpetuity in all media worldwide. Fox was also to retain theatrical, nontheatrical, and home video rights worldwide for the franchise's five subsequent films, which Lucasfilm produced and financed independently, through May 2020, at which time ownership was to transfer to Disney. This complex relationship between Fox and Disney, particularly in regards to Fox's perpetual rights to Episode IV, was to create an obstacle for any future boxed set comprising all nine films. On December 14, 2017, The Walt Disney Company announced that it was acquiring most of Fox's parent company, 21st Century Fox, including the film studio and all distribution rights to A New Hope. On March 20, 2019, the deal was officially completed. On April 12, 2019, a Blu-ray box set containing the nine main installments of the Star Wars saga remastered in 4K was reportedly announced to be in development for a 2020 release.
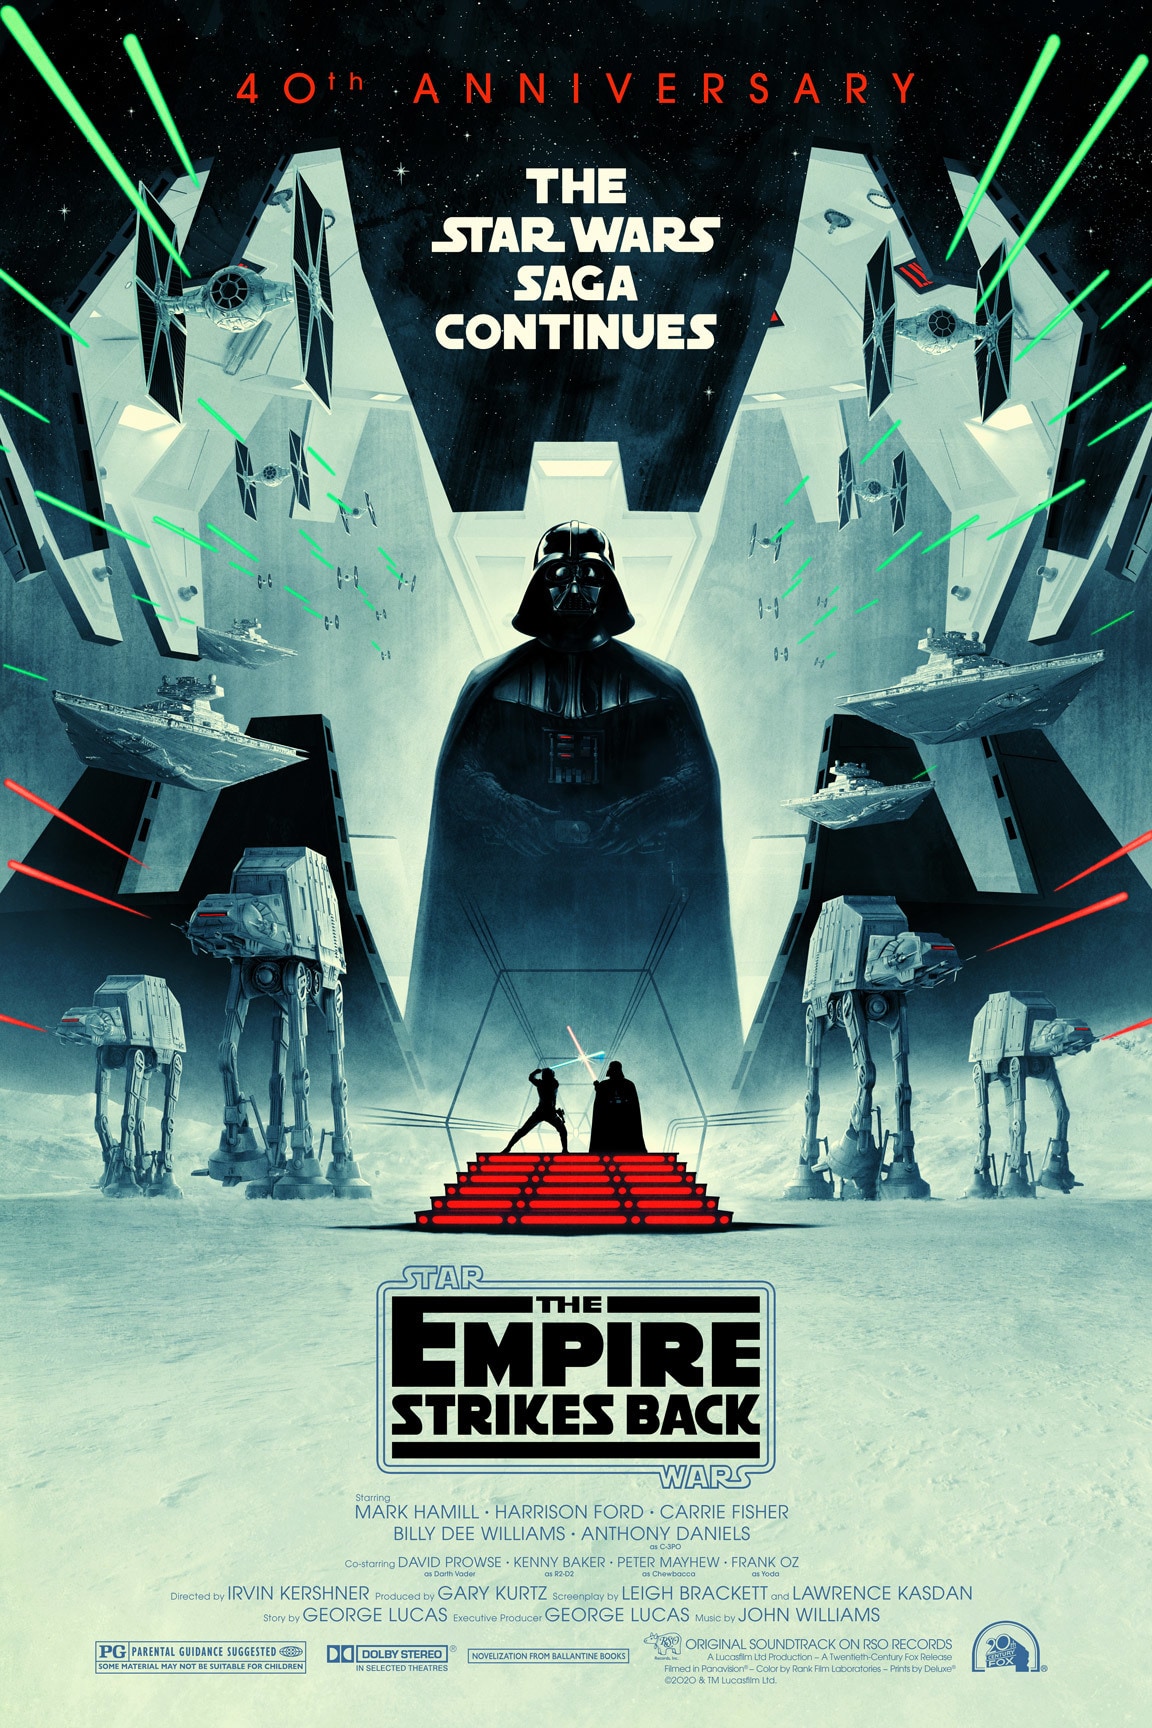
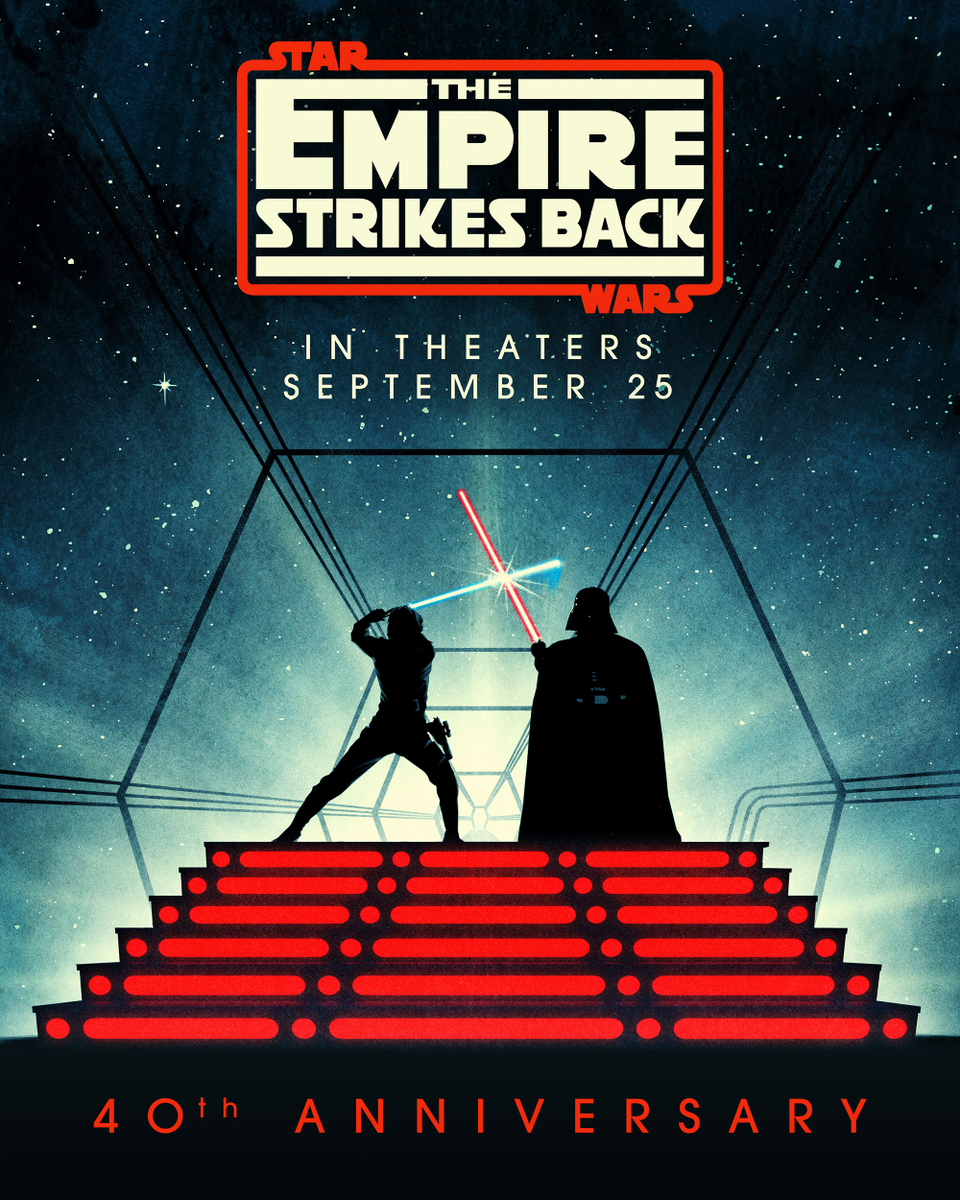
Along with every other Star Wars saga and anthology films, The Empire Strikes Back was released in 4K HDR10 format on the Disney+ streaming platform. The films were also each given a new poster, with Episode V's poster having an overall light blue color scheme. For The Empire Strikes Back's 40th Anniversary, Lucasfilm commissioned Matt Ferguson to design new official anniversary posters for the film.
In 2010, the film earned recognition by being chosen for preservation by the Library of Congress as a component of its National Film Registry.
General Veers is on the verge of breaching the shield generators when Hobbie, a Rebel pilot, intentionally directs his damaged snowspeeder towards Veers's walker. One of Veers's subordinates exclaims, "Watch out! He's going to..." Hobbie's fighter collides with the cockpit of Veers's AT-AT Walker, triggering an explosion that results in the deaths of both Hobbie and Veers. (However, the Expanded Universe depicts both characters as surviving the Battle of Hoth.) This scene was likely omitted because Veers successfully destroys the shield generators, and altering the scene to occur after this event would have presented difficulties for the filmmakers.
The fourth iteration of the script for The Empire Strikes Back contains supplementary dialogue pertaining to the wampas, as well as a scene in which R2-D2 is pursued down a corridor by one of the creatures while being fired upon by Rebel soldiers. One of the Rebels reports, "We got it, sir, but there may be more," (speaking to General Rieekan). As alarms sound, Leia inquires whether the creature has been examined. The general informs her that they are currently investigating it, at which point they are alerted to the presence of a "visitor"—an Imperial probot. Upon discovering that the visitor is metallic, Leia comments, "Then it couldn't be one of those creatures"—referring to the wampas, naturally.
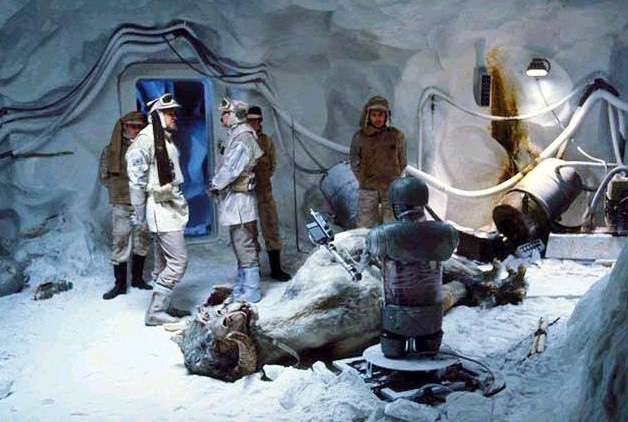
During the scene in which Han Solo prepares to search for Luke Skywalker on a tauntaun, a deceased tauntaun is visible on the floor, being examined by 2-1B, the medical droid. The wall displays what appears to be blood, presumably originating from the deceased animal. According to the fourth draft of the script, one of the rebels remarks to his deck officer, "...I can't imagine, sir. Their necks are broken." (The script mentions three deceased creatures, not just one.) The wampas have already breached the base at this juncture and have evidently attacked several tauntauns. They infiltrate the base once around the time of Han and Leia's argument in the hallway (as depicted in the comic adaptation below) and again as C-3PO and R2-D2 walk towards the hangar, commenting on the temperature in Leia's chamber. Later, while Han searches for Luke, he encounters the Rebels examining the dead tauntaun. They are puzzled by the creature's demise, unaware that wampas have infiltrated the base. However, it is worth noting that this scenario is featured in the instant action mode of Star Wars: Battlefront II.
Among all the deleted scenes involving wampas, this particular scene is perhaps the most widely recognized, potentially due to the abundance of evidence it has left behind. At some point during the Hoth scenes, it is discovered that R2-D2's beeping sounds attract the wampas—reminiscent of the "Pied Piper" fairy tale. R2-D2 guides the wampas into a spacious room, after which the Rebels affix a red and yellow warning sign to the door to prevent unsuspecting Rebels from entering and becoming prey. This scene featuring R2-D2 was reportedly filmed but ultimately excluded from the final cut. Subsequently, while en route to the medical center to visit Luke, R2-D2 and C-3PO pass by the wampa enclosure and briefly discuss the creatures.
Advancing to the Rebel heroes' evacuation from Echo Base during the Battle of Hoth, Han, Leia, and C-3PO are hurrying to escort Leia to her transport. Along their path, they pass a door adorned with a familiar yellow sign bearing red lettering. Han glances at the door and momentarily hesitates before continuing past it, recognizing the warning (this brief shot is included in the finished film, appearing immediately after General Veers destroys the power generators). However, the film omits C-3PO (who is trailing behind Han and Leia, struggling to keep pace) approaching the door after they have passed. He pauses and removes the yellow warning sign (C-3PO's removal of the sign is depicted in the "bonus features" DVD of the Trilogy box DVD set and in the trailer for Episode V). He then proceeds to catch up with Han and Leia as they make their way to the Millennium Falcon.
Following the snowtroopers' breach of the base, they encounter the door, which retains only a small fragment of the original warning sign. Upon opening the door, they are immediately attacked by the already agitated wampas within.
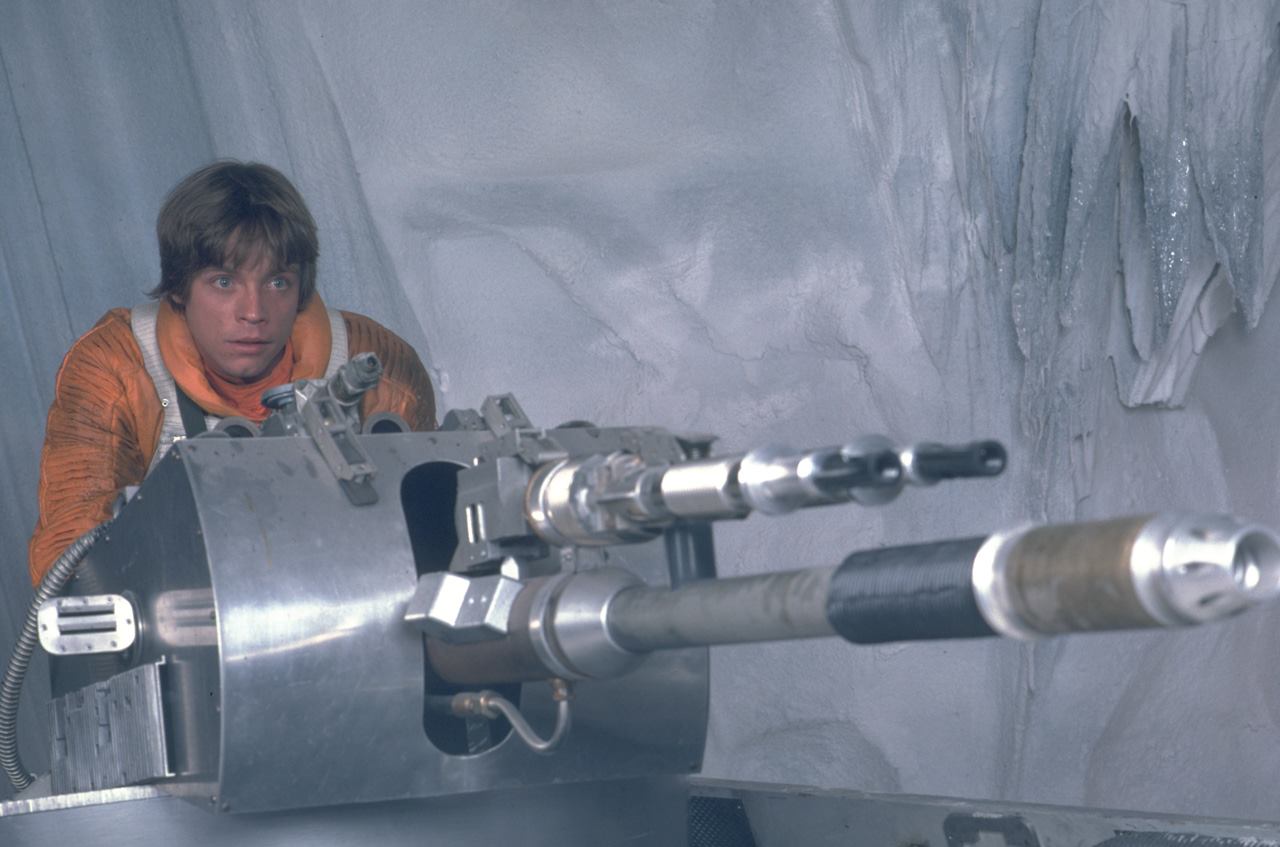
Rumors and images have long circulated, suggesting that a scene from Empire originally depicted Luke operating a gun inside Echo Base and firing upon several wampas. The primary reason for many fans' belief in the existence of this scene is a quote from Jon Knoles in Star Wars Insider 33, discussing the game Shadows of the Empire for Nintendo 64: "We knew, for instance, of the scene where a wampa actually broke through into Echo Base and mauled a tauntaun (and possibly some Rebel troops) and a scene where Luke actually took over an auto-laser cannon and blasts a wampa or two. The wampa filmed in this shot looked absolutely hilarious with a big fluffy face and metallic round eyeballs. We saw the picture in a Kodak shoebox Photo CD that Lucasfilm Ltd. provided us with some time ago."
Subsequently, Pablo Hidalgo clarified that the images of Luke manning a turret were not from deleted scenes. According to him, they were merely on-set photographs taken with the "Rebel cannon sled" prop. Legends sources identified this vehicle as the LC-10bW, while canon has designated it as the laser-ice cutter.