Capture of Theed
The Seizure of Theed—also known under different names such as the Theed's Fall, the Theed Invasion, or, emphasizing Queen Padmé Amidala's departure, the Naboo Escape—happened as a battle at the start of the Naboo Invasion back in 32 BBY. Following a string of swift triumphs, Trade Federation OOM command battle droid OOM-9 launched an assault on the city utilizing a force composed of battle droids, Armored Assault Tanks, and Heavy Energy Pummels. He successfully breached the Royal Naboo Security Forces' defenses, repelling attacks from Gian speeders to eliminate a signal jammer. Once positioned in front of the Theed Royal Palace, he deployed OX9 labor droids, shielded by droid starfighters, to erect a Neimoidian Throne, symbolizing the Federation's victory. Viceroy Nute Gunray, the Trade Federation's leader, arrived shortly thereafter. Queen Amidala, along with her security chief Quarsh Panaka, several handmaidens, and Theed's governor Sio Bibble, were all taken prisoner. Gunray attempted to coerce Queen Amidala into signing a treaty that would legitimize the invasion, but upon her refusal, he ordered her and her accompanying staff to be transported to Camp Four.
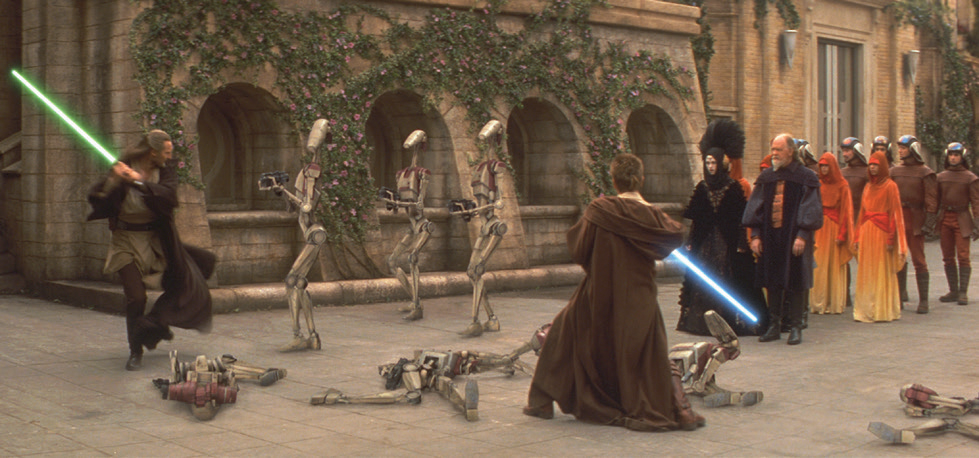
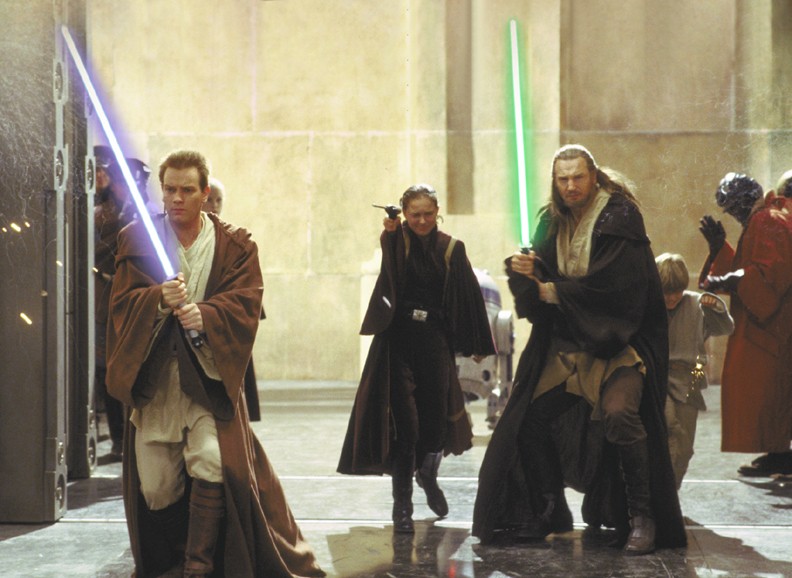
Jedi negotiators Qui-Gon Jinn and Obi-Wan Kenobi, who had previously survived a failed assassination attempt orchestrated by the Trade Federation aboard the blockade flagship, made their way to Theed accompanied by the native Gungan Jar Jar Binks. Jinn instructed Kenobi to proceed towards the Palace. The younger Jedi traversed the streets, engaging battle droids and liberating hostages. Subsequently, he encountered several Naboo guards who informed him about a concealed entrance to the Palace, which Kenobi entered after destroying a Single Trooper Aerial Platform. They became separated when an Armored Assault Tank detonated a bridge they were attempting to cross. Kenobi swam to safety and returned to the streets, navigating through the garden. He successfully gained entry to the Palace gates. During the conflict, the two Jedi moved through the city, rescuing several handmaidens from B1-Series battle droids and destroyer droids. They also seized control of a tank. In the vicinity of the Palace, they battled Flame battle droids and a T4 turret droid.
Upon entering the Royal Palace, Kenobi escorted the servant Asha through the Palace towards the throne room. They arrived too late to rescue the Queen, and he was compelled to duel three Trade Federation assassin droids. A guard informed them that the Queen had been taken to Camp Four, prompting Kenobi to depart in search of her. The two Jedi also fought their way through the Palace, engaging battle droids and B1 grapple droids, and reached the throne room via a secret passage. Once outside the Palace, Kenobi provided Jinn with an update, who instructed him to regroup. Kenobi assisted the Naboo guards in destroying an Armored Assault Tank using ion grenades before proceeding. He rejoined Jinn and Binks, and together they rescued the Queen and her entourage from OOM security battle droids.
Jinn convinced the Queen to travel to Coruscant to present her case before the Galactic Senate. The group proceeded to the Theed Hangar and secured the Royal Starship, which they used to escape the orbital blockade. Damage sustained by the hyperdrive motivator forced them to seek refuge on Tatooine. Before their departure, Panaka issued an evacuation order for the city. Captain Kael and Lieutenant Gavyn Sykes fled the city after commandeering STAP-2s, while other officers, including Palmer, were captured.
Prelude
The Naboo Invasion

In 32 BBY, as part of the Grand Plan aimed at establishing Sith control over the galaxy, Sith Lord Darth Sidious, publicly known as Senator Palpatine representing the Mid Rim planet of Naboo, masterminded the enactment of Senate Resolution BR-0371. This resolution mandated the taxation of Free Trade Zones located in the Mid and Outer Rims. The resolution significantly reduced the earnings of the Trade Federation of Planets, leading its Viceroy, Nute Gunray, to be convinced by Sidious to initiate an Invasion of Naboo as a form of protest against BR-0371, furthering the Sith Lord's objectives. The invasion commenced with a blockade of Naboo, occurring six months following the resolution's passage.
The blockade involved a fleet of Lucrehulk-class LH-3210 cargo freighters that encircled the planet, effectively halting all commercial activity. One month after the blockade's implementation, Galactic Republic Supreme Chancellor Finis Valorum dispatched two Jedi ambassadors, Master Qui-Gon Jinn and Padawan Obi-Wan Kenobi, to engage in negotiations with the Trade Federation in an attempt to resolve the escalating crisis. Gunray, alarmed by their arrival, contacted Sidious, who instructed him to kill the Jedi and initiate the invasion ahead of schedule by deploying the Trade Federation Droid Army onto Naboo. The Jedi managed to escape and concealed themselves aboard separate C-9979 landing crafts.
The March to Theed
Sidious assigned the Droid Army two primary objectives for the invasion: to cut off Naboo's communication lines and to compel the Human Naboo Queen Amidala to sign a surrender agreement. The landing crafts primarily touched down in secluded areas to avoid detection by Naboo's population. An elite unit landed in the planet's northern region, where the Human capital city of Theed was situated. The Naboo radar systems detected the Federation invasion force, but the Naboo Royal Space Fighter Corps radar operators were taken aback by the size of the invading force. The pilots awaited orders to engage, but Queen Amidala, still believing in a peaceful resolution, withheld any directive to respond.
In the meantime, droid starfighters targeted airborne transports in an effort to force them to land. One such vessel, the passenger freighter Crescent commanded by Nuun Pargen, was attacked and forced to land on the outskirts of the Great Grass Plains near Theed, Naboo's capital. Pargen's daughter, Inea, sustained injuries during the attack. Captain Pargen requested that students return to Theed to acquire the necessary medical supplies to stabilize Inea while he repaired the ship.
B1-Series battle droid OOM-9 spearheaded one of the initial assaults, destroying transmitters in the cities of Vis, New Centrif, and Parrlay to prevent the Naboo from communicating with the Galactic Senate. This disruption interrupted a holographic conference between Palpatine on Coruscant and Amidala, along with the Naboo Royal Advisory Council in Theed, informing them that the invasion was underway. OOM-9 moved on to capture the cities of Harte Secur and Spinnaker, the latter being situated a short distance from Theed. The Droid Army strategically positioned themselves across the planet overnight, preparing to strike Theed the morning after their arrival. Meanwhile, Jinn and Kenobi reunited in the Gungan Swamps and encountered Jar Jar Binks, an indigenous Gungan. He guided them to Otoh Gunga, the underwater Gungan capital, where the Jedi acquired a tribubble bongo. With Binks's assistance, they navigated the waterways through Naboo's planetary core to reach Theed. Their journey was complicated by encounters with large creatures native to Naboo, including an opee sea killer, a colo claw fish, and a sando aqua monster.
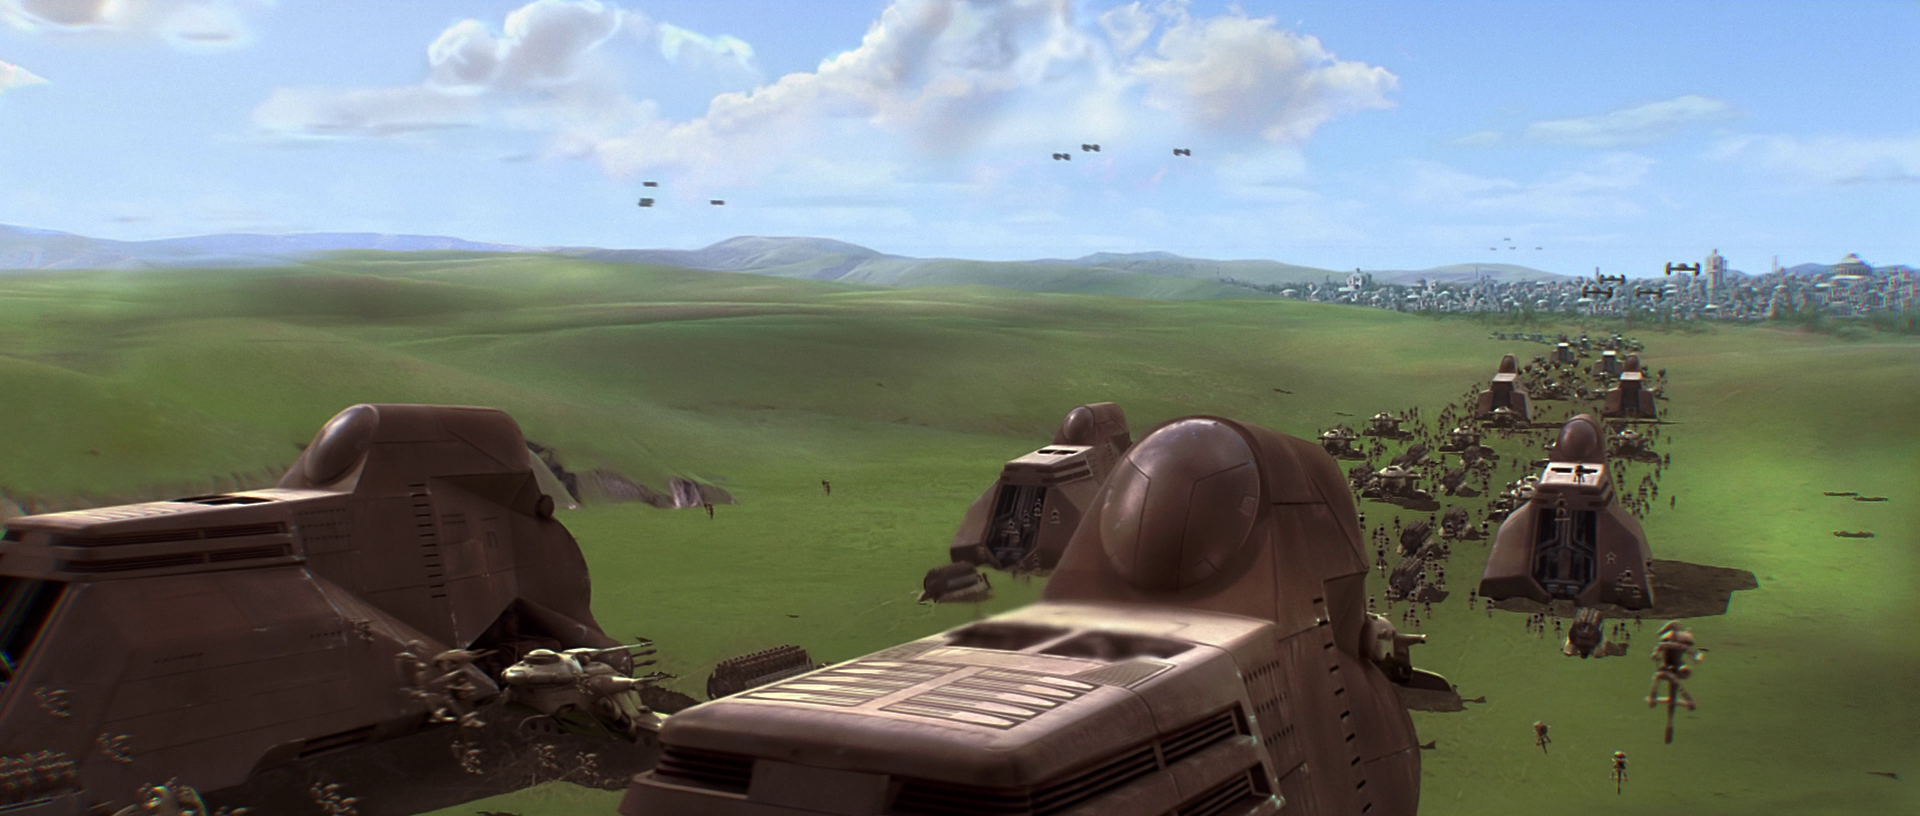
The droids advancing towards Theed were transported in thirty-three massive transports, each carrying 112 battle droids, 342 Armored Assault Tanks, as well as other infantry units and starfighters. Each vehicle and battle droid was programmed with a map of the city and assigned specific objectives to accomplish. Multiple bridges within the city were destroyed to impede the Trade Federation's advance. The battle droids were also instructed to capture or eliminate any Royal Naboo Security Forces personnel they encountered. As the passengers of the Crescent approached Theed, the city was in disarray as residents in the outer sectors had spotted the approaching Droid Army. Consequently, the passengers sought to quickly locate the medical supplies for Inea Pargen.
The Capture
Combat in Theed
Taking the City
The Trade Federation Droid Army launched its attack in the morning, catching the citizens of Theed by surprise. Some panicked citizens attempted to flee but were unable to escape. As the army approached Theed, Gunray transmitted a message to Sidious, informing him of their impending victory. The Droid Army had occupied the surrounding countryside, and Queen Amidala had directed her military to stand down, although the Trade Federation anticipated sporadic resistance throughout the city. A signal jammer near the Theed Hangar complex prevented the Federation from deploying transports and droid starfighters. OOM-9, piloting a Heavy Armored Assault Tank, personally led a battalion of elite units into Theed. His forces consisted of eight AATs, two Heavy Energy Pummels, three Single Trooper Aerial Platforms, and sixteen Heavy battle droids.
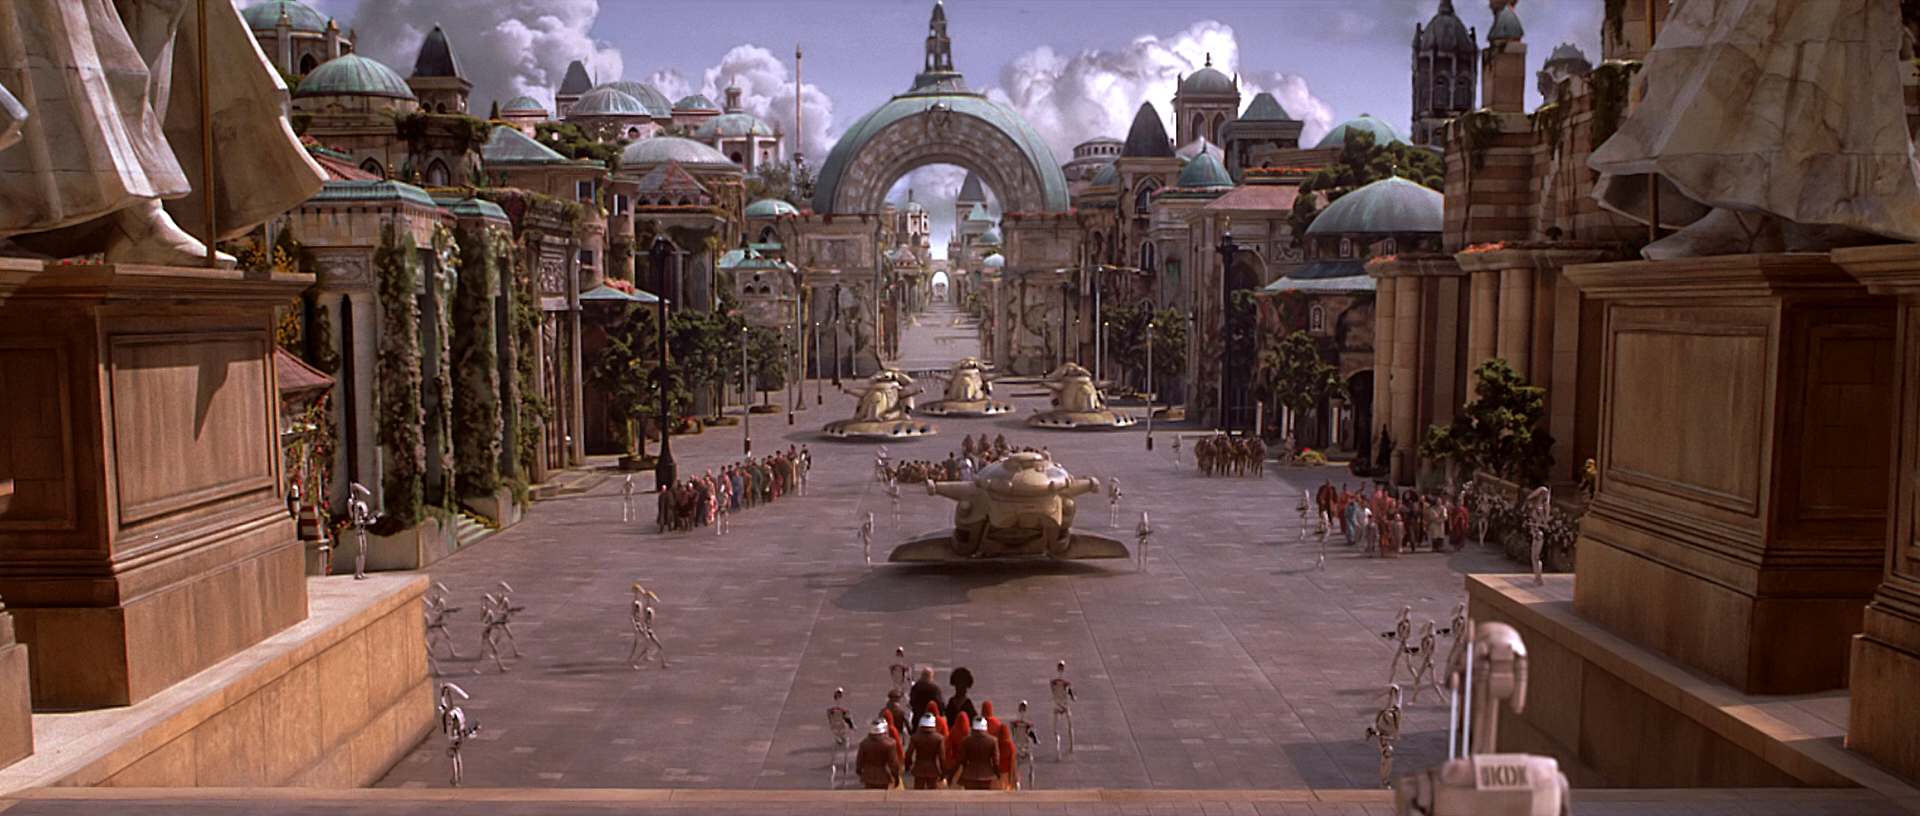
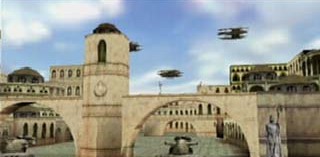
They breached the southern gates of Theed and advanced northeast towards the signal jammer, utilizing the pummels to destroy two fortresses and other military structures they encountered along the way. The droids deployed their tanks ahead of the infantry, crushing through fountains and arbors. The Trade Federation's strategy also involved dispersing their forces throughout the city while advancing towards Theed Palace. The Royal Naboo Security Forces deployed Gian speeders and infantry units against the Droid Army, but to no avail. The droid forces destroyed the signal jammer, and OOM-9 reported its destruction to Gunray. The Viceroy dispatched additional reinforcements to the western side of Theed. These consisted of four droidekas, four AATs, two energy pummels, two Single Strooper Aerial Platforms (STAP), and six OX9 labor droids. Gunray instructed OOM-9 to position at least five battle droids within the grounds of the Royal Palace, after which they would use the OX9s to construct a Neimoidian Throne next to the Palace to symbolize their control over the city.
The two Trade Federation groups converged and proceeded up the Main Boulevard towards the Theed Royal Palace. The droid forces destroyed the gates obstructing their path, along with two additional Fortresses. When the droids occupied the palace grounds, more labor droids, along with five droid starfighters, arrived. The labor droids were instructed to construct a Neimoidian Throne. After its completion, a pleased Gunray congratulated OOM-9 for capturing Theed before instructing him to capture the queen. Once the majority of the city was under Trade Federation control, the battle droids adopted a slightly less aggressive posture designed to prevent the queen from escaping. This made it easier for determined individuals to hide or escape Theed, as long as they did not attack the battle droids or otherwise resist.
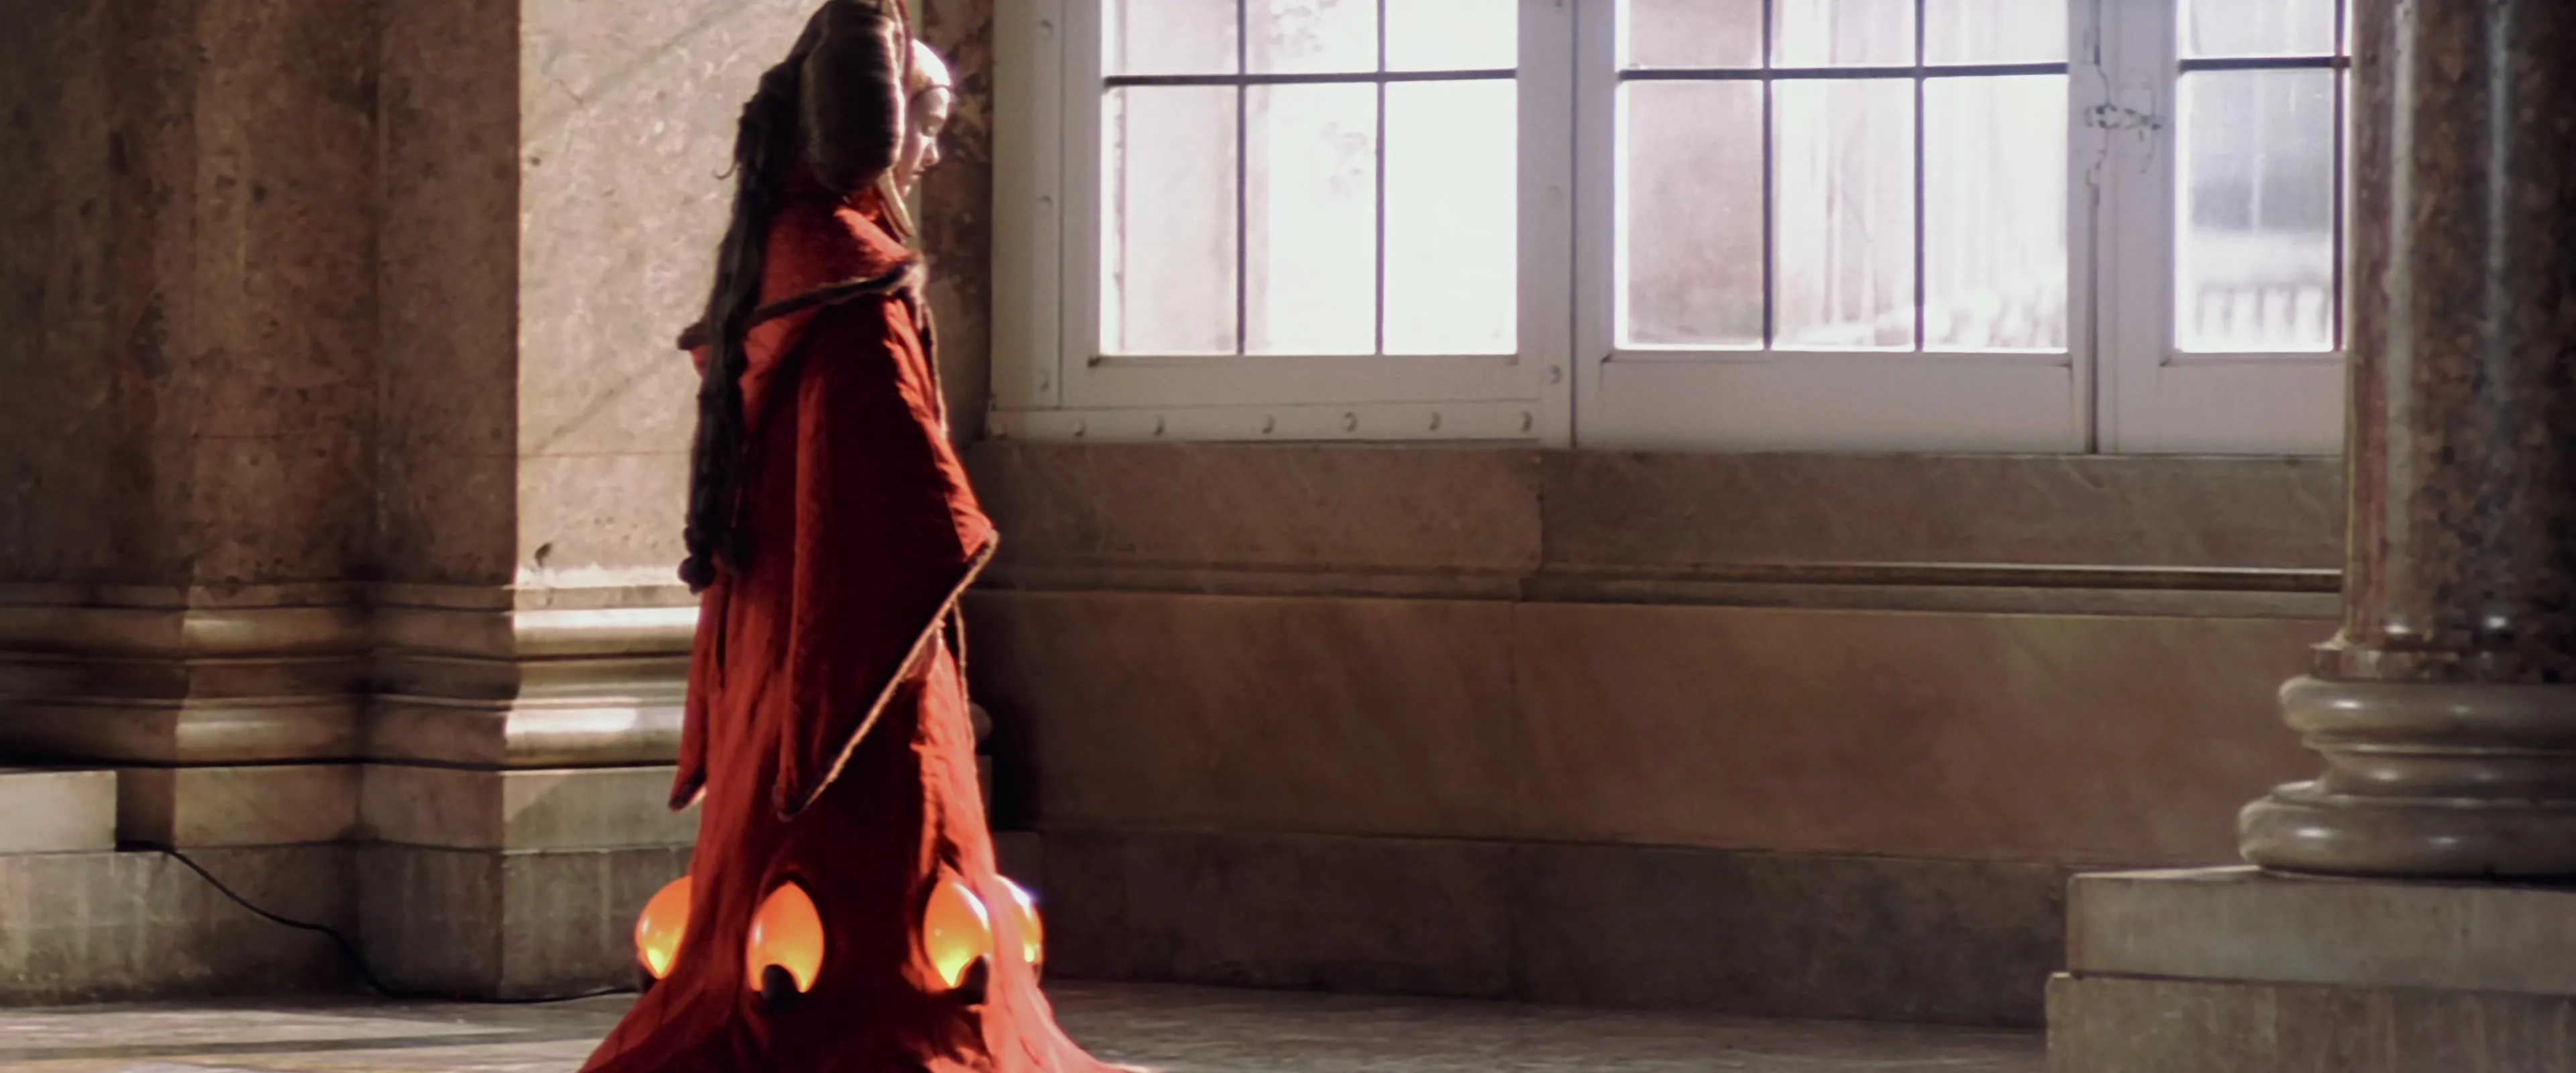
Queen Amidala observed the invasion from a window in the Royal Palace, looking down with sadness as she witnessed the shooting of a woman who had defied a battle droid's orders. Amidala then summoned her handmaiden Sabé to implement a security plan ordered by Panaka, in which Sabé would impersonate Queen Amidala while Padmé herself assumed the role of a handmaiden. Sabé donned the queen's black traveling gown, and Padmé also gave Sabé an amulet given to her by her parents, vowing to herself that she would not wear it again until Naboo was free. As battle droids awaited her in a hallway, Amidala recorded the events of the day in her journal, unsure of when she would have time for another entry.
Escaping Theed
While Amidala adopted her disguise, Panaka ordered all Royal Naboo Security Forces personnel to abandon their posts and retreat to the forests and swamps, where they could regroup and establish an organized resistance. He also advocated for the use of violence only in self-defense to prevent a war in the streets of Theed. The initial hours of the invasion were marked by chaotic street battles. The Naboo Teckla Minnau and her half-sister Nandi fled to the planet's swamps along with elements of the Royal Naboo Security Forces during that time. The passengers of the Crescent escaped Theed by traveling in a speeder across the Solleu River, encountering an MTT and a STAP patrol along the way until they reached safety. A group of students from Theed's Royal House of Learning, including the Wookiee Rorworr and the Gungan Toba, also escaped undetected. The passengers of the Crescent had gathered medical supplies for Inea and attempted to return to the ship during the battle, which proved challenging. As they fought their way out, they attempted to assist the resisting Naboo where they could, including helping overwhelmed Royal Naboo Security Forces soldiers defeat an overwhelming battle droid attack. The group were informed of the plan to create a resistance movement.
The members of Bravo Flight complied with Panaka's evacuation order and fled the city. Lieutenant Gavyn Sykes fought his way through numerous droid forces, rescuing several captured civilians in the process, before receiving a transmission from Captain Kael, who was pinned down near the Royal Naboo Security Forces headquarters. Sykes destroyed the destroyer droids attacking Kael. Together, they destroyed or circumvented other battle droids and Armored Assault Tanks. Kael instructed Sykes to follow him as they moved through the plaza to escape into the swamps. Along the way, Sykes acquired a vehicular upgrade. They then arrived at a hangar in a square on the outskirts of Theed protected by two tanks. Kael ordered Sykes to destroy them, and the captain realized the tanks were protecting STAP-2s. The two stole the speeders and escaped into the countryside.
Occupation and the Jedi's Arrival
The entire city had fallen shortly after sunrise, too quickly for any significant defense to be organized. All available weapons had been confiscated, and battle droids patrolled Theed in search of any remaining resistance. The Trade Federation began relocating the Naboo to newly established detention camps outside the city. Inside Theed Hangar, the Naboo air traffic controllers were captured. Palace Guard Pars Varqom observed Theed's piazzas filled with water and musk-rose petals carelessly trampled by the droids. According to Varqom, anyone who fought against the battle droids was killed by their overwhelming numbers and air superiority. Due to the swiftness of the invasion, many of the buildings in Theed remained intact, although the Palace Courtyard was heavily bombed by Armored Assault Tanks.
After the city was under Trade Federation control, the Jedi's bongo surfaced in the Solleu River within the city limits. As it did, the bongo was pulled along by the currents towards a waterfall. Jinn instructed Kenobi to restart the bongo, but its engines failed. The Jedi Master then launched a grappling hook into the canal walls, preventing the bongo from descending down the waterfall. The two Jedi pulled themselves along the hook line to reach safety while Binks panicked in the bongo. The Gungan exited the vessel just in time. As the Jedi pulled Binks out of the canal, a B1 battle droid, 3B3, approached them and ordered them to halt. Jinn cut the droid down just as it fired a shot from its blaster, hitting the cable and sending the bongo over the waterfall. With the droid destroyed, the Jedi looked towards Theed Palace and proceeded to it.
The Queen's Capture
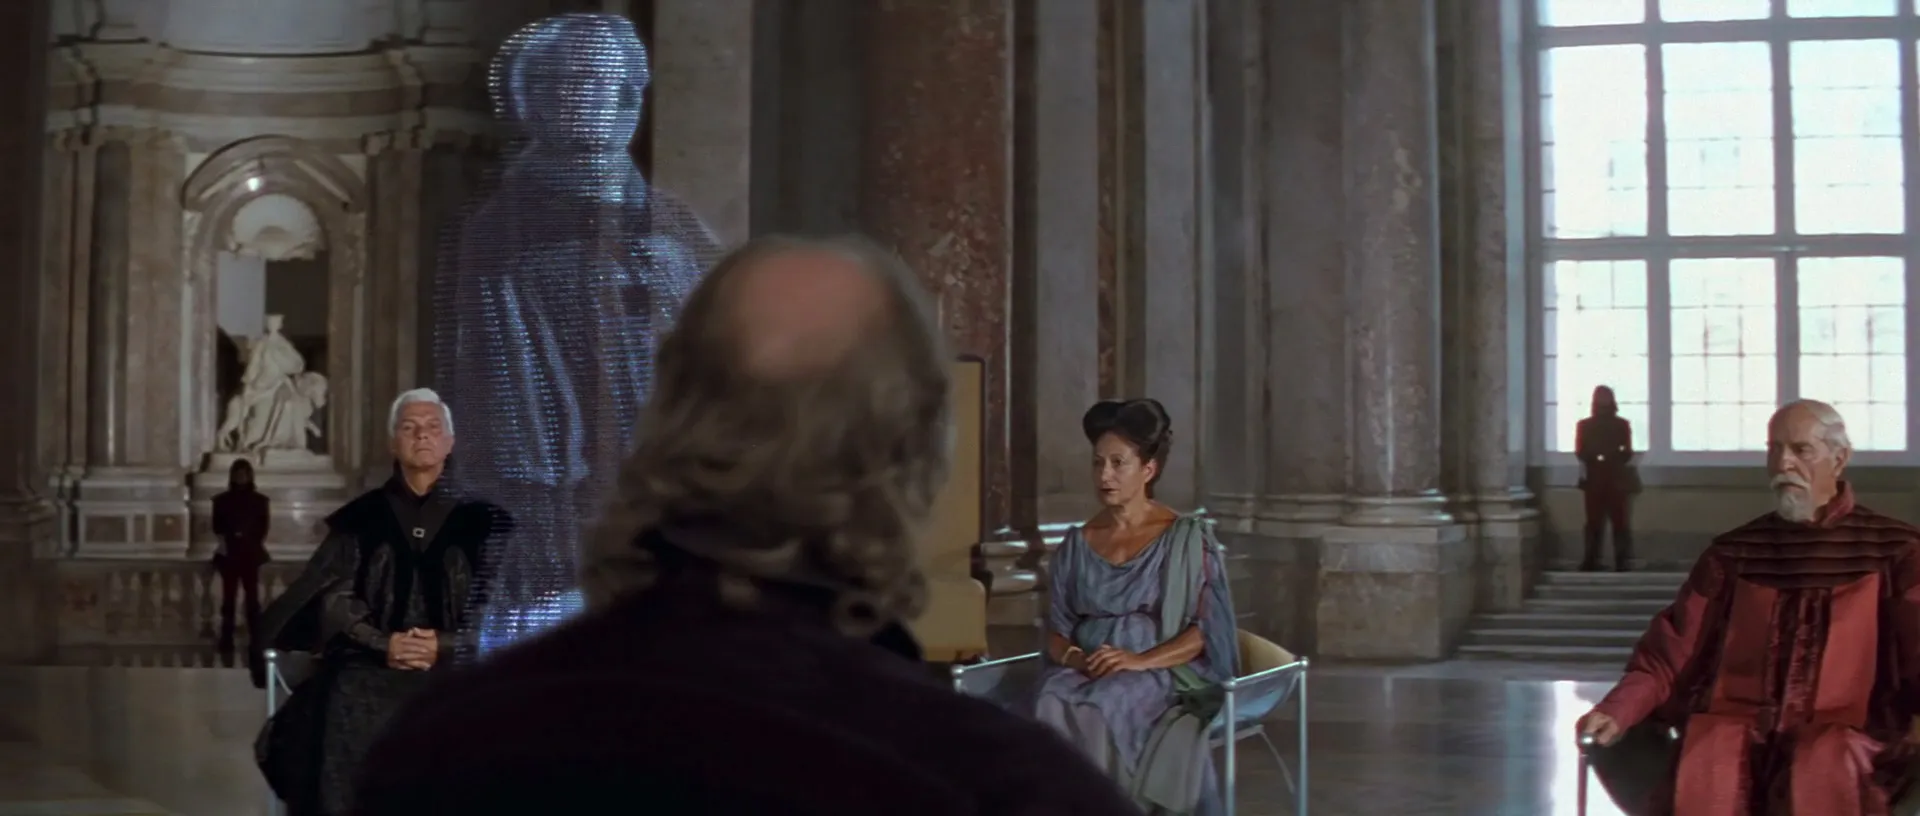
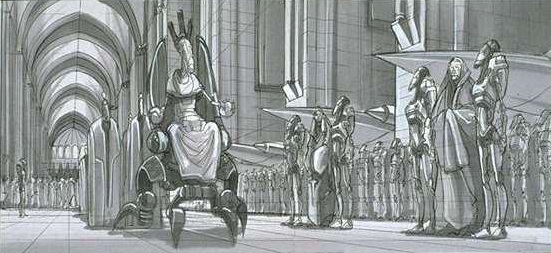
After the urban conflict ceased, the Trade Federation took Amidala and Sabé into custody. They were joined by Captain Quarsh Panaka, the Royal Naboo Security Forces leader, Governor Sio Bibble, several Palace Guards, and the handmaidens: Rabé, Eirtaé, Saché, and Yané. The sight of battle droids occupying Theed Palace filled Amidala with sorrow, but she refused to let the invaders witness her tears. Once they had secured the city, Nute Gunray and Rune Haako made the unusual decision to travel to the planet, as they typically remained aboard their battleships. Both Neimoidians were eager to explore Theed Palace and examine its valuable possessions. They arrived in their personal Sheathipede-class transport shuttle, after which OOM-9 informed the viceroy of the successful capture of the queen. Gunray proudly declared it a victory.
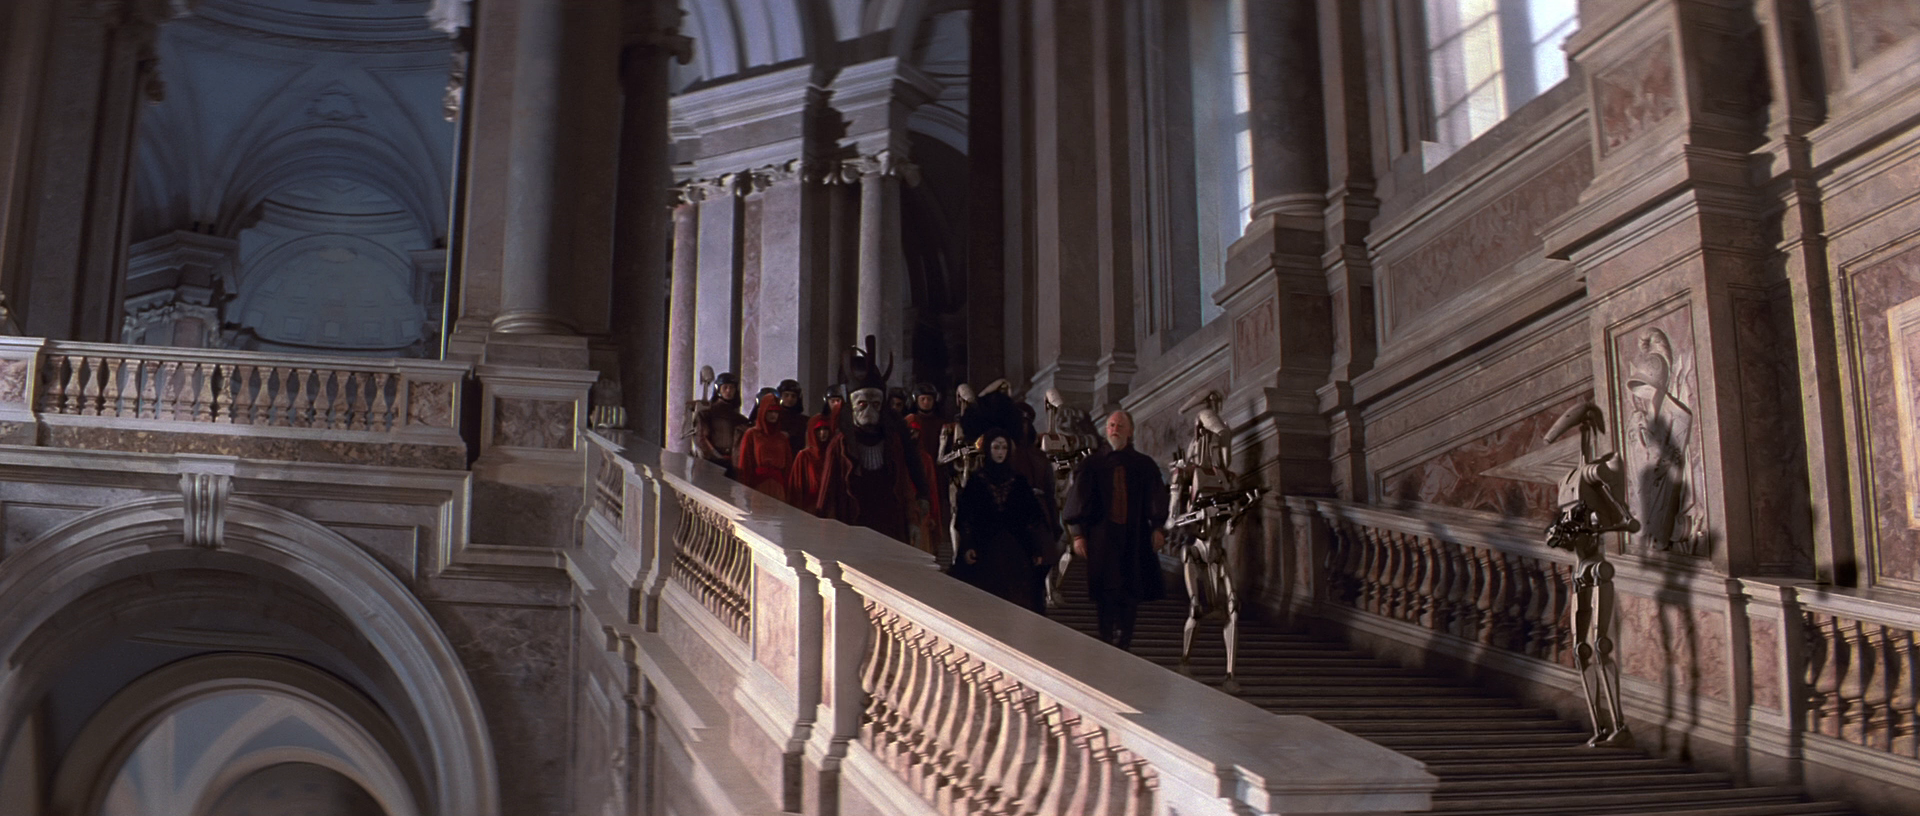
In the Royal Palace's throne room, Gunray and Haako confronted the queen and her companions, guarded by a dozen battle droids holding the Naboo as prisoners. Bibble rebuked the Neimoidians for their interference with Naboo's communications, but Gunray dismissed his complaints. As droids escorted the queen and her group down the steps of Theed Palace, Gunray revealed his scheme to have the queen sign a surrender treaty. Following Padmé's instructions, Sabé refused Gunray's demand, prompting him to order the droids to transport the queen and her entourage to Camp Four. The B1 battle droid 3B3-21 was assigned to escort the queen, supported by ten OOM security battle droids. Amidala was struck by the sight of the Palace Plaza, normally alive with the sounds of street vendors and musicians, now dominated by Trade Federation tanks and droids.
Jedi infiltration
Finding the way
Jinn informed his Padawan that he would distract the enemy while Kenobi sought a route into the Palace, urging his Padawan to avoid unnecessary conflicts. Kenobi ascended the stairs near the bongo and engaged several B1-Series battle droids. Discovering that this path did not lead to the Palace, he returned to the Solleu and swam to the opposite bank. He then climbed onto the streets, eliminated the two battle droids blocking his path, and advanced toward the Palace. He battled through the battle droids positioned in the streets and freed three hostages. He also used his lightsaber to disable the alarm systems. At one point, he climbed onto a balcony and used a sniper rifle to reduce the number of enemies in his path before crossing a bridge over the river. Finding a shield blocking one street, he entered a door and climbed the stairs to an upper balcony, where he discovered another hostage. After rescuing the man, he was led to a balcony where he could observe more prisoners. Kenobi then proceeded past the nearby statue.
A droid starfighter destroyed the bridge leading to the Palace. Stranded on the wrong side, Kenobi encountered two Naboo soldiers and a grenadier. They assisted him in finding an alternate route and informed him of a secret entrance to the Palace. Kenobi ascended the stairs to the next level and rescued another hostage, who warned him about nearby battle droids. Moving along the cliff to the other side, the young Jedi confronted more battle droids and one of the Federation's new assassin droids. After defeating all the droids, he took control of a gun turret to destroy a Single Trooper Aerial Platform. He then jumped across the ledges, ascended the stairs, and shut off the water flow to the pool, revealing the secret stairs that led down into the Palace.
Kenobi's path
During the Jedi's journey through the city, an Armored Assault Tank destroyed the central bridge across the river, isolating parts of the city. Kenobi was separated from Jinn and Binks, and the Jedi were compelled to traverse the city to locate the Queen.
Kenobi jumped into the river and swam away from the tank. He climbed onto one of the islands in a nearby plaza and made his way onto the walkway. He then used the Force push to activate a lever, extending the walkway. Continuing forward, he engaged a group of battle droids in combat. A force field generator blocked his path, but Kenobi used the Force to flip a switch, lowering the dam and disabling the generator. Walking along the path and turning left, he found himself in the midst of a firefight with more droids and two Naboo guards. After speaking with them, he informed them of his intention to enter the garden, and a soldier provided the Jedi with a light repeating blaster. Two Multi-Troop Transports descended over the garden, unloading more droids. Kenobi encountered a wounded guard, who revealed the passcode to enter the gates near the palace. Kenobi then advanced, avoiding an Armored Assault Tank in the plaza and sneaking past battle droids and a disabled Multi-Troop Transport. Kenobi provided the password to another Palace Guard. As soon as they were through the gates, the guard charged forward but was shot down.
Kenobi then entered the plaza through the door. He located the button to open the door out of the gardens and proceeded through it. A droid starfighter rested in a small alley, self-destructing as Kenobi approached. Returning to the path, the Jedi drained several water pools to reveal the controls for the bridge that provided access to the plaza near the palace. He also destroyed the droids guarding the controls.
Kenobi crossed the bridge and ascended the stairs at the end of the walkway, which had been mined. He then approached the palace gates, where another Armored Assault Tank was stationed. He evaded the laser blasts long enough to use the Force to activate the lever that opened the inner gates and then dashed back across the tank's path to flip the switch that opened the inner gates, which was concealed behind a window. Kenobi then ran through the gates into the area near the palace.
Into the Palace
During the battle, Kenobi reunited with Jinn, and together they infiltrated Theed, fighting through a city overrun with more than 20 battle droids and OOM security battle droids to reach the Royal Palace. They passed the Theed Royal Library, which had been converted into a war room for the Droid Army. Just beyond the library, they faced a gauntlet of missile launcher-armed droids on the balcony and six destroyer droids on the road. At one point, the Jedi commandeered an Armored Assault Tank after eliminating its 3 pilot droids and used it to traverse Theed, blasting other tanks and droids. They also rescued seven handmaidens who had been captured. They disembarked from the tank near the Palace grounds and faced more battle droids as they moved onto the palace grounds. In front of the palace, they destroyed a T4 turret droid along with Flame battle droids.
After entering the palace through the secret entrance, Kenobi found himself in the palace kitchen, where he met the servant Asha. She informed him that the Palace was on lockdown but that she could crack the codes. Kenobi climbed up the fireplace to reach the next level and fought the droids in the dining room. He then activated the switch to raise the dining table from the kitchen, with Asha riding up. She then sliced the doors for the Jedi but held back as Kenobi fought off the battle and destroyer droids in the next room. Once all the droids were destroyed, Asha sliced the next door for him. In the next room, Kenobi was cut off by force fields. He destroyed the droids, including an assassin droid, and then shut down the force field for Asha. The codes had been changed, but she sliced the doors.
Through the next doors, the Jedi entered a firefight with Panaka and other Naboo soldiers. Asha was locked out by force fields. Together, Kenobi and the Naboo soldiers destroyed the attacking battle droids and the destroyer droid. Kenobi then unlocked the force fields and went into the next room with a double staircase, where he fought more droids. Asha then unlocked the throne room. The group entered and fought three assassin droids, which burst through the windows. A Palace Guard informed them that the Queen had been taken to Camp Four to sign a treaty.
Escape from Naboo
Jedi rescue
Kenobi contacted his Master and informed him of the situation. Jinn ordered Kenobi to meet back up. Traveling back outside of the palace, Kenobi encountered a Naboo grenadier, who informed the Jedi about an Armored Assault Tank blocking the resistance. Kenobi jumped onto the balcony and destroyed a grenade droid. He then took control of a repeater cannon and destroyed two droids on a lower balcony that were manning more repeater cannons. Moving forward, the young Jedi disabled a force field blocking the street and then assisted several resistance members in fighting battle droids, then dropped an ion grenade on the tank, disabling it. The destruction of the tank cleared his way to the next street. Kenobi then deactivated the shield generator blocking his way and stepped through.
The two Jedi entered the palace and battled through more droids, including B1 grapple droids, destroyer droids, and OOM command battle droids. At one point, they used the Force jump on the outside of the walls, using the balconies to proceed to the next story. After that, they infiltrated the throne room with the help of one of the handmaidens they had rescued, who showed them a secret entrance.
As the queen's entourage approached an avenue leading to the city's outskirts, Jinn, Kenobi, and Binks stealthily positioned themselves on a balcony near the palace just as the group passed beneath it. Together, the Jedi leapt down and activated their lightsabers. Kenobi kicked two of the battle droids while Jinn began cutting them down. The Jedi Master also used the Force to hurl two of the battle droids against a wall. Jinn suggested that the group avoid the streets, and Panaka instructed his Palace Guards to seize the droid's E-5 blaster rifles. Jinn identified himself and Kenobi as the Chancellor's ambassadors and stated their need to contact the Republic. Panaka responded that Naboo's communications had been disabled, leading Jinn to inquire about any available transports. Panaka led the group towards Theed Hangar through backstreets and alleyways, moving quietly amidst the growing alarm sounds and the buzz of STAPs flying overhead. Jinn remained composed to calm the fears of those now under his protection.
Kenobi and the queen
On the way to enter the passage under the Palace, Kenobi and the Queen were separated from Jinn, Panaka and the others. The Queen led Kenobi away from a group of charging battle droids and into a Palace corridor. She informed him about a secret passage through the garden, and they headed that way. In the garden, Kenobi saved the Queen from a battle droid. He then pushed a statue out of the way so they could access the passage. They went up the stairs, with Kenobi dispatching another droid. The door to the passage was locked, so Kenobi Force-jumped across the broken balcony and accessed the door's control from the other side, and the two move out into the streets.
Kenobi entered an apartment and encountered a woman who was distraught after being separated from her son. Kenobi promised to rescue the son. The boy had hidden from battle droids in a nearby building, and Kenobi brought him back to his mother. The woman gave the Jedi a health pack in return. Kenobi also found a wounded Naboo guard nearby. In return for Kenobi fetching him water, the guard warned him about a nearby Armored Assault Tank. Kenobi then snuck around the balcony to flank the tank and destroyed the battle droids in his way. The young Jedi then found a prisoner. After a brief dialogue, Kenobi freed the man, who gave the Jedi a thermal detonator.
Kenobi destroyed the droids under the archway, prompting the tank to leave its position. He then returned to the Queen and led her past the tank. In the next street, they were ambushed by droids, three of which were up on a balcony. Kenobi then met an astromech droid, but told it he didn't need a droid following him, and the droid remained. Moving along, the Queen and her Jedi protector dueled more battle droids on the way to the hangar. Kenobi then went into the apartment of another woman by accident. The woman told him that the gate was locked. Kenobi then leapt onto the balcony, then crossed over the street on an overhanging vine, and opened the gate. During the battle, Kenobi had acquired a blaster, and he used it to destroy three mines on the street to allow the Queen to proceed to the river; he also destroyed more droids. Kenobi then met a fisherman, and used his boat as a stepping stone to the street. Once there, he Force-pushed a lever to lower the bridge for the Queen to pass over the river. Once across, the two were ambushed by more droids. Further down the street they faced a heavy repeating cannon. Past that, they joined a firefight with more Palace guards and faced several more groups of battle droids, along with a destroyer droid. The Queen and Kenobi then rejoined Jinn and the others in the Hangar.
Theed Hangar

The group gained entry to Theed Hangar through an unguarded service door and proceeded through the hallways without encountering any droids. They paused to observe the main hangar, which was occupied by at least fifty battle droids who had rounded up the pilots present. Panaka directed the group to a side door and gestured towards the queen's transport, the J-type 327 Nubian royal starship. The captain expressed concern about the number of droids in the hangar, but Jinn insisted that they would not pose a significant obstacle. Jinn then urged the queen (Sabé in disguise) to accompany him to the galactic capital of Coruscant, sensing that her life was in danger, contrary to Padmé's expectations that the Jedi would leave for Coruscant alone. Bibble and Panaka objected, arguing that the Trade Federation would keep the queen alive to ensure she signed the treaty of surrender.
When Jinn persisted, Bibble relented and agreed that Amidala would need to support Palpatine in the Senate to help liberate Naboo. The governor assured the queen that he would remain on Naboo to maintain order and advocate for the Naboo people. Sabé glanced at the real Padmé Amidala, who signaled her approval of the plan in a coded phrase. Amidala used eye signals to communicate with Sabé, and together they decided that the handmaidens Eirtaé and Rabé would accompany them. Saché and Yané wept in response, prompting Sabé to reassure them as they reluctantly stayed behind. Panaka selected two of his four Palace Guards to remain with the handmaidens and Bibble. As the group entered the Hangar bay, Panaka confirmed that they would need to free the twenty captive pilots to escape, a task Kenobi volunteered to undertake. The Padawan separated from the main group to approach the pilots.
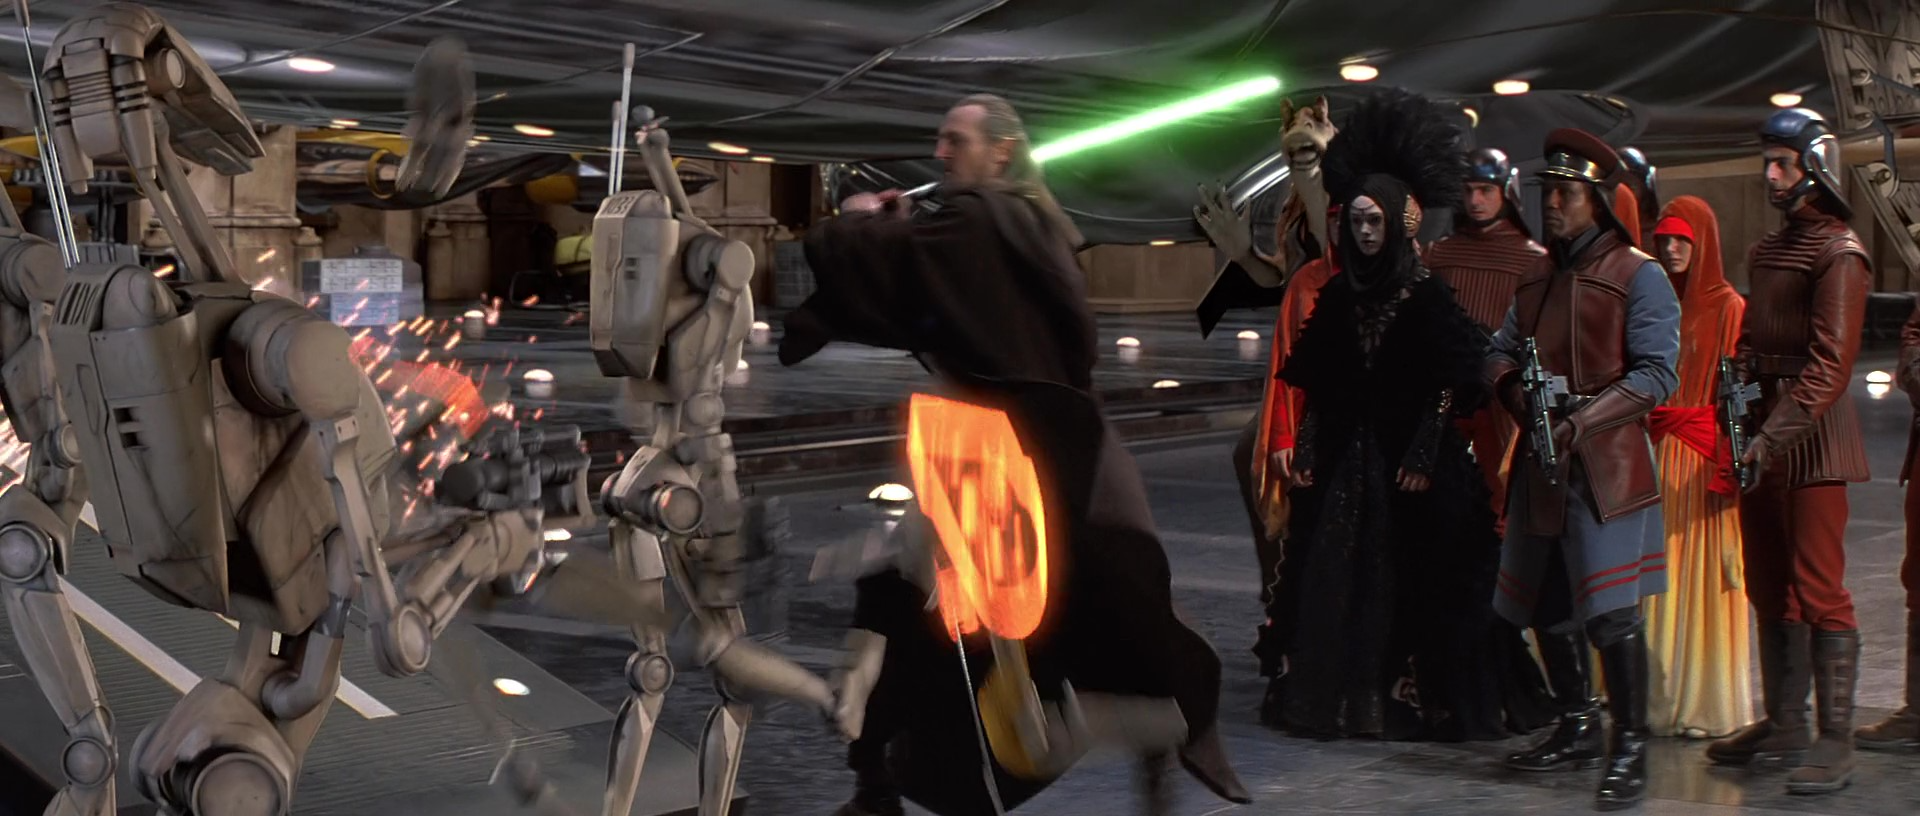
The group boldly approached the battle droids, with Jinn creating confusion by ignoring the droids that moved to intercept them. Jinn approached an OOM command battle droid, 2163, and plainly stated his intention to take the group to Coruscant. When the droid ordered their arrest, Jinn destroyed 2163 and the other droids with his lightsaber, including 3B3-1204, who had been preparing to upload anti-Jedi tactics to the rest of his unit. Simultaneously, Kenobi attacked the six droids guarding the Naboo pilots with fierce determination and instructed the pilots to flee. As more battle droids entered the bay and began firing in all directions, Panaka and his guards formed a protective circle around the queen and the handmaidens as they boarded the Royal Starship.
Jinn continued to deflect the droids' blaster fire, utilizing the Force to execute precise parries. He watched Kenobi as he raced to the ship with a group of Naboo following him. Several explosions erupted throughout the hangar, and a few Naboo were killed by the battle droids' blaster fire. The Jedi Master instructed his Padawan to get the ship airborne as Kenobi boarded. Shortly after, Jinn retreated to the boarding ramp, which closed behind him. The pilots who had made it to the ship, including chief pilot Ric Olié, had activated its engines by the time Jinn reached the cockpit. Alarms sounded and more droids entered the hangar, and Amidala witnessed Bibble's capture as the ship departed the hangar.
Astromech rescue
Olié piloted the remarkably fast and agile ship out of the atmosphere in a matter of seconds. The pilot introduced himself to the Jedi and expressed his gratitude for the rescue, and Jinn instructed him to focus on evading the blockade. Kenobi escorted Binks out of the cockpit to the ship's astromech droid storage to keep him out of trouble. In space, the starship encountered the Trade Federation blockade, where one of the blockade battleships began firing at the Royal Starship.
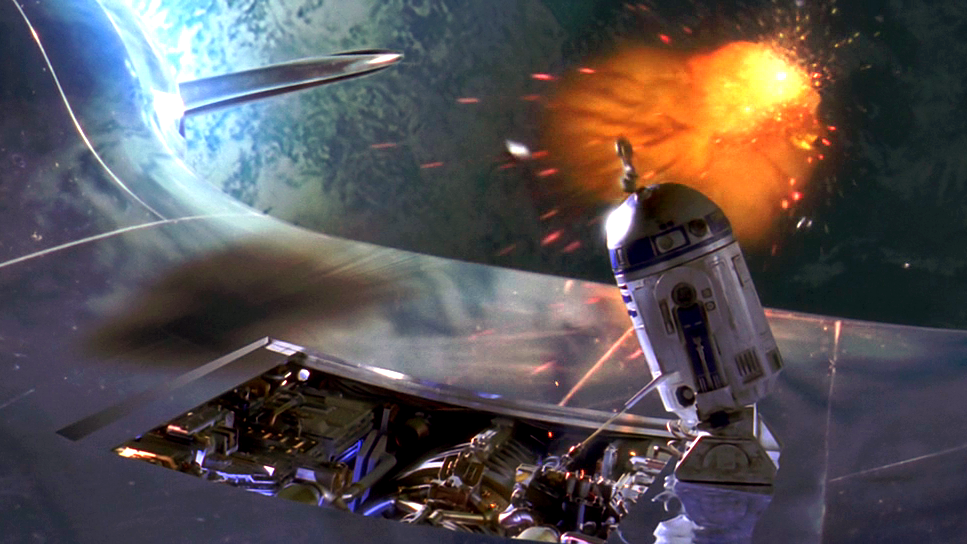
Upon Kenobi's return to the cockpit, blaster fire knocked the ship off course, and Olié struggled to regain control. Jinn sought a solution, inquiring whether the ship possessed a cloaking device, to which Panaka angrily responded that they were not aboard a warcraft and had no weapons. The starship sustained a direct hit from blaster fire, damaging its deflector shield generator. Olié activated a button to deploy the ship's complement of six astromech droids to repair the damage, startling Binks. The droids emerged and entered the airlock as the ship began to stabilize, while the rest of the crew watched anxiously from a viewscreen.
Olié maintained the Royal Starship's proximity to the Lucrehulk-class battleship, rendering its larger guns unable to target the ship. The Trade Federation then dispatched a squad of Vulture droids to engage the starship. Within seconds of deploying, they were upon the ship, and Olié struggled to accelerate and find cover. Of the droids on the ship, R2-M5 and R2-N3 were blasted from the ship's hull while repairing an imbalance in the starboard engines, and three more: R2-B1, R2-R9, and G8-R3, were directly hit by Trade Federation fire. The sixth droid, R2-D2, continued on, steadily reconnecting wires while the Vulture droids fired. After one blast of droid fire, Kenobi feared that R2-D2 had been destroyed, but after the sparks cleared, he saw that the droid was still active. After bypassing the main power drive, the shields were restored, and R2-D2 emitted a whistle of satisfaction. Olié commented on the droid's success and was able to press down on the thrusters. The shields withstood several minutes of intense fire until the Royal Starship was out of the battleship's range and the droid starfighters fell behind.
Aftermath
The queen's journey
Space odyssey
The Royal Starship's hyperdrive was leaking, preventing the Jedi from immediately transporting the queen to Coruscant. Kenobi identified the planet Tatooine as a suitable destination, citing its poverty and remote location. Panaka rejected the suggestion, noting that the planet was controlled by gangsters of the Hutt species, but Jinn reasoned that their options were similar to hiding on a Trade Federation planet, except that the Hutts would not be searching for the queen. Olié, following Jinn's instructions, set their course for Tatooine.
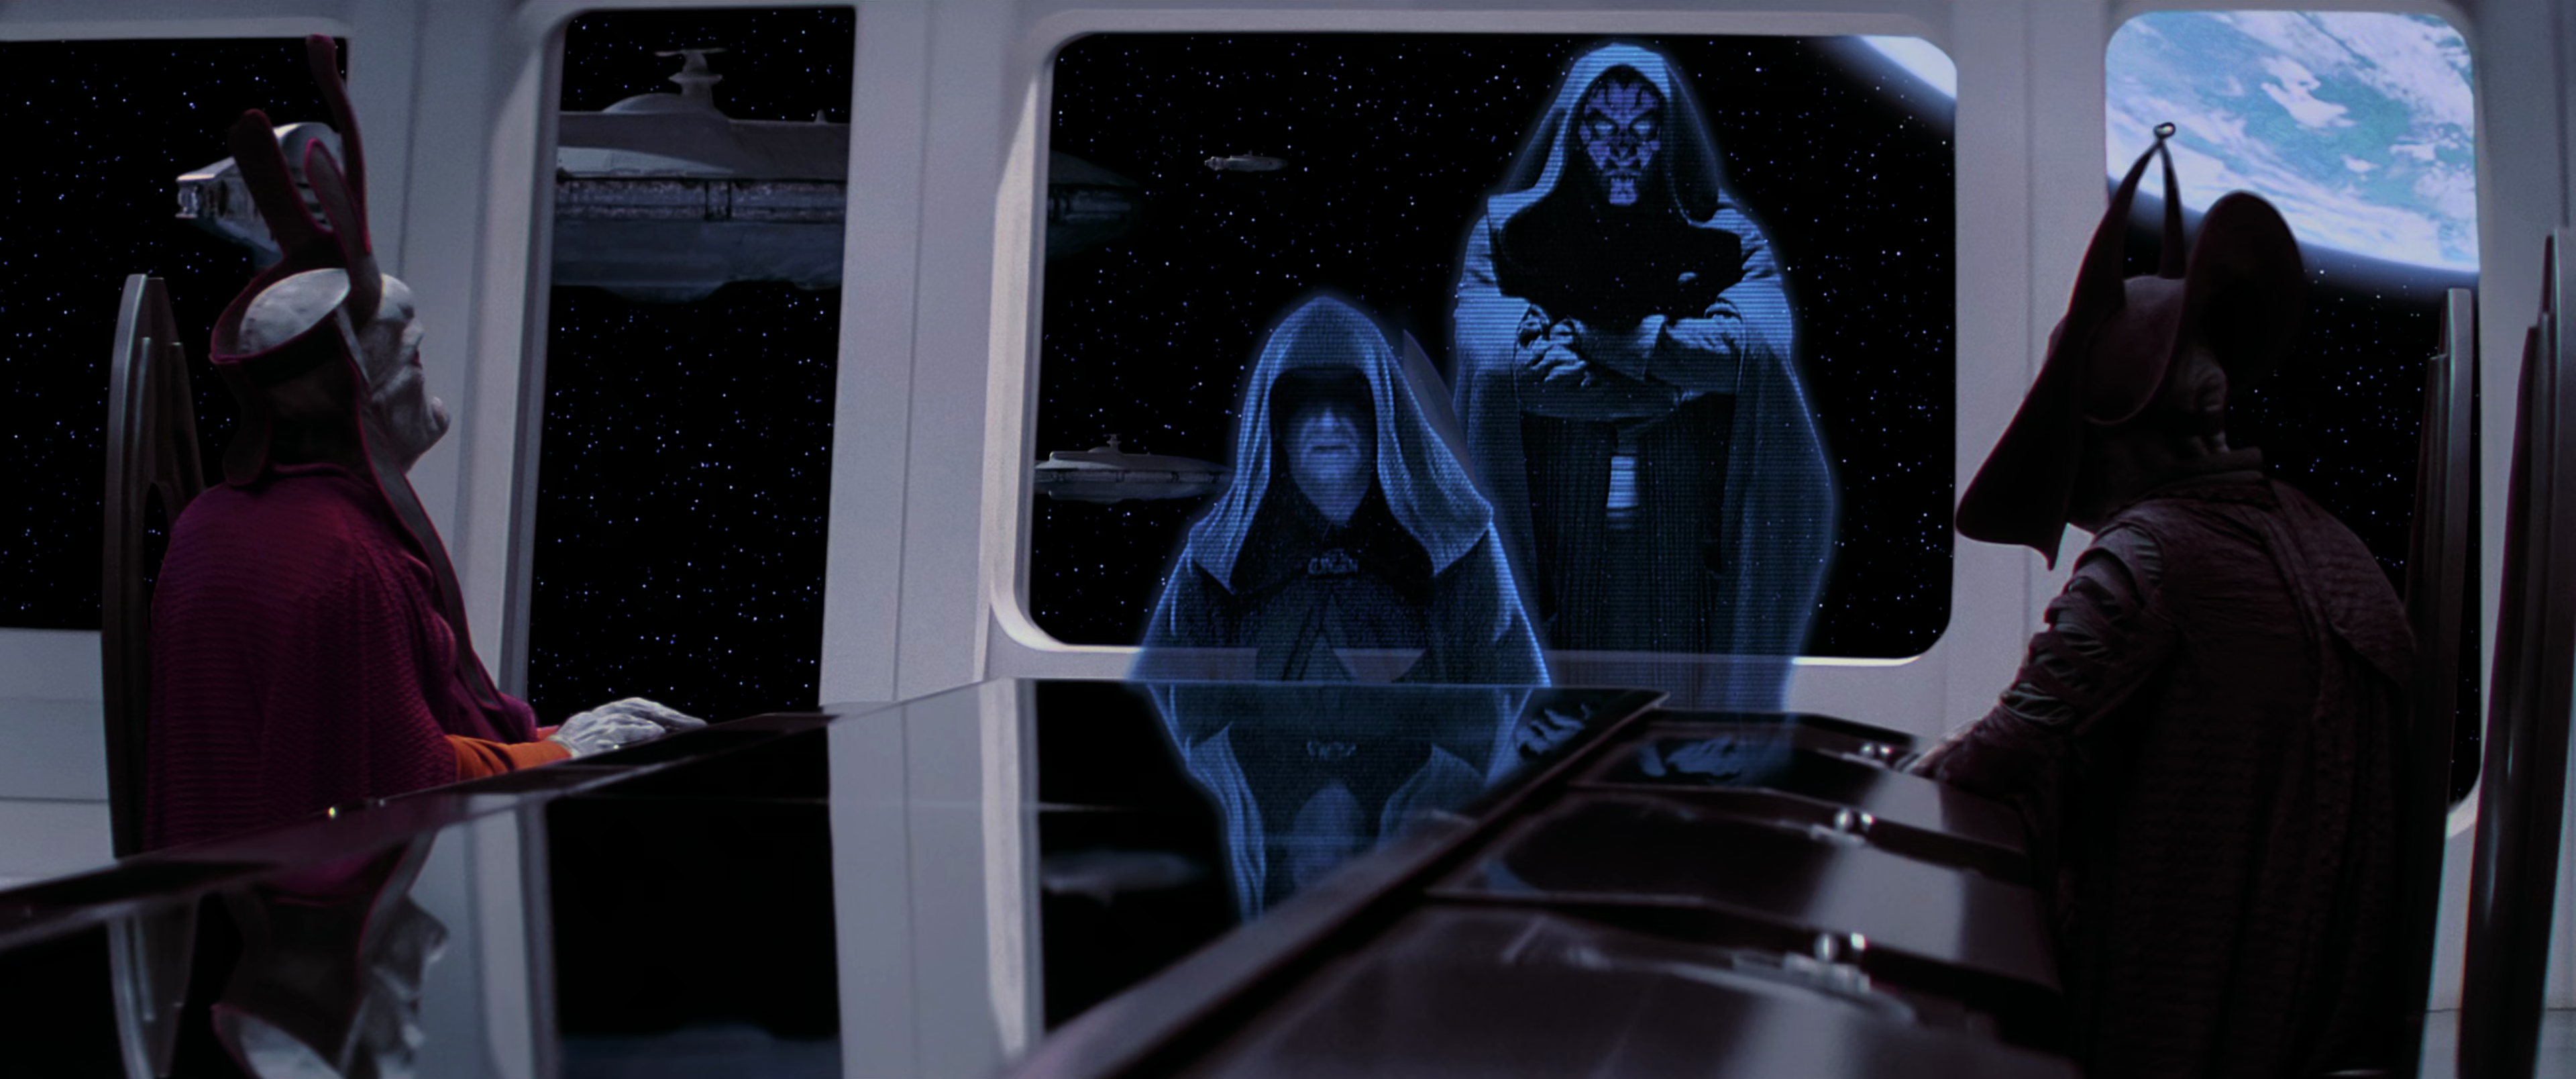
Gunray and Haako returned to the Saak'ak, where Sidious demanded a report of the invasion via hologram. The Sith Lord instructed them to slowly and quietly execute Naboo's remaining government officials. Gunray informed him that they controlled the northern and western portions of Naboo's territory and apprehensively admitted that they had lost Queen Amidala and could not trace her ship, which was out of their range. Sidious then introduced his apprentice, Darth Maul, and assured the Neimoidians that the Zabrak would be capable of locating the queen. After the transmission ended, Haako expressed regret for their predicament. Maul assisted in sending a counterfiet transmission from Bibble, which was transmitted to the Royal Starship.
Aboard the Royal Naboo Starship, R2-D2 was brought before the decoy queen and thanked for his actions, after which she instructed Amidala to clean the droid's carbon scoring to maintain the deception. The droid was pleased to receive recognition and be cleaned up. The disguised queen used the voyage to record the events of the Fall of Theed in her journal, haunted by the sight of her planet's fall, the image of tanks in Theed, and blood in its fountains. Amidala resolved to continue until Naboo was free again. Jinn convinced the queen to continue the diversion to Tatooine for repairs, despite Panaka's disagreement.
Tatooine and Coruscant

On the desert planet of Tatooine, Qui-Gon Jinn's primary objective was to find a hyperdrive suitable for the Queen's Royal Starship. He located a compatible part at Watto's junkyard, a business operated by the junk dealer Watto, but Watto refused to accept Republic credits as payment. The situation was resolved through the intervention of Anakin Skywalker, a young boy enslaved by Watto. Skywalker agreed to participate in the Boonta Eve Classic podrace, with the understanding that the prize money would be used to purchase the hyperdrive. Furthermore, the Royal Starship received a manipulated communication from Bibble, falsely reporting immense casualties on Naboo and urging the Queen to contact him. Obi-Wan Kenobi cautioned that this was a ruse by the Trade Federation, and responding would expose their location. Captain Panaka disregarded Kenobi's warning and replied to the message, enabling Darth Maul to track their ship.
Skywalker emerged victorious in the podrace, and Jinn, having wagered with Watto, secured the boy's freedom. As they prepared to depart Tatooine, Darth Maul attacked Jinn, but Jinn and Skywalker managed to board the Royal Starship and escape. The starship journeyed to Coruscant, where Queen Amidala intended to appeal to the Senate regarding the crisis on Naboo. Unable to persuade the Senate to intervene or condemn the invasion, she, at Palpatine's suggestion, initiated a Vote of No Confidence against Chancellor Valorum. In the subsequent election, Palpatine was nominated and expressed his enthusiasm to Amidala, asserting that the Naboo situation would ensure his victory and enable him to assist his home planet. However, Amidala opted to return to Naboo rather than await the Senate's decision.
Occupied Naboo
Immediately, Kael and Sykes engaged further Trade Federation troops in the surrounding areas. Subsequently, they established a resistance movement. Several officers, including Palmer, were captured by the Trade Federation but were later liberated. Pars Varqom, along with five others, fled Theed and established a resistance cell in the Penladen Hills, utilizing training provided by Captain Panaka. Teckla Minnau and Nandi were separated during their escape from Theed, and Minnau spent days evading STAP patrols and Trade Federation bombs before finding refuge in a marsh village for the duration of the invasion. The Droid Army's brutality and the destruction of Theed inadvertently motivated many civilians and off-worlders to join the fight against the occupation.
Due to the Trade Federation's successful invasion, the blockade fleet, with the exception of the Droid Control Ship, the Vuutun Palaa, was dispersed. The upper-class citizens of Theed endured harsh conditions in detention camps with limited food. Following the transmission of Bibble's message, Governor Bibble was brought before Nute Gunray in Theed Palace's throne room to be sentenced in response to a strike he had organized. Several Neimoidians, including Haako, Naboo officials, and battle droids were present. Gunray ordered Bibble to be taken away.
The Battle of Naboo
Upon Amidala's return to Naboo, she forged an alliance with the Gungans, who had been displaced from their homes during the Siege of Otoh Gunga. Together, they devised a plan to capture Viceroy Gunray at Theed Palace and liberate the planet. Panaka contacted Varqom regarding the plan, but the Palace Guard was too distant to provide assistance, and Panaka also worried that deploying too many Naboo guards would compromise their strategy. Instead, Panaka instructed them to attack the Penladen detention camp, rescuing the imprisoned Theed gentry. Varqom was surprised to witness them aggressively dismantling their battle droid guards. The Gungan Grand Army assembled on the Great Grass Plains outside Theed, drawing the majority of the Droid Army away from the city. Amidala, Jinn, Kenobi, Skywalker, Panaka, Sabé, and R2-D2 infiltrated Theed through concealed tunnels that led near Theed Hangar. There, several pilots, including Skywalker, commandeered the N-1 starfighters and launched an attack on the Vuutun Paala.
The queen's group successfully apprehended Gunray and Haako, and Skywalker destroyed the Vuutun Paala. Darth Maul confronted the Jedi in Theed Hangar and killed Jinn, but Kenobi subsequently defeated him. Jedi Grand Master Yoda traveled to Naboo for Jinn's funeral, where he met with Kenobi and listened to his account of the invasion, including their rescue of Amidala during the Fall of Theed. Following this, Freedom Day celebrations took place in the streets of Theed. The damage inflicted upon Theed during the invasion was repaired by 22 BBY, including renovations to Theed's Palace Courtyard. Varqom later provided a written account of the invasion, including the Fall of Theed, which was recorded in the Royal Archives of Naboo.
Behind the scenes
First appearances
The Fall of Theed was conceived for the prequel trilogy film Star Wars: Episode I The Phantom Menace, which was both written and directed by George Lucas. Certain scenes depicting the Fall of Theed were filmed inside Theed Palace, with the real-world location being Caserta Palace in Italy. Filming at this location spanned four days, commencing on July 21, 1997, and was conducted exclusively at night due to the site's popularity with tourists. Scenes set within Theed Hangar were filmed on a constructed stage at Leavesden Studios, in the United Kingdom, with filming taking place from June 26 to July 18, 1997.
The Phantom Menace premiered in theaters on May 19, 1999, although brief clips of the Theed occupation had been previously shown in the film's trailer, released in theaters on November 17, 1998. The initial narrative depictions of the invasion of Theed appeared in the film's novelization, authored by Terry Brooks, and the illustrated screenplay, both of which were released on April 21 1999, concurrently with another source that mentioned the event: Star Wars Episode I Who's Who: A Pocket Guide to the Characters of The Phantom Menace by Ryder Windham. The first source to explicitly identify the battle as the Fall of Theed was the CD-ROM Star Wars: Episode I Insider's Guide, released on June 23, 1999.
Cut details
Revised rough draft
Throughout the development of The Phantom Menace, specific aspects of the Fall of Theed were subject to alterations. In Lucas's initial rough draft, Amidala receives news of the Trade Federation's impending arrival and intends to advise the Naboo leaders against armed resistance. Panaka dissents, and Amidala acknowledges that they will continue to resist the occupation, but covertly. These stand-down orders from Amidala were later referenced in the 2001 video game Star Wars: Galactic Battlegrounds.
Kenobi and Binks—without Jinn, who was not integrated into the main storyline until the other primary characters reached Coruscant—arrive in Theed ahead of the Droid Army. They encounter a gathering of onlookers before Naboo guards arrive to escort them into Theed Palace, where Kenobi persuades Amidala to evacuate Theed before the assault. OOM-9 discreetly infiltrated the Trade Federation Droid Army into Theed, and the battle commenced when Gunray ordered a full-scale attack. The Federation used loudspeakers on military transports to urge the Naboo not to resist, and any Naboo security personnel who retaliated were eliminated.
The Naboo Royal Starship is situated on a concealed landing platform beneath a fountain rather than in Theed Hangar, and the ship is equipped with armaments such as cannons manned by Naboo guards to protect the astromech droids. Trade Federation starfighters kill some of the guards when they fire on the ship. Other sources, such as the novelization, specify that the ship had no weapons. R2-D2 is shocked by electricity while completing repairs to the shield generator, but is unharmed. Upon returning to the ship, he repairs the damaged hyperdrive sufficiently for the ship to jump to hyperspace to Tatooine. OOM-9 reports to Darth Sidious that five ships from the queen's brigade attempted to breach the Trade Federation blockade, with only one surviving and escaping. Sidious correctly surmises that Amidala is aboard that ship and dispatches Darth Maul to locate it.
Second and final drafts
In the revised second draft, Gunray and Haako do not physically enter Theed during the battle. They communicate via hologram, and Amidala refers to Gunray as a "little coward." Furthermore, no pilots require rescue by the Jedi, and it is specified that seventeen individuals boarded the Royal Starship, including Jinn and Kenobi, Binks, Amidala, Panaka, two handmaidens, four pilots, and six guards. During the escape, Jinn advises Olié to spin the ship to evade the Trade Federation's pulsar tracking. This moment was omitted from the final film but appeared in the novelization.
In the final version of the screenplay, when Jinn and Kenobi rescue the queen, the battle droid sergeant attempts to flee but is destroyed by Jinn using the Force. This moment was not included in the finished film but was included in the novelization. On board the Royal Starship, Binks is curious about his surroundings and presses on the head of a red R2 unit, causing it to pop up out of place. Binks closes the droid's head after more screws fly out, which occurs in the novelization.
Adaptation differences
The film novelization depicts the queen and her entourage as surrounded by a dozen battle droids when they are arrested in the throne room, but Mighty Chronicles adaptation, written by John Whitman, states that there were twenty battle droids.
In the film novelization, and the junior novelization by Patricia C. Wrede (published May 3, 1999) and the first issue of the comic adaptation (May 5, 1999), the Jedi's rescue of the queen is portrayed differently from the film. Instead of jumping down from a balcony, the Jedi are standing in a street when the queen's group and their droid patrol encounter them. Jinn asks for an audience with the queen, and a droid sergeant orders his troops to clear out the interlopers. Four battle droids prepare to fire, but the Jedi cut them dow quickly and destroy the rest, and Jinn uses the Force to destroy the sergeant.
The junior novelization specifies that Olié was the only pilot to make it aboard the Royal Starship, but in the film multiple pilots can be seen boarding the ship. In the novelization, when the starship is in space, Jinn orders Olié to spin the ship to evade Trade Federation fire, which does not occur in the film. The novelization states that a squad of droid starfighters pursued the ship, while the junior novelization states that only two ships participated. The March 2000 picture book Droid to the Rescue, written by Gail Herman and illustrated by Jesus Redondo, depicts three starfighters in pursuit of the starship. This article follows the novelization's description.
According to the novel, the Royal Starship was equipped with five astromech droids, and only four act to restore the shield generator after one is deactivated by Binks. However, the film depicts R2-R9 as one of five droids conducting repairs. Droid to the Rescue, the Mighty Chronicles adaptation, and 2002's The New Essential Guide to Characters by Daniel Wallace state that there were five astromech droids involved in repairing the ship. The 2012 Star Wars: The Phantom Menace: The Expanded Visual Dictionary states that all six droids participated in the repairs.
Video game appearances
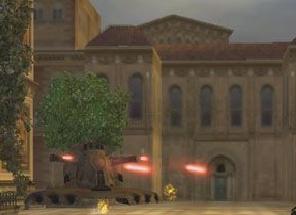
This battle also appeared in two missions in the Star Wars: Episode I The Phantom Menace video game. The player assumes the role of Kenobi for both missions. In the first segment, Gardens of Theed, Kenobi infiltrates the city after an Armored Assault Tank destroys a bridge, blocking his path. He follows the path through the gardens and through the gate to the Royal Palace. Along the way the player interacts with Naboo guards. If the player fails to get the code from the first wounded guard, the game allows the player to follow another guard through the gate. The second segment, Escape From Theed picks up after they rescue the Queen. She and Kenobi get separated from the others and Kenobi escorts her through the city. During the mission he has the option of talking to several characters to get information and game items, although none of it is required to complete the mission. The game's Star Wars Episode I: Jedi Power Battles: Prima's Official Strategy Guide reveals the required paths.
This battle appeared during two consecutive missions in the video game Star Wars: Episode I Jedi Power Battles, released in 2000. In the first mission, the player (or players) travel through Theed, with the option of bypassing a number of droids or destroying them all to boost their points. The turret droid is the level's boss, which must be destroyed to clear the level. The second level plays out differently from its appearance in other sources. For instance, the player(s), using the avatars of the Jedi, fight various battle droids, including B1 grapple droids. It is necessary to jump up the walls of the palace on balconies to reach another portion of the level. Then, the Jedi are led through a secret passage, under a large tomb, to the palace throne room by a handmaiden they had rescued in the first level; they rescue Amidala from a four-droid escort and lead her through the palace to the hangar, where they face two Plasma battle droids. In the Star Wars Episode I: The Phantom Menace film, the Jedi rescue Amidala and her retinue out on the streets before returning to the Theed hangar to destroy the battle droids guarding the royal starship. The game's strategy guide reveals the alternate paths along with the required paths.
In 2001 the video game Star Wars: Obi-Wan was released. The game features this battle during the the third chapter; the player assumes the role of Kenobi and plays the scene over three missions: City Under Siege, Within The Palace, and A Queen in Peril. These missions contradict the movie in that Kenobi meets Captain Panaka in the Royal Palace after the latter was supposed to be captured, and the Queen is escorted by a different group of droids when she is rescued. The first segment was written with to follow the 100% completion path outlined in the game's strategy guide. Going up and facing the first group of battle droids was necessary to pick up all the game's "location markers" and is off the critical path. In the third segment, destroying the Armored Assault Tank is optional.
The preceding three games contradict each other and the Episode I film to some extent. They all feature the Jedi's arrival in Theed up to rescuing the Queen or later. This article includes all three pathways and notes specific contradictions where applicable.
This battle also served as the first mission in the 2000 video game Star Wars: Episode I: Battle for Naboo, entitled Escape from Theed. The player, as Gavyn Sykes in a Flash speeder, was tasked with rescuing Kael and escaping the city. It was not necessary to destroy every droid in the level, just those attacking Kael. Finding the upgrade fulfills the bonus objective, but is not essential. Its placement during the battle is unclear, but it is before Panaka left the planet, as the opening video features his evacuation order.
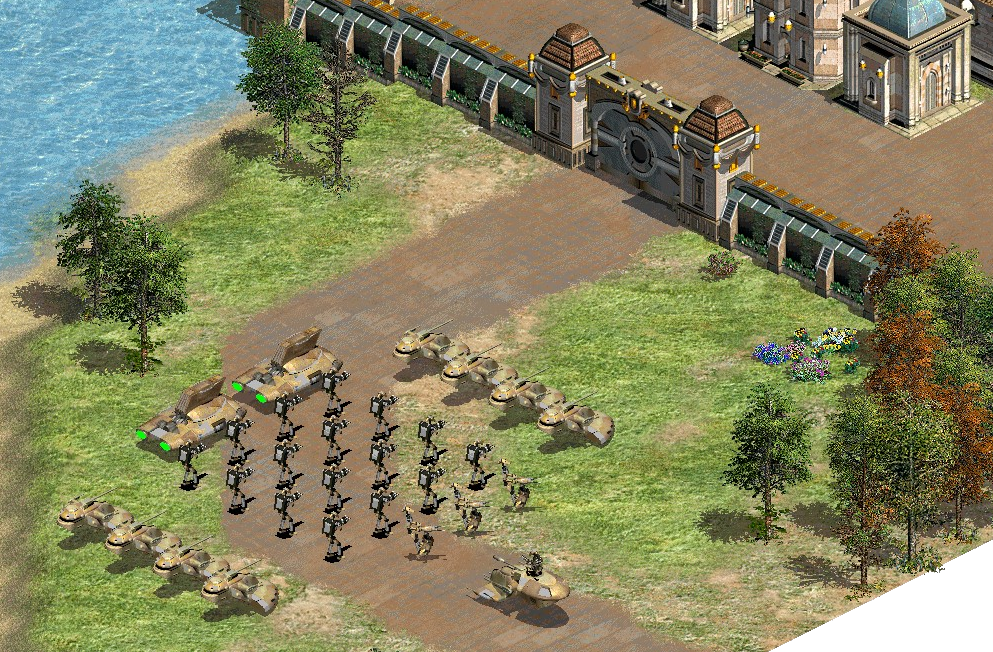
In 2001 the game Star Wars: Galactic Battlegrounds featured this battle and the ones leading up to it. The player, in the role of OOM-9, was tasked with leading a force into Theed and destroying the signal jammer. With that objective complete, reinforcements were granted and the player must move the army to the grounds of the Royal Palace, occupying the area (marked with flags) with at least five military units. When the player has fought through to the Palace, possibly destroying military buildings, Gunray orders the construction of a "Monument," the Neimoidian Throne, granting the player sufficient game rsources to do so. When the construction is complete, the mission ends. The game's strategy guide, besides walking the player through the mission locales and challenges, recommends the player destroy all Royal Security Force military buildings on the journey through Theed. When the reinforcements arrive, the game recommends sending them north to link up with the first army, instead of going west and running into additional fortresses.
In the Lego Star Wars game, the events and characters of the movie are re-stylized as the mute LEGO characters Amidala and Panaka during the game's mission Escape from Naboo; if only one player is active the other one is AI-controlled. The players must navigate through the level and use the game's telekinetic "Force power" mechanics and build new forms with LEGO studs. The level includes a number of freeplay areas which are not part of the required path. The mission starts in a courtyard and the players must immediately fight a squad of battle droids. At the end of the courtyard is an area where the grapple-carrying Naboo LEGO figures can use their grapples to move to the upper level. Up above the courtyard, the players must travel along the walkway and then jump through a window after breaking it. After that, the players must grapple up another level and destroy three battle droids. When that area is cleared, they proceed up another level by grappling and fight more droids before moving into another room. After clearing that room, the players shot then jump through another window and onto a walkway filled with battle droids. After that engagement, they follow the walkway to a closed gate, which opens when a target is shot with a blaster There they join Binks, Jinn, and Kenobi, who are fighting a group of droids. They proceed by grappling up to another level, where they drop into a walkway and face more droids. To get through the gate blocking their way, they shoot four targets. Passing through, they step on switches placed on three domes which open the tunnels underneath, and then shoot a cage to reveal the tunnel underneath, which they escape into.