Celeste Morne
Celeste Morne, a female Human Jedi Master, was part of the Jedi Covenant. Within this organization, she served as a Covenant Shadow, a secret division of Jedi whose identities had been purged from the Order's records. The destruction of her home and family during the Great Sith War motivated her dedication to the Covenant's cause. In 3963 BBY, the Covenant gave Morne the assignment to find the Muur Talisman, an artifact previously held by the Sith Lord Karness Muur. This talisman allowed its user to control the mutant rakghoul creatures. She was also ordered to apprehend the fugitive Padawan Zayne Carrick. However, as her mission progressed, she began to doubt Carrick's guilt in the Padawan Massacre on Taris, of which members of the Covenant's First WatchCircle had accused him.
As Morne navigated the challenges of her mission, including the unexpected Rakghoul Plague outbreak on the planet Jebble, and her own growing doubts about Carrick, she became possessed by the Muur Talisman. To protect the galaxy from the danger she posed, Morne allowed Carrick to imprison her within Dreypa's Oubliette. She remained in stasis there until 19 BBY, when the Sith Lord Darth Vader discovered the oubliette and released her. Upon emerging, she was haunted by the spirit of Karness Muur and learned that the Sith now ruled the galaxy. Enraged by this, Morne fought Vader, but after her defeat, she used the Muur Talisman to force him to retreat. For about nineteen years, she lived in isolation on a remote moon, until a squad of elite stormtroopers visited her, all of whom she transformed into rakghouls during a moment of temporary insanity. Shortly after, Rebel Alliance leaders Luke Skywalker and Princess Leia Organa undertook a mission to recover what they believed was a secret Imperial weapon, but was, in reality, Morne. She and her Sithspawn attacked Skywalker and Organa, who barely managed to escape. Morne then commandeered an abandoned transport and ventured into space to explore the galaxy.
A century later, her connection to Muur and the Talisman having granted her extended life, Morne seized control of the Pellaeon-class Star Destroyer Iron Sun and took it into the Deep Core, intending to confine Muur there permanently. She then encountered bounty hunter Cade Skywalker, and after witnessing him cure himself of the rakghoul plague using the Force, she joined Skywalker's plan to assassinate the current Dark Lord of the Sith, Darth Krayt. Their mission led them to the planet Had Abbadon, where Morne allowed Krayt to learn of Skywalker's presence in the Deep Core. Krayt arrived, and a battle broke out, resulting in his defeat by the strike team and his death at the hand of his own servant, Darth Wyyrlok. With the Dark Lord eliminated, Morne turned her attention to her own problem: the fear that the Sith spirit within her would soon completely take over. She asked Skywalker to free her from Muur's influence, and Skywalker complied, killing her with his lightsaber.
Biography
Early career
Celeste Morne, a female Human, was rendered homeless early in life when her homeworld, Ossus, was devastated in 3996 BBY, towards the latter stages of the Great Sith War. After a period of wandering through the galaxy, she eventually came under the care of Jedi Master Krynda Draay, the founder of the Jedi Covenant. This covenant was a clandestine organization within the Jedi Order, dedicated to preventing the resurgence of the Sith in the galaxy following the conclusion of the Sith War. Krynda raised Morne until she began her training as a Jedi Consular, though her training focused on becoming a Covenant Shadow, a group of covert operatives. She then came under the command of Krynda's son, Lucien, who was responsible for the Covenant's operational security and the Covenant Shadows. To allow Morne to fully dedicate herself to the Covenant and its objectives, her identity was removed from the Jedi Order's records. As a Covenant Shadow, her responsibilities included missions to recover and secure Sith artifacts before they could threaten the galaxy. Her accomplishments for the Covenant included destroying the last known copy of the Epistle of Marka Ragnos, and recovering Jori Daragon's amulet, the Eye of Horak-mul, and the double-bladed lightsaber of Exar Kun.
In 3963 BBY, three seers from the Covenant's First WatchCircle—Xamar, Feln, and Q'Anilia—had a vision of widespread destruction involving the Muur Talisman. This artifact, created by the ancient Sith Lord Karness Muur, could transform non-Force-sensitive beings into mindless mutants known as rakghouls, which the Talisman's master could control. The vision also included four distinct individuals: former Jedi Padawan Zayne Carrick, a tall figure clad in black armor, and two young blond men, one wearing a long brown coat. Aside from Zayne Carrick, the Covenant members did not recognize the latter three. In response, Lucien contacted Morne and tasked her with finding the Muur Talisman, believed to be on Taris due to the Rakghoul Plague presence in the Tarisian Undercity. Morne was also ordered to apprehend Carrick and bring him to justice for his involvement in the massacre of his fellow Padawans on Taris.
Unbeknownst to Morne, the First WatchCircle, based on Taris, had acted the previous year on a prophecy that suggested one of their Padawans would fall to the dark side. To prevent the return of the Sith, they committed the Padawan Massacre of Taris, killing the students. However, Lucien Draay's apprentice, Zayne Carrick, escaped. To protect the Covenant's reputation, the WatchCircle blamed Carrick for the killings and ordered his elimination. With both Carrick and the Talisman on Taris, Morne was positioned to eliminate two threats to the Covenant simultaneously.
In pursuit of the Muur Talisman
Taris
Shortly before Morne's arrival, the ecumenopolis of Taris was besieged by the Mandalorians, forcing many to flee the Upper City into the lower levels. In the Tarisian Undercity, Morne aided Sector Constable Noana Sowrs, who had been separated from the Taris Resistance and was under attack by rakghouls. The deformed mutants, present since the Muur Talisman was lost on Taris, could transmit the Rakghoul Plague through their bites. Morne eliminated the rakghouls, but discovered that Sowrs had been infected. She was forced to kill Sowrs as she mutated.
Shortly after, Carrick and his companion, the Snivvian con artist Marn Hierogryph, rushed past her, fleeing from another horde of rakghouls, which Morne also quickly dispatched. After a conversation in which she learned of their misadventures, Morne left them to continue her search for the Talisman. Despite her disdain, Carrick and Hierogryph accompanied her, hoping she would lead them off-planet to their friends on the spaceship Moomo Williwaw. The dangerous environment and their constant squabbling led Morne to doubt Carrick's ability to kill anyone. Though obligated to apprehend him, she prioritized the Muur Talisman and continued her search. Following explosions, the trio fell into a cavern occupied by Mandalorian Neo-Crusaders, who had just acquired the Talisman.
Jebble
To keep the Sith artifact in sight, Morne, Carrick, and Hierogryph stowed away on the Mandalorians' ship, the Mar'eyce, bound for the planet Jebble. From her hiding place, Morne tried to convince Pulsipher, a former scientific intern, to eject the Muur Talisman, but he resisted. She then saw the Talisman attach itself to Pulsipher's arm and kill a Mandalorian. Once the Mar'eyce landed near the Mandalorian staging area on Jebble, Pulsipher was taken to his laboratory, and Morne tried to dismiss Carrick and Hierogryph to follow. However, Carrick informed her that the Mandalorians were planning a raid on the Core world of Alderaan.
Hierogryph, disguised as a Mandalorian, convinced Morne and Carrick to assume the slicer aliases of Joam and Hettie Hierogarl to enter the Ice Citadel, a mountaintop building turned into a temporary war forge and base of operations for the Mandalorian invasion force. Inside, Morne decided Carrick should warn the Republic about the attack on Alderaan while she retrieved the Talisman. However, Hierogryph accidentally discharged his weapon, causing a cave-in that sent him to a lower level and alerted the Mandalorians to their presence.
Before Morne and Carrick could be captured, a guard transformed into a rakghoul, forcing the others to fire on him before transforming themselves. Morne noted the evolved characteristics of the new rakghouls, which could use weapons and appeared smarter than the Taris rakghouls. After defeating them, Morne and Carrick discovered that Jebble was not just a local war forge but a staging arena for an invasion, endangering all the Mandalorian recruits from the Outer Rim with the Rakghoul Plague.
Sending out communication
After an awkward escape down the mountainside, Morne again expressed disbelief that Carrick was responsible for killing his classmates. He revealed that the Jedi Masters on Taris were part of a "secret Jedi cabal" who had framed him. Morne feigned ignorance of the Covenant, but revealed its name, which Carrick had not mentioned. As they headed towards the communication dome, he realized she knew about the clandestine organization, though he remained unaware of her connection.
While Carrick was away, Morne contacted Lucien Draay to inform him about the impending invasion of Alderaan and the Rakghoul Plague. Lucien ordered her to obtain the Muur Talisman and kill Carrick immediately. Morne questioned the order, but Lucien reminded her of her past and dedication to the Covenant's vigil against the Sith, warning that Carrick would cause more damage than she imagined. Moments later, Carrick appeared and contacted his friends on the Moomo Williwaw. While Carrick's back was turned, Morne activated her lightsaber to kill him, but stopped when he contacted Cassus Fett, the Mandalorian Field Marshal, who was en route to Jebble with transports for the invasion. Carrick alerted Fett to the Rakghoul Plague and cautioned him not to land. Morne realized Carrick was concerned for all life, both Republic citizens and Mandalorians, which gave her pause. After the transmission, Carrick went to rescue Hierogryph in the rakghoul-infested citadel. Hierogryph was safe and, while examining Covenant financial records obtained by Pulsipher, discovered Morne was a Covenant agent.
Once Carrick reentered the citadel, rakghouls ambushed him and brought him to Pulsipher's lab. The Mandalorian scientist restrained and interrogated him about the Talisman's secrets, which Pulsipher now used to control the rakghouls. Carrick's attempts to feign ignorance led Pulsipher to suspect he had companions. Pulsipher threatened to encase him in a Sith artifact known as Dreypa's Oubliette, putting him into infinite stasis undetectable by sensors. The interrogation was interrupted when the Talisman detached from Pulsipher, causing the rakghouls to turn on and kill him. Morne and Hierogryph entered and found Carrick under attack from the Muur Talisman itself, due to its affinity for Force-sensitive individuals.
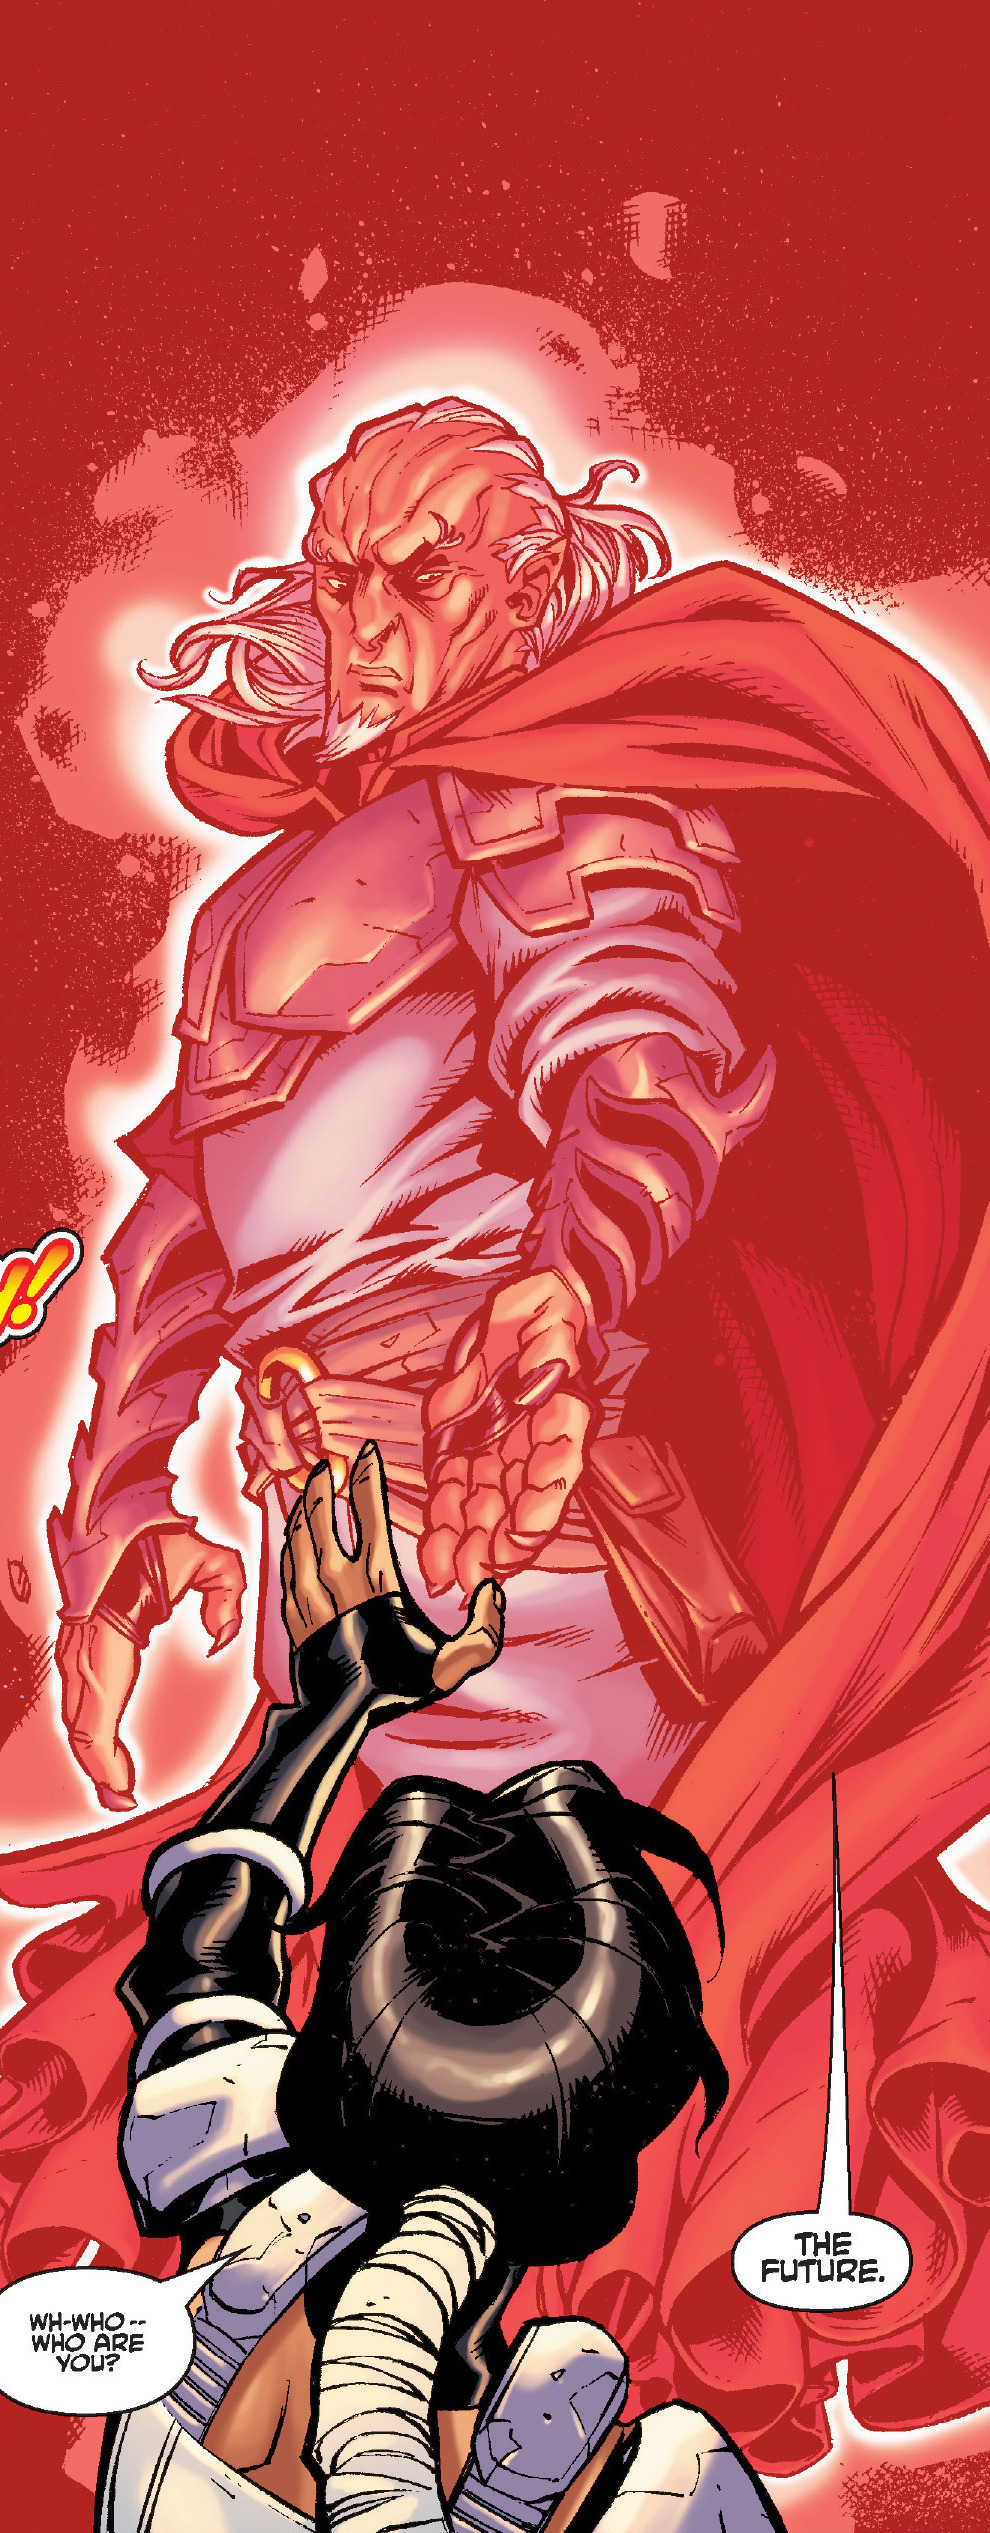
Morne tried to pry the Talisman away from Carrick, but he suggested he could stop the plague by controlling the relic. Morne, understanding the artifact's nature, rebuffed him and ordered the Talisman to come to her, identifying herself as a Jedi. The Muur Talisman released itself from Carrick and attacked Morne, binding itself to her neck and engulfing her in a cocoon of energy. Weakened, Morne encountered the spirit of Karness Muur, who declared that he was her future and she was his. When Morne stood, she discovered she now commanded the rakghouls.
Possession
Resisting the Talisman
Standing with Morne above the icy plains of Jebble, Carrick was horrified to see her indifferently send the rakghouls to spread the plague and kill the remaining Mandalorians. It became clear that Morne had been corrupted by the Talisman and was using its power to manipulate the rakghouls. Morne used her rakghouls to locate Hierogryph and Carrick's lightsaber, and had both brought to them. Hierogryph revealed that Morne was a Covenant agent under orders from Lucien Draay. As the duo questioned her devotion to the Jedi cabal, Morne's anger grew until she was ready to strike them down. However, Carrick helped Morne see the consequences of her actions; by expanding the rakghoul army, she was aiding the Sith, the faction she and the Covenant had sworn to protect the galaxy from. Morne gained control over the Talisman and asked Carrick to strike her down before the Mandalorian transports arrived, feeling the change within her. Remembering another solution, Carrick stated he would not kill her but would help her.
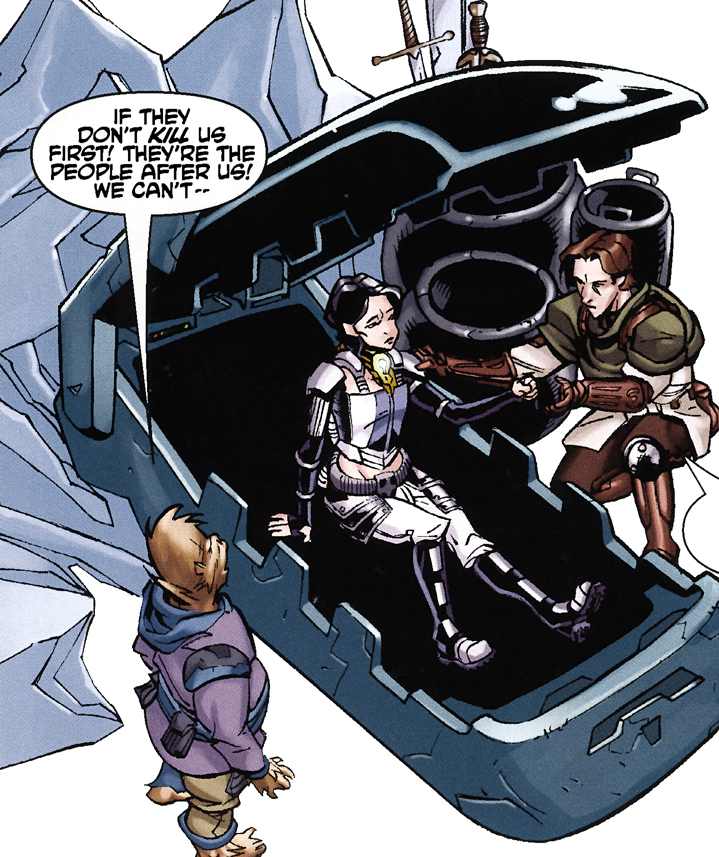
Carrick and Hierogryph took Morne to Pulsipher's laboratory to have her temporarily sealed inside Dreypa's Oubliette, which would place her into stasis and contain the Muur Talisman's influence. Morne, through her connection to Muur, recognized that the Oubliette had been built by Dreypa for this purpose and willingly entered the device. Handing Carrick a key, she asked him to take her to a Covenant location on Odryn, where the organization stored and researched Sith relics, hoping they could help her. Before sealing the Oubliette, Morne told Carrick she believed he had not killed the Padawans on Taris and asked him to tell Krynda Draay the true version of the Padawan Massacre to end the Covenant's corruption.
Securing Morne in the Oubliette contained the Talisman's influence, and the rakghouls degenerated into mindless beasts. Carrick and Hierogryph made their way to the highest point on the Citadel, expecting safety, but the rakghouls surrounded them. At the last moment, the Moomo Williwaw, carrying their friends, rescued them. However, Carrick insisted they return and retrieve Morne inside the Oubliette. Just then, Cassus Fett's fleet arrived in the system. At first, Carrick believed they would land, but they instead fired nuclear warheads onto the planet, decimating the surface. Carrick was devastated at the loss of Morne, and feeling the Covenant and their manipulations were to blame, he vowed to stop them.
After securing the help of those onboard the Moomo Williwaw, and deciding that physical proof of the Covenant's activities was needed, the group traveled to Odryn. With Jarael, an Arkanian Offshoot, posing as Morne, and using the key Morne had given Carrick, they gained access to the Covenant storehouse. Their deception was discovered by Jedi Master Feln, and after contacting Lucien Draay, the two WatchCircle members concluded that Carrick had killed Morne and stolen her key, refusing to believe she would betray the Covenant.
Meeting Darth Vader
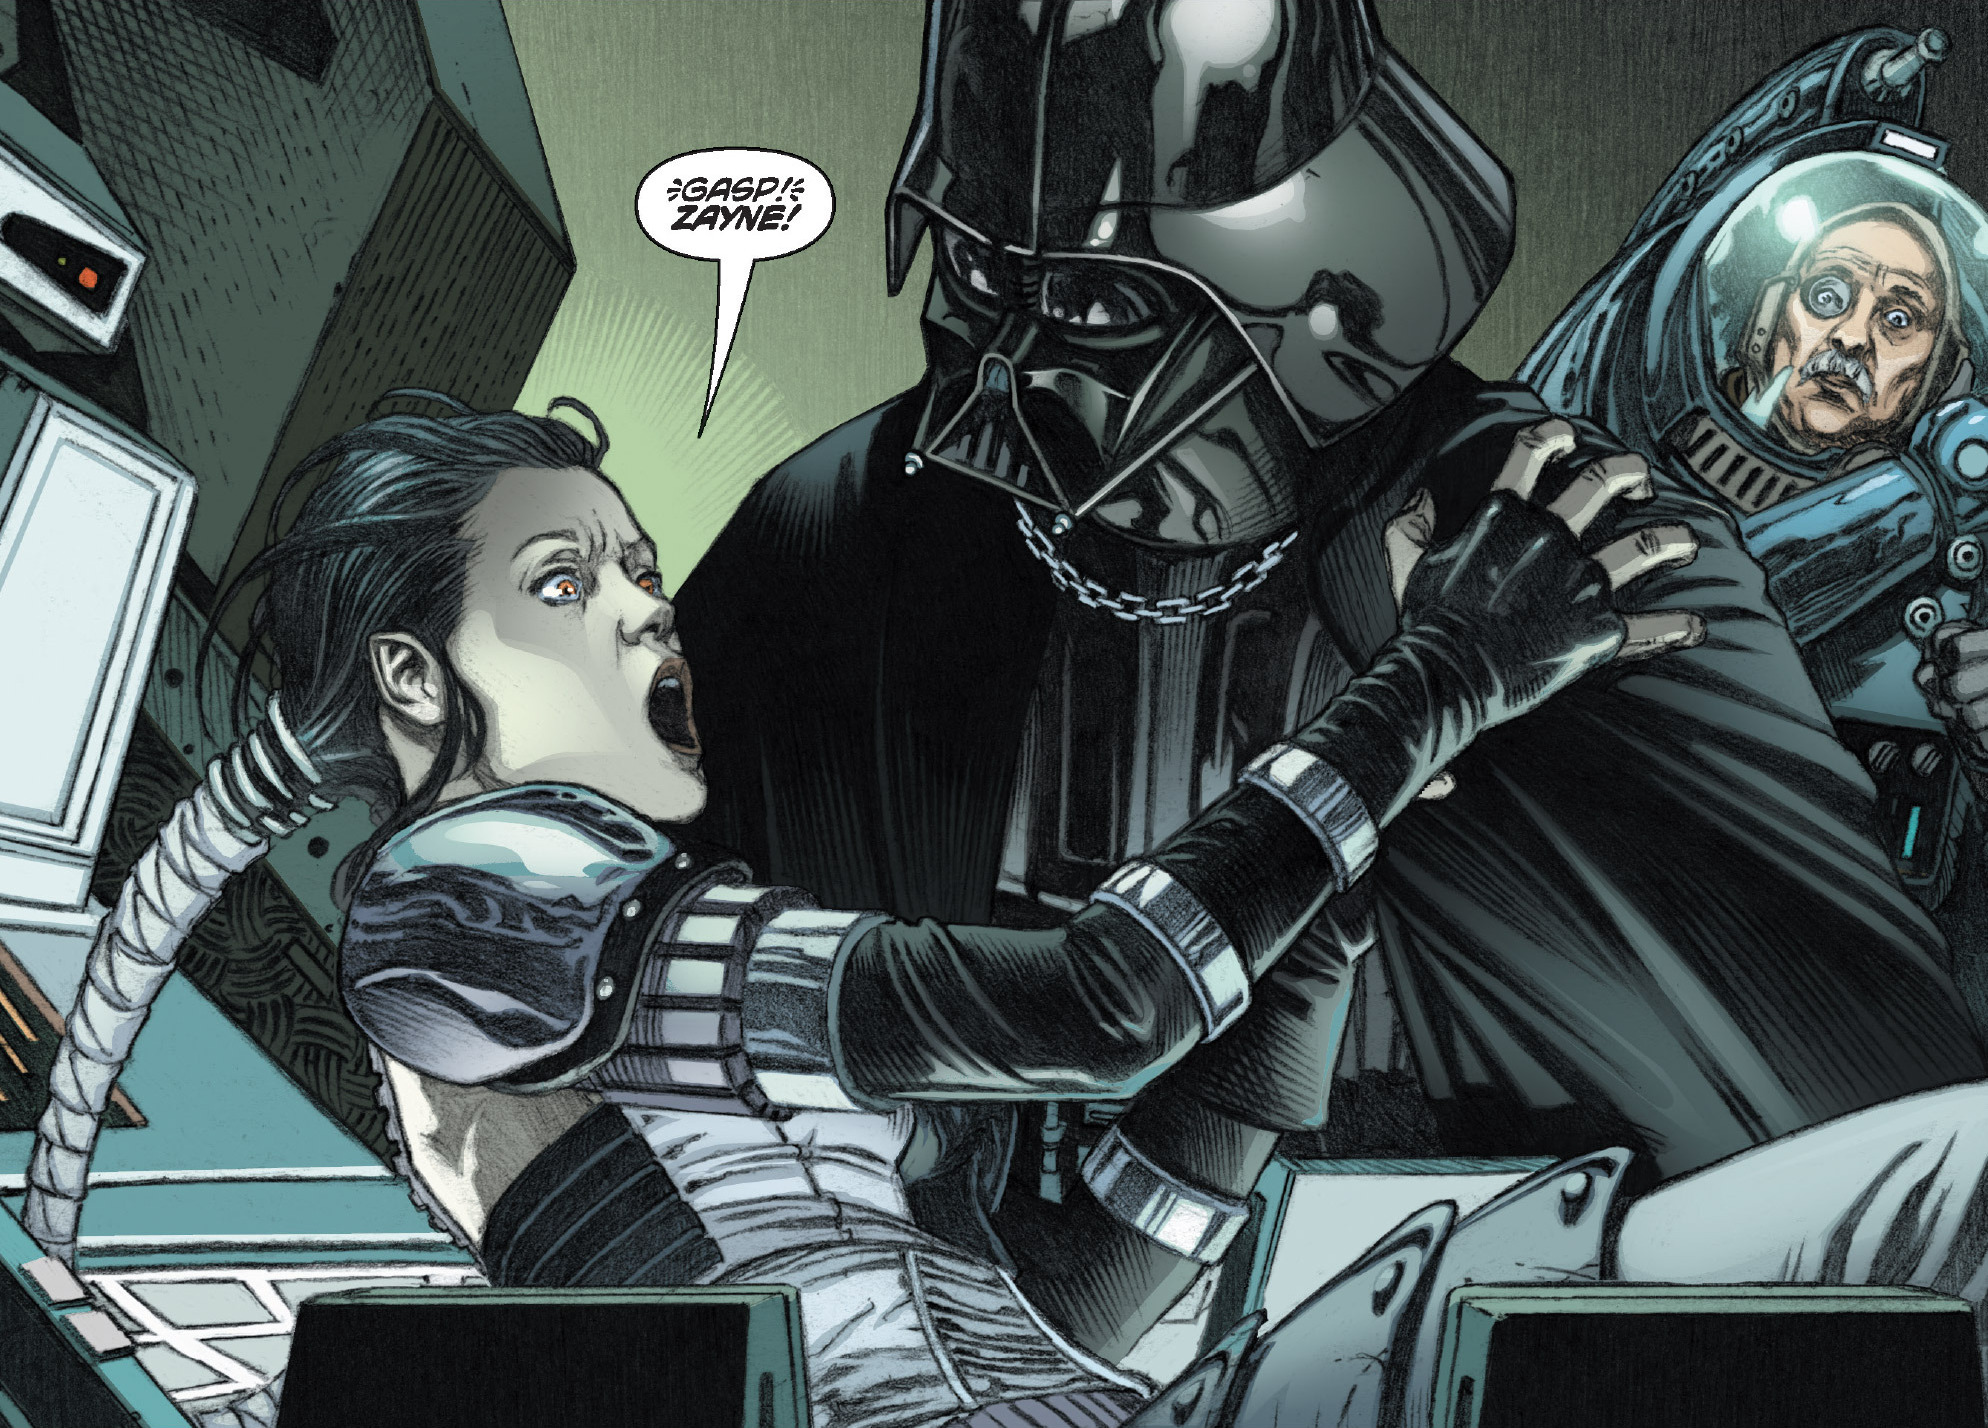
Celeste Morne, however, was not deceased; rather, she existed in suspended animation inside the impenetrable Oubliette, where she would remain for nearly four millennia. The Oubliette's initial discovery occurred when ice miners stumbled upon it on Jebble. It subsequently changed hands multiple times, eventually ending up in the possession of the crew aboard the smuggling ship, the Uhumele, in 19 BBY. Schurk-Heren, the captain, initially intended to sell the Oubliette to Haka Hai, a crime boss operating on Mimban. However, after the crime boss deceived and tortured them, the crew escaped and attempted to sell the Oubliette a second time, this time to the historian Fane Peturri. Unbeknownst to them, Peturri had informed the Sith Lord Darth Vader about the arrangement, not realizing that Vader would seize the oubliette before the transaction could be finalized.
Vader wasted no time in opening the Oubliette, and Morne was revived. She found herself in a state of confusion and disorientation, but she recognized that the Muur Talisman was still secured around her neck, indicating that its creator's presence was still within her. After questioning Peturri, Morne discovered that the Sith, rather than the Mandalorians, had overthrown the Republic and were now in control of the galaxy. Enraged by this revelation, she engaged Vader in a duel. Like Muur, Vader attempted to seduce her with the allure of the dark side. Ultimately, Vader disarmed Morne and proposed that she become his Sith apprentice. Muur's spirit, on the other hand, urged Morne to sacrifice her life so that the Talisman could take possession of Vader. To prevent Vader from acquiring the Talisman and potentially endangering the galaxy, Morne opted for what she considered the lesser of two evils, transforming Fane Peturri, all of the stormtroopers, and Crys Taanzer, the only Human member of the Uhumele's captive crew, into rakghouls. The remaining members of the Uhumele's crew managed to flee. Overwhelmed by Morne and the mutated warriors, Vader was forced to retreat to his shuttle in defeat.
Morne was now marooned on the moon, her only companions the mutant rakghouls and the furious Karness Muur, whose plans had once again been thwarted. Although she understood that escape from her predicament was unlikely, she found solace in the fact that Muur was also trapped, at least until she encountered another sentient being.
Galactic Civil War
Almost two decades later, Darth Vader's thoughts returned to Celeste Morne, and he wondered if she was still alive. Should she have survived, Vader hoped to utilize her as a weapon against the Rebellion, with whom his Galactic Empire was currently embroiled in a civil war. A convoy was dispatched to investigate Morne's last known location. Reaching out with the Force, she transformed the pilots and stormtroopers into rakghouls before they could even land, causing their ships to crash. Upon receiving news of the lost convoys, Vader instructed Wyl Tarson, a former Rebel spy currently in Imperial custody, to send a message through the Rebellion's spy network. After receiving the message about a secret Imperial weapon abandoned on a moon, Rebel agents Luke Skywalker and Princess Leia Organa led an investigative team. Upon landing, the rakghouls under Morne's control attacked the Rebels, dragging Skywalker and Organa to the ancient ruin where Morne awaited them.
Morne and Karness Muur recognized Skywalker's and Organa's Force-sensitive lineage, leading Muur to realize that an opportunity to escape and unleash his power upon the galaxy had presented itself. The twenty years of isolation on the dark moon, combined with the influence of the Muur Talisman and the whispers of Karness Muur, had driven Celeste Morne to madness. She had forgotten much of her past life, and Muur had instilled in her a hatred of Vader and the Jedi, whom she now believed had abandoned her. Consequently, believing Luke to be a Jedi, she launched an attack against him.
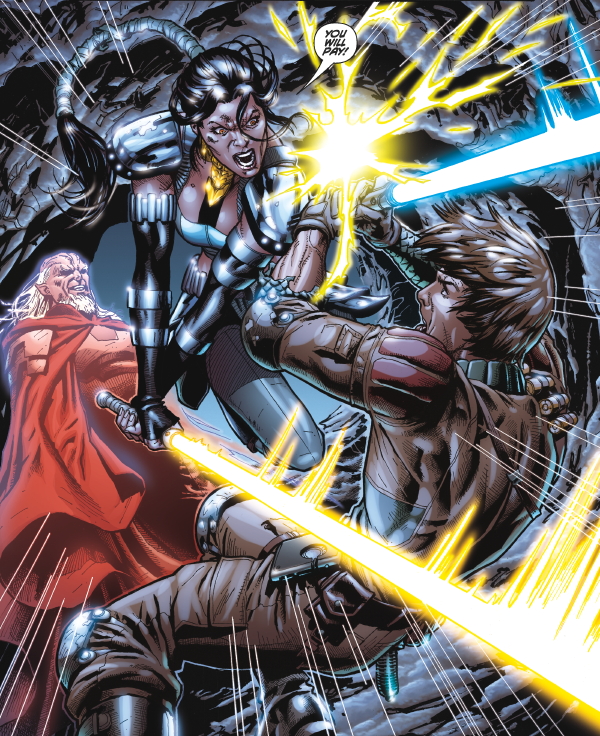
After a brief exchange of blows, Morne overpowered Skywalker, scoffing at the notion that he was a Jedi and demanding that he reveal his true allegiances. However, Organa and the Rebel soldier Able intervened, attacking Morne to rescue Skywalker, whom they perceived to be in danger. Morne succumbed to her rage at the loss of the glimmer of hope she believed had arrived with the Rebels. Instead of saviors, Morne believed that fate had sent her assassins, and she transformed Able into a rakghoul, while Skywalker and Organa remained unaffected due to their Force-sensitivity. Upon closer examination of the two through Morne, Karness Muur confirmed his suspicions: Skywalker and Organa possessed immense power in the Force, which he could exploit to rule the galaxy. The Muur Talisman then detached itself from Morne and attempted to attach itself first to Skywalker and then to Organa when she stepped in front of him.
After centuries of being bound to the Sith Lord and his artifact—a bond that granted her extended life—Morne was finally free, but she realized that her suffering would never end. She would continue to be abandoned on the desert moon in darkness until her death. Coming to terms with her tragedy, Morne resolved that she would no longer be a victim. As Skywalker struggled to help Organa remove the Talisman before it became firmly attached, Morne seized the Sith artifact and reattached it to herself. She acknowledged her oneness with Karness Muur, but she would imprison him as much as he did her. As she made her way to the abandoned Rebel B-wing starfighter to finally leave the moon, Skywalker stopped her, expressing his desire to learn more about the Jedi and the Force in order to fulfill his own destiny. Morne only warned him about the darkness in his past and future before shoving him aside. Before Morne left the system, she attacked the Imperial Star Destroyer that was waiting for the Rebels, transforming the crew into rakghouls and sending the ship crashing down onto the moon. She then departed to see the galaxy from which she had been absent for nearly four thousand years.
Final days
Contact
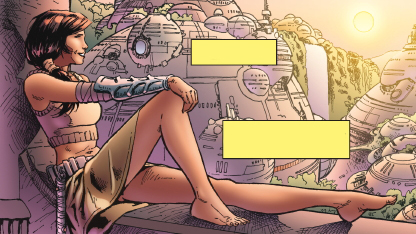
Before long, Morne came to the realization that her desire for exploration stemmed from Muur's yearning to escape her body. In 127 ABY, she fled deep into space where her ship was captured by the Pellaeon-class Star Destroyer Iron Sun. Assuming that the Iron Sun served the same Empire as Darth Vader, Morne created a new army of rakghouls from the Iron Sun's crew and piloted the Destroyer into the treacherous hyperlanes of the Deep Core. Morne had no companion other than Muur's spirit, who indulged his host with temptations of the dark side. He also promised her that another would arrive whom he could possess, at which point he would no longer need Morne.
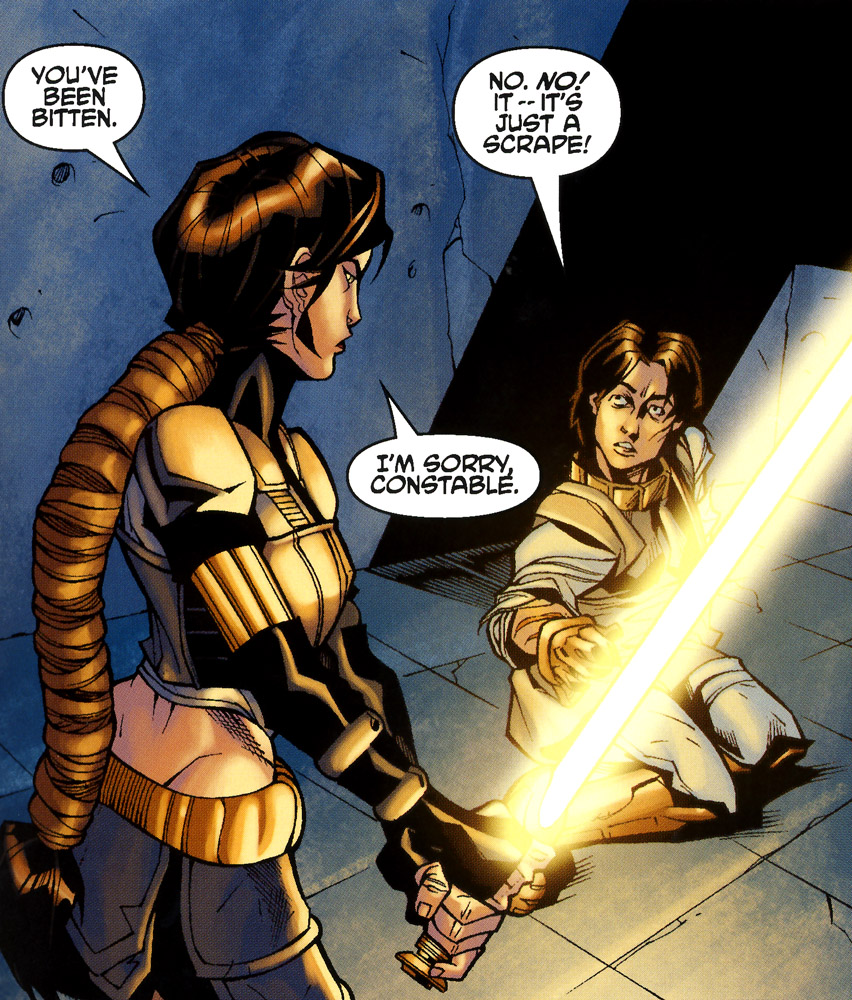
A decade later, Cade Skywalker, an ex-Jedi turned bounty hunter, experienced a vision of Morne while meditating on the Force. His ship, the Mynock, was interdicted and brought aboard the Iron Sun while en route to a mission against the current Sith-dominated Empire. Skywalker and his crew, consisting of pirates Jariah Syn, Deliah Blue; the Imperial Knights Azlyn Rae, Antares Draco, Ganner Krieg; and Shado Vao, a Twi'lek Jedi, entered the Star Destroyer, where they were ambushed by several of Morne's rakghouls. After a brief skirmish in which Skywalker and Rae were bitten and infected with the Rakghoul Plague, Morne separated the team by imprisoning Skywalker and Rae, believing that the two bite victims would soon transform into rakghouls that she would have to eliminate. The Jedi Master also recognized Cade as a descendant of Luke Skywalker, whom she had encountered decades prior. When she informed Skywalker that he was infected with a disease, he astonished her by using the Force to heal himself and Rae of the plague. Both Morne and the spirit within her were intrigued by Skywalker's ability and his use of the dark side in doing so. She then decided to assist Skywalker in his quest to overthrow Darth Krayt, the reigning Dark Lord of the Sith and Galactic Emperor.
Had Abbadon
Morne accompanied Skywalker when he attacked the Imperial garrison on the Deep Core world of Had Abbadon in an attempt to draw Emperor Krayt away from Coruscant. The Imperial Knights provided intelligence but failed to inform Morne and Skywalker that Sith Lord Darth Reave was present on Had Abbadon. Morne utilized the Talisman's power to transform Reave's stormtroopers into rakghouls, who then attacked the Sith Lord. He sustained several bites before fleeing the scene unharmed, which angered Skywalker. Morne, however, had planned for Reave to escape, confident that he would report Skywalker's presence on Had Abbadon to Darth Krayt.
While Morne slept, the Muur Talisman reached out to the Jedi Shado Vao, inundating him with visions of himself murdering Morne and seizing the Talisman for himself. She awoke to find Vao in her quarters, questioning him about his reasons for allying himself with Skywalker. The Twi'lek responded that he had vowed to kill Skywalker should he fully embrace the dark side. Morne believed that the Talisman posed a significant temptation for Vao and dismissed him. Skywalker approached her shortly thereafter, threatening to send Morne and the Talisman into the galaxy's central black hole if Muur's spirit did not cease antagonizing his crew.
By this time, the presence of Muur's spirit began to weigh more heavily on Celeste Morne, but she continued to hold him captive within, while also remaining his prisoner. Allowing Muur to momentarily take control of her, Morne contacted Darth Krayt directly on Coruscant. She approached him as Muur, one Sith Lord to another, and offered Krayt Cade Skywalker, whom Muur appeared to hold captive. Through Morne, Muur also offered to heal Krayt of his Yuuzhan Vong biot infestation through the Force, but only if he came to Had Abbadon alone—otherwise, Muur threatened to kill both him and Skywalker. Krayt partially complied—he did come to Had Abbadon, but not alone. With his lieutenant Darth Wyyrlok remaining in orbit, Krayt landed planetside with Darths Maladi, Stryfe, and Talon, uncertain of what to expect from their host. Morne confronted the Dark Lord about his blatant disregard for the terms of their agreement, while also acknowledging his wisdom in doing so. As Muur demonstrated through Morne his Force healing abilities for Darth Krayt, Skywalker, who appeared to be bound and incapacitated, summoned his lightsaber to his grasp, and the trap was sprung. Morne immediately regained control of herself and attacked Krayt with her lightsaber and army of rakghouls, while the rest of Skywalker's team engaged Krayt's One Sith.
Full circle
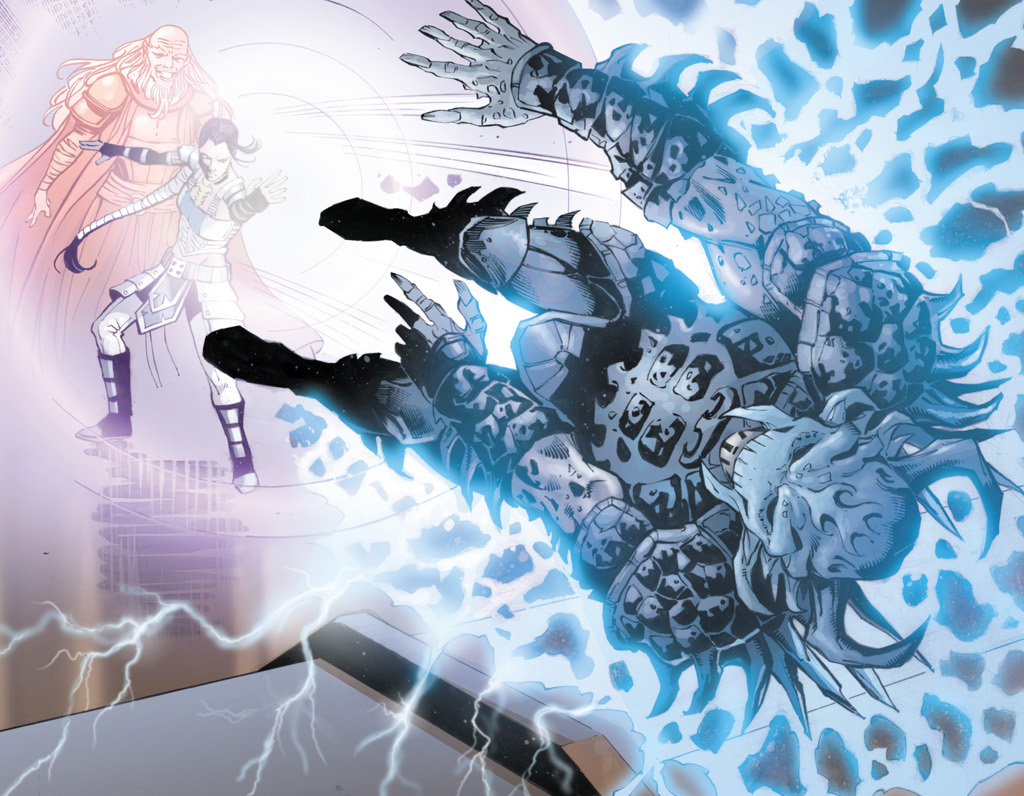
Meanwhile, the Imperial Knights debated among themselves, torn between their duty to eliminate Darth Krayt and their desire to claim the Talisman for their leader, Roan Fel, the exiled Emperor. When Morne sensed Antares Draco's intentions to seize it, Muur's spirit resurfaced and denounced the Knight's belief that his Emperor was strong enough to control the Talisman. Muur then incapacitated Draco before claiming to have been in control of Morne's flesh all along. Through Morne, he planned to transform them all into rakghouls, kill her, and claim Darth Krayt's body as his own. Now in complete control of Morne's body, Muur unleashed the rakghouls upon all Jedi, Sith, and Imperials alike, while he dueled Darth Krayt in Morne's guise. However, Celeste fought for control of her own body and continued to battle the Dark Lord, who had abandoned his lightsabers in favor of Sith lightning alongside Darth Maladi. She withstood their attacks while gradually succumbing to the power of the Sith within her. Azlyn Rae noticed the struggle and seized an opportunity to strike down Darth Krayt by stabbing him in the back. With Krayt injured, Morne and Muur unleashed a devastating Force storm that engulfed Krayt and Rae. Krayt was sent hurtling over a cliff to his apparent death.
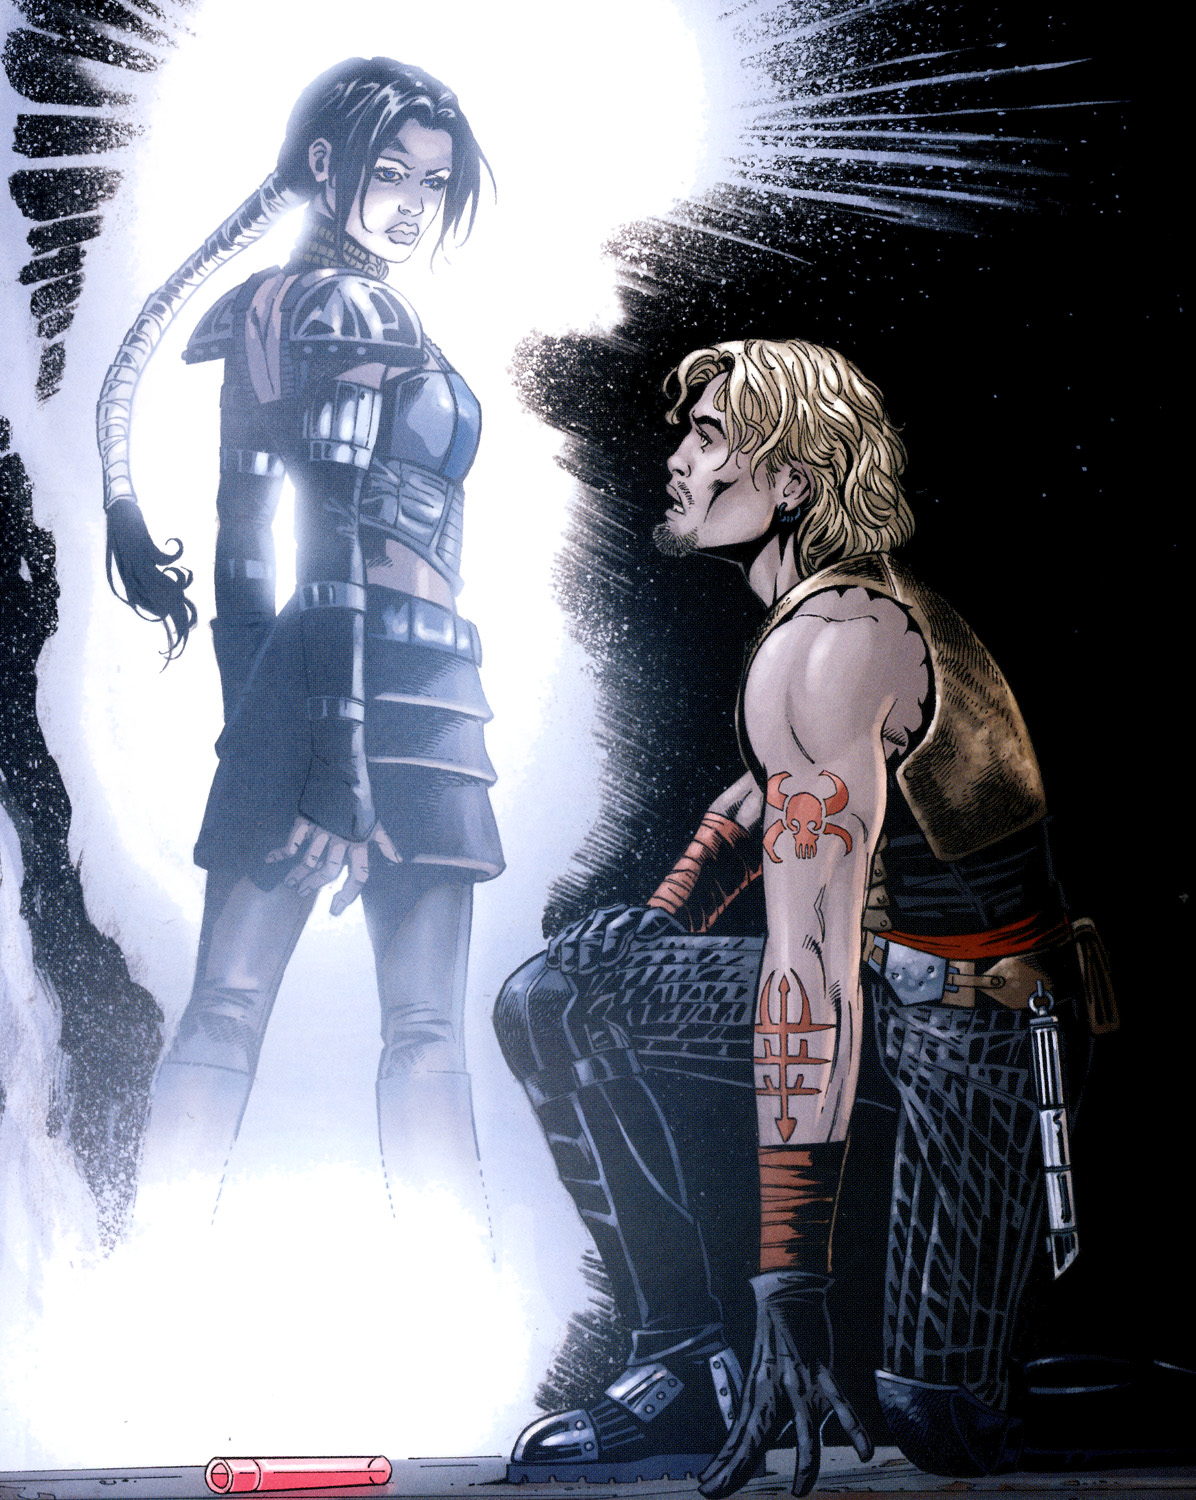
The Dark Lord of the Sith had been defeated, and Morne once again asserted control over her flesh. She had grown weary of her burden and realized that she was losing the fight to contain Muur's spirit within her. Morne also recognized Skywalker as a unique individual; one who walked dangerously close to the dark side of the Force, yet remained unaffected by its temptations and desired none of its power. She then requested that Skywalker release her from Muur's influence and kill her, remembering Zayne Carrick's millennia-old promise that someone would be sent to free her—now believing that someone to be Cade Skywalker. He ran her through with his lightsaber, and Morne's body disintegrated into dust.
Personality and traits
The devastation of Morne's early life during the Old Sith Wars instilled in her a hatred of the Sith, leading her to join the Jedi in order to dedicate her life to guarding against their return. However, believing that the Jedi Order had become complacent, Morne became convinced that the Covenant was correct in its mission to eliminate the agents of the dark side by any means necessary. Even after learning of the Covenant's corruption from Carrick, and throughout the millennia she was bound to the Muur Talisman, her hatred of the Sith and her commitment to eradicating their existence never waned.
As a Shadow, Morne served as a sleeper agent for the Covenant, living her daily life while awaiting her next assignment, many of which took her to the galaxy's most unpleasant locations and shaped her rough personality. Morne had little patience when on a mission, focusing her energies on completing the task at hand. During her search for the Muur Talisman, she regularly insulted Carrick and Hierogryph, expressing her irritation with their bickering from the moment she met them in the Tarisian Undercity, on their flight aboard the Mar'eyce, and in the Ice Citadel on Jebble. Even after four millennia, Morne spoke her mind, bluntly informing an indignant Cade Skywalker that his plan to ambush Lord Krayt was flawed and that she had needed to improve it.

Morne possessed a sense of justice, as well as respect and compassion for life, and she refrained from killing unless it was necessary. In the Undercity of Taris, she was unable to kill Constable Sowrs, who was infected with the Rakghoul Plague, until the woman had transformed into the beast. Furthermore, she found herself unable to follow orders and kill Zayne Carrick once she began to doubt that he was responsible for the Padawan murders on Taris, witnessing him go out of his way to protect Cassus Fett's Mandalorian fleet from the Rakghoul Plague. Upon meeting Skywalker and Azlyn Rae after they had been exposed to the plague, Morne remained with them during the illness' progression, telling them that she would grant them a quick and merciful death. Nevertheless, Morne also possessed a pragmatic and calculating approach to life, recognizing that certain situations and actions were unavoidable. After assuming command of the Iron Sun and transforming the crew into rakghouls, Morne allowed the creatures to cannibalize each other for sustenance once the food supplies had been exhausted.
The strength of her iron will and her dedication to protecting the galaxy from the Sith compelled Morne to sacrifice herself for the greater good. In Pulsipher's laboratory on Jebble, she had drawn the Muur Talisman away from Carrick in order to save him, sensing that she, not Carrick, was strong enough to withstand the Talisman's power. Furthermore, after realizing that she posed a threat due to her bond with the Talisman, Morne allowed herself to be sealed in Dreypa's Oubliette, even knowing that it would be a torture chamber for her. Nearly four thousand years later, after being awakened by Darth Vader, she risked losing control of herself by tapping into the Talisman's power to prevent Vader from claiming it for his own. Twenty years later, Morne's duel with Vader's son, Luke Skywalker, resulted in the Muur Talisman leaving her, granting her freedom from Karness Muur. Nevertheless, she realized that she was the only one capable of imprisoning Muur's spirit and retook the relic and its burden. When Cade Skywalker asked her a century later why she had not simply buried the Sith artifact somewhere, Morne replied that she could not risk someone weaker than herself finding it and unleashing an army of rakghouls upon the galaxy. Morne also explained that she had developed methods of imprisoning Muur's spirit within herself and had gone into self-imposed exile for the protection of all.
While Morne did not cultivate friendships, she did form alliances with individuals who made an impression on her, granting them her trust. Zayne Carrick had impressed her while they were on Jebble, and before she was sealed in the oubliette, Morne asked him to transport her to the Covenant's secret storehouse for Sith artifacts on Odryn, hoping that researchers there could help her. She trusted him to find a way to alleviate her affliction and gave him her key to the storehouse. Upon her awakening by Lord Vader and learning the fate of the galaxy, Morne was despondent, believing that Carrick had failed her. Not until the death of Lord Krayt on Had Abbadon did she finally understand that Zayne had not failed her, having sent Cade Skywalker to assist her. Morne deemed Skywalker strong enough to withstand Karness Muur, and trusting him to destroy the Muur Talisman, she allowed Skywalker to kill her and end her imprisonment.
Powers and abilities

Celeste Morne, as a Shadow operative, underwent training to exist as a dormant agent for the Covenant. Her life consisted of ordinary routines, awaiting a summons for a specific mission. She maintained a high level of secrecy, and acted in ways that were not typical, deliberately avoiding Jedi attire. Public displays of her lightsaber skills were rare. To effectively carry out her assigned tasks, Morne became exceptionally skilled in various methods of deception, both with and without using the Force, all to successfully complete the Covenant's objectives by any means necessary. Proficient in the Bocce language, she also honed her ability to move silently across diverse terrains, including the Undercity of Taris and the icy landscapes of Jebble. Demonstrating her resilience, Morne withstood being forcefully thrown against a wall by Darth Vader, sustaining no significant injuries beyond losing her lightsaber, which she then retrieved through telekinesis. Her willpower was formidable, resisting Muur's complete control for millennia while carrying his Talisman, although he could still influence and advise her.
In battle, Morne demonstrated considerable skill with her lightsaber, often employing the Force to gain a slight height advantage over adversaries and amplify the power of her strikes. She swiftly eliminated Darth Vader's stormtroopers, even while defending against their attacks. She cleaved apart a box that Vader hurled at her with the Force, and engaged the Sith Lord in combat, although Vader initially held back, aiming only to subdue her. However, when Vader fully committed to the fight, he easily overpowered Celeste and relieved her of her weapon. Celeste Morne achieved victory over Luke Skywalker in a lightsaber duel, leveraging her blade skills, superior Force abilities, and a series of well-timed kicks. Morne was capable of executing incredibly precise strikes with her lightsaber, as demonstrated when she dislodged the Muur Talisman from Organa's neck without harming the princess.
Furthermore, she possessed a remarkable talent for telekinesis, using this Force power to propel enemies and objects away from her. She managed to Force throw Darth Vader, although he wasn't intending to harm her at that time. When the Dark Lord focused on killing her, he overcame her defenses and slammed her against a wall. Subsequently, she used the Force to crush entire squads of stormtroopers, resulting in numerous fatalities. Morne could also Force choke opponents from considerable distances, as she did when she strangled a shuttle pilot, causing the ship to crash near her before transforming the crew into rakghouls. Morne was able to Force push Luke Skywalker, both during combat and when he was unprepared, and she used Force grip on a GAR clone.
Morne also possessed the ability to use the Force to shield herself from enemy attacks.
By utilizing her Force powers, Morne was adept at persuading or confusing her adversaries into following her commands. These actions could involve compelling someone to perform a specific task, as she did with Pulsipher on the Mar'eyce, or obscuring an individual's perception to move undetected, a form of Force cloak known as Force Haze. Similarly, Morne could communicate with others through the Force. Celeste Morne possessed a highly developed Force sense, enabling her to detect Leia Organa's stealthy approach and discern Luke Skywalker's lineage and its dark legacy. She also stated that Luke had darkness in his past and future.
Over a century later, she confronted Darth Krayt. During this encounter, while feigning complete submission to Muur's control, she revealed that she had learned Dark Transfer from him and began to heal Krayt. She also employed Vongsense on Darth Krayt's armor, despite lacking any prior training in this ability.
The power of Sith lightning was within her grasp.
After forming a bond with the Muur Talisman, Morne gained the capacity to wield Sith magic to transform certain species into rakghouls and command these mutants according to her will. On one occasion, she transformed all stormtroopers serving with Vader into rakghouls (as well as an innocent who was caught in the wave of dark power), creating a force so threatening that Darth Vader chose to flee rather than continue the battle. She later annihilated an entire Imperial force consisting of three fully loaded Lambda-class T-4a shuttles by turning them into rakghouls. Years afterward, she destroyed an Imperial-class Star Destroyer by boarding the command center, transforming the bridge crew into rakghouls, and allowing the now unpiloted ship to be dragged down to crash on a moon.
Furthermore, she harnessed the dark side power of Muur and the Talisman during combat, unleashing Sith lightning upon her enemies. Exposing herself to the Talisman's power was risky, as Muur constantly sought to seize control of her body and use her as a puppet, sometimes successfully guiding her to perform actions that benefited him, such as attacking Luke Skywalker.
Behind the scenes
Celeste Morne's character was conceived as the central figure for Star Wars: Vector, a year-long crossover storyline spanning four Star Wars comic book series published by Dark Horse Comics: Knights of the Old Republic, Dark Times, Rebellion, and Legacy. According to John Ostrander, the writer of the Legacy series, Morne's creation occurred early in the story arc's development because it was recognized that a relatable character was needed to unify the crossover. It was also believed that a single character would eliminate the need for complex explanations regarding the Muur Talisman's fate; while the Talisman could have found new hosts in each era, this would have required explaining their disappearances as well as the Talisman's. The developers also decided that a new character would allow them to explore the protagonist's personality and ultimately determine how the character would leave the Star Wars universe.
Morne's debut occurred in a scene from Knights of the Old Republic 25, where she is depicted fighting rakghouls, as illustrated by artist Scott Hepburn. Jan Duursema, a popular artist from the Legacy series, initially suggested incorporating the rakghouls into the story and played a significant role in designing Morne's physical appearance. Duursema revealed that the intention was for Morne to have a "tough" look, combined with a "Sleeping Beauty" quality.
John Jackson Miller, the writer of the Knights of the Old Republic series and a key architect of Vector, originated the idea of Morne being a secret agent of the Jedi Covenant. This concept served to explain why such a prominent character was not recognized in the Star Wars universe's historical records. As the writer responsible for introducing Morne into the story arc, Miller incorporated various threads into the story regarding her potential future developments. However, he had already decided early on how Morne would exit the Old Republic era. One such "red herring" suggested that Morne might be the Jedi Exile, the protagonist of the video game Star Wars: Knights of the Old Republic II: The Sith Lords. Another form of misdirection was presented on the cover of Knights of the Old Republic 29, where the artwork depicted Jarael disguised as Morne, leading readers to believe that Morne had not left the Old Republic era, contradicting the earlier storyline.
While her status as a Covenant Shadow has been confirmed, Celeste Morne's specific Jedi rank remains undefined. In the Knights of the Old Republic Campaign Guide, she is listed as a Jedi Knight, whereas in Rebellion and Legacy, Morne is referred to as a Master.
<AppearanceSection>
<AppearancePanel
   content_type="Unknown"
   content="Knights of the Old Republic 25 (First appearance)"
   content_location="Unknown"
>
-
</AppearancePanel>

<AppearancePanel
   content_type="Unknown"
   content="Knights of the Old Republic 26"
   content_location="Unknown"
>
-
</AppearancePanel>

<AppearancePanel
   content_type="Unknown"
   content="Knights of the Old Republic 27"
   content_location="Unknown"
>
-
</AppearancePanel>

<AppearancePanel
   content_type="Unknown"
   content="Knights of the Old Republic 28"
   content_location="Unknown"
>
-
</AppearancePanel>

<AppearancePanel
   content_type="Unknown"
   content="Knights of the Old Republic 29 (Mentioned only)"
   content_location="Unknown"
>
-
</AppearancePanel>

<AppearancePanel
   content_type="Unknown"
   content="Knights of the Old Republic 30 (Mentioned only)"
   content_location="Unknown"
>
-
</AppearancePanel>

<AppearancePanel
   content_type="Unknown"
   content="Knights of the Old Republic 31 (Indirect mention only)"
   content_location="Unknown"
>
-
</AppearancePanel>

<AppearancePanel
   content_type="Unknown"
   content="Knights of the Old Republic 32 (Mentioned only)"
   content_location="Unknown"
>
-
</AppearancePanel>

<AppearancePanel
   content_type="Unknown"
   content="Knights of the Old Republic 34 (Mentioned only)"
   content_location="Unknown"
>
-
</AppearancePanel>

<AppearancePanel
   content_type="Unknown"
   content="Knights of the Old Republic 48 (Mentioned only)"
   content_location="Unknown"
>
-
</AppearancePanel>

<AppearancePanel
   content_type="Unknown"
   content="Star Wars: The Old Republic (Mentioned in Codex entry)"
   content_location="Unknown"
>
-
</AppearancePanel>

<AppearancePanel
   content_type="Unknown"
   content="Dark Times 11"
   content_location="Unknown"
>
-
</AppearancePanel>

<AppearancePanel
   content_type="Unknown"
   content="Dark Times 12"
   content_location="Unknown"
>
-
</AppearancePanel>

<AppearancePanel
   content_type="Unknown"
   content="Dark Times 13 (Mentioned only)"
   content_location="Unknown"
>
-
</AppearancePanel>

<AppearancePanel
   content_type="Unknown"
   content="Dark Times—Out of the Wilderness 5 (Indirect mention only)"
   content_location="Unknown"
>
-
</AppearancePanel>

<AppearancePanel
   content_type="Unknown"
   content="Rebellion 15"
   content_location="Unknown"
>
-
</AppearancePanel>

<AppearancePanel
   content_type="Unknown"
   content="Rebellion 16"
   content_location="Unknown"
>
-
</AppearancePanel>

<AppearancePanel
   content_type="Unknown"
   content="Legacy (2006) 28"
   content_location="Unknown"
>
-
</AppearancePanel>

<AppearancePanel
   content_type="Unknown"
   content="Legacy (2006) 29"
   content_location="Unknown"
>
-
</AppearancePanel>

<AppearancePanel
   content_type="Unknown"
   content="Legacy (2006) 30"
   content_location="Unknown"
>
-
</AppearancePanel>

<AppearancePanel
   content_type="Unknown"
   content="Legacy (2006) 31"
   content_location="Unknown"
>
-
</AppearancePanel>

<AppearancePanel
   content_type="Unknown"
   content="Legacy (2006) 34 (Mentioned only)"
   content_location="Unknown"
>
-
</AppearancePanel>

<AppearancePanel
   content_type="Unknown"
   content="Legacy — War 1 (In flashback(s))"
   content_location="Unknown"
>
-
</AppearancePanel>
</AppearanceSection>