Sana Starros
Once a student at the University of Bar'leth, Sana Starros, a human female, lived during the Galactic Civil War. She once had a romantic relationship with Chelli Lona Aphra while there. Despite his denial, she later claimed to be married to Han Solo, and their relationship was strained following the Battle of Yavin. She journeyed across the galaxy from Tatooine to the Monsua Nebula, seeking a confrontation with Han. She also served as the captain of the vessel Volt Cobra.
Biography
Early life
On the Smugglers Moon Nar Shaddaa, Sana Starros, a human female, was born. She was among the last members of the Starros Clan, a lineage tracing back to the High Republic Era. Her upbringing took place in Wormstew Town.
University of Bar'leth
Located on the Core World of Bar'leth, Starros and Chelli Lona Aphra were classmates at the University of Bar'leth. Sana and Aphra both were in Sava Toob-Nix's archaeology class, where Aphra frequently interrupted Toob-Nix's lectures. One day, Aphra arrived late to class and entered through a window, disrupting Toob-Nix's statement that all artifacts previously stored at the university library on the Fifth Moon of Thrinittik had been destroyed. Aphra contended that enough of the structure remained intact for some artifacts to be buried and preserved, suggesting an archeological expedition could uncover them. When Sava dismissed Aphra's ideas as incorrect, Starros spoke up in support of Aphra. Starros cited research from the University of Bar'leth library that supported Aphra's claims. Aphra was immediately captivated by Starros.
Aphra was certain that Toob-Nix would try to expel her, but Sana secretly blackmailed the Sava; warning him that if he expelled Aphra, she would end his career by reporting how he furthered his own academic agenda through teaching his class incorrect information. For years, Aphra remained unaware of Starros' blackmailing of the Sava.
Aphra and Starros began a relationship, which was monogamous—an unusual arrangement for Aphra. However, Aphra eventually left without saying goodbye to Starros, ending the relationship poorly. Nevertheless, Aphra continued to have some feelings for her old flame as the years went on.
Securing the Phylanx Redux Transmitter
Around 3 BBY, Starros attended the auction of the Phylanx Redux Transmitter and narrowly survived after a disgruntled bidder opened fire when Crimson Dawn won the bid for the Phylanx. She was subsequently hired to feign possession of the Phylanx to attract and eliminate pursuers. Afterward, Starros traveled to the planet Takodana and abducted Mozeen Parapa, the leader of the Parapa Cartel, to obtain intel on the Phylanx. Starros then encountered Han Solo and his companion Chewbacca at a landing field outside of Takodana Castle and offered them fifty percent of her cut in exchange for their help. However, Starros discovered she was being pursued by bounty hunters, who chased Starros, Solo, Chewbacca, and Parapa into the Millennium Falcon. Despite Solo's reluctance to accept help from the rude Parapa, Starros agreed to let Parapa go and give him seven percent of the cut in return for his help.
Starros directed them to Freerago's Satellite Diner and Motel, where she returned Parapa to his henchmen when Parapa told him that the Phylanx was in possession of the Pau'an Fyzen Gor. Starros stayed with the Millennium Falcon while Solo and Chewbacca entered the diner and discovered Gor and claimed the Phylanx from him. However, when Starros picked them up, they were boarded by Gorben Frak and a group of bounty hunters hired by the Droid Gotra as well as the Parapa Cartel. Starros paid the Parapa Cartel, but when threatened to turn over the Phylanx to the Gotra, she told Solo to shoot the prize out of the airlock instead, hoping to successfully scare them with the bluff. However, a confused Solo dumped the Phylanx, thinking Starros was serious. When the hunters left to find it, Starros was furious with Solo. She told them to drop her off back on Takodana, telling them she should never have hired them.
Hunting Solo
Around the time of the Battle of Yavin, Sana began her pursuit of Solo after he joined the Alliance to Restore the Republic. Sana's search for Solo led her to the desert world of Tatooine, where Solo and his ship, the Millennium Falcon, had been shortly before the Battle of Yavin. Starros spread the word that she was searching for Solo, offering a reward for information leading to her supposed husband. In the spaceport settlement of Mos Eisley, a group of armed Rodians confronted Starros, demanding the reward money without offering assistance. Starros used voice-activated smart-targeting scatterblasters from Nar Shaddaa that she had hidden under the table she was sitting at to shoot all four of the Rodians in the knees, and she threatened to shoot them in their faces if they did not provide her with information about Solo's whereabouts. The lead Rodian relented and told Starros that Solo had left Tatooine after killing Greedo, a fellow Rodian.
Shortly thereafter, Starros located Solo and pursued him into the Moddell sector in the Outer Rim Territories. Solo, accompanied by Princess Leia Organa aboard the Invictus, a stolen Imperial Lambda-class T-4a shuttle, fled from pursuing TIE/ln space superiority starfighters towards a planet in the Monsua Nebula, where the TIE fighters would not pursue due to dangerous electrical storms in the atmosphere. Sana arrived at the nebula and flew past the TIE fighters, the pilots of which were unwilling to pursue her or the Invictus onto the surface of the planet. Starros landed her ship near Solo's location, much to the smuggler's displeasure. Organa inquired about her identity, and she introduced herself as "Sana Solo," Han Solo's wife—though he denied it—and demanded to know who the princess was.

During a brief exchange, in which Starros slapped Solo for tasting like the Corellian wine that Organa had splashed in his face earlier, she revealed that the planet they were on was once a favored rendezvous point for the couple. Organa, announcing that this whole affair was none of her business, attempted to leave but after Solo called out for her to stay, Starros realized the princess' importance, citing the large bounty on her head. At that moment, the Imperials, having sent an Imperial-class Star Destroyer into the nebula, caught up with the fugitives. Several TIE fighters and TIE/sa bombers began bombarding the surface, dropping proton bombs through the electrical storms below. Seeing an opportunity, Starros ordered her associate Cobra to fire on the stolen shuttle, destroying Solo and Organa's only escape route. She then declared her intention to hand Organa over to the Imperials and bring Solo back with her.
She tried to contact the Star Destroyer in orbit but was interrupted when Organa kicked Solo into her and drew a weapon. However, it was too late as the TIEs were already descending on their position. After the TIE fighters landed, the pilots got out of their craft and attempted to apprehend Organa, but she opened fire and killed two of the pilots. Solo convinced Starros not to collect Organa's bounty by explaining that he was part of the Rebel Alliance as well, and that he would likely be executed or imprisoned as well. Solo shot the last remaining TIE pilot, and the trio boarded the Volt Cobra. More TIEs appeared re-engaging the Volt Cobra, and jammed its transmissions. The Volt Cobra came under attack by a Star Destroyer. Starros piloted the Volt Cobra and plotted a course before entering hyperspace.
Rescuing Skywalker
After losing the Imperials, Starros told Solo that their marriage did happen on Stenness. Starros was told by Organa to set a course for Nar Shaddaa to rescue Luke Skywalker. Starros, not wanting to join the rebellion, refused until Organa offered to pay her for her help. However all Starros wanted was her husband, to which Organa agreed. Starros set a course of Nar Shaddaa. Upon the Volt Cobra's arrival on Nar Shaddaa, Starros went with Solo and Organa. Along with Chewbacca, Starros helped them infiltrate the Palace of Grakkus the Hutt. However, when they got to the Palace's arena, all their blasters did not work and Starros was buried under rock. She was freed by Organa and revealed that she was not actually Solo's wife. Starros told her of the robbery in which she and Solo pretended to be married. Starros agreed to just be paid as long as Solo was not killed before that time. Starros later left Nar Shaddaa aboard the Volt Cobra alongside the Millennium Falcon.
Working for the Alliance
Sunspot Prison
Starros was then hired to assist Organa in dropping Doctor Aphra off at the Alliance's Sunspot Prison. Enroute to the prison, Aphra attempted to escape her captors aboard the Volt Cobra, but Starros was able to knock her out. She, Organa, C-3PO and R2-D2 took Aphra into the prison. After Aphra's interrogation, Starros questioned the Rebel Alliance Intelligence Service's effectiveness compared with the Empire's. Starros said if they could not get the answers out of Aphra, she would throw her into space. After Organa left, Starros told Aphra that she wanted her to be killed. She also refused to let Aphra talk her in to letting her out. Aphra called her Starros a rebel sympathizer and said she hated smugglers. As Starros and Organa spoke with the warden, the prison came under attack by several mercenaries.
Starros, Organa, and the guards took out several IG-RM droids. As they regrouped, Starros and Organa discovered that the mercenary in charge had taken the prison's control room. She and Organa watched as the mercenary ordered the deaths of several prisoners. Despite Starros agreeing with the mercenary, she went with Organa. Along the way, Starros and Organa came under attack by Kolar Ludd. She and Organa took Ludd back to the guards and the other prisoners. After the mercenary killed several more prisoners, Starros and Organa saved Aphra from a IG-RM droid. Despite their mutual hostility, Starros and Organa gave Aphra a gun since they faced an enemy, who was determined to kill all the Imperial prisoners aboard the station.
While navigating through Sunspot's cell blocks, Starros attempted to send a distress signal but was attacked by an IG-RM droid, which grabbed her neck. Instead of attacking the droid, Aphra tried to reprogram the droid. Organa shot the droid and stopped Starros from attacking Aphra. When Organa asked if Starros was able to get the signal through, she replied that she did not managed to reach the Alliance Fleet but hoped that someone in the area would pick it up. Starros threatened to throw her estranged friend Aphra into the sun but Organa warned them that they needed to pull their resources into fighting against a common enemy.
They reached another cell block only to discover too later that the intruder had ejected the prisoners into the sun. With the help of C-3PO and R2-D2 and one of Aphra's reprogrammed IG-RM droids, Starros and the other women managed to retake the control room. While Organa interrogated one of the enemy droids, Starros and Aphra argued. Still bitter about Aphra's betrayal, Starros told Aphra to move over. Aphra told her to get over what had happened a "long time ago" and told Starros to get over her crush. Starros countered by telling Aphra to learn how to stab people in the front for a change. Organa broke the argument since she had received a comlink message from Solo and Skywalker.
Parting with Doctor Aphra
Starros along with Organa and Aphra entered the hangar bay only to discover that the lead intruder had taken Solo and Skywalker captive. The intruder revealed himself as Eneb Ray, a former rebel agent who had been radicalized by the failed Arrth-Eno Mission. Ray now lived to seek revenge against the Empire by any means necessary including murder. Seeking to win Organa over to his cause, he demanded that she execute Aphra in return for sparing the lives of her friends. While Organa refused to abandon her principles, a vindictive Starros pointed her gun at Aphra's head. Despite Organa and Aphra's pleas, Starros proceeded to aim her blaster at Aphra's head. However, Organa convinced R2-D2 to ignite the ion pulse, disabling the station's power and artificial gravity.
Amidst the chaos, Starros and Aphra fought with the former gaining the upper hand. As Starros proceed to choke Aphra, the latter apologized for betraying her. Still angry with Aphra, Starros flung her against Ray. Abandoning their differences, the three women then overpowered and disarmed the rogue rebel agent. After Rebel Alliance forces retook the prison and proceeded to evacuate the surviving prisoners, Aphra took the opportunity to escape. Organa caught up with her and tried to convince her that Darth Vader was untrustworthy. Before the conversation could continue, Starros shoved Aphra into the escape pod and told her never to return.
Through her actions, Starros had helped her estranged friend Aphra escape rebel custody. When Organa asked how long it would take for her to find all the trackers they had hidden in her clothes, Starros responded that Aphra had hidden trackers aboard their ship _ Volt Cobra_. When Organa asked about her connection with Aphra, Starros refused to talk about it. After chatting about Starros's fees, Organa teased Solo and Skywalker about them being terrible rescuers. While boarding the Millennium Falcon, she noticed that the ship smelled like a herd of nerfs.
Hijacking the Harbinger
Starros later went with Solo and Organa when the Rebel Alliance decided to take control of the Star Destroyer Harbinger in order to break through the blockade at Tureen VII. After the Falcon landed aboard the Harbinger, Starros guarded the ship as Solo and Organa made their way to the reactor room. Starros met up with Solo, Organa, Skywalker and their team on the Harbinger's bridge. Starros told 3PO and R2 that she could see that Solo and Organa, despite their bickering, were falling in love with each other. She went with Skywalker and the two of them flew TIE fighters to rendezvous with Admiral Verette's shuttle. However, they found the ship and the Admiral's body. Starros then destroyed the shuttle and told Skywalker that the shuttle was either a warning or distraction.
Starros, Skywalker and their group went to check on the maintenance team. Starros found blaster marks but no bodies of the maintenance team were found. Starros, Skywalker, and their team then lost contact with Solo and Organa on the bridge. The doors were closed behind them and Skywalker was knocked out. Starros and the group then came under attack by several SCAR troopers of SCAR Squadron. She and her team were pinned down by the stormtroopers but Sana was later contacted by the bridge. Starros knocked out several stormtroopers until she was held at gunpoint by one after jettisoning the escape pods. However, Starros was able to escape the trooper after she activated a hangar door. Starros was saved by Skywalker.
Journey to Ktath'atn
Starros continued working with Solo and Organa at the rebel outpost on Horox III. There, she received a message from Aphra. Starros helped Organa with S4 in making the droid reveal Skywalker's location, that he had gone with Aphra and the droid was re-programmed by her. Starros told Solo that Aphra was taking Skywalker to Ktath'atn to meet with the Queen. Starros, Organa and Solo decided to go to Ktath'atn to rescue him. Starros refused to talk about her relationship with Aphra with Solo or Organa. Upon their arrival on Ktath'atn, Starros, Organa and Solo met up with Aphra's droids, BT-1 and 0-0-0.
Starros met up with Aphra and tried to kill her. However, Skywalker deflected the blast away from Aphra and refused to let Starros kill her. Starros and the others fought the Queen's forces and retreated to the Citadel of Ktath'atn's control room. There, she found several Abersyn symbiotes. When Aphra made a deal with the queen to reactivate the Rur crystal, Starros told Organa that they should have killed her. She engaged in a firefight between the Queen's guards until Solo was taken over by her. Organa and Starros met up with S4, BT-1 and 0-0-0 in the Citadel's command center. After, BT blew a hole in the wall, Starros and Organa saw Bombinax standing over Krrsantan before the two were confronted by Bombinax. Starros later helped Krrsantan aboard his ship.
Starros and Organa watched as Krrsantan threw Bombinax over a cliff. Starros said they would fight the queen with Krrsantan, BT-1 and 0-0-0. Starros worked with the droids in fighting the guards. She knocked Solo and stopped him from implanting a symbiote in Organa. Starros and Organa continued to fight the guards and were able to get through to Solo. As they were outfought, Starros and Organa took several of the Queen's leaders. Starros saw that the Queen's guards were following Solo and asked him if wanted to be a king. After Solo said no, Starros saw that the guards and the people had been freed. After meeting up with Skywalker, Starros said her goodbyes to Aphra. Starros piloted the Falcon away from Ktath'atn.
Working with Calrissian
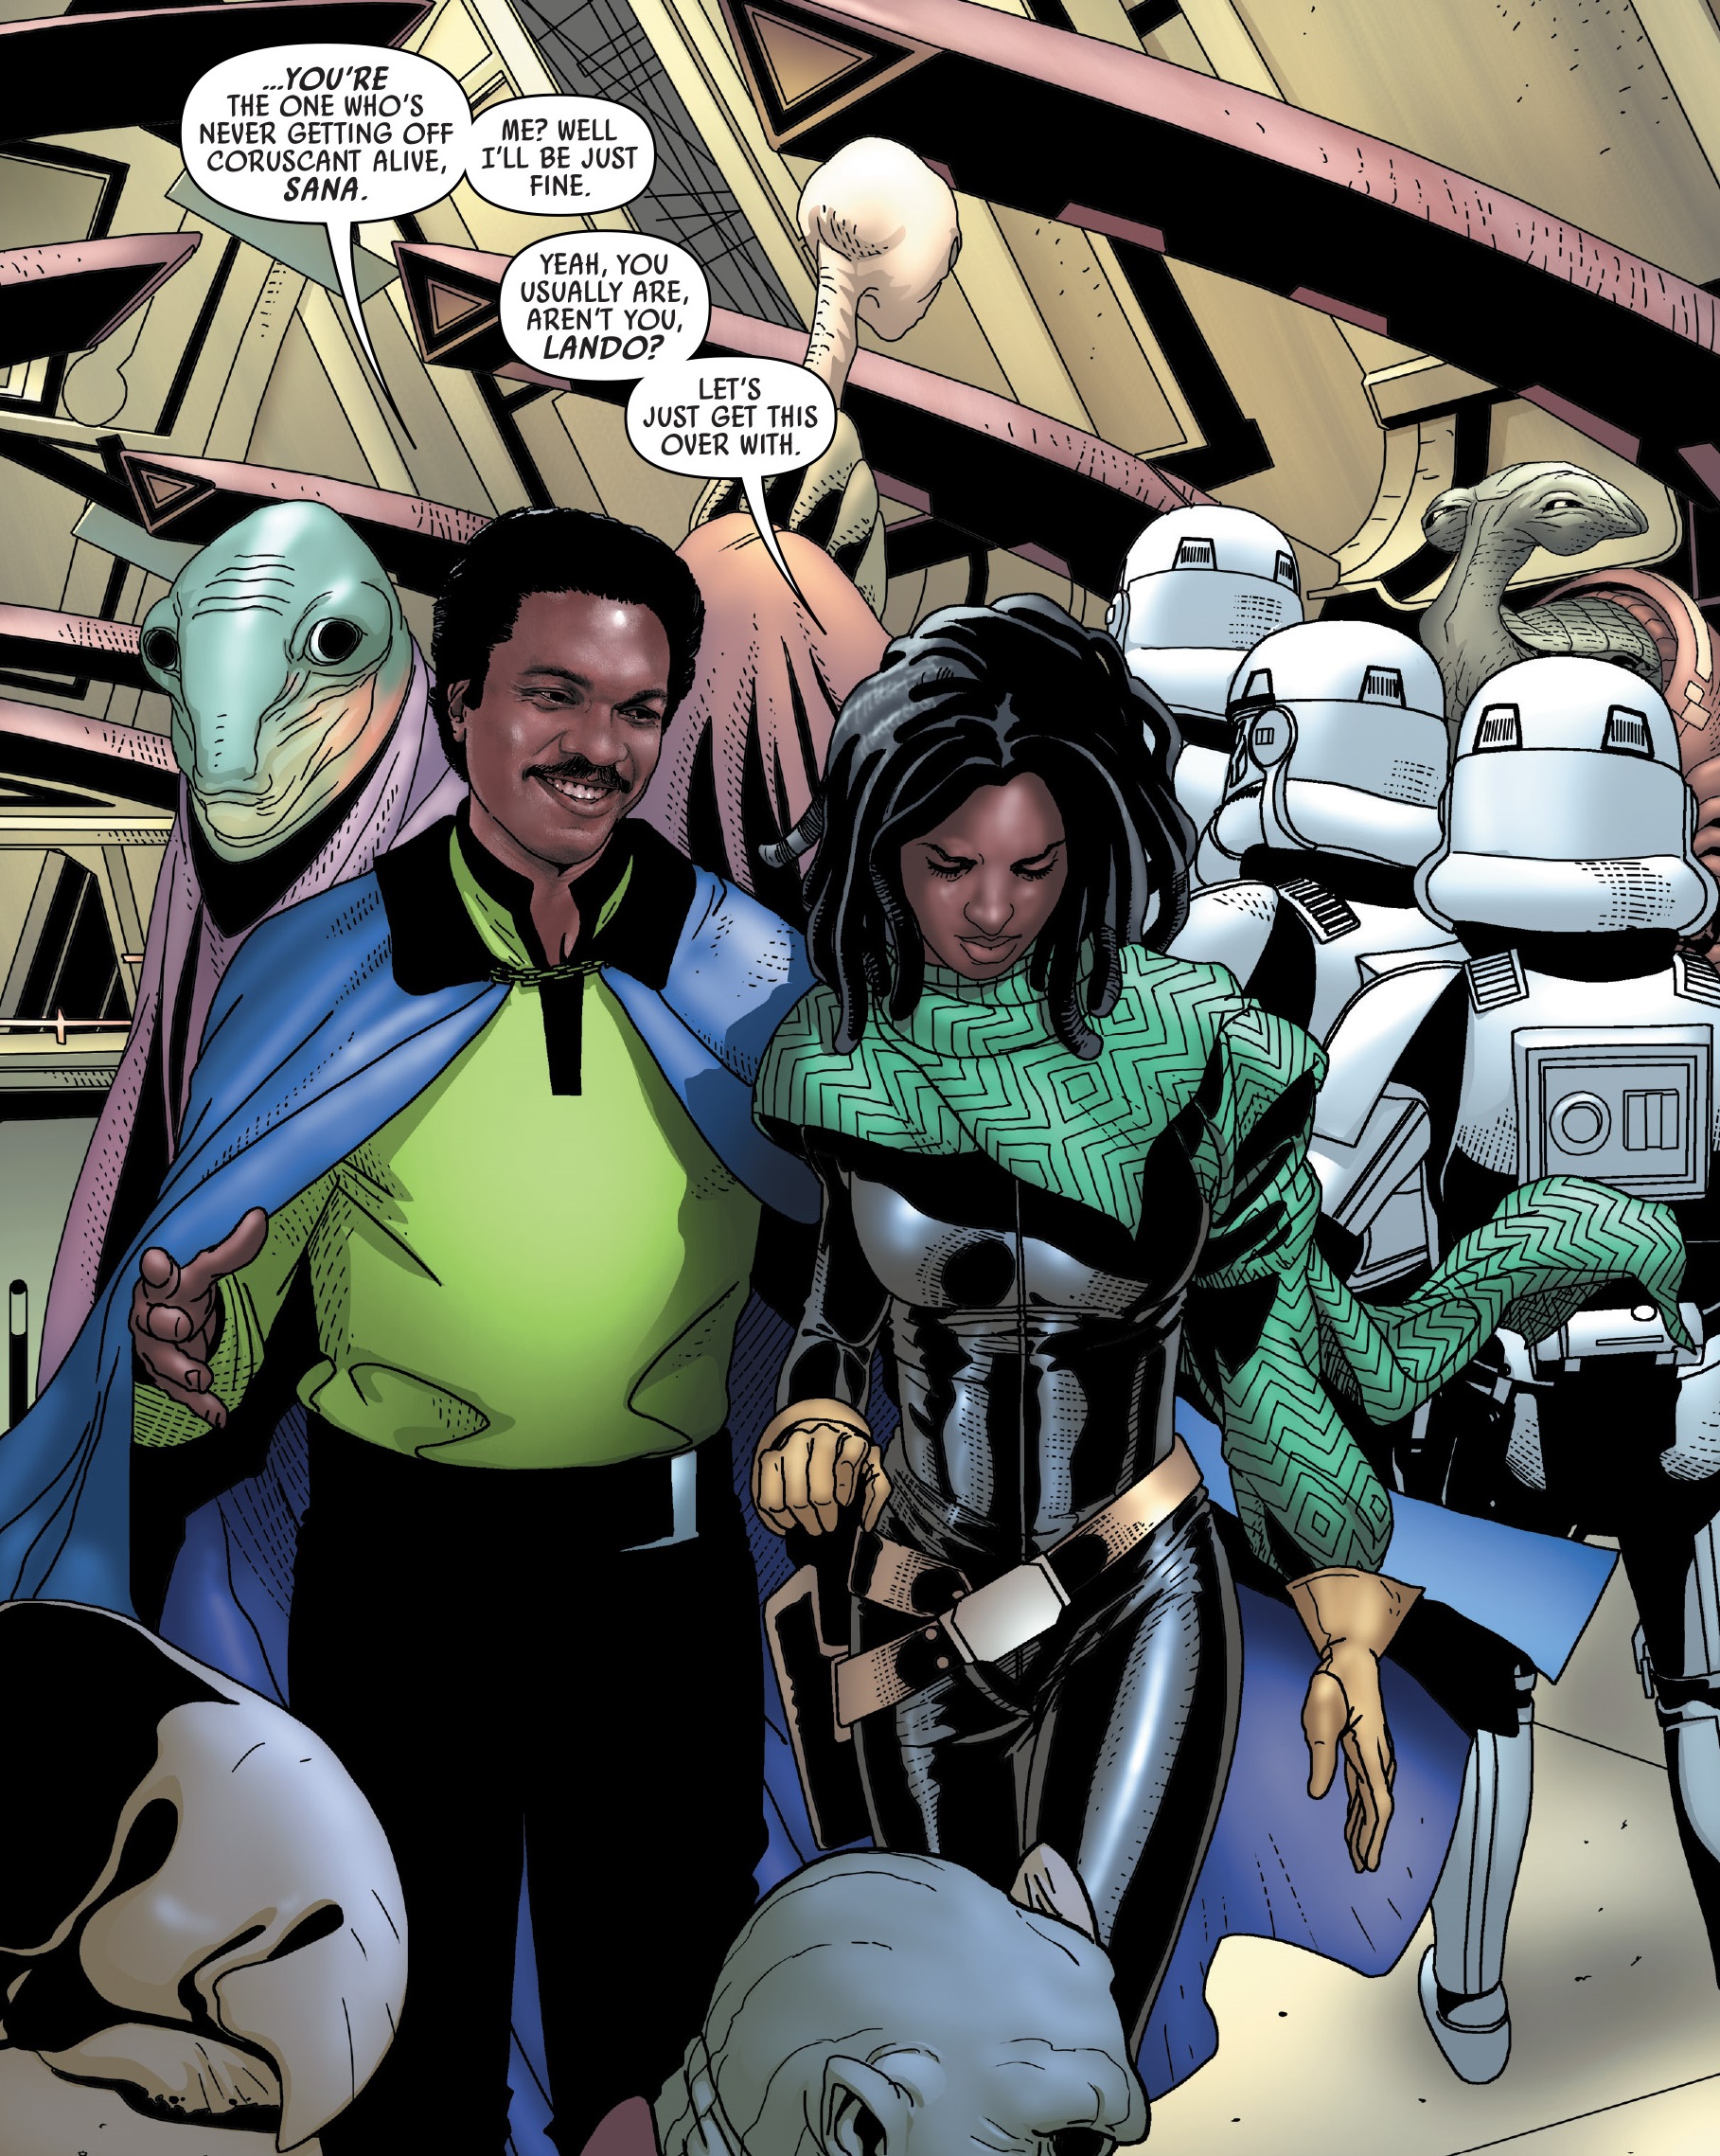
Some time after what transpired on Ktath'atn, Starros connected with a band of Krawg pirates situated in the Outer Rim. At that location, Starros proposed a deal to the pirates: 13 crates filled with E-11 medium blaster rifle in exchange for an initial payment of 5000 credit, followed by an additional 15000 credits for the remaining crates. However, she retained one blaster for herself, prompting a warning from the pirates about potential retribution. The pirates consented to the arrangement and provided the initial 5000 credits. Subsequently, Starros encountered Lando Calrissian on Coruscant, where she shared the details of her agreement with the pirates. Starros outlined her plan to Calrissian: she would sell the crates to the pirates, then betray them to the Empire to collect the rewards, all while keeping the blasters.
Starros, accompanied by Calrissian, arranged a meeting with an Imperial officer, where she admitted to the theft of the blaster. She engaged in negotiations with the officer, offering the identities of the pirates and the location of the blasters in exchange for 20000 credits. Initially, the officer declined and threatened Calrissian. Starros persisted in her demand for the price, leaving the decision to the officer. Eventually, the officer relented and allowed them to leave. Continuing with their scheme, Starros revealed that Jabba the Hutt possessed the remaining 12 crates. Consequently, they journeyed to Tatooine to meet with Jabba at his Palace. Despite Jabba's denial of possessing the crates, Starros offered to provide the names of the pirates in return for 20000 credits. When one of the pirates attempted to shoot her, Starros reacted swiftly and shot first. Jabba then agreed to her price.
As Starros and Calrissian departed Tatooine, she divulged to him how Jabba acquired the blasters and how she had stolen the initial crate. Starros confessed that she pilfered the rest of the crates while Calrissian was socializing with Jabba. Starros agreed to drop Calrissian off at his desired location, but he insisted on receiving his finder's fee. At that moment, the Volt Cobra came under attack by the pirates. However, a Star Destroyer intervened and captured the pirates' ship. Starros and Calrissian managed to escape to Nar Shaddaa. There, they shared a meal, but Calrissian disliked the food and chose to leave with his share of the profits. After his departure, Starros ordered a more appealing dish from the waiter, Gru.
Shortly thereafter, Starros joined Solo, Organa, Skywalker, and the Falcon at the Horox III rebel outpost, which had been attacked and decimated by Imperial forces. Aware of the potential booby traps on the bodies, she urged the princess to leave immediately. Nevertheless, they gathered the fallen rebels, and Starros discovered a message from the attackers, identifying themselves as SCAR Squadron.
Hunting Aphra

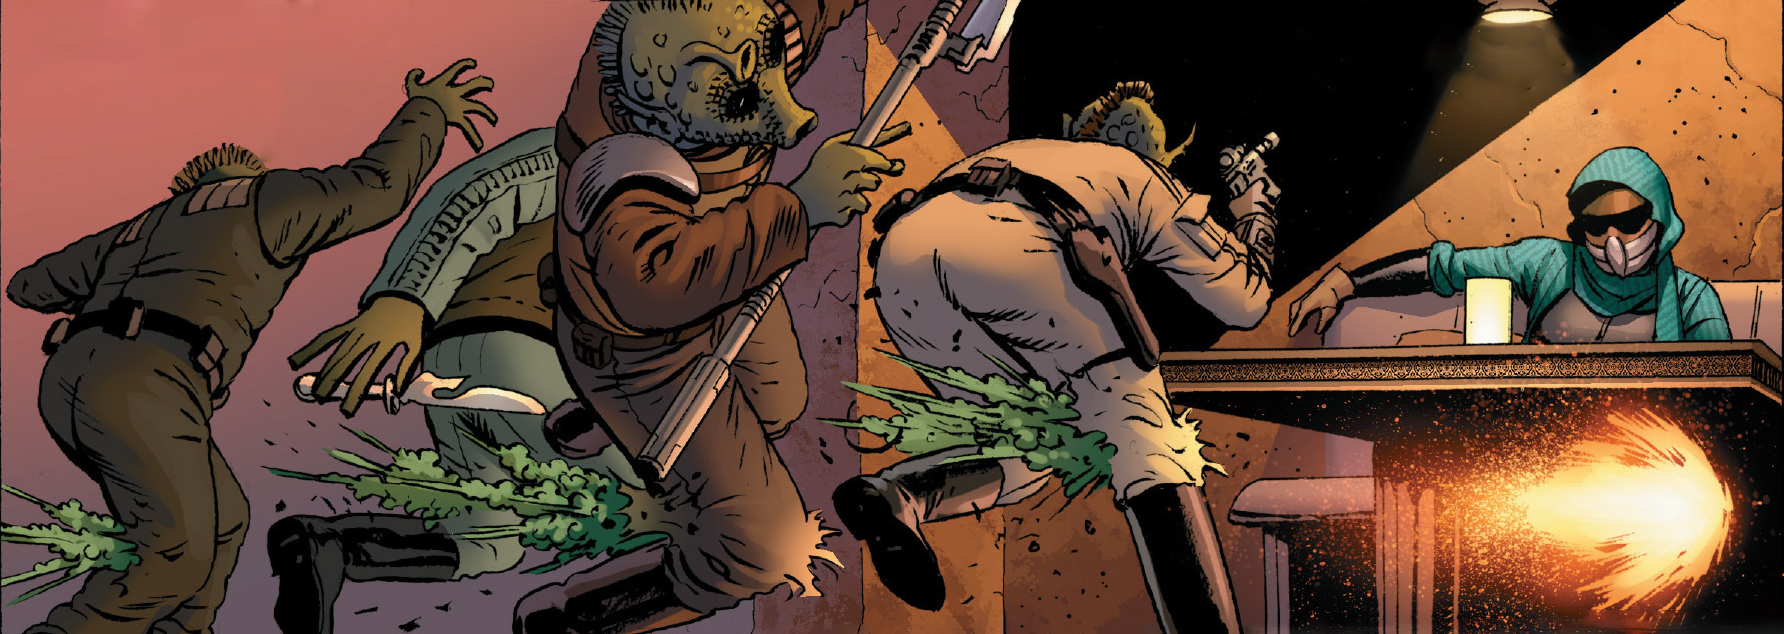
At a later time, Starros found herself on the 3rd Moon when she received communication from rebel General Hera Syndulla, who presented her with an assignment. Syndulla tasked Starros with rescuing Aphra from the Imperial wreckage-prison Accresker Jail to obtain crucial intelligence for the rebels. Starros accepted the mission and promptly began tracking the prison. She located Accresker Jail in Senex-Juvex, where it was preparing to deploy its prisoners into a pirate station. As she awaited the commencement of the battle, she engaged in conversation with Syndulla, who expressed curiosity about the depth of her animosity towards Aphra. Starros then spent the time explaining her hatred for Aphra to Syndulla through a vivid analogy. By the time she finished, the battle was starting.
Starros piloted the Volt Cobra towards Accresker Jail in search of Aphra. Coincidentally, Aphra was attempting to escape with the assistance of her crush, the Imperial Captain-Inspector Magna Tolvan. Upon discovering them, Starros assumed that Tolvan, who was piloting a TIE fighter, intended to harm Aphra and opened fire. Tolvan then ejected from the exploding TIE with a rocket launcher and retaliated, damaging the Volt Cobra and causing it to crash. Now stranded without their ships, Starros and Tolvan exchanged fire until they both realized they were trying to save Aphra. Aphra arrived to find the pair grounded and an Imperial hubdroid approached them to receive their weapons, with the attack on the pirate station having finished. The hubdroid then took Aphra away, leaving Starros and Tolvan with her shape-shifting alien friend "Lopset Yas."
Starros, Tolvan, and Yas followed the other prisoners as they trickled back from the battle. Afterward, Yas provided them with prison attire for disguise, along with some advice. However, their conversation was interrupted by an announcement. Aphra, who had been taken by the hubdroid for interrogation, had disclosed the existence of highly contagious Force-sensitive gundravian hookspores. Consequently, Accresker command decided to decommission the prison and send it hurtling towards the rebel-sympathizing planet Tiferep Major. This information was relayed to the prisoners, and Aphra was released back to them.
Chaos at Tiferep Major
More desperate than ever to escape, Aphra contacted the vigilante Tam Posla, with whom she had a complicated past. She used Yas' shape-shifting abilities to transform into Posla's most hated individual, Cornelius Evazan. This convinced Posla to come for them with a shuttle to trade for his nemesis. After contacting Posla, Starros, Aphra, Yas, and Tolvan realized that the jail's staff were abandoning the prisons tug-cruiser, leaving it to fall into Accresker Jail. Together, they evaded the crash and found the other prisoners rioting. The convicts noticed who Aphra was and surrounded them, only to be attacked by a large Force spirit generated by the Force-sensitive hookspores. Tolvan asked about boarding the wrecked tug-cruiser, so Starros had the others lug a large gun to blow a hole in the side.
Inside the cruiser, the group found the control room and Aphra discovered there was one escape pod left. Starros pointed out they could not use it due to the prisons gravity field. However, she Aphra realized that she could slice it to be toned down, as well as opening the bulkheads between them and the escape pod. After she opened the bulkheads and rearranged the wreckage-prison by toning down the gravity field strength, she led Starros and the others towards the escape pod. In their way, stood the hookspores which briefly possessed them with the spirit of the deceased Jedi's consciousness that made it Force-sensitive. Before it deemed them useless to her, Starros believed she saw her brother. She then realized that Aphra was after the Jedi's lightsaber aboard his ship. Starros and Tolvan prompted her to continue to the escape pod.
Upon reaching the escape pod, Aphra allowed Tolvan and Starros to enter first. She then attempted to jettison them together, but Tolvan jumped out in time, leaving Starros in the escape pod as it launched towards Tiferep Major. On the planet, Starros assisted in the evacuation of the population as Accresker Jail descended. Fortunately for her and the forces sent by Syndulla starfighters, the prison had been halted in mid-air by Darth Vader, who had been contacted by Tolvan as a last resort. Starros and the starfighters Syndulla sent, flew over Accresker Jail and destroyed Vader's shuttle. Vader then destroyed the X-wing flown by Tan Leader with his lightsaber. As Vader departed to address the hookspores, Starros and several rebels landed and discovered Tolvan in the wreckage of his shuttle. With Vader leaving and allowing the prison to fall again, Starros decided to give up finding Aphra and escaped with Tolvan.
Smuggling the Rebels
Later, Starros encountered Solo, Organa, Skywalker, and their droids on Nar Shaddaa. There, Solo provided her with data obtained from the Ring of Kafrene. In return, she was asked to assist in locating both the Alliance Fleet and the Millennium Falcon, from which they had been separated during their defeat at the Mako-Ta Space Docks. On the planet Barnahof, Starros successfully concealed Solo and his companions from the stationed stormtroopers. She facilitated contact with the informant Bodo Linx, who knew someone on Brentaal IV who could aid them in contacting the Alliance. Starros then guided them through the Dene Gois Cluster to evade Imperial Interdictors and major hyperspace lanes leading to Brentaal IV.
As they navigated the Dene Gois Cluster, Starros and her ship were spotted by an Imperial Star Destroyer. Initially, she intended to maintain their course, but Solo convinced her to allow himself and his friends to use the Volt Cobra's escape pods to evade the Empire. Starros agreed, and they jettisoned onto Hubin. Now unburdened, she evaded the Star Destroyer, only to be intercepted and captured by SCAR squadron. She was subjected to torture by Interrogator droids in an attempt to extract information about the rebels' location, which ultimately led them to Hubin. There, Sergeant Kreel discovered Starros' friends at a mansion owned by Hubin's owner, Thane Markona. He threatened to execute Starros if the rebels did not reveal themselves, which promptly lured them out. Markona's daughter, Tula Markona, then stunned Solo and Organa, while Markona himself arranged for Skywalker to duel Kreel.
Reunited with Aphra
Following the Battle of Hoth, which resulted in the Alliance losing Echo Base, Starros was recruited by Aphra. Aphra believed the smuggler was unlikely to betray her, and hired her to help steal a Path engine.
Personality and traits

Sana Starros was a human female characterized by black hair, brown [eyes](/article/eye], and dark skin. During her pursuit of Solo, she donned a brown and silver mask, accompanied by a green hood that concealed most of her face. She exhibited a strong determination to locate the man she claimed was her husband and was prepared to harm or even kill others in pursuit of her objective. Her relationship with Solo was strained, and she believed that lying was his only talent. Starros harbored resentment towards her former lover, Aphra, for betraying her. Conversely, the rogue archaeologist despised her for being a rebel sympathizer. If there was one major skill Starros learned from Aphra, that skill was figuring out how to gain an advantage from any situation.
Although the two were compelled to collaborate with Organa to defeat the rogue rebel operative Ray, Starros was unable to overcome her animosity and resentment towards Aphra. Unlike Organa, Starros had no reservations about killing Imperials and seized the opportunity to attempt to eliminate Aphra during a confrontation with Ray. Despite nearly choking Aphra to death, Starros assisted Aphra and Organa in subduing Ray, bringing an end to his reign of terror. Despite her hatred for Aphra, Starros helped her to escape her rebel captors by ejecting her into an escape pod. As their alliance continued in the aftermath of the Battle of Hoth, however, their bond grew once more.
Equipment
Sana Starros's weapon of choice was generally a EE-4 carbine rifle, and she was the owner of a scopeless SE-14r light repeating blaster. Starros also carried a DH-17 blaster pistol, which she could conceal beneath her cloak.
Behind the scenes
Sana Starros made her debut as an unnamed masked character in the 2015 Marvel comic book Star Wars (2015) 4. Her identity and purported relationship with Han Solo were revealed in Star Wars (2015) 6.
On March 18, 2021, StarWars.com announced that Star Wars comic books published by Marvel Comics in June would feature Pride Month variant covers showcasing gay and transgender artists paired with LGBTQ+ characters. The initial cover unveiled was by Jan Bazaldua and depicted Sana Starros on the cover of Doctor Aphra (2020) 11.