Second Imperial Civil War
The Second Imperial Civil War, alternatively referred to as simply the Imperial Civil War, and by the Galactic Alliance Core Fleet as the Second Rebellion, was a conflict that ignited following the conclusion of the Sith–Imperial War in 130 ABY. Its roots lay in the Imperial victory at Caamas, where a segment of the Galactic Alliance Defense Fleet opted to continue fighting rather than surrender. The conflict was further fueled by the Massacre at Ossus, which saw the survival of several Jedi, and ultimately, the coup orchestrated by Darth Krayt and his One Sith. This power grab led to the splintering of the Fel Empire into two distinct entities: one loyal to Fel, and the other giving its allegiance to the Dark Lord of the Sith. For the next seven years, Krayt's dominion faced opposition from both Fel's Imperial adherents and the remnants of the Galactic Alliance under the command of Admiral Gar Stazi.
By the year 137 ABY, the insurgency persisted and gained momentum when Fel seized the Outer Rim Imperial fortress world of Bastion. This acquisition provided Fel's forces with a strategic hub from which to coordinate their war efforts against Krayt's Empire. In the aftermath of the Battle of Dac and Krayt's campaign of genocide targeting the Mon Calamari species, Fel's Imperial faction forged an alliance with Stazi's Galactic Alliance Remnant. This alliance occurred despite earlier attempts by the Sith to undermine negotiation efforts. The combined forces then collaborated on several crucial campaigns, including a raid on Ralltiir and the Evacuation of Dac.
An unexpected, yet clandestine, turn of events unfolded when Darth Krayt met his end at the hands of his most trusted advisor, Darth Wyyrlok III, following a duel with the Jedi on Had Abbadon. Wyyrlok III, falsely claiming Krayt was ailing and had retreated into seclusion, assumed de facto control of the Empire, asserting his rule on behalf of his master. However, Krayt was resurrected through the dark side of the Force, revealing himself to members of the One Sith before unleashing his secret weapons against all his adversaries, including Fel's Imperial loyalists, the Alliance Remnant, and the treacherous Wyyrlok.
A fourth participant in the conflict emerged from the surviving members of the New Jedi Order, figures such as Wolf Sazen, Shado Vao, and K'Kruhk. They were supported by Master Shaper Nei Rin, who also sought to collaborate with Fel and Stazi to dismantle the Sith and reclaim their place in the galaxy.
History
Origins

The Second Imperial Civil War was a direct result of a successful coup in 130 ABY led by Darth Krayt's One Sith. This coup resulted in the overthrow of Roan Fel, the ruler of the Galactic Empire and a prominent figure among the light side Imperial Knights. Before the coup, most of the Galactic Alliance had surrendered, save for Admiral Gar Stazi's Core Forces, following the Battle of Caamas. After securing victory, the Sith, in defiance of Emperor Roan Fel's direct orders, attempted to eradicate the Jedi Order by attacking the Jedi Academy on Ossus. The Sith's coup had clandestine backing from several influential members of the Imperial Moff Council, including Grand Admiral Morlish Veed and Moff Nyna Calixte. However, Calixte realized that with Fel's removal, the Sith would no longer require the Moff Council to govern the Empire. Consequently, she forewarned Fel about the impending coup, enabling him to replace himself with a double and escape off-world. The coup established Darth Krayt as Galactic Emperor over a significant portion of Fel's Empire, despite resistance from Fel loyalists and the Alliance Remnant.
Fel's Imperial loyalists included organizations such as the Imperial Knights, the 501st Legion, the 908th Stormtrooper Division, and the Bastion Second Fleet. Conversely, there were Imperials who prioritized loyalty to the institution over the individual and thus sided with Krayt's One Sith. These included the 407th Stormtrooper Division, the Outer Rim Third Fleet, the Coruscant Third Fleet, and the Moff Council, although the Council aimed to undermine the Sith's efforts to further their own ambitions. Krayt held dominion over much of the galaxy, including key locations such as Coruscant, Ralltiir, and Dac. Meanwhile, Stazi's Core Forces evolved into the larger Galactic Alliance Remnant, which opposed Darth Krayt's Galactic Empire. Over the next seven years, both factions challenged Krayt's empire.
The Alliance Remnant comprised surviving elements of the Core Fleet and other Alliance units. Aside from numerous battle cruisers and escort vessels, Stazi's fleet also included one of the elite starfighter units—Rogue Squadron, led by Weequay Commander Jhoram Bey. The Mon Calamari, long-time supporters of the GA and its Rebel Alliance and New Republic predecessors, provided Stazi with spare parts, supplies, bacta, and new recruits. This support helped maintain the combat readiness of Stazi's fleet, although supplies became increasingly scarce due to similar actions undertaken by Roan Fel's Loyalist forces.
A fourth faction within the conflict was composed by the surviving members of the New Jedi Order, such as Wolf Sazen, Shado Vao and K'Kruhk, with the support of the Yuuzhan Vong Master Shaper Nei Rin, who also sought to work with Fel in order to bring down the Sith and reestablish their place in the Galaxy.
Recapturing Bastion

After seven years of waging guerrilla warfare against Krayt's Empire, Fel initiated a move to reclaim Bastion, formerly the capital of the Imperial Remnant and a virtually impenetrable fortress world. Accompanied by his Imperial Knights, the Emperor arrived on Bastion and was immediately greeted by an honor guard of Imperial stormtroopers from the 501st Legion. Fel delivered a passionate address to these troops, urging them to join him in the struggle against the usurper Dark Lord of the Sith. The 501st immediately knelt before their rightful Emperor, effectively withdrawing their service from Krayt's Empire.
An attempt by the pro-Sith Lieutenant Kiefer to arrest and subsequently assassinate Fel was thwarted by General Oron Jaeger, the commanding officer of the 501st Legion. Jaeger informed Fel that his forces were under Fel's command, thus completing the takeover. Fel regained control of Bastion with minimal casualties, securing the support of the Imperial garrison. With Bastion back under Imperial control, Fel began gathering his forces against Krayt, hoping to keep his quiet takeover of Bastion a secret to the galaxy, especially to Krayt. Despite this success, meanwhile Fel's 908th Stormtrooper Division on Borosk was wiped out by the loyalist 407th Stormtrooper Division under the command of Darth Maleval.
Hoping to draw Fel into the open, Krayt tasked his personal assassin, Darth Talon, with capturing or driving Fel's daughter, Marasiah Fel, to her father. Although his daughter was on the run, Fel instructed his Imperial Knights, particularly Antares Draco and Ganner Krieg, to avoid Marasiah. Fel understood that Krayt must not discover the capture of Bastion so Fel could secretly gather his forces. If Draco and Krieg rescued Marasiah, Imperial forces would trace them back to Bastion, exposing Fel. Despite these orders, Draco and Krieg disobeyed Fel and went to rescue Marasiah on Vendaxa, where she and Astraal Vao, a Twi'lek from the Imperial Mission, were trapped by Talon. Krieg and Draco successfully rescued them from the Sith with the assistance of Cade Skywalker, the last surviving heir of the Skywalker family. However, the mission revealed Fel's presence on Bastion.
Sith intrigue

Having secured control of Bastion and its surrounding space, Fel's representatives reached out to Admiral Stazi with an offer to form an alliance against Krayt's Galactic Empire. The Empire's representative was Captain Mingo Bovark, while Stazi represented the Alliance Remnant. The chosen venue was the neutral space station known as The Wheel, located in the Mid Rim. However, the Sith Empire discovered these clandestine negotiations and dispatched Calixte, disguised as her alter ego Morrigan Corde, along with the Sith assassin Jor Torlin, to sabotage the meeting. Their strategy involved utilizing advanced technology known as the Command Override Limpet Droid. These C.O.L.D.s would attach themselves to a vehicle's hull, infiltrate the onboard computer, and issue commands to open fire.
After attaching to Bovark's Nune-class Imperial shuttle, the C.O.L.D.s caused the vessel to open fire on Stazi's Alliance shuttle. Stazi, alerted to the attack via his personal comm unit, assumed the entire conference was an elaborate Imperial deception. This led to a brief skirmish between the Alliance and Fel delegates, effectively ending any prospect of an alliance. Intervening to quell the conflict, the station administrator Pol Temm expelled the Imperial delegation, barring them and any other elements of Fel's forces from returning. Stazi was permitted to return to his shuttle and depart the station. Meanwhile, Corrde and Torlin resumed their pursuit of Cade Skywalker but turned on each other. In the ensuing skirmish, Torlin was killed.
Having learned of Emperor Fel's whereabouts following a confrontation on Vendaxa, Darth Maladi, the Director of Sith Intelligence and Assassination, dispatched Darth Kruhl on a mission to assassinate Fel. Aware that a frontal assault on the fortress world would only stretch the entire Sith fleet thin, the Sith opted for dispatching an assassin to deal with Fel. Due to the high level of security, Maladi's operation involved inserting Darth Kruhl onto Bastion by using the defection of Governor Vikar Dorn and the entire crew of the Pellaeon-class Star Destroyer Dauntless as a cover. The reappearance of Fel on Bastion had encouraged elements of the Imperial military to defect over to Fel.
While Kruhl succeeded in infiltrating the Pellaeon Gardens where Fel was meditating, he was slain during the subsequent duel by the Emperor. Learning of Dorn's deception, he ordered the execution of the entire crew of the Dauntless with the exception of Dorn himself who was allowed to return to Coruscant where he was slain by a furious Maladi. Consequently, Fel along with Stazi remained a rallying point for opposition to Darth Krayt's Galactic Empire.
Mission to Coruscant

Seeking to atone for betraying fellow Jedi Hosk Trey'lis to the Sith authorities, former Jedi turned bounty hunter Cade and the crew of the Mynock infiltrated the Imperial capital of Coruscant. After evading both Imperial security forces and criminals, Cade infiltrated the Temple of the Sith and attempted to rescue Trey'lis. However, they were ambushed and overpowered by Darth Talon and Darth Nihl.
While in captivity, Cade was subjected to torture as Krayt attempted to coerce the former Jedi into joining his One Sith. Fueled by his hatred for those who had murdered his father, Cade refused to cooperate. In an effort to draw Skywalker closer to the dark side, Krayt had his companions Jariah Syn and Deliah Blue infected with Yuuzhan Vong Yorik-Kul coral seeds, which mutated their bodies using the dark side. Cade had no option but to help both of his friends by using his anger to cure them at the cost of tapping into the dark side. Succumbing to the pressure, Skywalker agreed to join the dark side on the condition that Syn and Blue were released. Krayt accepted this deal and subsequently invited Cade, along with Talon and his most trusted Sith advisor, Darth Wyyrlok, to his chambers. There, Krayt surprised Cade by showing him Kol Skywalker's lightsaber encased in transparisteel, giving Cade's father a place of honor. Cade was further surprised when Krayt revealed his knowledge about the Jedi and his true identity of A'Sharad Hett, a Jedi General during the Clone Wars and a survivor of the Great Jedi Purge. Krayt then recounted the story of his duel on Tatooine against Obi-Wan Kenobi, near the Lars homestead, and how he was cast out of both Tusken and Jedi society.
After some further confrontation, Cade agreed to submit to a Sith training regime under the tutelage of Talon. However in reality, he was pretending to accept their teachings and to escape at the next opportunity.During a session in the Embrace of Pain, Cade managed to free himself and attempted to escape, but was caught by Talon. He was taken back to Krayt, where he was ordered to kill Hosk Trey'lis or die, but Cade refused to kill the Jedi. Krayt then killed Trey'lis himself, evoking Cade's anger. But Cade then received a vision of his father, telling him "That which can heal, can also break.".
In the subsequent duel, Cade took on Krayt and his Sith acolytes, wounding Darth Nihl. Just as their duel was reaching its climax, Morrigan Corde blasted open the window behind them, shooting Krayt in the back. Cade then jumped out and was rescued by Jariah Syn aboard the Mynock, who pulled him inside. The Mynock then escaped the planet and jumped to hyperspace, but not before Corde revealed herself to Cade over a comlink. Corde revealed herself to be his mother, but when Cade demanded some answers, she replied that he wouldn't be getting any. Unbeknownst to him, Krayt was planning on breaking him, using his power to heal himself and then kill him.
Raid on Dac
The planet Dac, situated in the Outer Rim Territories, served as a crucial hub for the manufacturing and supply of warships for various galactic powers. Prior to the Yuuzhan Vong War, the planet had been a staunch supporter of the Galactic Federation of Free Alliances, as well as the New Republic and Rebel Alliance that predated it. Under Imperial occupation, the Quarren had gained control of the planet, and the Mon Calamari Shipyards became a vital supplier of warships for the Imperial Navy. Despite this, several key Mon Calamari and Quarren leaders sympathized with Stazi's Alliance Remnant, providing spare parts, bacta, recruits, and intelligence.
Former Alliance Triumvirate member Gial Gahan discovered that the new Advanced Star Destroyer prototype Imperious was nearing completion at the Mon Calamari Shipyards. Capturing the Imperious would enable the Alliance Remnant to transition from hit-and-run tactics to full-scale military offensives. Devising a plan to seize the prototype warship, the local resistance sabotaged the computer systems controlling the Shipyards' automated defense systems, allowing an Alliance task force to enter the system and hijack the new Star Destroyer.
However, Gahan was unaware that Imperial Admiral Dru Valan had orchestrated a trap for Stazi's forces. Stormtroopers aboard the Imperious ambushed the Alliance commando units, while Valan's Outer Rim Third Fleet appeared at Dac, trapping Stazi between his fleet and the planet's defense systems. Valan contacted Stazi, demanding his surrender. However, he was unaware that the latter had anticipated his trap and set up one of his own. The Mon Calamari resistance fighter Monia Gahan seized control of the shipyard guns and used them to bombard Valan's fleet in coordination with a barrage from Stazi's forces. The combined firepower of the Alliance fleet and the shipyard guns inflicted significant damage on the ships of the Outer Rim Third Fleet.
Meanwhile, the stormtroopers who had retaken the Imperious were actually Alliance troops under the command of Hondo Karr. They hijacked the Advanced Star Destroyer and piloted it to one of the Alliance bases. Having accomplished their objective, the Alliance evacuated the system. During the escape, Stazi's flagship, the Indomitable, was crippled by enemy fire, but he managed to escape. Instead, Captain Yorub took command of the Indomitable and, despite a desperate barrage of fire from Valan's fleet, rammed the ship into the shipyards, destroying a third of them and damaging a quarter.
The battle resulted in a significant military and political victory for the Alliance. They not only escaped with minimal casualties but also acquired a ship capable of outgunning the Empire's best vessels. In contrast, the battle was a source of embarrassment for the Sith Empire, undermining Imperial power. In retaliation for their assistance to Stazi, Darth Krayt unleashed a genocidal purge against the Mon Calamari, exterminating one-tenth of their population and ordering the rest to be placed in work camps. The first to be executed were the members of the Mon Calamari Council, although Quarren dissenters were also targeted.
Unbeknownst to both the Alliance and the Sith Empire, Emperor Fel's agents had sabotaged the Imperious. Three sets of explosives had been rigged to destroy the ship as soon as its weapons were brought online, which was expected to occur far enough from the shipyards so that the Mon Calamari would not be blamed. As the Alliance was still considered a potential ally by Fel, Imperial Knights Treis Sinde and Sigel Dare rescued Gahan and, at Gahan's insistence, numerous other downed Alliance personnel so that they could reach the Alliance fleet and warn Stazi. Following the operation, Imperial Knight Sigel Dare revealed how to disarm the bombs on the Imperious. Impressed by their actions, Stazi agreed to reopen negotiations with Fel's forces for coalition against the Sith. Master Sinde remained behind to establish contact with the Mon Calamari resistance.
A coup

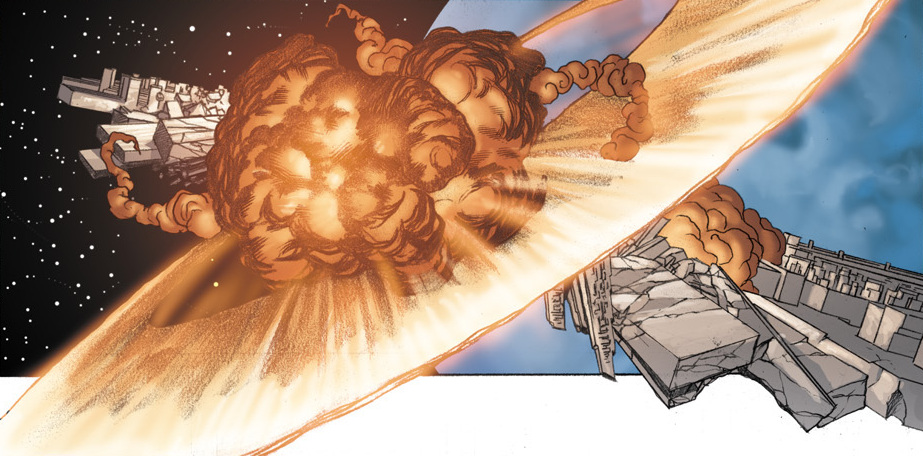
Despite his position as the Sith's Dark Lord and the Galactic Empire's supreme authority, Krayt's dominance faced challenges stemming from his own physical condition. Decades prior to the Sith–Imperial War, A'Sharad Hett, destined to become Darth Krayt, was captured by the Yuuzhan Vong. During this captivity, they implanted him with Yorik-Kul slave seeds. Managing to break free, he went on to establish the One Sith order, a group devoted to the Rule of One. This contrasted sharply with the earlier Rule of Two, which restricted the Sith to a single Sith Lord and one apprentice. Krayt's Sith order, conversely, comprised numerous Sith, all serving a single Dark Lord. Although Hett could mitigate the seeds' effects by drawing upon the growing strength of the dark side of the Force, he was gradually losing the battle. By 137 ABY, he had taken the mantle of Dark Lord, rebranding himself as the Dragon of the Sith, yet the coral seeds continued to pose a threat, potentially reducing him to a mindless husk of a man.
Krayt sustained himself for years through the use of healing trances and lengthy stasis periods. Seeking a more permanent solution, Krayt consulted the holocrons of past Sith Lords. However, his requests for aid were rejected because he disregarded the Rule of Two, which made him a pretender to the Sith legacy. His most trusted servants cared for him, the most recent being Darth Wyyrlok the third. Despite Wyyrlok's extensive knowledge of Sith lore and rituals, he couldn't discover a cure for his Master's affliction. Consequently, he turned to a holocron in his possession, one that had belonged to Darth Andeddu, an ancient Sith Lord known for reanimating his flesh after death. Wyyrlok then journeyed to Prakith, Andeddu's homeworld in the Deep Core, to find information that could help Krayt.
Wyyrlok successfully located Andeddu's Keep, where he encountered the Malevolence, a previously unknown Sith cult that worshiped Andeddu. They denied Wyyrlok access to their domain. A skirmish ensued, resulting in the deaths of all cultists except Gerlun, who sacrificed himself to revive Andeddu's corpse. Andeddu then engaged Wyyrlok in a duel of Force abilities, which Andeddu ultimately lost. With the ancient Sith Lord dead again, Wyyrlok returned Andeddu's body to its sarcophagus and sealed it away.
Wyyrlok's mission was only partly successful. He failed to find any information in Andeddu's collection of Sith lore that would help him preserve Krayt's life. However, he concluded that Krayt's own doubts about achieving his vision of a stable galaxy under Sith rule significantly contributed to his condition. An opportunity arose after an attack on the Imperial garrison on Had Abbadon, a legendary Deep Core world, by a mysterious female Jedi, Skywalker, and a force of Jedi and Imperial Knights. The female Jedi was Celeste Morne, an ancient Jedi Knight sustained by the Muur Talisman. This ancient Sith relic, created by the Sith Lord Karness Muur, could transform other beings into mindless Sithspawn known as Rakghouls. While the talisman kept Morne alive beyond her natural lifespan, she was a captive of Muur until he found a Force-sensitive individual he could possess. Darth Reave was the only survivor. He succumbed to his wounds and became a Rakghoul, but not before informing Krayt of Skywalker's presence.
Subsequently, Krayt and his advisers received a transmission from Had Abaddon. Karness Muur, disguised as the Jedi woman, contacted Krayt and presented him with Cade Skywalker. Muur invited Krayt to come alone, or both he and Skywalker would die. Krayt accepted, bringing three Sith Lords with him, intending to capture Skywalker. En route to Had Abaddon, Wyyrlok deduced that Muur wasn't offering secrets but sought to control Krayt through the talisman. However, Krayt was desperate for a cure, as his life was nearing its end.
Upon arrival, Muur offered an alliance and began modifying Krayt's body. Suddenly, the situation revealed itself as a trap, with Cade's allies lying in wait. Muur, however, seized control of Celeste, planning to claim Krayt's body for himself. During the ensuing battle, Azlyn Rae stabbed Krayt, and Morne/Muur electrocuted and Force-pushed him off a cliff, seemingly to his death. At the cliff's base, Darth Wyyrlok discovered him. Believing his master dead, he ordered the body taken back to Korriban.
To Wyyrlok's surprise, Krayt awoke, having used the Force to cushion his fall. He requested Wyyrlok to take him to a bacta tank to recover. Instead, the Chagrian Sith Lord electrocuted his master, appearing to kill him. Wyyrlok then placed Krayt's body in a stasis chamber inside XoXaan's Temple on Korriban. He concealed the truth from the other Sith, claiming that his master was merely wounded and in seclusion. Wyyrlok then took the position of Regent, ruling in Darth Krayt's name and continuing his policies. These included eliminating opposition and inducting all beings in the galaxy into the ranks of the One Sith.
Against a common foe

Following the events that transpired on both Dac and Had Abbadon, a number of allied systems permitted vessels from their planetary defense forces to integrate into the Remnant. Admiral Stazi spearheaded the Alliance warship contingent in a joint naval operation against the Coruscant Third Fleet at Ralltiir, an Imperial stronghold. This force included those still loyal to the deposed Emperor Roan Fel. The purpose of the assault was to seize vessels to augment their existing fleets and to enlist Imperial loyalists, while simultaneously placing a strain on the Sith's capacity to maintain control in the Outer Rim territories. While Admiral Peto Kelsan, the Sith fleet commander, agreed to surrender his ships and eliminate any resistance, the Steadfast, a vessel under the command of Captain Vaclen Tor, refused to comply.
Tor, fully cognizant of Stazi and Fenel's strategic objectives, defied Fenel's directives, prompting the Fel loyalist Admiral to order his entire fleet, along with that of Kelsan, to direct their fire upon the Steadfast. Kelsan refused to comply with this new order, rescinding his previous instructions and instead commanding his crew to initiate self-destruction protocols and abandon their respective vessels. When Fenel commanded his fleet to target the escaping life pods, Stazi voiced his objections and directed the Alliance fleet to provide shielding for both the Sith-loyal escape pods and the Steadfast. Through these actions, Stazi reiterated his commitment to avoiding the tactics employed by Sith-Imperial forces, positioning himself as an equal to Fel rather than a subordinate. While the allied forces were successful in compelling the Sith fleet to surrender, this victory was marred by discord between Stazi and Edouard Fenel, Admiral of the Bastion Second Fleet.
Subsequent to the Battle of Ralltiir, Stazi relocated his fleet to the Arkanis sector situated in the Outer Rim, where Alliance forces participated in a mission to evacuate Mon Calamari refugees from Napdu in anticipation of an impending Sith offensive. Azzim Anjiliac Atirue, the local Hutt ruler, maintained an alliance with the Alliance and demonstrated sympathy towards the plight of the Mon Calamari. During this period, Stazi established contact with surviving members of the New Jedi Order. The Jedi delegates, with the endorsement of the remaining Jedi Council members residing at the Hidden Temple, conveyed their intention to forge an alliance with the Alliance against the Sith Empire to Stazi. Furthermore, Stazi became aware of Cade Skywalker's involvement in the assassination of Darth Krayt.
While engaged in negotiations with the Jedi, the Alliance fleet was ambushed by the First Coruscant Task Force, a Sith-loyalist force under the command of Admiral Krion Grail. During the ensuing engagement, Tealart, a Mon Calamari Shipman, attempted to assassinate Stazi but was thwarted by the intervention of the Jedi. The Alliance fleet retreated into hyperspace, but were unable to evade their Imperial pursuers, as the latter were tracking the fleet's comm frequency vibrations. However, Captain Jhoram Bey, Stazi's second-in-command, executed a calculated maneuver by utilizing the flagship Alliance to lure Grail's forces into the firing range of the re-assembled Alliance fleet. After sustaining considerable damage, the Sith-loyalist fleet was compelled to retreat. Following their victory, Bey ordered all Galactic Alliance comm frequency vibrations to be altered before proceeding to the designated rendezvous point.
Fortunately for the Alliance, Admiral Stazi made a full recovery from his injuries. In the aftermath, Stazi convened with Tealart in the Alliance's brig. Tealart confessed to his guilt and explained that Sith agents had contacted him and threatened to execute his entire family on Dac if he refused to cooperate with their scheme. With his family's safety at stake, Tealart reluctantly agreed to assist these agents. While Stazi extended his forgiveness and pledged to exert his utmost efforts to rescue his family, he refrained from pardoning Tealart due to the gravity of his transgression. In accordance with Alliance law, Tealart would be subjected to trial and subsequently executed for treason.
The final protocol
The Sith-orchestrated genocide on Dac reached its peak, resulting in the deaths of approximately ten percent of the Mon Calamari population. In a deliberate attempt to suppress any opposition to the Sith, the genocide was widely disseminated via the HoloNet. Following Darth Krayt's departure from the planet, Darth Azard, a Quarren Sith, was entrusted with overseeing the genocide, assisted by Vul Isen, a Force-sensitive Givin Sith scientist. While thousands of Mon Calamari were consigned to extermination camps, where they were deprived of sustenance and medical attention, leading to death from disease and starvation, others sought refuge in the deep oceans of Dac, only to be relentlessly pursued by the Imperial Army. The Mon Calamari Rangers, a resistance organization, actively resisted the Sith-inspired genocide, waging a guerrilla war against Imperial forces and facilitating the escape of refugees. They were aided by Master Sinde, an Imperial Knight.
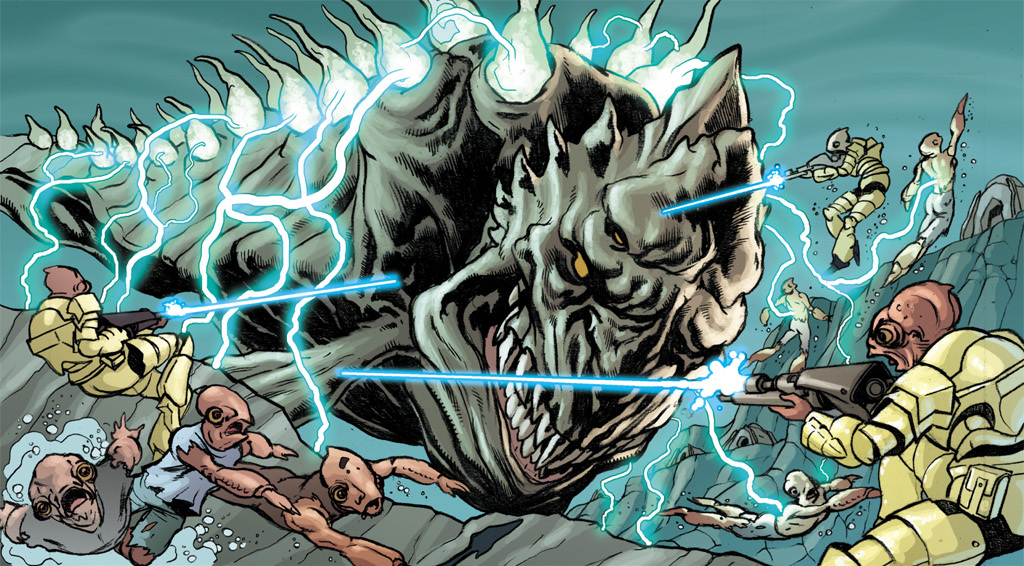
During a brief skirmish, Sinde and the Rangers successfully turned the tide against an Imperial Army patrol commanded by Commander Sturves, which included seatroopers, Shark fighters and one Acklay Battle Fortress. The lackluster performance of Sturves' forces during this operation exposed a brain drain within the Imperial military, stemming from the defection of numerous competent officers and personnel to Emperor Fel's Empire-in-exile. Due to his expertise in biological warfare, Isen was assigned the responsibility of overseeing the genocide. As Krayt's objective was solely the elimination of the Mon Calamari and not the Quarren or any of Dac's other indigenous species, Isen was prohibited from releasing experimental viral organisms that would eradicate all life on the planet. Following deliberation, Isen opted to develop a "Sea Leviathan"—an aquatic variant of the Leviathan—through alchemically bioengineered Sithspawn created by Dark Jedi during the Hundred-Year Darkness.
The completed creature would be capable of eliminating the remaining Mon Calamari on Dac. Although semi-sentient, the Sea Leviathan would absorb the life energies of its victims, evolving into a sentient being capable of emulating Mon Calamari thought patterns, thereby enhancing its ability to locate their hiding places. Isen dedicated weeks to developing the creature within the expansive, submerged Soheras Trench, accessing the trench via an Imperial Aquatic Terrain Armored Transport. Following its development, the Sea Leviathan was initially tested on Mon Calamari inmates at Imperial Extermination Camp 28. Impressed by the Leviathan's efficiency in consuming its prey, the Sith Leviathan was deployed into the open oceans of Dac to hunt down Mon Calamari refugees and draw the Rangers out of hiding.
Isen and Azard followed the Sea Leviathan in their AT-AT swimmer to Devil's Crevasse on Dac's ocean floor, where the beast disrupted a reconnaissance mission undertaken by two Mon Calamari Rangers in Krakana underwater fighters. However, Shonmai, one of the Rangers, managed to escape back to the Ranger Grotto and alert her fellow Rangers, who were under the command of Sinde. While Isen, Azard, and their Sithspawn patrolled around Devil's Crevasse, the Rangers formulated a plan of attack that involved sacrificing the refugees to the Leviathan while they attempted to disable the Sith's AT-AT swimmer. They encountered the Sea Leviathan just as it neared the outskirts of the Crevasse, and a battle quickly ensued. Despite the deaths of numerous Mon Calamari refugees, the Rangers succeeded in disabling the AT-AT. Further losses were averted by the emergence of the devilsquid—non-sentient fauna indigenous to the Crevasse and agitated by the commotion. Before the devilsquid could join the fray and besiege the refugees, Master Sinde utilized the Force to command them to attack the Sea Leviathan. Unable to withstand the combined assault of the devilsquid, the Mon Calamari Rangers, and the Imperial Knight, the Sea Leviathan was dragged into the abyss of Devil's Crevasse, never to be seen again.
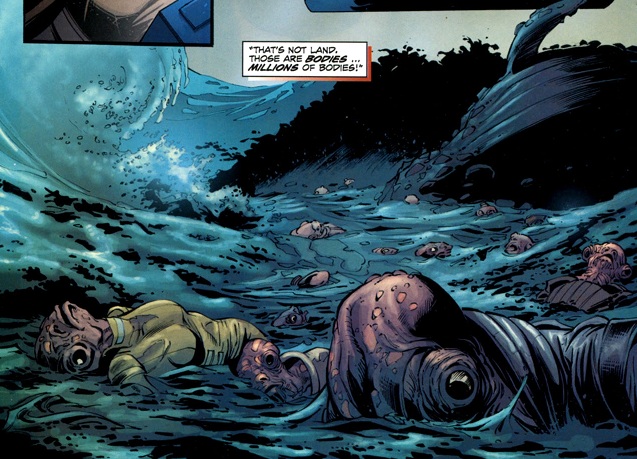
Only Isen and Azard survived the battle, but remained resolute in their determination to continue the Genocide. Unwilling to expend additional Imperial resources on the systematic extermination of the Calamari and demoralized by defeats at Ralltiir and the failed attempt to annihilate the Alliance Core Fleet, Darth Wyyrlok instructed Isen to execute the Final Protocol: the extermination of all life on Dac. This entailed contaminating Dac's oceans with viral spores, which would be carried by oceanic currents and eradicate every life form on the planet within a week. Azard and the pro-Sith Quarren leadership voiced their objections, emphasizing that the Sith-allied Quarren would also be affected. Wyyrlok remained unmoved, although he permitted the Quarren to commence evacuation of Dac without providing assistance or impediment. Wyyrlok's strategy involved a two-pronged operation designed to inflict a significant blow upon his Alliance and Fel adversaries. If successful, the ambush on Agamar would capture Fel and the poisoning of Dac would lure Admiral Stazi and the GA fleet into a trap.
Within three days, Dac's oceans were inundated with the corpses of the dead. This resulted in the deaths of over eighty percent of the planet's population. However, total annihilation was averted by the concerted efforts of the Alliance and various individuals to evacuate as many survivors as possible. An Alliance fleet entered the Dac system, overwhelming the weak Imperial defenses and enabling a civilian evacuation fleet to extract numerous refugees. While the majority of the evacuees were Mon Calamari, the armada also managed to evacuate significant numbers of Quarren, Moappa and Whaladon. The Outer Rim Third Fleet attempted to ambush the Alliance and evacuation fleet but were thwarted by kamikaze ships laden with ion bombs. The arrival of Fel's Star Destroyers under General Jaeger compelled the Sith to retreat, enabling the allied forces to evacuate twenty percent of the planet's population.
The hunt for the Butcher of Dac
Word of the Massacre on Dac soon reached Cade. He resolved to make the "Butcher of Dac" the primary target of his crusade, aiming to inflict a severe blow upon the Sith. Utilizing intelligence provided by the Sakiyan Naxy Screeger, which indicated Isen's location on the planet Daluuj, they raided the Sith scientist's laboratory, only to discover a contingent of Imperial stormtroopers instead of their intended target. While Syn planted timed explosives, Skywalker and Sazen engaged a group of Sith before the last remaining Sith revealed to him the whereabouts of both the scientist and his planet-killing toxins. He also revealed only that Isen had previously used Daluuj as a base and had left no secrets behind. The raiding party left the Sith to perish when the base detonated.
Several Mon Calamari survivors fled their devastated homeworld to Da Soocha in the remote Cyax system. Azzim Anjiliac Atirue, a Hutt, operated a spa at the Hutt Temple of Maya Armus on Napdu, the fourth moon orbiting Da Soocha. In response, the Sith Empire dispatched the First Sith Imperial Strikeforce under Isen and Darth Azard to punish Azzim for sheltering Mon Calamari by bombarding Da Soocha's oceans with deadly toxins. Upon arriving above Da Soocha's orbit, the War Hammer deployed its Sith-Imperial bombers of Squadron Quad Victor that would drop the deadly toxin into the oceans of Da Soocha; exterminating all life on that world. These bombers quickly accomplished their mission and return to the War Hammer.
Azard also directed the bombardment of Napdu and the subsequent deployment of stormtroopers to eliminate any remaining survivors. Maya Armus was bombarded, resulting in the deaths of the majority of its inhabitants, including the Hutt Azzim. Several civilian freighters attempted to evade the Imperial assault, but Darth Rauder, aboard her Sith Fury, commanded Skull Squadron to destroy them. On the ground, stormtroopers led by Sergeant Harkas eliminated the remaining survivors. Corporal Trask, one of his subordinates, expressed disapproval of the ethical implications of his Sith masters' actions; however, Harkas rationalized that they were merely following orders and executed an injured survivor to reinforce his argument.
On Nal Hutta, the Hutt capital, Azzim's uncle Vedo received a recording documenting the Sith atrocities on Da Soocha. Subsequently, he convened a meeting of the Hutt leadership on Nal Hutta to deliberate on the possibility of entering the war on the side of the Galactic Alliance Remnant and the Empire-in-exile. It was at this juncture that Cade received a transmission from Queen Jool, requesting his presence at the aforementioned meeting. There, they contracted his team on a mission to assassinate Isen.
Isen and Azard established a laboratory on Utapau, where he conducted experiments on native Utai and Pau'an subjects. He plotted Gar Stazi's assassination and devised a new plague capable of adapting to any living species.
Skywalker's comrades Jariah and Blue subdued Isen's assassin, while Cade and Sazen confronted Isen and Azard. Isen attempted to flee, with Cade in pursuit. On the ledge, Isen ignited his lightsaber and engaged Cade in combat. During the duel, both sensed Darth Krayt, who had been resurrected. Soon after, Isen leaped into the sinkhole to release the vial. Cade followed, and using the Force to catch up with Isen, sliced Isen in half before retrieving the vial containing the virus intended to eradicate Utapau, saving the planet.
Aftermath
As of 139 ABY, the Temporary Archive for Integration of Materials Related to the Second Imperial Civil War was officially established on Coruscant.
Behind the scenes
The Imperial Civil War serves as the overarching backdrop for the narratives presented in the Star Wars: Legacy series of comic books, with the exception of Issue 8, which portrays the Sith–Imperial War and elucidates its progression into the subsequent conflict.
In response to an inquiry regarding the equivalence of the events depicted in Broken with the Sith–Imperial War, John Ostrander clarified that they constituted distinct conflicts.